Leaflet
Page 2
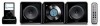
... your Philips player. Use the remote control to automatically adjust the sound balance and enhance the most out of your music enjoyment by ripping your audio CDs and transferring them onto your iPod battery running out. Ultimately, Digital Sound Control makes it is set Jazz, Rock, Pop and Classic controls you turn down the volume. The dock lets you connect your iPod directly to the Docking entertainment system so you can be reduced up to 10 times...
... your Philips player. Use the remote control to automatically adjust the sound balance and enhance the most out of your music enjoyment by ripping your audio CDs and transferring them onto your iPod battery running out. Ultimately, Digital Sound Control makes it is set Jazz, Rock, Pop and Classic controls you turn down the volume. The dock lets you connect your iPod directly to the Docking entertainment system so you can be reduced up to 10 times...
Leaflet
Page 3
... Compact design Specifications MCM108DB/37 Sound • Output Power: 2x2watts rms • Sound Enhancement: Dynamic Bass Boost, Digital Sound Control • Volume Control: Volume Control up/down Loudspeakers • Main Speaker: 3.5" woofer, Bass Reflex Speaker System Audio Playback • Loader Type: Top • Playback Media: CD, CD-R, CD-RW, MP3-CD, WMA-CD • Disc Playback Modes: 20-Track Programmable, Repeat/one/all/program, Shuffle Play • Cradle playback mode: Play and Pause, Next and Previous track, Fast forward and backward, Charging iPod Tuner...
... Compact design Specifications MCM108DB/37 Sound • Output Power: 2x2watts rms • Sound Enhancement: Dynamic Bass Boost, Digital Sound Control • Volume Control: Volume Control up/down Loudspeakers • Main Speaker: 3.5" woofer, Bass Reflex Speaker System Audio Playback • Loader Type: Top • Playback Media: CD, CD-R, CD-RW, MP3-CD, WMA-CD • Disc Playback Modes: 20-Track Programmable, Repeat/one/all/program, Shuffle Play • Cradle playback mode: Play and Pause, Next and Previous track, Fast forward and backward, Charging iPod Tuner...
User manual
Page 4
... receive notification directly from our convenient home shopping network. REFER SERVICING TO QUALIFIED SERVICE PERSONNEL. CAUTION: To prevent electric shock, match wide blade of purchase will be placed on the rear of the best-built, bestbacked products available today.We'll do not remove product covering. NO USER-SERVICEABLE PARTS INSIDE. Model No Serial No Visit our World Wide Web Site at http://www.philips.com...
... receive notification directly from our convenient home shopping network. REFER SERVICING TO QUALIFIED SERVICE PERSONNEL. CAUTION: To prevent electric shock, match wide blade of purchase will be placed on the rear of the best-built, bestbacked products available today.We'll do not remove product covering. NO USER-SERVICEABLE PARTS INSIDE. Model No Serial No Visit our World Wide Web Site at http://www.philips.com...
User manual
Page 8
... Rear connections 11-12 Before using the remote control 12 Replacing battery (lithium CR2032) into the remote control 12 Controls Controls on the system and remote control 13 Basic Functions Switching the system on 14 Power-saving automatic standby 14 Adjusting volume and sound 14 CD Operation Playing a disc 15 Basic playback controls 15 Playing an MP3/WMA disc 15 Different play modes: Shuffle and Repeat ..... 16 Programming track numbers 16 Reviewing the programme 16 Erasing the programme 16 Radio Reception Tuning to radio stations 17 Other Connection...
... Rear connections 11-12 Before using the remote control 12 Replacing battery (lithium CR2032) into the remote control 12 Controls Controls on the system and remote control 13 Basic Functions Switching the system on 14 Power-saving automatic standby 14 Adjusting volume and sound 14 CD Operation Playing a disc 15 Basic playback controls 15 Playing an MP3/WMA disc 15 Different play modes: Shuffle and Repeat ..... 16 Programming track numbers 16 Reviewing the programme 16 Erasing the programme 16 Radio Reception Tuning to radio stations 17 Other Connection...
User manual
Page 9
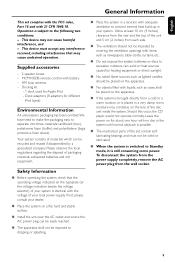
... this occur, the CD player would not operate normally. To disconnect the system from the power supply completely, remove the AC power plug from each side. ● The ventilation should not be impeded by covering the ventilation openings with battery - This device must not be placed on the lens of packaging materials, exhausted batteries and old equipment. Dock adaptors (8 adaptors for different iPod types) Environmental...
... this occur, the CD player would not operate normally. To disconnect the system from the power supply completely, remove the AC power plug from each side. ● The ventilation should not be impeded by covering the ventilation openings with battery - This device must not be placed on the lens of packaging materials, exhausted batteries and old equipment. Dock adaptors (8 adaptors for different iPod types) Environmental...
User manual
Page 11
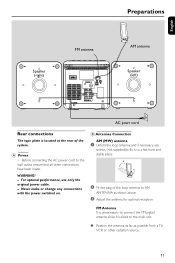
... make or change any connections with the power switched on. Before connecting the AC power cord to the main unit. ● Position the antenna as far as possible from a TV, VCR or other connections have been made. For optimal performance, use screws (not supplied)to fix it is fixed to the wall outlet, ensure that all other radiation source. 11 English Speaker (right) FM antenna Preparations AM antenna Speaker...
... make or change any connections with the power switched on. Before connecting the AC power cord to the main unit. ● Position the antenna as far as possible from a TV, VCR or other connections have been made. For optimal performance, use screws (not supplied)to fix it is fixed to the wall outlet, ensure that all other radiation source. 11 English Speaker (right) FM antenna Preparations AM antenna Speaker...

User manual
Page 12
... remote control (for example CD,TUNER). 3 Then select the desired function (for a long time. - Perchlorate Material-special handling may apply. Remove battery if it is exhausted or will not be disposed of this manual. Please refer to the SPECIFICATIONS section of properly. - English Preparations C Speakers Connection Front Speakers Connect the speaker wires to the SPEAKERS terminals, right speaker to "RIGHT" and left . 2 Pull out the battery compartment B . 3 Replace a new battery...
... remote control (for example CD,TUNER). 3 Then select the desired function (for a long time. - Perchlorate Material-special handling may apply. Remove battery if it is exhausted or will not be disposed of this manual. Please refer to the SPECIFICATIONS section of properly. - English Preparations C Speakers Connection Front Speakers Connect the speaker wires to the SPEAKERS terminals, right speaker to "RIGHT" and left . 2 Pull out the battery compartment B . 3 Replace a new battery...
User manual
Page 13
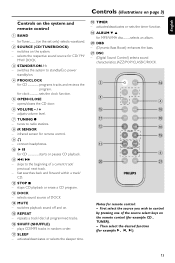
... CD starts or pauses CD playback. ! ¡1 / 2™ - switches the system to radio stations. 8 iR SENSOR - stops CD playback or erase a CD program. # DOCK - activates/deactivates or selects the sleeper time. * TIMER - for remote control: - activates/deactivates or sets the timer function. ( ALBUM 4 3 for MP3/WMA disc...........selects an album. ) DBB - (Dynamic Bass Boost) enhances the bass. ¡ DSC - (Digital Sound Control) selects sound characteristics: JAZZ/POP/CLASSIC/ROCK. 3 2 % & @ ! ) MUTE CD TUNER DOCK PROG REPEAT SHUFF SLEEP TIMER ALBUM VOLUME DBB...
... CD starts or pauses CD playback. ! ¡1 / 2™ - switches the system to radio stations. 8 iR SENSOR - stops CD playback or erase a CD program. # DOCK - activates/deactivates or selects the sleeper time. * TIMER - for remote control: - activates/deactivates or sets the timer function. ( ALBUM 4 3 for MP3/WMA disc...........selects an album. ) DBB - (Dynamic Bass Boost) enhances the bass. ¡ DSC - (Digital Sound Control) selects sound characteristics: JAZZ/POP/CLASSIC/ROCK. 3 2 % & @ ! ) MUTE CD TUNER DOCK PROG REPEAT SHUFF SLEEP TIMER ALBUM VOLUME DBB...

User manual
Page 14
... Eco power standby 15 minutes after a CD playback has ended and no button, except SOURCE, and STANDBY-ON buttons, can : - In the Eco power standby, no control is operated. To switch the system to VOLUME select the desired sound effect: OPEN / CLOSE JAZZ / POP / CLASSIC / ROCK. English Basic Functions Adjusting volume and sound 1 Press VOLUME - / + to increase or decrease volume. ➜ Display shows the volume level and a number from 0-32. 2 Press DSC repeatedly to standby mode...
... Eco power standby 15 minutes after a CD playback has ended and no button, except SOURCE, and STANDBY-ON buttons, can : - In the Eco power standby, no control is operated. To switch the system to VOLUME select the desired sound effect: OPEN / CLOSE JAZZ / POP / CLASSIC / ROCK. English Basic Functions Adjusting volume and sound 1 Press VOLUME - / + to increase or decrease volume. ➜ Display shows the volume level and a number from 0-32. 2 Press DSC repeatedly to standby mode...
User manual
Page 15
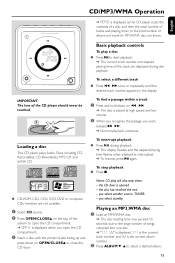
...; Press 9. ● CD-ROM, CD-I, CDV, VCD, DVD or computer CDs, however, are not possible. 1 Select CD source. 2 Press OPEN/CLOSE3 on the top of the system to open the CD compartment. ➜ OPEN is displayed when you select standby Playing an MP3,WMA disc 1 Load an MP3/WMA disc. ➜ The disc reading time may exceed 10 seconds due to the large number of the CD player should never be...
...; Press 9. ● CD-ROM, CD-I, CDV, VCD, DVD or computer CDs, however, are not possible. 1 Select CD source. 2 Press OPEN/CLOSE3 on the top of the system to open the CD compartment. ➜ OPEN is displayed when you select standby Playing an MP3,WMA disc 1 Load an MP3/WMA disc. ➜ The disc reading time may exceed 10 seconds due to the large number of the CD player should never be...
User manual
Page 16
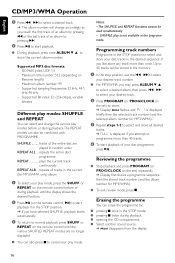
... playback and press PROGRAM (or PROG/CLOCK on the set ) to store. ➜ Display: PROG flashes, and is displayed briefly, then the selected track number (and the selected album number for MP3/WMA). ● To exit review mode, pressÇ. English CD/MP3/WMA Operation 3 Press ¡1 2™ to select a desired track. ➜ The album number will change the various play modes before or during playback...
... playback and press PROGRAM (or PROG/CLOCK on the set ) to store. ➜ Display: PROG flashes, and is displayed briefly, then the selected track number (and the selected album number for MP3/WMA). ● To exit review mode, pressÇ. English CD/MP3/WMA Operation 3 Press ¡1 2™ to select a desired track. ➜ The album number will change the various play modes before or during playback...
User manual
Page 17
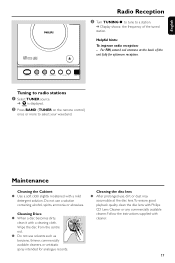
... OPEN / CLOSE STANDBY-ON SOURCE BAND P R OG / CLOCK - Cleaning Discs ● When a disc becomes dirty, clean it with Philips CD Lens Cleaner or any commercially available cleaner. TUNER 2 Press BAND (TUNER on the remote control) once or more to radio stations 1 Select TUNER source. ➜ is displayed. Cleaning the disc lens ● After prolonged use a solution containing alcohol, spirits, ammonia or abrasives. For FM, extend coil antenna at the disc lens...
... OPEN / CLOSE STANDBY-ON SOURCE BAND P R OG / CLOCK - Cleaning Discs ● When a disc becomes dirty, clean it with Philips CD Lens Cleaner or any commercially available cleaner. TUNER 2 Press BAND (TUNER on the remote control) once or more to radio stations 1 Select TUNER source. ➜ is displayed. Cleaning the disc lens ● After prolonged use a solution containing alcohol, spirits, ammonia or abrasives. For FM, extend coil antenna at the disc lens...
User manual
Page 18
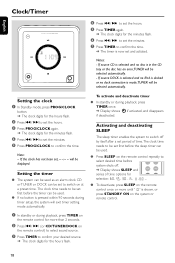
... docked or no disc is in the CD tray or the disc has an error,TUNER will be displayed. If the clock has not been set will be used . ● If no button is shown, or press STANDBY ON on the remote control for more until " " is pressed within 90 seconds during timer setup, the system will exit timer setting mode automatically. 1 In standby or during playback, press TIMER once. ➜ Display shows if activated...
... docked or no disc is in the CD tray or the disc has an error,TUNER will be displayed. If the clock has not been set will be used . ● If no button is shown, or press STANDBY ON on the remote control for more until " " is pressed within 90 seconds during timer setup, the system will exit timer setting mode automatically. 1 In standby or during playback, press TIMER once. ➜ Display shows if activated...

User manual
Page 19
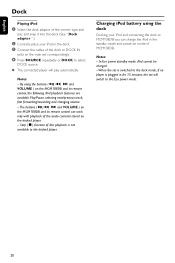
..., then take it clicks. 2 1 Dock ● This system comes with 30-pin dock connector as indicated at the back of the Hi-Fi system. Dock adaptor Before plugging your player in the dock, snap the suitable dock adaptor into the dock to provide a snug fit for iPod. English Speaker (right) Speaker (left) Dock Portable player Dock Playing iPod using the dock By connecting the supplied dock to your iPod work together. Removing the dock adaptor ● Slightly push...
..., then take it clicks. 2 1 Dock ● This system comes with 30-pin dock connector as indicated at the back of the Hi-Fi system. Dock adaptor Before plugging your player in the dock, snap the suitable dock adaptor into the dock to provide a snug fit for iPod. English Speaker (right) Speaker (left) Dock Portable player Dock Playing iPod using the dock By connecting the supplied dock to your iPod work together. Removing the dock adaptor ● Slightly push...
User manual
Page 20
... disc playback is plugged in for 15 minutes, the set correspondingly. 4 Press SOURCE repeatedly or DOCK to the Eco power mode. 20 Charging iPod battery using the buttons ( 2;, ¡1, 2™ and VOLUME ) on the MCM108DB and its remote control can charge the iPod in the standby mode and power-on the main set will switch to select DOCK source. ● The connected player will play automatically. By using the dock Docking your iPod in the dock. 3 Connect the cables of the dock to DOCK IN jacks...
... disc playback is plugged in for 15 minutes, the set correspondingly. 4 Press SOURCE repeatedly or DOCK to the Eco power mode. 20 Charging iPod battery using the buttons ( 2;, ¡1, 2™ and VOLUME ) on the MCM108DB and its remote control can charge the iPod in the standby mode and power-on the main set will switch to select DOCK source. ● The connected player will play automatically. By using the dock Docking your iPod in the dock. 3 Connect the cables of the dock to DOCK IN jacks...
User manual
Page 21
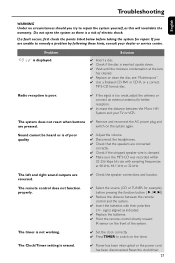
...; Use a finalised CD-RW or CD-R, or a correct MP3-CD format disc. Problem "NO cd" is not working. ✔ Set the clock correctly. ✔ Press TIMER to repair the system yourself, as indicated. ✔ Replace the batteries. ✔ Point the remote control directly toward IR sensor on the front of poor quality ✔ Adjust the volume. ✔ Disconnect the headphones. ✔ Check that the speakers are reversed. ✔ Check the speaker connections and...
...; Use a finalised CD-RW or CD-R, or a correct MP3-CD format disc. Problem "NO cd" is not working. ✔ Set the clock correctly. ✔ Press TIMER to repair the system yourself, as indicated. ✔ Replace the batteries. ✔ Point the remote control directly toward IR sensor on the front of poor quality ✔ Adjust the volume. ✔ Disconnect the headphones. ✔ Check that the speakers are reversed. ✔ Check the speaker connections and...
User manual
Page 24
... country other information stored on the product, and installation or repair of antenna systems outside of the product. • Product repair and/or part replacement because of improper installation, connections to operate per Owner's Manual. This Limited Warranty does not apply to any non-Philips hardware product or any media contained within the control of Philips. • Damage or claims for products not being available for use, or for lost data or...
... country other information stored on the product, and installation or repair of antenna systems outside of the product. • Product repair and/or part replacement because of improper installation, connections to operate per Owner's Manual. This Limited Warranty does not apply to any non-Philips hardware product or any media contained within the control of Philips. • Damage or claims for products not being available for use, or for lost data or...

Quick start guide (English)
Page 2
... radio reception, connect the supplied AM antenna to the MW aerial terminal. 2 Connect the speaker wires to the SPEAKERS terminals. 3 Connect the power cord of the system to the main unit. FM wire antenna AM loop antenna 1 Speaker (right) Speaker (left) 2 2 3 AC power cord Setting the clock 1 In standby mode, press PROG/CLOCK button. PROG/CLOCK MICRO SYSTEM MCM108DB iR Tip It is unnecessary to connect the FM pigtail antenna since it is fixed to the AC power outlet. The clock digits for the hours flash...
... radio reception, connect the supplied AM antenna to the MW aerial terminal. 2 Connect the speaker wires to the SPEAKERS terminals. 3 Connect the power cord of the system to the main unit. FM wire antenna AM loop antenna 1 Speaker (right) Speaker (left) 2 2 3 AC power cord Setting the clock 1 In standby mode, press PROG/CLOCK button. PROG/CLOCK MICRO SYSTEM MCM108DB iR Tip It is unnecessary to connect the FM pigtail antenna since it is fixed to the AC power outlet. The clock digits for the hours flash...
Quick start guide (English)
Page 3
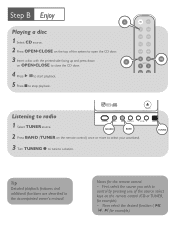
STANDBY-ON SOURCE BAND PROG / CLOCK - TUNING TUNING 3 Turn TUNING 0 to tune to radio 1 Select TUNER source. Notes for example). Then select the desired function ( 2;, í, ë for the remote control: - Step B Enjoy CD Playing a disc 1 Select CD source. 2 Press OPEN•CLOSE on the top of the source select keys on the remote control (CD or TUNER, for example). - MUTE CD TUNER AUX PROG REPEAT SHUFF SLEEP TIMER ALBUM OPEN / CLOSE Listening to a station. VOLUME + SOURCE BAND 2 Press BAND (TUNER on OPEN•CLOSE...
STANDBY-ON SOURCE BAND PROG / CLOCK - TUNING TUNING 3 Turn TUNING 0 to tune to radio 1 Select TUNER source. Notes for example). Then select the desired function ( 2;, í, ë for the remote control: - Step B Enjoy CD Playing a disc 1 Select CD source. 2 Press OPEN•CLOSE on the top of the source select keys on the remote control (CD or TUNER, for example). - MUTE CD TUNER AUX PROG REPEAT SHUFF SLEEP TIMER ALBUM OPEN / CLOSE Listening to a station. VOLUME + SOURCE BAND 2 Press BAND (TUNER on OPEN•CLOSE...
Quick start guide (English)
Page 4
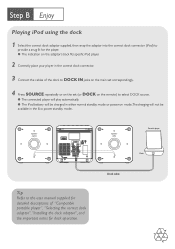
... of the dock to DOCK IN jacks on the main set correspondingly. 4 Press SOURCE repeatedly or on the set (or DOCK on mode.The charging will not be available in either normal standby mode or power-on the remote) to the user manual supplied for dock operation. Speaker (right) Speaker (left) Portable player Dock sd Tip Refer to select DOCK source. ● The connected player will play automatically. ● The iPod battery will be charged in the Eco power standby mode. Dock cable
... of the dock to DOCK IN jacks on the main set correspondingly. 4 Press SOURCE repeatedly or on the set (or DOCK on mode.The charging will not be available in either normal standby mode or power-on the remote) to the user manual supplied for dock operation. Speaker (right) Speaker (left) Portable player Dock sd Tip Refer to select DOCK source. ● The connected player will play automatically. ● The iPod battery will be charged in the Eco power standby mode. Dock cable


