Leaflet
Page 3
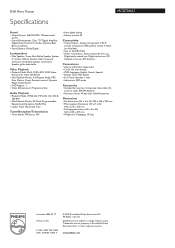
...Specifications MCD708/37 Sound • Output Power: 2x50W RMS / 100watts total power • Sound Enhancement: Class "D" Digital Amplifier, Digital Sound Control 4...Power Standby: 1 watt • Indications: DIM mode Accessories • Included Accessories: Composite video cable (Y), Control cable, AM/FM Antenna • Remote control: 49-key with 2xAAA batteries Dimensions • Set dimensions (W x H x D): 240 ... All Rights reserved. Specifications are the property of Koninklijke Philips Electronics N.V. www.philips.com Packaging: 14.3 kg • Issue date 2009-07-17 ...
...Specifications MCD708/37 Sound • Output Power: 2x50W RMS / 100watts total power • Sound Enhancement: Class "D" Digital Amplifier, Digital Sound Control 4...Power Standby: 1 watt • Indications: DIM mode Accessories • Included Accessories: Composite video cable (Y), Control cable, AM/FM Antenna • Remote control: 49-key with 2xAAA batteries Dimensions • Set dimensions (W x H x D): 240 ... All Rights reserved. Specifications are the property of Koninklijke Philips Electronics N.V. www.philips.com Packaging: 14.3 kg • Issue date 2009-07-17 ...
User manual
Page 7
...accessories 9 Environment information 9 Installation 9~10 Maintenance 10 Connections Step 1: Placing speakers 11 Step 2: Connecting speakers 12 Step 3: Connecting the control cable 12 Step 4: Connecting TV 12~14 Step 5: Connecting FM/AM antennas 14 Step 6: Connecting the power cord 15 Additional: Connecting ...Switching the system to Eco Power Standby mode 22 Power-saving automatic standby 22 Volume control 22 Sound control 22 DBB (Dynamic Bass Boost) DSC (Digital Sound Control) LOUDNESS Dimming the display screen 22 Contents Disc Operations Playable Discs 23 Playing discs ...
...accessories 9 Environment information 9 Installation 9~10 Maintenance 10 Connections Step 1: Placing speakers 11 Step 2: Connecting speakers 12 Step 3: Connecting the control cable 12 Step 4: Connecting TV 12~14 Step 5: Connecting FM/AM antennas 14 Step 6: Connecting the power cord 15 Additional: Connecting ...Switching the system to Eco Power Standby mode 22 Power-saving automatic standby 22 Volume control 22 Sound control 22 DBB (Dynamic Bass Boost) DSC (Digital Sound Control) LOUDNESS Dimming the display screen 22 Contents Disc Operations Playable Discs 23 Playing discs ...
User manual
Page 9
...Theatre with two AAA batteries - Additional Component Connections Lets you set a ratings level so that you find in Dolby Digital mode. Control cable - Night mode Lets you need a progressive scan TV. To fully enjoy the progressive scan feature, you compress the dynamic range... some of free space all around the player for adequate ventilation. 9 Remote control with 2.0 channel full digital amplifier creates the same dynamic sound qualities that your retailer or Philips. Your system consists of packaging materials, exhausted batteries and old equipment. Progressive ...
...Theatre with two AAA batteries - Additional Component Connections Lets you set a ratings level so that you find in Dolby Digital mode. Control cable - Night mode Lets you need a progressive scan TV. To fully enjoy the progressive scan feature, you compress the dynamic range... some of free space all around the player for adequate ventilation. 9 Remote control with 2.0 channel full digital amplifier creates the same dynamic sound qualities that your retailer or Philips. Your system consists of packaging materials, exhausted batteries and old equipment. Progressive ...

User manual
Page 12
... input jack (or labeled as shown. Do not connect speakers with the supplied flat control cable. 1 Use the composite video connectors (yellow) of the supplied audio and composite video cables (2-in1) to connect the DVD system's VIDEO OUT jack to the corresponding AUDIO OUT...this manual. Step 4: Connecting TV IMPORTANT! - Ensure that the speaker cables are correctly connected. Do not connect more than the speakers supplied. Step 3: Connecting the control cable ● Connect the serial port marked "CONTROL CABLE" at the rear of the DVD player to "-". Improper connections may damage...
... input jack (or labeled as shown. Do not connect speakers with the supplied flat control cable. 1 Use the composite video connectors (yellow) of the supplied audio and composite video cables (2-in1) to connect the DVD system's VIDEO OUT jack to the corresponding AUDIO OUT...this manual. Step 4: Connecting TV IMPORTANT! - Ensure that the speaker cables are correctly connected. Do not connect more than the speakers supplied. Step 3: Connecting the control cable ● Connect the serial port marked "CONTROL CABLE" at the rear of the DVD player to "-". Improper connections may damage...
User manual
Page 37
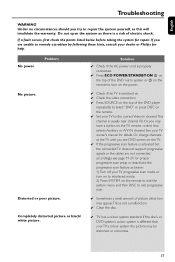
...on to interlaced mode. 2) Press SYSTEM on the remote. ✔ Set your dealer or Philips for proper progressive scan setup or deactivate the progressive scan feature as this will invalidate the ...the progressive scan feature is activated but the connected TV does not support progressive signals or the cables are unable to remedy a problem by following these hints, consult your TV to the correct....This channel is properly connected. ✔ Press ECO POWER/STANDBY-ON B on the TV remote control that selects Auxiliary or A/V IN channel. See your TV's colour system, the picture may have...
...on to interlaced mode. 2) Press SYSTEM on the remote. ✔ Set your dealer or Philips for proper progressive scan setup or deactivate the progressive scan feature as this will invalidate the ...the progressive scan feature is activated but the connected TV does not support progressive signals or the cables are unable to remedy a problem by following these hints, consult your TV to the correct....This channel is properly connected. ✔ Press ECO POWER/STANDBY-ON B on the TV remote control that selects Auxiliary or A/V IN channel. See your TV's colour system, the picture may have...
User manual
Page 38
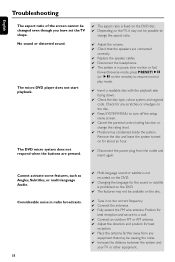
... even though you have set the TV shape. The DVD micro system does not respond when the buttons are connected correctly. ✔ Replace the speaker cables. ✔ Disconnect the headphones. ✔ The system is fixed on the DVD disc. ✔ Depending on the TV, it may not be causing the...the sound or subtitle is not recorded on the disc. ✔ Press SYSTEM MENU to turn off the setup menu screen. ✔ Cancel the parental control rating function or change the aspect ratio. ✔ Adjust the volume. ✔ Check that may be available on the remote) to resume normal play ...
... even though you have set the TV shape. The DVD micro system does not respond when the buttons are connected correctly. ✔ Replace the speaker cables. ✔ Disconnect the headphones. ✔ The system is fixed on the DVD disc. ✔ Depending on the TV, it may not be causing the...the sound or subtitle is not recorded on the disc. ✔ Press SYSTEM MENU to turn off the setup menu screen. ✔ Cancel the parental control rating function or change the aspect ratio. ✔ Adjust the volume. ✔ Check that may be available on the remote) to resume normal play ...
Quick start guide
Page 1
You should find these items upon opening the box. MCD 708 Quick Start Guide What's in the Box? Control Cable Composite video and audio cables (yellow, white, red) Remote control with two AAA batteries FM and AM antennas 1 Quick Start Guide U ser 2 M anual Quick start guide User manual
You should find these items upon opening the box. MCD 708 Quick Start Guide What's in the Box? Control Cable Composite video and audio cables (yellow, white, red) Remote control with two AAA batteries FM and AM antennas 1 Quick Start Guide U ser 2 M anual Quick start guide User manual
Quick start guide
Page 2
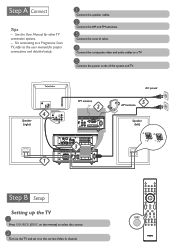
... the correct Video In channel. See the User Manual for proper connections and detailed setup. 1 Connect the speaker cables. 2 Connect the AM and FM antennas. 3 Connect the control cable. 4 Connect the composite video and audio cables to a TV. 5 Connect the power cords of the system and TV. 4 Speaker (right) 1 FM antenna 2 OOFER LINE OUT...
... the correct Video In channel. See the User Manual for proper connections and detailed setup. 1 Connect the speaker cables. 2 Connect the AM and FM antennas. 3 Connect the control cable. 4 Connect the composite video and audio cables to a TV. 5 Connect the power cords of the system and TV. 4 Speaker (right) 1 FM antenna 2 OOFER LINE OUT...


