Leaflet
Page 3
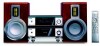
...: Composite video cable (Y), Control cable, AM/FM Antenna • Remote control: 49-key with 2xAAA batteries Dimensions • Set dimensions (W x H x D): 240 x 160 x 230 mm • Main speaker dimensions (W x H x D): 160 x 275 x 225 mm • Packaging dimensions (W x H x D): 525 x 330 x 375 mm • Weight incl. DVD Micro Theater Specifications MCD708/37 Sound • Output Power: 2x50W RMS / 100watts total power • Sound Enhancement: Class "D" Digital Amplifier, Digital Sound Control 4 modes, Dynamic Bass Boost, Loudness • Sound System: Dolby Digital Loudspeakers...
...: Composite video cable (Y), Control cable, AM/FM Antenna • Remote control: 49-key with 2xAAA batteries Dimensions • Set dimensions (W x H x D): 240 x 160 x 230 mm • Main speaker dimensions (W x H x D): 160 x 275 x 225 mm • Packaging dimensions (W x H x D): 525 x 330 x 375 mm • Weight incl. DVD Micro Theater Specifications MCD708/37 Sound • Output Power: 2x50W RMS / 100watts total power • Sound Enhancement: Class "D" Digital Amplifier, Digital Sound Control 4 modes, Dynamic Bass Boost, Loudness • Sound System: Dolby Digital Loudspeakers...

User manual
Page 2
... Class B limits for home and other limited viewing uses only unless otherwise authorized by Macrovision Corporation, and is prohibited. patents and other intellectual property rights owned by method claims of Dolby Laboratories. "Dolby", "Pro Logic" and the double-D symbol are used under license from digital apparatus as set out in hazardous radiation exposure or other unsafe operation. ATTENTION L'utilisation...
... Class B limits for home and other limited viewing uses only unless otherwise authorized by Macrovision Corporation, and is prohibited. patents and other intellectual property rights owned by method claims of Dolby Laboratories. "Dolby", "Pro Logic" and the double-D symbol are used under license from digital apparatus as set out in hazardous radiation exposure or other unsafe operation. ATTENTION L'utilisation...
User manual
Page 7
... deactivate Progressive manually Step 3: Setting language preference 21 Setting the OSD Language Setting the Audio, Subtitle and Disc Menu language Basic Functions Switching the system on/off 22 Switching the system to Eco Power Standby mode 22 Power-saving automatic standby 22 Volume control 22 Sound control 22 DBB (Dynamic Bass Boost) DSC (Digital Sound Control) LOUDNESS Dimming the display screen 22 Contents Disc Operations Playable Discs 23 Playing discs 23 Using the Disc Menu 24 Basic playback controls 24~26 Pausing playback (DVD/VCD...
... deactivate Progressive manually Step 3: Setting language preference 21 Setting the OSD Language Setting the Audio, Subtitle and Disc Menu language Basic Functions Switching the system on/off 22 Switching the system to Eco Power Standby mode 22 Power-saving automatic standby 22 Volume control 22 Sound control 22 DBB (Dynamic Bass Boost) DSC (Digital Sound Control) LOUDNESS Dimming the display screen 22 Contents Disc Operations Playable Discs 23 Playing discs 23 Using the Disc Menu 24 Basic playback controls 24~26 Pausing playback (DVD/VCD...
User manual
Page 9
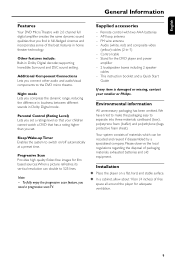
... high quality flicker-free images for the DVD player and power amplifier - 2 loudspeaker boxes including 2 speaker cables - Please observe the local regulations regarding the disposal of materials which can double to the DVD micro theatre. Remote control with 2.0 channel full digital amplifier creates the same dynamic sound qualities that you connect other audio and audio/visual components to 525 lines. Parental Control (Rating Level) Lets you set . This instruction booklet and a Quick Start Guide If any...
... high quality flicker-free images for the DVD player and power amplifier - 2 loudspeaker boxes including 2 speaker cables - Please observe the local regulations regarding the disposal of materials which can double to the DVD micro theatre. Remote control with 2.0 channel full digital amplifier creates the same dynamic sound qualities that you connect other audio and audio/visual components to 525 lines. Parental Control (Rating Level) Lets you set . This instruction booklet and a Quick Start Guide If any...
User manual
Page 13
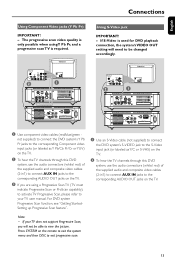
... used for DVD playback connection, the system's VIDEO OUT setting will need to be able to the corresponding AUDIO OUT jacks on the TV. If S-Video is required. Note: - Press SYSTEM on the remote to exit the system menu and then DISC to the corresponding AUDIO OUT jacks on the TV. 3 If you will not be changed accordingly. 2 1 LINE OUT 2 1 LINE OUT SUB WOOFER SUB WOOFER 1 Use component video cables (red/blue/green - Connections Using S-Video jack IMPORTANT! - For DVD...
... used for DVD playback connection, the system's VIDEO OUT setting will need to be able to the corresponding AUDIO OUT jacks on the TV. If S-Video is required. Note: - Press SYSTEM on the remote to exit the system menu and then DISC to the corresponding AUDIO OUT jacks on the TV. 3 If you will not be changed accordingly. 2 1 LINE OUT 2 1 LINE OUT SUB WOOFER SUB WOOFER 1 Use component video cables (red/blue/green - Connections Using S-Video jack IMPORTANT! - For DVD...
User manual
Page 14
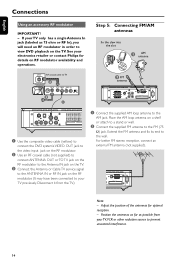
... 5: Connecting FM/AM antennas fix the claw into the slot 1 AM antenna 2 FM antenna SUB WOOFER LINE OUT 1 Use the composite video cable (yellow) to connect the DVD system's VIDEO OUT jack to the video input jack on the RF modulator. 2 Use an RF coaxial cable (not supplied) to connect ANTENNA OUT or TO TV jack on the RF modulator to the Antenna IN jack on the TV. 3 Connect the Antenna or Cable TV service signal to the ANTENNA IN...
... 5: Connecting FM/AM antennas fix the claw into the slot 1 AM antenna 2 FM antenna SUB WOOFER LINE OUT 1 Use the composite video cable (yellow) to connect the DVD system's VIDEO OUT jack to the video input jack on the RF modulator. 2 Use an RF coaxial cable (not supplied) to connect ANTENNA OUT or TO TV jack on the RF modulator to the Antenna IN jack on the TV. 3 Connect the Antenna or Cable TV service signal to the ANTENNA IN...
User manual
Page 15
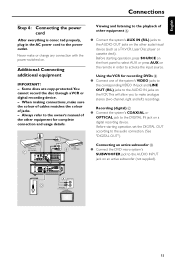
... front panel to select AUX or press AUX on the remote in the AC power cord to the owner's manual of the other equipment for recording DVDs B ● Connect one of the system's VIDEO jacks to the corresponding VIDEO IN jack and LINE OUT (R/L) jacks to the AUDIO IN jacks on the VCR.This will allow you to make analogue stereo (two channel, right and left) recordings. Before star ting operation, set the DIGITAL...
... front panel to select AUX or press AUX on the remote in the AC power cord to the owner's manual of the other equipment for recording DVDs B ● Connect one of the system's VIDEO jacks to the corresponding VIDEO IN jack and LINE OUT (R/L) jacks to the AUDIO IN jacks on the VCR.This will allow you to make analogue stereo (two channel, right and left) recordings. Before star ting operation, set the DIGITAL...
User manual
Page 16
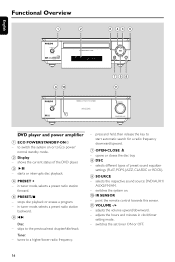
... radio frequency. - tunes to start automatic search for a radio frequency downward/upward. 7 OPEN•CLOSE ç - switches the set timer ON or OFF. 16 adjusts the volume upward/downward. - switches the system on or to the previous/next chapter/title/track. DVD player and power amplifier 1 ECO POWER/STANDBY-ON y - stops disc playback or erases a program. - in tuner mode, selects a preset radio station forward. 5 PRESET-/9 - starts or interrupts disc playback. 4 PRESET + - adjusts the hours and minutes in clock/timer setting mode...
... radio frequency. - tunes to start automatic search for a radio frequency downward/upward. 7 OPEN•CLOSE ç - switches the set timer ON or OFF. 16 adjusts the volume upward/downward. - switches the system on or to the previous/next chapter/title/track. DVD player and power amplifier 1 ECO POWER/STANDBY-ON y - stops disc playback or erases a program. - in tuner mode, selects a preset radio station forward. 5 PRESET-/9 - starts or interrupts disc playback. 4 PRESET + - adjusts the hours and minutes in clock/timer setting mode...

User manual
Page 18
... function (auto off). ( CLOCK Standby mode - enables or disables bass enhancement. ª SURROUND (unavailable for DVD/ AUX1/AUX2/FM/AM. - switches the set timer ON or OFF. $ CH - Tuner: selects a preset radio station. % ÉÅ - stops disc playback or erases a program. & DISC/TUNER/AUX - sets Stereo, Mono-Left or Mono-Right sound mode. selects an audio language. ∞ A-B - Disc: skips to switch between AM and FM - sets time for individual speakers. ⁄ DSC - adjusts volume level for switching on a disc. § MODE - selects 2.1 channel output...
... function (auto off). ( CLOCK Standby mode - enables or disables bass enhancement. ª SURROUND (unavailable for DVD/ AUX1/AUX2/FM/AM. - switches the set timer ON or OFF. $ CH - Tuner: selects a preset radio station. % ÉÅ - stops disc playback or erases a program. & DISC/TUNER/AUX - sets Stereo, Mono-Left or Mono-Right sound mode. selects an audio language. ∞ A-B - Disc: skips to switch between AM and FM - sets time for individual speakers. ⁄ DSC - adjusts volume level for switching on a disc. § MODE - selects 2.1 channel output...
User manual
Page 19
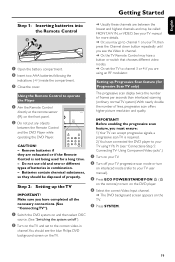
... the Remote Control 3 1 2 1 Open the battery compartment. 2 Insert two AAA batteries following the indications (+/-) inside the compartment. 3 Close the cover. Remove batteries if they should see "Connections-Step 5: Connecting TV- Make sure you have connected the DVD player to your TV user manual). 3 Press ECO POWER/STANDBY-ON B (B on the remote) to turn on the DVD player. 4 Select the correct Video Input channel. ➜ The DVD background screen appears on the TV and set the...
... the Remote Control 3 1 2 1 Open the battery compartment. 2 Insert two AAA batteries following the indications (+/-) inside the compartment. 3 Close the cover. Remove batteries if they should see "Connections-Step 5: Connecting TV- Make sure you have connected the DVD player to your TV user manual). 3 Press ECO POWER/STANDBY-ON B (B on the remote) to turn on the DVD player. 4 Select the correct Video Input channel. ➜ The DVD background screen appears on the TV and set the...
User manual
Page 23
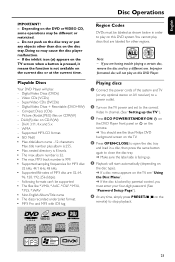
... enter your four-digit password. (See "Password Setup Page"). 6 At any optional stereo or AV receiver) to a power outlet. 2 Turn on the TV power and set to the correct Video In channel. (See "Setting up the TV"). 3 Press ECO POWER/STANDBY-ON B on the DVD Player front panel or B on the remote. ➜ You should see the blue Philips DVD background screen on the TV. 4 Press OPEN•CLOSE to open the disc tray and load...
... enter your four-digit password. (See "Password Setup Page"). 6 At any optional stereo or AV receiver) to a power outlet. 2 Turn on the TV power and set to the correct Video In channel. (See "Setting up the TV"). 3 Press ECO POWER/STANDBY-ON B on the DVD Player front panel or B on the remote. ➜ You should see the blue Philips DVD background screen on the TV. 4 Press OPEN•CLOSE to open the disc tray and load...
User manual
Page 26
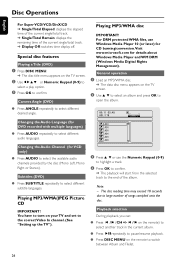
... album. Special disc features Playing a Title (DVD) 1 Press DISC MENU. ➜ The disc title menu appears on the TV screen. 2 Use 3 4 to select an album and press OK to confirm. General operation 1 Load an MP3/WMA disc. ➜ The data disc menu appears on the TV screen. 2 Use 1 2 3 4 or Numeric Keypad (0-9) to select a play option. 3 Press OK to open the album. Playing MP3/WMA/JPEG Picture CD IMPORTANT! Changing the Audio Channel (for details...
... album. Special disc features Playing a Title (DVD) 1 Press DISC MENU. ➜ The disc title menu appears on the TV screen. 2 Use 3 4 to select an album and press OK to confirm. General operation 1 Load an MP3/WMA disc. ➜ The data disc menu appears on the TV screen. 2 Use 1 2 3 4 or Numeric Keypad (0-9) to select a play option. 3 Press OK to open the album. Playing MP3/WMA/JPEG Picture CD IMPORTANT! Changing the Audio Channel (for details...

User manual
Page 30
... ener its submenu and press OK again to confirm. ➜ The registration code will send output signals to Left speaker and Right speaker. 30 Notes: - Digital Audio Setup The options included in Digital Audio Setup are : "Digital Audio Setup", "Dolby Digital Setup", "3D Processing", "HDCD" and "Night Mode". English System Menu Options DIVX(R) VOD registration code Philips provides you the DivX® VOD (Video On Demand) registration code that matches the number of decoding multi-channel audio.
... ener its submenu and press OK again to confirm. ➜ The registration code will send output signals to Left speaker and Right speaker. 30 Notes: - Digital Audio Setup The options included in Digital Audio Setup are : "Digital Audio Setup", "Dolby Digital Setup", "3D Processing", "HDCD" and "Night Mode". English System Menu Options DIVX(R) VOD registration code Philips provides you the DivX® VOD (Video On Demand) registration code that matches the number of decoding multi-channel audio.

User manual
Page 32
... 2. 3 Use 3 4 to highlight a rating level for your children or have connected the DVD player's Y Pb Pr jacks to enter Color Setting Setup. The rating levels are from 1 to certain scenes on those kinds of certain discs that suppor ts the progressive video input. Contrast Adjusts the contrast level. Gamma Adjusts the gamma level. ➜ High, Medium, Low and None. Parental Some DVDs may have no level indication, so parental control function...
... 2. 3 Use 3 4 to highlight a rating level for your children or have connected the DVD player's Y Pb Pr jacks to enter Color Setting Setup. The rating levels are from 1 to certain scenes on those kinds of certain discs that suppor ts the progressive video input. Contrast Adjusts the contrast level. Gamma Adjusts the gamma level. ➜ High, Medium, Low and None. Parental Some DVDs may have no level indication, so parental control function...

User manual
Page 34
on the remote to set the hours. 3 Press CLOCK to confirm. ➜ The minute digits flash on the display screen. 4 Turn VOLUME -/+ clockwise or anticlockwise or press VOLUME +/- Presetting radio stations You can preset up timer Sleep timer setting In power-on mode, the sleep setting enables the system to switch to standby mode automatically at a preset time. 1 In power-on mode, press SLEEP/TIMER on the remote repeatedly to select a preset time. ➜ The selections are as...
on the remote to set the hours. 3 Press CLOCK to confirm. ➜ The minute digits flash on the display screen. 4 Turn VOLUME -/+ clockwise or anticlockwise or press VOLUME +/- Presetting radio stations You can preset up timer Sleep timer setting In power-on mode, the sleep setting enables the system to switch to standby mode automatically at a preset time. 1 In power-on mode, press SLEEP/TIMER on the remote repeatedly to select a preset time. ➜ The selections are as...
User manual
Page 37
..., change channels at the TV until you see page 19-20 for help. Do not open the system as below before taking the system for details. See your dealer or Philips for proper progressive scan setup or deactivate the progressive scan feature as there is a risk of the DVD player repeatedly to select "DVD" or press DISC on the TV remote control that selects...
..., change channels at the TV until you see page 19-20 for help. Do not open the system as below before taking the system for details. See your dealer or Philips for proper progressive scan setup or deactivate the progressive scan feature as there is a risk of the DVD player repeatedly to select "DVD" or press DISC on the TV remote control that selects...
User manual
Page 38
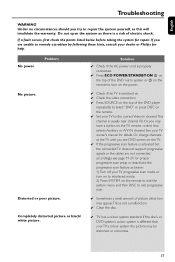
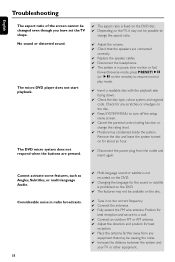
... as Angles, Subtitles, or multi-language Audio. No sound or distorted sound. The micro DVD player does not start playback. The DVD micro system does not respond when the buttons are connected correctly. ✔ Replace the speaker cables. ✔ Disconnect the headphones. ✔ The system is fixed on the DVD disc. ✔ Depending on the remote) to resume normal play mode. ✔ Insert a readable disc with the playback side...
... as Angles, Subtitles, or multi-language Audio. No sound or distorted sound. The micro DVD player does not start playback. The DVD micro system does not respond when the buttons are connected correctly. ✔ Replace the speaker cables. ✔ Disconnect the headphones. ✔ The system is fixed on the DVD disc. ✔ Depending on the remote) to resume normal play mode. ✔ Insert a readable disc with the playback side...

User manual
Page 40
... only play discs that supports PBC, you can find the region code of its high compression ratio. Each chapter is needed to a structure of Motion Picture Experts Group 1 (or MPEG-1) Audio Layer 3.Through the MP3 format, one sound field. Disc menu: A screen display prepared for reproduction control. MP3: A file format with more space on the back of a picture or a music piece on a DVD. Multichannel refers to receive progressive scan output from DVD...
... only play discs that supports PBC, you can find the region code of its high compression ratio. Each chapter is needed to a structure of Motion Picture Experts Group 1 (or MPEG-1) Audio Layer 3.Through the MP3 format, one sound field. Disc menu: A screen display prepared for reproduction control. MP3: A file format with more space on the back of a picture or a music piece on a DVD. Multichannel refers to receive progressive scan output from DVD...
Quick start guide
Page 2
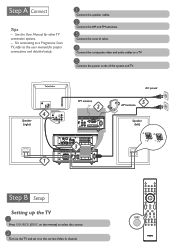
... the User Manual for proper connections and detailed setup. 1 Connect the speaker cables. 2 Connect the AM and FM antennas. 3 Connect the control cable. 4 Connect the composite video and audio cables to a TV. 5 Connect the power cords of the system and TV. 4 Speaker (right) 1 FM antenna 2 OOFER LINE OUT 3 SUB WOOFER AC power 5 AM antenna Speaker (left) 1 2 Setting up the TV 1 Press SOURCE (DISC on the remote) to select disc source. 2 Turn on the TV and set it to the user manual for other TV connection options. - For connecting to...
... the User Manual for proper connections and detailed setup. 1 Connect the speaker cables. 2 Connect the AM and FM antennas. 3 Connect the control cable. 4 Connect the composite video and audio cables to a TV. 5 Connect the power cords of the system and TV. 4 Speaker (right) 1 FM antenna 2 OOFER LINE OUT 3 SUB WOOFER AC power 5 AM antenna Speaker (left) 1 2 Setting up the TV 1 Press SOURCE (DISC on the remote) to select disc source. 2 Turn on the TV and set it to the user manual for other TV connection options. - For connecting to...

Quick start guide
Page 3
... not support progressive signals or the cables are not connected accordingly, see the user manual for detailed descriptions. Setting the clock 1 In standby mode, press and hold CLOCK on the remote. 2 When the hour digits flash, turn VOLUME-/+ on the remote to set the hours. 3 Press CLOCK again and the minute digits flash.Then turn on to confirm the time setting. on the system or press VOLUME+/- on the remote to set the...
... not support progressive signals or the cables are not connected accordingly, see the user manual for detailed descriptions. Setting the clock 1 In standby mode, press and hold CLOCK on the remote. 2 When the hour digits flash, turn VOLUME-/+ on the remote to set the hours. 3 Press CLOCK again and the minute digits flash.Then turn on to confirm the time setting. on the system or press VOLUME+/- on the remote to set the...


