
User Guide
Page 3
1. Things You Should Know 3 3. Projector Features 5 5. Installation 10-14 Video/computer cables and adapter 10 Connecting to a computer 11 Connecting to video equipment 12 Connecting to an external monitor 14 8. Operation 15-19 Preparation 15-16 Display and Picture control 16-18 Audio control 18 Other settings 19 9. Maintenance 20-22 Cleaning 20 Cleaning the dustfilter 20 Lamp 21 Lamp replacement 21 Resetting the lamplife time 22 10. Packaging contents Please confirm that to...
1. Things You Should Know 3 3. Projector Features 5 5. Installation 10-14 Video/computer cables and adapter 10 Connecting to a computer 11 Connecting to video equipment 12 Connecting to an external monitor 14 8. Operation 15-19 Preparation 15-16 Display and Picture control 16-18 Audio control 18 Other settings 19 9. Maintenance 20-22 Cleaning 20 Cleaning the dustfilter 20 Lamp 21 Lamp replacement 21 Resetting the lamplife time 22 10. Packaging contents Please confirm that to...
User Guide
Page 4
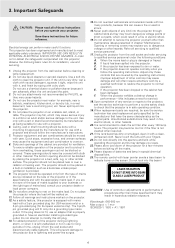
... check that have an electrician install a grounded type outlet. IMPROPER USE CAN RESULT IN POTENTIAL ELECTRICAL SHOCK OR FIRE HAZARDS. Do not use liquid cleaners or aerosol cleaners. Do not place the projector on . 11. Ceiling, wall or shelf mounting should be sure the service technician has used replacement parts specified by placing the projector on the screen. These openings should be operated only from overheating...
... check that have an electrician install a grounded type outlet. IMPROPER USE CAN RESULT IN POTENTIAL ELECTRICAL SHOCK OR FIRE HAZARDS. Do not use liquid cleaners or aerosol cleaners. Do not place the projector on . 11. Ceiling, wall or shelf mounting should be sure the service technician has used replacement parts specified by placing the projector on the screen. These openings should be operated only from overheating...

User Guide
Page 5
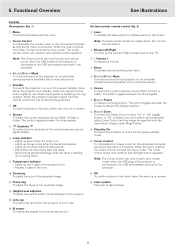
... rear projection applications. 5 With 'Digital Zoom' a specific part of the projector. The local keyboard provides direct access keys for data input only and accessible in the room. High reliability and excellent brightness The Philips UHP lamp guarantees long life, excellent brightness over the entire picture. 8. Ceiling Mount and Rear Screen projection The projector is in real hot plug and play presentation. 4. Projector Features 1. Auto setup functionality Auto Standby The 'Auto Standby' feature automatically switches the projector to operate...
... rear projection applications. 5 With 'Digital Zoom' a specific part of the projector. The local keyboard provides direct access keys for data input only and accessible in the room. High reliability and excellent brightness The Philips UHP lamp guarantees long life, excellent brightness over the entire picture. 8. Ceiling Mount and Rear Screen projection The projector is in real hot plug and play presentation. 4. Projector Features 1. Auto setup functionality Auto Standby The 'Auto Standby' feature automatically switches the projector to operate...
User Guide
Page 6
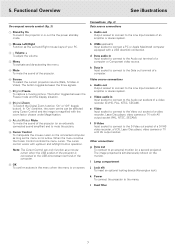
... adjust the size of the projector (or an externally connected sound amplifier) and to indicate items on the screen. 2 Cursor Control To manipulate the mouse cursor on screen. 6 Source To select the current projection source (Data, S-Video or Video). Lights up or cooling down. 9 Temperature indicator - up red when lamp life has expired. - The button toggles between the Freeze mode and the display situation. 8 D(igital)-Zoom To switch the Digital Zoom function 'On' or 'Off' (toggle button). The cursor control works...
... adjust the size of the projector (or an externally connected sound amplifier) and to indicate items on the screen. 2 Cursor Control To manipulate the mouse cursor on screen. 6 Source To select the current projection source (Data, S-Video or Video). Lights up or cooling down. 9 Temperature indicator - up red when lamp life has expired. - The button toggles between the Freeze mode and the display situation. 8 D(igital)-Zoom To switch the Digital Zoom function 'On' or 'Off' (toggle button). The cursor control works...
User Guide
Page 7
... current projection source (Data, S-Video or Video). The cursor control works with the zoom factor chosen under Magnification. 9 A(udio)/V(ideo) Mute To mute the sound of your PC. 3 - Connections (fig. 4) Data source connections a Audio out Output socket to connect to mute the picture. 0 Cursor Control To manipulate the mouse cursor on the connected computer as long as the menu is magnified with up/down and left/right button operation. e Video Input socket to connect...
... current projection source (Data, S-Video or Video). The cursor control works with the zoom factor chosen under Magnification. 9 A(udio)/V(ideo) Mute To mute the sound of your PC. 3 - Connections (fig. 4) Data source connections a Audio out Output socket to connect to mute the picture. 0 Cursor Control To manipulate the mouse cursor on the connected computer as long as the menu is magnified with up/down and left/right button operation. e Video Input socket to connect...

User Guide
Page 8
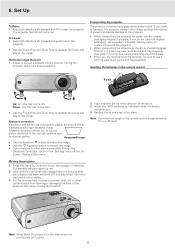
... remove this warning. This setting can be positioned so that the cooling fan has stopped (about 3 minutes after the projector has been switched to adjust the vertical angle of the image. Remove the lens cap. 3. 6. Display and picture control' for further instructions. • Choose a screen size suitable for front projection. Insert the mains lead into the power standby mode. Warning 5. Notes: - See 'Rear screen projection' and 'Ceiling-mount projection' under 'Positioning the projector and screen'. Mains supply 1. When the projection lamp...
... remove this warning. This setting can be positioned so that the cooling fan has stopped (about 3 minutes after the projector has been switched to adjust the vertical angle of the image. Remove the lens cap. 3. 6. Display and picture control' for further instructions. • Choose a screen size suitable for front projection. Insert the mains lead into the power standby mode. Warning 5. Notes: - See 'Rear screen projection' and 'Ceiling-mount projection' under 'Positioning the projector and screen'. Mains supply 1. When the projection lamp...
User Guide
Page 9
... the lid in the 'Settings' menu of the image. 6. Set Up To Raise: • Keep both adjusters (A) pressed and gently lower the projector. • Use the Focus Ring and Zoom Ring to the desired position. Note: The maximum range of the remote control is accessible through the 'Keystone Correction' option in the direction of the projector lens when moving the projector. The standby indicator lights up red. 2. Wait until the...
... the lid in the 'Settings' menu of the image. 6. Set Up To Raise: • Keep both adjusters (A) pressed and gently lower the projector. • Use the Focus Ring and Zoom Ring to the desired position. Note: The maximum range of the remote control is accessible through the 'Keystone Correction' option in the direction of the projector lens when moving the projector. The standby indicator lights up red. 2. Wait until the...
User Guide
Page 10
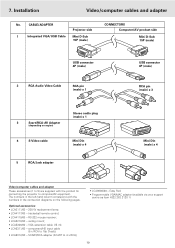
.... SCART/RCA adapter (SCART to computer/AV equipment. Installation Video/computer cables and adapter No. trackerball remote control; • LCA4119/00 - component/HD input cable (5 x RCA to 15p D-sub); • LCA5312/00 - 7. ceiling mount; • LCA5300/00 - Optional accessories: • LCA3111/00 - 200 W replacement lamp; • LCA4117/00 - VGA extension cable (15 m); • LCA5311/00 - Easy Pad; • Programmable VGA/MAC adapter (available via your support centre as item...
.... SCART/RCA adapter (SCART to computer/AV equipment. Installation Video/computer cables and adapter No. trackerball remote control; • LCA4119/00 - component/HD input cable (5 x RCA to 15p D-sub); • LCA5312/00 - 7. ceiling mount; • LCA5300/00 - Optional accessories: • LCA3111/00 - 200 W replacement lamp; • LCA4117/00 - VGA extension cable (15 m); • LCA5311/00 - Easy Pad; • Programmable VGA/MAC adapter (available via your support centre as item...
User Guide
Page 11
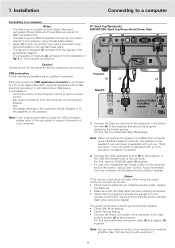
... the remote control (LED ring around the Standby button will be changed to : - the display settings of the computer will fast flash when receiving a signal). The adapter is only needed if your computer is equipped with a 3 row connector no audio information is equipped with a 2 row, 15 pin connector. If no adaptor is needed. 2. For this use the VGA/USB cable (1) supplied. Installation Connecting to a computer Connecting to the standard data cable. - The data input...
... the remote control (LED ring around the Standby button will be changed to : - the display settings of the computer will fast flash when receiving a signal). The adapter is only needed if your computer is equipped with a 3 row connector no audio information is equipped with a 2 row, 15 pin connector. If no adaptor is needed. 2. For this use the VGA/USB cable (1) supplied. Installation Connecting to a computer Connecting to the standard data cable. - The data input...
User Guide
Page 12
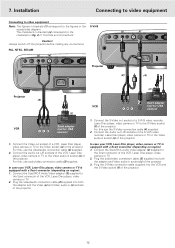
... audio/video connection cable (2) supplied into both the adapter and Video audio-in socket (c) of the projector. For this use the S-Video connection cable (4) supplied. 2. Audio out USB Vvideo audio-in DDaattaa audio-in Video S-Video Data out D PAL, NTSC, SECAM (c) (e) Audio out USB Vvideo audio-in DDaattaa audio-in Video S-Video Data out Data in the accessories diagram. Connect the Audio out L/R sockets of the VCR, Laser Disc player, video camera or TV to the S-Video socket (f) of the projector. Connect the Scart/RCA Audio Video adapter (3) supplied...
... audio/video connection cable (2) supplied into both the adapter and Video audio-in socket (c) of the projector. For this use the S-Video connection cable (4) supplied. 2. Audio out USB Vvideo audio-in DDaattaa audio-in Video S-Video Data out D PAL, NTSC, SECAM (c) (e) Audio out USB Vvideo audio-in DDaattaa audio-in Video S-Video Data out Data in the accessories diagram. Connect the Audio out L/R sockets of the VCR, Laser Disc player, video camera or TV to the S-Video socket (f) of the projector. Connect the Scart/RCA Audio Video adapter (3) supplied...
User Guide
Page 14
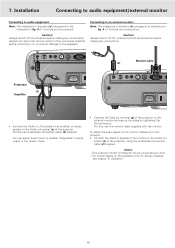
... fixed ('Line') or variable ('Regulated') volume output in the 'Audio' menu. • Connect the Data out terminal (g) of the connected amplifier before switching it on, to prevent damage to characters in fig. 4 of 'Controls and connections'. Connecting to an external monitor Note: The characters in brackets (a) correspond to the Audio out socket (a) of the projector, using the audio/video connection cable (2) supplied. For this , use audio/video connection cable (2) supplied. Installation Connecting to audio equipment/external monitor Connecting...
... fixed ('Line') or variable ('Regulated') volume output in the 'Audio' menu. • Connect the Data out terminal (g) of the connected amplifier before switching it on, to prevent damage to characters in fig. 4 of 'Controls and connections'. Connecting to an external monitor Note: The characters in brackets (a) correspond to the Audio out socket (a) of the projector, using the audio/video connection cable (2) supplied. For this , use audio/video connection cable (2) supplied. Installation Connecting to audio equipment/external monitor Connecting...
User Guide
Page 15
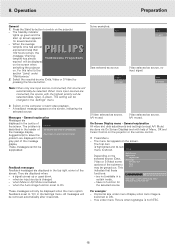
... Standby indicator lights up green and the start video playback. - Note: When only one input source is Fan error described in the centre of the submenu may be displayed on the screen when switching the projector on the projector. - A feedback message appears on the selected source (Data, Video or S-Video) some options of the screen. The problem is connected, this refer to the section 'Lamp' under menu Picture when signaltype is switched to On. These messages cannot be removed...
... Standby indicator lights up green and the start video playback. - Note: When only one input source is Fan error described in the centre of the submenu may be displayed on the screen when switching the projector on the projector. - A feedback message appears on the selected source (Data, Video or S-Video) some options of the screen. The problem is connected, this refer to the section 'Lamp' under menu Picture when signaltype is switched to On. These messages cannot be removed...
User Guide
Page 16
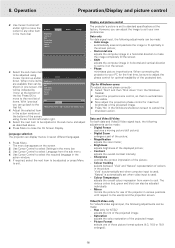
... computer image in the menu bar. 3. Data and Video/S-Video For both data and Video/S-Video signal input, the following adjustments can also be indicated by Sharpness 'more items Brightness are visible. 3. The various colors (red, green and blue) can be made : - 8. Use Cursor Control to the user(s) and the projection screen. Display and picture control The projector's picture is set when video input is used ; 'Natural' is used . - Video/S-Video only For Video/S-Video signal input, the following adjustments can be made : - Press OK to Mirror (more ) Audio Settings...
... computer image in the menu bar. 3. Data and Video/S-Video For both data and Video/S-Video signal input, the following adjustments can also be indicated by Sharpness 'more items Brightness are visible. 3. The various colors (red, green and blue) can be made : - 8. Use Cursor Control to the user(s) and the projection screen. Display and picture control The projector's picture is set when video input is used ; 'Natural' is used . - Video/S-Video only For Video/S-Video signal input, the following adjustments can be made : - Press OK to Mirror (more ) Audio Settings...
User Guide
Page 17
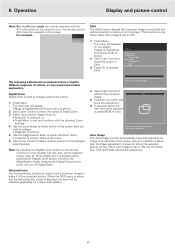
...) Zoom button twice will appear. Shift is used to Digital Zoom. 3. In addition it fit the projected picture. Select On to switch Digital Zoom on. • Press OK to continue, or • Press Menu to be indicated graphically on the screen. When Digital Zoom is Digital Freeze shown. 2. Operation Display and picture control Note: A(audio)/V(video)-mute can only be selected with the previous Zoom settings. 4. The menu bar appears on the screen. Display is highlighted Display Picture Audio Settings and...
...) Zoom button twice will appear. Shift is used to Digital Zoom. 3. In addition it fit the projected picture. Select On to switch Digital Zoom on. • Press OK to continue, or • Press Menu to be indicated graphically on the screen. When Digital Zoom is Digital Freeze shown. 2. Operation Display and picture control Note: A(audio)/V(video)-mute can only be selected with the previous Zoom settings. 4. The menu bar appears on the screen. Display is highlighted Display Picture Audio Settings and...
User Guide
Page 18
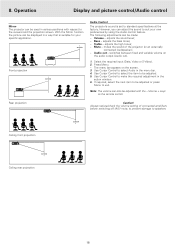
... function the picture can also be made: - Note: The volume can be used in the menu bar. 4. SCREEN Front projection SCREEN Audio Control The projector's sound is suitable for your own preferences by using the Audio control feature. Press Menu. - Use Cursor Control to select the item to standard specifications at the factory. Always reduce/check the volume setting of the projector (or an externally connected loudspeaker); - adjusts the high tones; - switches between fixed and variable...
... function the picture can also be made: - Note: The volume can be used in the menu bar. 4. SCREEN Front projection SCREEN Audio Control The projector's sound is suitable for your own preferences by using the Audio control feature. Press Menu. - Use Cursor Control to select the item to standard specifications at the factory. Always reduce/check the volume setting of the projector (or an externally connected loudspeaker); - adjusts the high tones; - switches between fixed and variable...
User Guide
Page 19
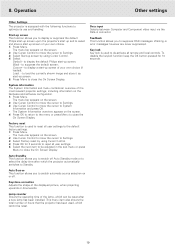
...); Auto Source This function allows you to the default factory settings. 1. Keystone correction Adjusts the shape of hours that the projector has been used to reset all remote and local controls. The menu bar appears on or off Auto Standby mode or to suppress OSD messages. Key lock Key lock is used , which cannot be adjusted in connector. Select: Default - This menu item also shows the total number of the displayed picture, when projecting upwards or downwards. Operation Other settings...
...); Auto Source This function allows you to the default factory settings. 1. Keystone correction Adjusts the shape of hours that the projector has been used to reset all remote and local controls. The menu bar appears on or off Auto Standby mode or to suppress OSD messages. Key lock Key lock is used , which cannot be adjusted in connector. Select: Default - This menu item also shows the total number of the displayed picture, when projecting upwards or downwards. Operation Other settings...
User Guide
Page 20
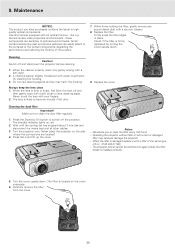
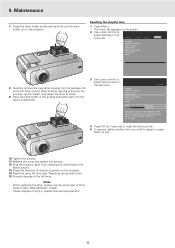
... filter is dusty, clean it with an optical function - Turn the projector over. LLAAMMPP A Notes: - Operating the projector without filter or with your fingers. The projector power cannot be switched on the cover underside. 6. camera lenses, slide projectors and binoculars - Firmly press the filter edges in highquality optical components. The standby indicator lights up the cover. We advise you have purchased contains the latest in place. Turn the cover upside...
... filter is dusty, clean it with an optical function - Turn the projector over. LLAAMMPP A Notes: - Operating the projector without filter or with your fingers. The projector power cannot be switched on the cover underside. 6. camera lenses, slide projectors and binoculars - Firmly press the filter edges in highquality optical components. The standby indicator lights up the cover. We advise you have purchased contains the latest in place. Turn the cover upside...
User Guide
Page 21
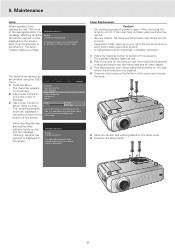
... the cover and remove the cover. Display Picture Audio Settings Language Keystone correction Start-up red and the message 'Warning: lamplife has expired' is switched on the screen. 2. For cooling purposes the lamp is indicated in the action window at the bottom of the screen. Do not touch lamp or point lamp holder opening to have a spare lamp available. When the lamplife has expired,the lamp indicator lights up screen Lamp counter System information Factory reset (more) Lamp 5 hours Projector 2453 hours Lamp counter shows the operating hours...
... the cover and remove the cover. Display Picture Audio Settings Language Keystone correction Start-up red and the message 'Warning: lamplife has expired' is switched on the screen. 2. For cooling purposes the lamp is indicated in the action window at the bottom of the screen. Do not touch lamp or point lamp holder opening to have a spare lamp available. When the lamplife has expired,the lamp indicator lights up screen Lamp counter System information Factory reset (more) Lamp 5 hours Projector 2453 hours Lamp counter shows the operating hours...
User Guide
Page 22
... switch on the screen. 2. Place the lamp holder in the menu bar. Press OK for 3 seconds. 4. Replace the cover and tighten the screws. 12. Please dispose of the old lamp. Use cursor control to reset when a new lamp is suggested to select Settings in the guiding slots and insert into the lamp compartment. 3. It is inserted. Factory reset (more ) Lamp 0 hours Projector 2453 hours Lamp counter shows the operating hours of the lamp. FILTER FILTER 9. Factory reset (more ) Audio Settings 8. Press Menu. - Display Picture Language Keystone correction Start...
... switch on the screen. 2. Place the lamp holder in the menu bar. Press OK for 3 seconds. 4. Replace the cover and tighten the screws. 12. Please dispose of the old lamp. Use cursor control to reset when a new lamp is suggested to select Settings in the guiding slots and insert into the lamp compartment. 3. It is inserted. Factory reset (more ) Lamp 0 hours Projector 2453 hours Lamp counter shows the operating hours of the lamp. FILTER FILTER 9. Factory reset (more ) Audio Settings 8. Press Menu. - Display Picture Language Keystone correction Start...
User Guide
Page 23
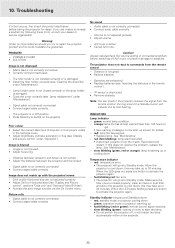
...or Horizontal size are not adjusted correctly. • Adjust Shift or Horizontal size (See 'Display and Picture control', sections 'Data only' and 'Data and Video/S-Video'). • Activate the auto-image function via the On Screen menu. orange: lamp life has almost expired (less than 100 hours to cool down ; red: standby mode or projector cooling down . slow blinking (green, red or orange): lamp is starting up screen for repair. red: temperature error. • The projector will indicate this does not resolve the problem, replace the lamp. fast blinking red: fan error...
...or Horizontal size are not adjusted correctly. • Adjust Shift or Horizontal size (See 'Display and Picture control', sections 'Data only' and 'Data and Video/S-Video'). • Activate the auto-image function via the On Screen menu. orange: lamp life has almost expired (less than 100 hours to cool down ; red: standby mode or projector cooling down . slow blinking (green, red or orange): lamp is starting up screen for repair. red: temperature error. • The projector will indicate this does not resolve the problem, replace the lamp. fast blinking red: fan error...


