User Guide
Page 3
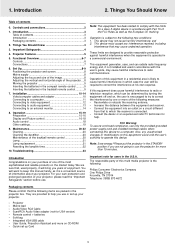
... and on a circuit different from that to comply with Part 15 of your projector, please read the 'Important Safeguards' section before use or set up your projector. Projector - Remote control + batteries - Integrated VGA/USB cable - Important Safeguards 4 4. For... of enjoyment. Introduction 3 Table of the projector ....8 Moving the projector 9 Inserting the batteries in the compact remote control ...........9 Inserting the batteries in the projector box. Operation is the following: Philips Consumer Electronics Company One Philips Drive Knoxville, TN 37914 Telephone (1888)...
... and on a circuit different from that to comply with Part 15 of your projector, please read the 'Important Safeguards' section before use or set up your projector. Projector - Remote control + batteries - Integrated VGA/USB cable - Important Safeguards 4 4. For... of enjoyment. Introduction 3 Table of the projector ....8 Moving the projector 9 Inserting the batteries in the compact remote control ...........9 Inserting the batteries in the projector box. Operation is the following: Philips Consumer Electronics Company One Philips Drive Knoxville, TN 37914 Telephone (1888)...
User Guide
Page 5
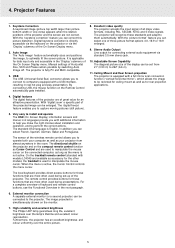
...resulting in the 'Display' submenu of the projected image can be enlarged. The directional shuttle on the projector and on the compact remote control function as your projector from 21" (0.53 m) to computers equipped with additional information to manipulate the mouse cursor. With the ...and MAC compatible. 3. With the 'picture format' feature you to the projector, The image projected is active, the Cursor Control controls the menu cursor. High reliability and excellent brightness The Philips UHP lamp guarantees long life, excellent brightness over the entire picture. 5...
...resulting in the 'Display' submenu of the projected image can be enlarged. The directional shuttle on the projector and on the compact remote control function as your projector from 21" (0.53 m) to computers equipped with additional information to manipulate the mouse cursor. With the ...and MAC compatible. 3. With the 'picture format' feature you to the projector, The image projected is active, the Cursor Control controls the menu cursor. High reliability and excellent brightness The Philips UHP lamp guarantees long life, excellent brightness over the entire picture. 5...
User Guide
Page 6
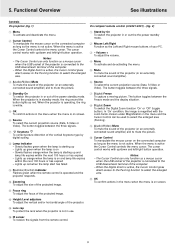
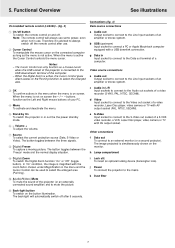
...the menu when the menu is magnified with up /down and left /right button operation. When the projector is operating, the ring is in use. $ IR sensor To receive the signals from the remote control. The button toggles between the three signals. 7 D(igital)-Freeze To capture a moving picture. ...When the projector is white. 5 OK To confirm actions in the menu and the Cursor Control can only ...
...the menu when the menu is magnified with up /down and left /right button operation. When the projector is operating, the ring is in use. $ IR sensor To receive the signals from the remote control. The button toggles between the three signals. 7 D(igital)-Freeze To capture a moving picture. ...When the projector is white. 5 OK To confirm actions in the menu and the Cursor Control can only ...
User Guide
Page 7
...three signals. 8 D(igital)-Freeze To capture a moving picture. Note: The remote control will automatically switch off the remote control after 5 seconds. 7 When the menu is connected to the USB downstream terminal of the projector (or an externally connected sound amplifier) and to select the enlarged area ... USB downlink connection. In 'On' condition, the image is simultaneously shown on screen the - / - - j Power To connect the projector to select the enlarged area. The Cursor Control can be used to mute the picture. Video source connections a Audio out Output socket to ...
...three signals. 8 D(igital)-Freeze To capture a moving picture. Note: The remote control will automatically switch off the remote control after 5 seconds. 7 When the menu is connected to the USB downstream terminal of the projector (or an externally connected sound amplifier) and to select the enlarged area ... USB downlink connection. In 'On' condition, the image is simultaneously shown on screen the - / - - j Power To connect the projector to select the enlarged area. The Cursor Control can be used to mute the picture. Video source connections a Audio out Output socket to ...
User Guide
Page 9
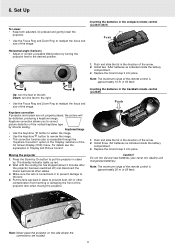
Note: The maximum range of the projector lens when moving the projector. For details see the explanation in the trackball remote control (LC4345) Push 1. Moving the projector 1. Put the lens cap back in place to prevent dust, dirt or other cables. 3. Replace the lid and snap it .... 4. Wait until the cooling fan has stopped (about 3 minutes after the projector has been switched off) and disconnect the mains lead and all other contamination from harming or damaging the front of the remote control is accessible through the 'Keystone Correction' option in the direction of the...
Note: The maximum range of the projector lens when moving the projector. For details see the explanation in the trackball remote control (LC4345) Push 1. Moving the projector 1. Put the lens cap back in place to prevent dust, dirt or other cables. 3. Replace the lid and snap it .... 4. Wait until the cooling fan has stopped (about 3 minutes after the projector has been switched off) and disconnect the mains lead and all other contamination from harming or damaging the front of the remote control is accessible through the 'Keystone Correction' option in the direction of the...
User Guide
Page 11
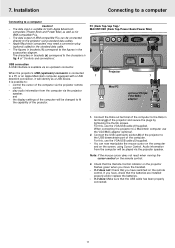
... the trackball. - the display settings of IBM compatible PCs can now manipulate the mouse cursor on the computer and on the remote control. When connecting the projector to the standard data cable. - For this , use the VGA/MAC adaptor (optional). 2. Apple Macintosh computers may need ...a conversion plug (optional) added to a Macintosh computer use the VGA/USB cable (1) supplied. Projector 1 1 Mac/PC USB optional Philips VGA/MAC adapter DDaattaa oouutt A 1. Connect the Data out terminal of the computer to the figures in fig. 4 of the...
... the trackball. - the display settings of IBM compatible PCs can now manipulate the mouse cursor on the computer and on the remote control. When connecting the projector to the standard data cable. - For this , use the VGA/MAC adaptor (optional). 2. Apple Macintosh computers may need ...a conversion plug (optional) added to a Macintosh computer use the VGA/USB cable (1) supplied. Projector 1 1 Mac/PC USB optional Philips VGA/MAC adapter DDaattaa oouutt A 1. Connect the Data out terminal of the computer to the figures in fig. 4 of the...
User Guide
Page 13
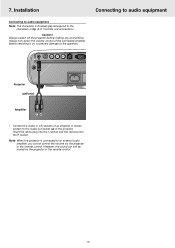
...it on, to prevent damage to an external audio amplifier, you cannot control the volume via the projector or the remote control. 13 7. Caution! Note: When the projector is connected to the speakers. Always turn down the volume control of the connected amplifier before making ...any connections. However, the sound can still be muted via the projector or the remote control. Connecting to audio equipment (a) Audio out USB RL Audio in RL Video S-Video DDaatataoiunt Projector (optional) Amplifier L Audio R in • Connect the Audio in L/R sockets...
...it on, to prevent damage to an external audio amplifier, you cannot control the volume via the projector or the remote control. 13 7. Caution! Note: When the projector is connected to the speakers. Always turn down the volume control of the connected amplifier before making ...any connections. However, the sound can still be muted via the projector or the remote control. Connecting to audio equipment (a) Audio out USB RL Audio in RL Video S-Video DDaatataoiunt Projector (optional) Amplifier L Audio R in • Connect the Audio in L/R sockets...
User Guide
Page 15
...average PHILIPS lamplife time has almost expired and less than 100 hours remain, the message 'Warning: lamplife has almost Multimedia Projectors expired' will only be displayed when the menu option Feedback is set to the section 'Lamp' under 'Maintenance' - If you use the trackball remote control... for the selected source. The first item is highlighted and its sub menu is switched to switch on the Submenu projector or the remote Submenu highlight control. This indicates that these 5 seconds, the illumination time is pressed within these functions: - Horizontal ...
...average PHILIPS lamplife time has almost expired and less than 100 hours remain, the message 'Warning: lamplife has almost Multimedia Projectors expired' will only be displayed when the menu option Feedback is set to the section 'Lamp' under 'Maintenance' - If you use the trackball remote control... for the selected source. The first item is highlighted and its sub menu is switched to switch on the Submenu projector or the remote Submenu highlight control. This indicates that these 5 seconds, the illumination time is pressed within these functions: - Horizontal ...
User Guide
Page 17
... the selected picture format. When the OSD menu is active and the horizontal size option is enlarged with the AV mute button on the projector or on the remote control. Use Cursor Control to move the cursor to activate the Digital Zoom function. 2. Shift... Pan To view an enlarged area of the...
... the selected picture format. When the OSD menu is active and the horizontal size option is enlarged with the AV mute button on the projector or on the remote control. Use Cursor Control to move the cursor to activate the Digital Zoom function. 2. Shift... Pan To view an enlarged area of the...
User Guide
Page 18
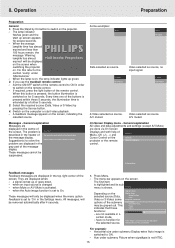
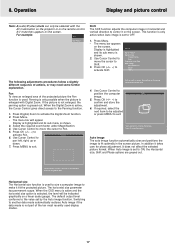
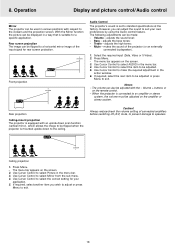
... the projection screen. The following adjustments can be made: - Press Menu. - The menu bar appears on the screen. 2. When the projector is suitable for a specific application. Always reduce/check the volume setting of the input signal for your own preferences by using the Audio control...select AUDIO in the menu bar. 3. Use Cursor Control to select Picture in the menu bar. 4. The volume can be adjusted on the remote control. - adjusts the bass tones; - Use Cursor Control to select the correct setting for rear screen projection. Volume + buttons or on...
... the projection screen. The following adjustments can be made: - Press Menu. - The menu bar appears on the screen. 2. When the projector is suitable for a specific application. Always reduce/check the volume setting of the input signal for your own preferences by using the Audio control...select AUDIO in the menu bar. 3. Use Cursor Control to select Picture in the menu bar. 4. The volume can be adjusted on the remote control. - adjusts the bass tones; - Use Cursor Control to select the correct setting for rear screen projection. Volume + buttons or on...
User Guide
Page 19
... OK (-/- -) for 3 seconds to close the On Screen Display. Use Cursor Control to move the cursor to display or suppress the default Philips start-up screen upon the projector's start -up . 1. Use Cursor Control to move the cursor to suppress OSD messages. Press Menu. - Select Start-up screen This function... to Settings. 3. Press Menu. - Select On to use and handling: Start-up screen by using Cursor Control. 4. Operation Other Settings The projector is used to lock all remote and local controls. The menu bar appears on the screen. 2. 8. Press Menu. -
... OK (-/- -) for 3 seconds to close the On Screen Display. Use Cursor Control to move the cursor to display or suppress the default Philips start-up screen upon the projector's start -up . 1. Use Cursor Control to move the cursor to suppress OSD messages. Press Menu. - Select Start-up screen This function... to Settings. 3. Press Menu. - Select On to use and handling: Start-up screen by using Cursor Control. 4. Operation Other Settings The projector is used to lock all remote and local controls. The menu bar appears on the screen. 2. 8. Press Menu. -
User Guide
Page 20
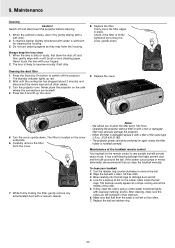
... the screen cursor jumps or moves abnormally, we recommend that you to switch off the projector. 9. Blow carefully into the ball cage to remove the ball. 2. When the lens is located on the remote control is damaged replace it by gently wiping with a soft brush or lens cleaning paper.... Press tab A and lift up red. 2. The filter is dirty or dusty, first blow the dust off and disconnect the projector before cleaning. 1. Maintenance of the trackball remote control Your trackball on the cover underside. 6. This build-up usually appears as they may seriously damage the...
... the screen cursor jumps or moves abnormally, we recommend that you to switch off the projector. 9. Blow carefully into the ball cage to remove the ball. 2. When the lens is located on the remote control is damaged replace it by gently wiping with a soft brush or lens cleaning paper.... Press tab A and lift up red. 2. The filter is dirty or dusty, first blow the dust off and disconnect the projector before cleaning. 1. Maintenance of the trackball remote control Your trackball on the cover underside. 6. This build-up usually appears as they may seriously damage the...
User Guide
Page 23
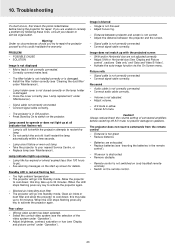
... (see 'Inserting the batteries in Off position. • Press Stand by On to activate the projector again. IR sensor is not switched on (only trackball remote controle). • Switch on the projector. Remote control is obstructed. • Remove obstacle. - Blocked air inlets/dirty dust filter • The...connect mains lead. - When the LED stops flashing press any key to switch on the remote control. - Clean air inlets or dust filter and allow the projector to commands from the remote control - this could invalidate the warranty. When the LED stops flashing press any key to...
... (see 'Inserting the batteries in Off position. • Press Stand by On to activate the projector again. IR sensor is not switched on (only trackball remote controle). • Switch on the projector. Remote control is obstructed. • Remove obstacle. - Blocked air inlets/dirty dust filter • The...connect mains lead. - When the LED stops flashing press any key to switch on the remote control. - Clean air inlets or dust filter and allow the projector to commands from the remote control - this could invalidate the warranty. When the LED stops flashing press any key to...

