
Brochure
Page 1
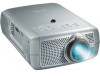
... Control your investment in full ambient light. Exceptional Performance! Extend Lamp Life SmartSave™ extends valuable lamp life by automatically switching off the projector after a user-defined interval. Philips Multimedia Projectors Future Proof Featuring HDTVReady™ the bSure Brilliance Series is a challenge. Easy-to-Use SmartSet™ utilizes advanced digital architecture to a quiet...
... Control your investment in full ambient light. Exceptional Performance! Extend Lamp Life SmartSave™ extends valuable lamp life by automatically switching off the projector after a user-defined interval. Philips Multimedia Projectors Future Proof Featuring HDTVReady™ the bSure Brilliance Series is a challenge. Easy-to-Use SmartSet™ utilizes advanced digital architecture to a quiet...
Brochure
Page 2
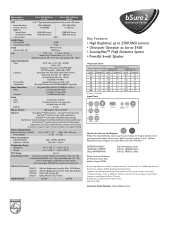
...-150-7_10/03 Literature Order Number: bSure Brilliance Series Printed in the U.S.A., ©2003 Philips Consumer Electronics Co., a Division of Philips Electronics North America Corp. * Available in other regions. ** Projector warranty is 3 years or 2500 hours, whichever comes first. All trademarks are subject to ...bSure SV2 Brilliance 200 watt Replacement Lamp for bSure XG2 Brilliance Deluxe Soft Carrying Bag Ceiling Mount for bSure Series Model Number LC3136 LC3146 bSure2 Brilliance Series Key Features • High Brightness up to 2500 ANSI Lumens • Ultra-quiet Operation as ...
...-150-7_10/03 Literature Order Number: bSure Brilliance Series Printed in the U.S.A., ©2003 Philips Consumer Electronics Co., a Division of Philips Electronics North America Corp. * Available in other regions. ** Projector warranty is 3 years or 2500 hours, whichever comes first. All trademarks are subject to ...bSure SV2 Brilliance 200 watt Replacement Lamp for bSure XG2 Brilliance Deluxe Soft Carrying Bag Ceiling Mount for bSure Series Model Number LC3136 LC3146 bSure2 Brilliance Series Key Features • High Brightness up to 2500 ANSI Lumens • Ultra-quiet Operation as ...
User Manual
Page 2
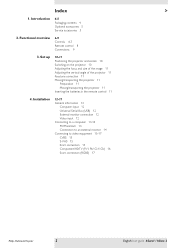
... Adjusting the focus and size of the image 11 Adjusting the vertical angle of the projector 11 Keystone correction 11 Moving/transporting the projector 11 Preparation 11 Moving/transporting the projector 11 Inserting the batteries in the remote control 11 4. Introduction 4-5 Packaging contents 4 Optional accessories 5 Service accessories 5 2. Functional overview 6-9 Controls 6-7 ... video equipment 15-17 CVBS 15 S-VHS 15 Scart connection 15 Component/HDTV (Pr,Y, Pb/ Cr,Y, Cb) 16 Scart connection (RGBS) 17 Philips Multimedia Projector 2 English User guide bSure1 / bSure 2 Index > 1.
... Adjusting the focus and size of the image 11 Adjusting the vertical angle of the projector 11 Keystone correction 11 Moving/transporting the projector 11 Preparation 11 Moving/transporting the projector 11 Inserting the batteries in the remote control 11 4. Introduction 4-5 Packaging contents 4 Optional accessories 5 Service accessories 5 2. Functional overview 6-9 Controls 6-7 ... video equipment 15-17 CVBS 15 S-VHS 15 Scart connection 15 Component/HDTV (Pr,Y, Pb/ Cr,Y, Cb) 16 Scart connection (RGBS) 17 Philips Multimedia Projector 2 English User guide bSure1 / bSure 2 Index > 1.
User Manual
Page 3
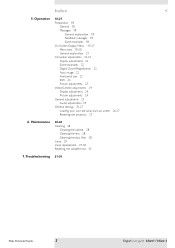
... cabinet 28 Cleaning the lens 28 Cleaning the dust filter 28 Lamp 29 Lamp replacement 29-30 Resetting the lamplife time 30 7.Troubleshooting 31-34 Philips Multimedia Projector 3 English User guide bSure1 / bSure 2 Operation 18-27 Preparation 18 General 18 Messages 18 General explanation 18 Feedback messages 18 Some examples 18 On... Display adjustments 24 Picture adjustments 24 General adjustments 25 Audio adjustments 25 General settings 25-27 Loading your own personal start-up screen Resetting the projector 27 26-27 6. Index < 5.
... cabinet 28 Cleaning the lens 28 Cleaning the dust filter 28 Lamp 29 Lamp replacement 29-30 Resetting the lamplife time 30 7.Troubleshooting 31-34 Philips Multimedia Projector 3 English User guide bSure1 / bSure 2 Operation 18-27 Preparation 18 General 18 Messages 18 General explanation 18 Feedback messages 18 Some examples 18 On... Display adjustments 24 Picture adjustments 24 General adjustments 25 Audio adjustments 25 General settings 25-27 Loading your own personal start-up screen Resetting the projector 27 26-27 6. Index < 5.
User Manual
Page 4
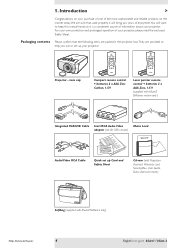
... products on your purchase of one of your projector. Lens cap Compact remote control + batteries 2 x AAA Zinc Carbon, 1.5 V Laser pointer remote control + batteries 2 x AAA Zinc, 1.5 V (supplied with bSure2 Brilliance only) Philips Multimedia Projector 4 English User guide bSure1 / bSure 2 ...We are sure that the following items are packed in the projector box.They are provided to help you years of enjoyment.You will want to keep ...
... products on your purchase of one of your projector. Lens cap Compact remote control + batteries 2 x AAA Zinc Carbon, 1.5 V Laser pointer remote control + batteries 2 x AAA Zinc, 1.5 V (supplied with bSure2 Brilliance only) Philips Multimedia Projector 4 English User guide bSure1 / bSure 2 ...We are sure that the following items are packed in the projector box.They are provided to help you years of enjoyment.You will want to keep ...
User Manual
Page 6
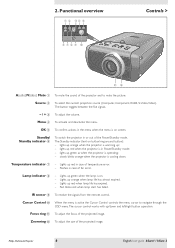
... the focus of the projected image. The button toggles between the five signals. - / + 3 To adjust the volume. Lights up green as when the projector is warming up red when lamp life has expired. - Zoomring @ To adjust the size of the projected image. Functional overview 1 2 34 5 AV Mute... picture. IR sensor 9 To receive the signals from the remote control. Cursor Control 0 When the menu is in case of the projector and to navigate through the OSD menu.The cursor control works with up/down . Focus ring ! Philips Multimedia Projector 6 English User guide bSure1 / bSure 2
... the focus of the projected image. The button toggles between the five signals. - / + 3 To adjust the volume. Lights up green as when the projector is warming up red when lamp life has expired. - Zoomring @ To adjust the size of the projected image. Functional overview 1 2 34 5 AV Mute... picture. IR sensor 9 To receive the signals from the remote control. Cursor Control 0 When the menu is in case of the projector and to navigate through the OSD menu.The cursor control works with up/down . Focus ring ! Philips Multimedia Projector 6 English User guide bSure1 / bSure 2
User Manual
Page 7
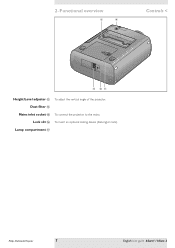
Lamp compartment & Philips Multimedia Projector 7 English User guide bSure1 / bSure 2 Functional overview # $ Controls < % ^& Height/Level adjuster # To adjust the vertical angle of the projector. Lock slit ^ To insert an optional locking device (Kensington lock). Dust filter $ Mains inlet socket % To connect the projector to the mains. 2.
Lamp compartment & Philips Multimedia Projector 7 English User guide bSure1 / bSure 2 Functional overview # $ Controls < % ^& Height/Level adjuster # To adjust the vertical angle of the projector. Lock slit ^ To insert an optional locking device (Kensington lock). Dust filter $ Mains inlet socket % To connect the projector to the mains. 2.
User Manual
Page 8
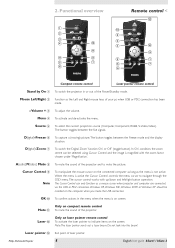
...2000 or Windows XP should be selected using Cursor Control and the image is not active. Philips Multimedia Projector 8 English User guide bSure1 / bSure 2 A(udio)/V(ideo) Mute 8 To mute the sound of the projector. OK 0 To confirm actions in or out of laser pointer. Note: The laser pointer... by On SSOoUuRrcCeE DD-F-FRreEeEzZeE D-ZOooOmM 0 9 1 7 Compact remote control Laser pointer remote control Stand by On 1 To switch the projector in the menu when the menu is active the Cursor Control controls the menu cursor to indicate items on screen. Source 5 To select ...
...2000 or Windows XP should be selected using Cursor Control and the image is not active. Philips Multimedia Projector 8 English User guide bSure1 / bSure 2 A(udio)/V(ideo) Mute 8 To mute the sound of the projector. OK 0 To confirm actions in or out of laser pointer. Note: The laser pointer... by On SSOoUuRrcCeE DD-F-FRreEeEzZeE D-ZOooOmM 0 9 1 7 Compact remote control Laser pointer remote control Stand by On 1 To switch the projector in the menu when the menu is active the Cursor Control controls the menu cursor to indicate items on screen. Source 5 To select ...
User Manual
Page 9
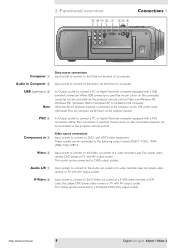
...laser disc player, video camera or TV with a PS/2 connection. When PS/2 connection is installed on the connected computer can be controlled via the projector remote control. Video 6 Input socket to connect to the Audio out sockets of a computer. Audio L/R 7 Input sockets to connect to the Video... out socket of a S-VHS video recorder, a VCR, Laser Disc player, DVD player, video camera or TV with AV output socket. Philips Multimedia Projector 9 English User guide bSure1 / bSure 2 Make sure Windows 98, Windows ME, Windows 2000 or Windows XP is used the mouse cursor on the...
...laser disc player, video camera or TV with a PS/2 connection. When PS/2 connection is installed on the connected computer can be controlled via the projector remote control. Video 6 Input socket to connect to the Audio out sockets of a computer. Audio L/R 7 Input sockets to connect to the Video... out socket of a S-VHS video recorder, a VCR, Laser Disc player, DVD player, video camera or TV with AV output socket. Philips Multimedia Projector 9 English User guide bSure1 / bSure 2 Make sure Windows 98, Windows ME, Windows 2000 or Windows XP is used the mouse cursor on the...
User Manual
Page 10
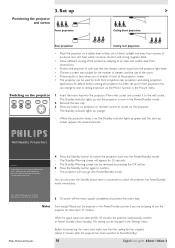
... screen appears for several seconds. PHILIPS Multimedia Projectors Warning If the projector is on the projector. - Please put the projector in the Power/Standby mode. 2 Remove the lens cap. 3 Press any button on projector or remote control to use the projector for the number of viewers and...Press the Standby button to switch the projector back into the projector light beam. • Choose a screen size suitable for more than 15 minutes. Notes Save energy! Philips Multimedia Projector 10 English User guide bSure1 / bSure 2 Set up red, the projector is best when you sit directly ...
... screen appears for several seconds. PHILIPS Multimedia Projectors Warning If the projector is on the projector. - Please put the projector in the Power/Standby mode. 2 Remove the lens cap. 3 Press any button on projector or remote control to use the projector for the number of viewers and...Press the Standby button to switch the projector back into the projector light beam. • Choose a screen size suitable for more than 15 minutes. Notes Save energy! Philips Multimedia Projector 10 English User guide bSure1 / bSure 2 Set up red, the projector is best when you sit directly ...
User Manual
Page 11
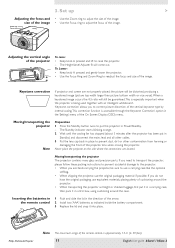
...; When you do not have the original packaging, use the original packaging material if possible. Philips Multimedia Projector Note The maximum range of the projector lens when moving the projector. If you need to transport the projector, please follow these packing instructions to pervent accidental damage to prevent dust, dirt or other contamination from harming...
...; When you do not have the original packaging, use the original packaging material if possible. Philips Multimedia Projector Note The maximum range of the projector lens when moving the projector. If you need to transport the projector, please follow these packing instructions to pervent accidental damage to prevent dust, dirt or other contamination from harming...
User Manual
Page 12
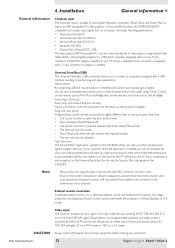
...™ application, supplied on the CD-ROM, allows you take a number of precautions against unauthorized use of your pc. Notes - Philips Multimedia Projector 12 English User guide bSure1 / bSure 2 Mouse control: By connecting USB, the mouse function on the CD-ROM. If your computer...the 'Security Max' user guide on the Remote Control automatically gets installed. External monitor connection A separate external monitor (or a second projector) can be connected to move the selected item.Then release Mouse Left. - The item will now be moved. • Press and...
...™ application, supplied on the CD-ROM, allows you take a number of precautions against unauthorized use of your pc. Notes - Philips Multimedia Projector 12 English User guide bSure1 / bSure 2 Mouse control: By connecting USB, the mouse function on the CD-ROM. If your computer...the 'Security Max' user guide on the Remote Control automatically gets installed. External monitor connection A separate external monitor (or a second projector) can be connected to move the selected item.Then release Mouse Left. - The item will now be moved. • Press and...
User Manual
Page 13
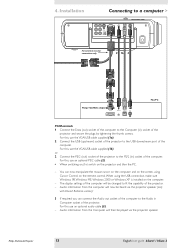
...of the computer. Philips Multimedia Projector 13 English User guide bSure1 / bSure 2 When using Cursor Control on the computer. - For this , use the VGA/USB cable supplied (1b). For this , use an optional PS/2 cable (2). • When switching on, first switch on the projector and then the ... L AudioPRb B Audio R Data Audio in CAoumdipouitnerData USB PSP/2S/2 For external monitor connection only MONITOR 5 44cc 3 1b 2 4b COMPUTER 1a Philips VGA/MAC adapter Data out Audio out USB PS/2 Mac/PC PC/Macintosh 1 Connect the Data (out) socket of the computer to the PS/2...
...of the computer. Philips Multimedia Projector 13 English User guide bSure1 / bSure 2 When using Cursor Control on the computer. - For this , use the VGA/USB cable supplied (1b). For this , use an optional PS/2 cable (2). • When switching on, first switch on the projector and then the ... L AudioPRb B Audio R Data Audio in CAoumdipouitnerData USB PSP/2S/2 For external monitor connection only MONITOR 5 44cc 3 1b 2 4b COMPUTER 1a Philips VGA/MAC adapter Data out Audio out USB PS/2 Mac/PC PC/Macintosh 1 Connect the Data (out) socket of the computer to the PS/2...
User Manual
Page 14
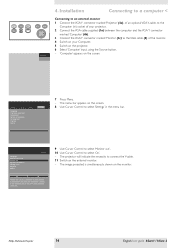
...the necessity to select 'Settings' in ) socket of your Computer. 5 Switch on the projector. 6 Select 'Computer' input, using the Source button. - 'Computer' appears on the monitor. Philips Multimedia Projector 14 English User guide bSure1 / bSure 2 AV Mute Stand by Source Lamp Temp Menu... System information... Installation Connecting to a computer < Connecting to an external monitor 1 Connect the VGA Y connector marked 'Projector' (4a), of the monitor. 4 Switch on your projector. 2 Connect the VGA cable supplied (1a) between the computer and the VGA Y connector marked 'Computer' (4b)....
...the necessity to select 'Settings' in ) socket of your Computer. 5 Switch on the projector. 6 Select 'Computer' input, using the Source button. - 'Computer' appears on the monitor. Philips Multimedia Projector 14 English User guide bSure1 / bSure 2 AV Mute Stand by Source Lamp Temp Menu... System information... Installation Connecting to a computer < Connecting to an external monitor 1 Connect the VGA Y connector marked 'Projector' (4a), of the monitor. 4 Switch on your projector. 2 Connect the VGA cable supplied (1a) between the computer and the VGA Y connector marked 'Computer' (4b)....
User Manual
Page 15
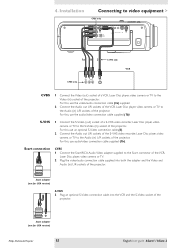
... L/R sockets of the VCR, Laser Disc player, video camera or TV to the Video (in ) L/R sockets of the projector. Scart adapter (not for USA version) Philips Multimedia Projector 15 English User guide bSure1 / bSure 2 For this , use an optional S-Video connection cable (2). 2 Connect the Audio out...for USA version) S-VHS 3 Plug an optional S-Video connection cable into both the adapter and the Video and Audio (in ) socket of the projector. For this , use audio/video connection cable supplied (1b). S-VHS 1 Connect the S-Video (out) socket of a S-VHS video recorder,...
... L/R sockets of the VCR, Laser Disc player, video camera or TV to the Video (in ) L/R sockets of the projector. Scart adapter (not for USA version) Philips Multimedia Projector 15 English User guide bSure1 / bSure 2 For this , use an optional S-Video connection cable (2). 2 Connect the Audio out...for USA version) S-VHS 3 Plug an optional S-Video connection cable into both the adapter and the Video and Audio (in ) socket of the projector. For this , use audio/video connection cable supplied (1b). S-VHS 1 Connect the S-Video (out) socket of a S-VHS video recorder,...
User Manual
Page 16
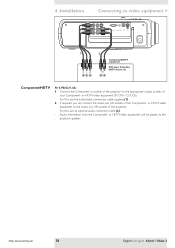
... connection cable supplied (1). 2 If required you can connect the Audio out L/R sockets of your Component- or HDTV-video equipment will be played via the projector speaker. Philips Multimedia Projector 16 English User guide bSure1 / bSure 2 or HDTV-video equipment (Pr,Y, Pb / Cr,Y, Cb). or HDTV-video equipment to video equipment > S-Video Pr R YG...
... connection cable supplied (1). 2 If required you can connect the Audio out L/R sockets of your Component- or HDTV-video equipment will be played via the projector speaker. Philips Multimedia Projector 16 English User guide bSure1 / bSure 2 or HDTV-video equipment (Pr,Y, Pb / Cr,Y, Cb). or HDTV-video equipment to video equipment > S-Video Pr R YG...

User Manual
Page 17
4. Philips Multimedia Projector 17 English User guide bSure1 / bSure 2 Audio information from the Component- or HDTV-video equipment will be played via the projector speaker. or HDTV-video equipment to the Scart connector of the projector. Scart connection RGBS RGBS 1 Connect an optional Scart... cable (4). - Installation Connecting to video equipment < S-Video Pr R YG Pb B Video Audio L Audio R Computer Audio in sockets of the projector to the Y output of the adapter. or HDTV-video equipment 2 Connect the Component in Computer USB PS/2 3 2 1 4 Audio out R...
4. Philips Multimedia Projector 17 English User guide bSure1 / bSure 2 Audio information from the Component- or HDTV-video equipment will be played via the projector speaker. or HDTV-video equipment to the Scart connector of the projector. Scart connection RGBS RGBS 1 Connect an optional Scart... cable (4). - Installation Connecting to video equipment < S-Video Pr R YG Pb B Video Audio L Audio R Computer Audio in sockets of the projector to the Y output of the adapter. or HDTV-video equipment 2 Connect the Component in Computer USB PS/2 3 2 1 4 Audio out R...
User Manual
Page 18
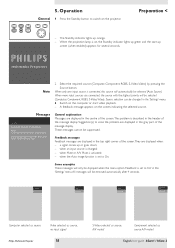
... centre of the message display. Computer Video No signal S-Video A/V Muted Component video A/V Muted Computer selected as source Philips Multimedia Projector Video selected as source, no input signal 18 S-Video selected as source, A/V muted Component selected as source A/V muted... English User guide bSure1 / bSure 2 The Standby indicator lights up or goes down; - PHILIPS Multimedia Projectors Note 2 Select the required source (Computer, Component, RGBS, S-Video,Video) by Source Lamp Temp pj 5. General explanation Messages are...
... centre of the message display. Computer Video No signal S-Video A/V Muted Component video A/V Muted Computer selected as source Philips Multimedia Projector Video selected as source, no input signal 18 S-Video selected as source, A/V muted Component selected as source A/V muted... English User guide bSure1 / bSure 2 The Standby indicator lights up or goes down; - PHILIPS Multimedia Projectors Note 2 Select the required source (Computer, Component, RGBS, S-Video,Video) by Source Lamp Temp pj 5. General explanation Messages are...
User Manual
Page 19
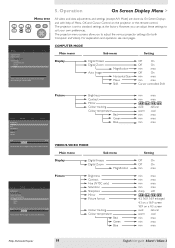
...max min max min max min max sharp soft B AB 4:3, 16:9, 16:9 enlarged 4:3 on a 16:9 screen 16:9 on the projector or the remote control. However, you to suit your own preferences. COMPUTER MODE Main menu Sub menu Display Digital Freeze Digital Zoom Auto Image...right to adjust the position of Menu, OK and Cursor Control on a 4:3 screen vivid natural warm cool min max min max min max Philips Multimedia Projector 19 English User guide bSure1 / bSure 2 Display Picture Digital Freeze Digital Zoom Magnification Auto Image Horizontal size Phase Shift . . . 5. ...
...max min max min max min max sharp soft B AB 4:3, 16:9, 16:9 enlarged 4:3 on a 16:9 screen 16:9 on the projector or the remote control. However, you to suit your own preferences. COMPUTER MODE Main menu Sub menu Display Digital Freeze Digital Zoom Auto Image...right to adjust the position of Menu, OK and Cursor Control on a 4:3 screen vivid natural warm cool min max min max min max Philips Multimedia Projector 19 English User guide bSure1 / bSure 2 Display Picture Digital Freeze Digital Zoom Magnification Auto Image Horizontal size Phase Shift . . . 5. ...
User Manual
Page 20
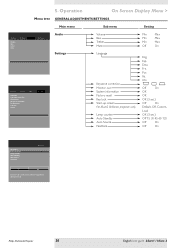
... reset Key lock (more) Audio Settings Volume Bass Treble Mute Language Keystone correction Monitor out System information Factory reset Key lock Start-up . Por. Philips Multimedia Projector 20 English User guide bSure1 / bSure 2 Chi. Esp. Fra. Deu. Operation On Screen Display Menu > Menu tree GENERAL ADJUSTMENTS/SETTINGS Main menu... Feedback Audio Settings Off On The Start-up screen can be shown or suppressed during start-up screen For bSure2 Brilliance projectors only Lamp counter Auto Standby Auto Source Feedback Min Max Min Max Min Max Off On Eng. Ita.
... reset Key lock (more) Audio Settings Volume Bass Treble Mute Language Keystone correction Monitor out System information Factory reset Key lock Start-up . Por. Philips Multimedia Projector 20 English User guide bSure1 / bSure 2 Chi. Esp. Fra. Deu. Operation On Screen Display Menu > Menu tree GENERAL ADJUSTMENTS/SETTINGS Main menu... Feedback Audio Settings Off On The Start-up screen can be shown or suppressed during start-up screen For bSure2 Brilliance projectors only Lamp counter Auto Standby Auto Source Feedback Min Max Min Max Min Max Off On Eng. Ita.


