Brochure
Page 2
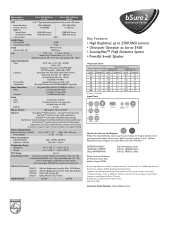
...) Audio Video Data Speaker Stereo Audio (2x RCA) 1x Stereo Audio (3.5 mm stereo jack) 1x Digital Audio (via USB) 6 watts Mouse Control USB (type A), PS/2 (mini-DIN) Features SecurityMax™ Theft protection, YourLogo™ Start-Up Screen SmartSet™ automatic image quality optimization SmartSave™ auto-standby mode helps extend lamp life SmartDimmer (reduces lamp power to extend lamp life and minimize audible noise) ColorTracking™ provides superior colorimetry for Video display Digital Zoom and Freeze, Digital Keystone correction...
...) Audio Video Data Speaker Stereo Audio (2x RCA) 1x Stereo Audio (3.5 mm stereo jack) 1x Digital Audio (via USB) 6 watts Mouse Control USB (type A), PS/2 (mini-DIN) Features SecurityMax™ Theft protection, YourLogo™ Start-Up Screen SmartSet™ automatic image quality optimization SmartSave™ auto-standby mode helps extend lamp life SmartDimmer (reduces lamp power to extend lamp life and minimize audible noise) ColorTracking™ provides superior colorimetry for Video display Digital Zoom and Freeze, Digital Keystone correction...
User Manual
Page 3
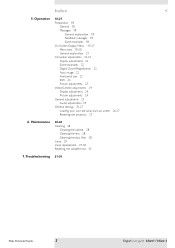
... lens 28 Cleaning the dust filter 28 Lamp 29 Lamp replacement 29-30 Resetting the lamplife time 30 7.Troubleshooting 31-34 Philips Multimedia Projector 3 English User guide bSure1 / bSure 2 Operation 18-27 Preparation 18 General 18 Messages 18 General explanation 18 Feedback messages 18 Some examples 18 On Screen Display Menu 19-27 Menu tree 19-20 General explanation 21 Computer adjustments 22-23 Display adjustments 22 Some examples 22 Digital Zoom/Magnification 22 Auto image 22 Horizontal size...
... lens 28 Cleaning the dust filter 28 Lamp 29 Lamp replacement 29-30 Resetting the lamplife time 30 7.Troubleshooting 31-34 Philips Multimedia Projector 3 English User guide bSure1 / bSure 2 Operation 18-27 Preparation 18 General 18 Messages 18 General explanation 18 Feedback messages 18 Some examples 18 On Screen Display Menu 19-27 Menu tree 19-20 General explanation 21 Computer adjustments 22-23 Display adjustments 22 Some examples 22 Digital Zoom/Magnification 22 Auto image 22 Horizontal size...
User Manual
Page 6
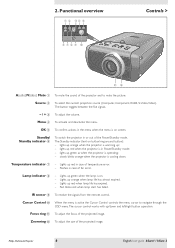
...or out of fan error. slowly blinks orange when the projector is operating; - Lights up orange when lamp life has almost expired. - Cursor Control 0 When the menu is on . - Standby/ Standby indicator 6 To switch the projector in Power/Standby mode; - Temperature indicator 7 - Lamp indicator 8 - Fast blinks red when lamp start has failed. To adjust the focus of the projected image. Philips Multimedia Projector 6 English User guide bSure1 / bSure 2 lights up red in case of the Power/Standby mode. Lights up orange when the projector is on screen. Flashes in case...
...or out of fan error. slowly blinks orange when the projector is operating; - Lights up orange when lamp life has almost expired. - Cursor Control 0 When the menu is on . - Standby/ Standby indicator 6 To switch the projector in Power/Standby mode; - Temperature indicator 7 - Lamp indicator 8 - Fast blinks red when lamp start has failed. To adjust the focus of the projected image. Philips Multimedia Projector 6 English User guide bSure1 / bSure 2 lights up red in case of the Power/Standby mode. Lights up orange when the projector is on screen. Flashes in case...
User Manual
Page 8
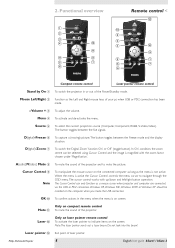
... the current projection source (Computer, Component, RGBS, S-Video,Video). A(udio)/V(ideo) Mute 8 To mute the sound of the projector. Cursor Control 9 Note To manipulate the mouse cursor on the screen. When the menu is not active. Only on the computer when you make the USB connection. Menu 4 To activate and de-activate the menu. D(igital)-Zoom 7 To switch the 'Digital Zoom' function 'On' or 'Off ' (toggle button). OK...
... the current projection source (Computer, Component, RGBS, S-Video,Video). A(udio)/V(ideo) Mute 8 To mute the sound of the projector. Cursor Control 9 Note To manipulate the mouse cursor on the screen. When the menu is not active. Only on the computer when you make the USB connection. Menu 4 To activate and de-activate the menu. D(igital)-Zoom 7 To switch the 'Digital Zoom' function 'On' or 'Off ' (toggle button). OK...
User Manual
Page 10
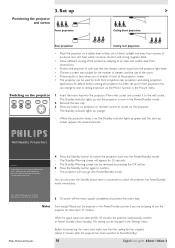
...! PHILIPS Multimedia Projectors Warning If the projector is on the projector. - You can change to rear or ceiling projection via the 'Mirror' function in the Power/Standby position if you have to wait 1 minute before switching on projector or remote control to confirm. 3. As default factory setting, the projector has been set up screen appears for 20 seconds. • The Standby Warning screen can be removed by Source Lamp Temp Menu OK 1 Insert the mains lead into Power/Standby mode immediately. Set up orange...
...! PHILIPS Multimedia Projectors Warning If the projector is on the projector. - You can change to rear or ceiling projection via the 'Mirror' function in the Power/Standby position if you have to wait 1 minute before switching on projector or remote control to confirm. 3. As default factory setting, the projector has been set up screen appears for 20 seconds. • The Standby Warning screen can be removed by Source Lamp Temp Menu OK 1 Insert the mains lead into Power/Standby mode immediately. Set up orange...
User Manual
Page 12
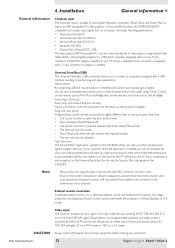
... IBM compatible PCs can be connected to the projector.The image projected is simultaneously shown on the screen, using standard data cables.When connecting the projector to a Macintosh computer equipped with bSure2 Brilliance version): Audio information from all major video formats, including NTSC 3.58, 4.43, PAL B, G, D, H, I, N, M and SECAM signals.The projector will be connected directly to the projector using Cursor Control on the remote control.The Mouse Left/Right keys...
... IBM compatible PCs can be connected to the projector.The image projected is simultaneously shown on the screen, using standard data cables.When connecting the projector to a Macintosh computer equipped with bSure2 Brilliance version): Audio information from all major video formats, including NTSC 3.58, 4.43, PAL B, G, D, H, I, N, M and SECAM signals.The projector will be connected directly to the projector using Cursor Control on the remote control.The Mouse Left/Right keys...
User Manual
Page 14
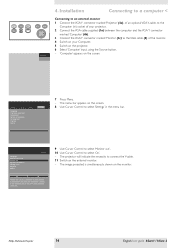
...Audio Settings 7 Press Menu. - Philips Multimedia Projector 14 English User guide bSure1 / bSure 2 Factory reset Key lock (more ) Audio Settings Off On Monitor out is simultaneously shown on the screen. 8 Use Cursor Control to select 'On'. - Display Picture Language Kestone correction Monitor out System information... The projector will indicate the necessity to the VGA cable (5) of the monitor. 4 Switch on your Computer. 5 Switch on the projector. 6 Select 'Computer' input, using the Source button. - 'Computer' appears on the external monitor. - Installation Connecting...
...Audio Settings 7 Press Menu. - Philips Multimedia Projector 14 English User guide bSure1 / bSure 2 Factory reset Key lock (more ) Audio Settings Off On Monitor out is simultaneously shown on the screen. 8 Use Cursor Control to select 'On'. - Display Picture Language Kestone correction Monitor out System information... The projector will indicate the necessity to the VGA cable (5) of the monitor. 4 Switch on your Computer. 5 Switch on the projector. 6 Select 'Computer' input, using the Source button. - 'Computer' appears on the external monitor. - Installation Connecting...
User Manual
Page 18
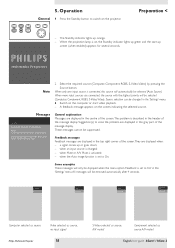
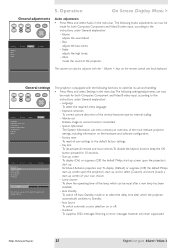
... projection lamp is connected, this source will automatically be removed automatically after 4 seconds. PHILIPS Multimedia Projectors Note 2 Select the required source (Computer, Component, RGBS, S-Video,Video) by Source Lamp Temp pj 5. When only one input source is on the computer or start -up green and the start video playback. - Check whether the filter door is described in the gray part of the message display. a signal comes up orange. - AV Mute Stand by pressing the Source button. Feedback messages Feedback messages are displayed...
... projection lamp is connected, this source will automatically be removed automatically after 4 seconds. PHILIPS Multimedia Projectors Note 2 Select the required source (Computer, Component, RGBS, S-Video,Video) by Source Lamp Temp pj 5. When only one input source is on the computer or start -up green and the start video playback. - Check whether the filter door is described in the gray part of the message display. a signal comes up orange. - AV Mute Stand by pressing the Source button. Feedback messages Feedback messages are displayed...
User Manual
Page 20
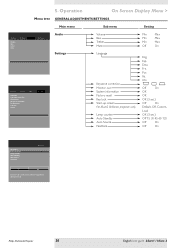
Por. Philips Multimedia Projector 20 English User guide bSure1 / bSure 2 Esp. Factory reset Key lock (more) Audio Settings Volume Bass Treble Mute Language Keystone correction Monitor out System information Factory reset Key lock Start-up . Deu. Operation On Screen Display Menu > Menu tree GENERAL ADJUSTMENTS/SETTINGS Main menu Sub menu Setting Display Volume Bass Treble Mute Picture Audio Settings Audio Settings Display Picture Language Keystone correction Monitor out System information... Fra. Ita. Off On OK OK OK (3 sec.) Off On Default, Off, ...
Por. Philips Multimedia Projector 20 English User guide bSure1 / bSure 2 Esp. Factory reset Key lock (more) Audio Settings Volume Bass Treble Mute Language Keystone correction Monitor out System information Factory reset Key lock Start-up . Deu. Operation On Screen Display Menu > Menu tree GENERAL ADJUSTMENTS/SETTINGS Main menu Sub menu Setting Display Volume Bass Treble Mute Picture Audio Settings Audio Settings Display Picture Language Keystone correction Monitor out System information... Fra. Ita. Off On OK OK OK (3 sec.) Off On Default, Off, ...
User Manual
Page 21
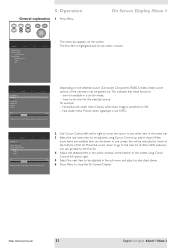
... window at the bottom of the submenu may be indicated by Source Lamp Temp Menu OK On Screen Display Menu > Display Picture Digital Freeze Digital Zoom Magnification Auto Image Horizontal size Phase Shift . . . Philips Multimedia Projector 21 English User guide bSure1 / bSure 2 The first item is highlighted and its sub menu is switched to the first list. 4 Adjust the selected item in one screen, this will be greyed out.This indicates that these functions: - Operation General explanation 1 Press Menu...
... window at the bottom of the submenu may be indicated by Source Lamp Temp Menu OK On Screen Display Menu > Display Picture Digital Freeze Digital Zoom Magnification Auto Image Horizontal size Phase Shift . . . Philips Multimedia Projector 21 English User guide bSure1 / bSure 2 The first item is highlighted and its sub menu is switched to the first list. 4 Adjust the selected item in one screen, this will be greyed out.This indicates that these functions: - Operation General explanation 1 Press Menu...
User Manual
Page 22
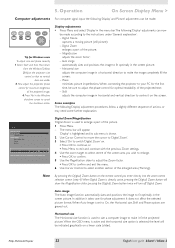
.... Philips Multimedia Projector 22 English User guide bSure1 / bSure 2 When connecting the projector to your PC for the first time, be made . When Digital Zoom is already active, pressing the D(igital) Zoom button will appear. 'Display' is highlighted and its sub menu is selected, the level will turn off on Digital Zoom is used to switch 'Digital Zoom' on a linear scale (slider). Display adjustments • Press Menu and select 'Display' in the screen picture. Digital Zoom enlarges a part of the projected image...
.... Philips Multimedia Projector 22 English User guide bSure1 / bSure 2 When connecting the projector to your PC for the first time, be made . When Digital Zoom is already active, pressing the D(igital) Zoom button will appear. 'Display' is highlighted and its sub menu is selected, the level will turn off on Digital Zoom is used to switch 'Digital Zoom' on a linear scale (slider). Display adjustments • Press Menu and select 'Display' in the screen picture. Digital Zoom enlarges a part of the projected image...
User Manual
Page 25
...; - Factory reset To reset all remote and local controls.To disable the keylock function keep the OK button pressed for both Computer, Component and Video/S-video input, according to Standby; - Key lock To de-activate all user settings to the instructions under 'General explanation': - Lamp counter To show the operating time of the vertical keystone type by Source Lamp Temp Menu OK Display Picture Language Keystone correction Monitor out System information... Feedback To suppress OSD messages. Philips Multimedia Projector 25 English User guide...
...; - Factory reset To reset all remote and local controls.To disable the keylock function keep the OK button pressed for both Computer, Component and Video/S-video input, according to Standby; - Key lock To de-activate all user settings to the instructions under 'General explanation': - Lamp counter To show the operating time of the vertical keystone type by Source Lamp Temp Menu OK Display Picture Language Keystone correction Monitor out System information... Feedback To suppress OSD messages. Philips Multimedia Projector 25 English User guide...

User Manual
Page 26
... area to the instructions under 'Other settings' can load any image as long as the size of the window. 7 Keep OK pressed for 3 seconds to load the currently shown image and store it as start -up screen Lamp counter Auto Standby Auto Source Feedback Audio Settings Default Off DefCauuslttom Load... Press Menu key to return to the menu. 2 Use Cursor Control to move the window to select the part of the image you wish to...
... area to the instructions under 'Other settings' can load any image as long as the size of the window. 7 Keep OK pressed for 3 seconds to load the currently shown image and store it as start -up screen Lamp counter Auto Standby Auto Source Feedback Audio Settings Default Off DefCauuslttom Load... Press Menu key to return to the menu. 2 Use Cursor Control to move the window to select the part of the image you wish to...
User Manual
Page 28
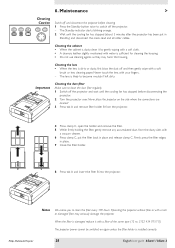
... A B Cleaning the dust filter Make sure to clean the filter every 100 hours. The Standby indicator starts blinking orange. 2 Wait until the cooling fan has stopped before cleaning. 1 Press the Standby button twice to become mouldy if left dirty. Firmly press the filter edges in Standby) and disconnect the mains lead and all other cables. B Notes We advise you to clean the dust filter regularly. 1 Switch off the projector. - Philips Multimedia Projector 28 English User guide...
... A B Cleaning the dust filter Make sure to clean the filter every 100 hours. The Standby indicator starts blinking orange. 2 Wait until the cooling fan has stopped before cleaning. 1 Press the Standby button twice to become mouldy if left dirty. Firmly press the filter edges in Standby) and disconnect the mains lead and all other cables. B Notes We advise you to clean the dust filter regularly. 1 Switch off the projector. - Philips Multimedia Projector 28 English User guide...
User Manual
Page 29
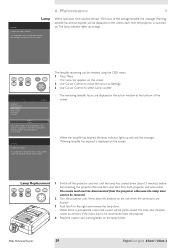
... screen, each time the projector is suggested to change the lamp, to avoid sudden failure and to improve overall picture quality. When tab A is suggested to select 'Lamp counter'. - AV Mute Stand by Lamp Temp cannot be partly closed. Warning: Lamplife has expired It is pressed the mains inlet socket will be checked using the OSD menu. 1 Press Menu. - When the lamplife has expired, the lamp indicator lights up screen Lamp counter Auto standby Auto source Feedback Audio Settings Lamp 5 Hours Lamp counter...
... screen, each time the projector is suggested to change the lamp, to avoid sudden failure and to improve overall picture quality. When tab A is suggested to select 'Lamp counter'. - AV Mute Stand by Lamp Temp cannot be partly closed. Warning: Lamplife has expired It is pressed the mains inlet socket will be checked using the OSD menu. 1 Press Menu. - When the lamplife has expired, the lamp indicator lights up screen Lamp counter Auto standby Auto source Feedback Audio Settings Lamp 5 Hours Lamp counter...
User Manual
Page 30
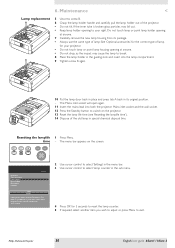
... Standby button to your projector. • Do not touch lamp or point lamp housing opening to switch on the screen. The menu bar appears on the projector. AV Mute Stand by Source Lamp Temp Menu OK Display Picture (previous) Start-up screen Lamp counter Auto standby Auto source Feedback Audio Settings Lamp 0 hours Lamp counter shows the operating hours of the projector. • Do not tilt. It is suggested to exit. A 13 Reset the lamp life time (see 'Resetting the lamplife time'). 14 Dispose of lamp for 3 seconds to reset the lamp counter...
... Standby button to your projector. • Do not touch lamp or point lamp housing opening to switch on the screen. The menu bar appears on the projector. AV Mute Stand by Source Lamp Temp Menu OK Display Picture (previous) Start-up screen Lamp counter Auto standby Auto source Feedback Audio Settings Lamp 0 hours Lamp counter shows the operating hours of the projector. • Do not tilt. It is suggested to exit. A 13 Reset the lamp life time (see 'Resetting the lamplife time'). 14 Dispose of lamp for 3 seconds to reset the lamp counter...
User Manual
Page 31
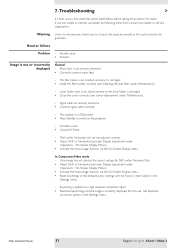
... size' (see 'Display adjustment' under 'Operation' - 'On Screen Display Menu'). • Activate the 'Auto-image' function via the On Screen Display menu. • Reset all settings to repair the projector yourself as follows Problem - In Component Video mode - 'Auto Image' has not selected the correct settings for repair. Signal cable not correctly connected. • Connect signal cable correctly. - Philips Multimedia Projector 31 English User guide bSure1 / bSure 2 Possible cause • Solution Image is damaged. • Close the cover correctly (see 'Lamp replacement...
... size' (see 'Display adjustment' under 'Operation' - 'On Screen Display Menu'). • Activate the 'Auto-image' function via the On Screen Display menu. • Reset all settings to repair the projector yourself as follows Problem - In Component Video mode - 'Auto Image' has not selected the correct settings for repair. Signal cable not correctly connected. • Connect signal cable correctly. - Philips Multimedia Projector 31 English User guide bSure1 / bSure 2 Possible cause • Solution Image is damaged. • Close the cover correctly (see 'Lamp replacement...
User Manual
Page 32
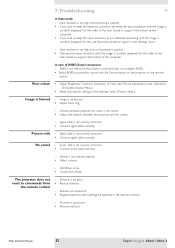
... 'Settings' menu ('Factory reset'). Signal cable is not adjusted properly. • Adjust volume. - (A/V-)Mute active. • Cancel (A/V-)Mute. Volume is not correctly connected. • Connect signal cable correctly. For this , refer to commands from the remote control - Image is too great. • Reduce distance. - Distance is not focused. • Adjust focus ring. - Input resolution is too high (and keystoning is applied). • If you wish to keep the input resolution as projection source with the Source button on the projector or the remote control. In...
... 'Settings' menu ('Factory reset'). Signal cable is not adjusted properly. • Adjust volume. - (A/V-)Mute active. • Cancel (A/V-)Mute. Volume is not correctly connected. • Connect signal cable correctly. For this , refer to commands from the remote control - Image is too great. • Reduce distance. - Distance is not focused. • Adjust focus ring. - Input resolution is too high (and keystoning is applied). • If you wish to keep the input resolution as projection source with the Source button on the projector or the remote control. In...
User Manual
Page 33
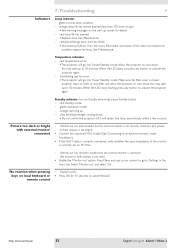
...hours to activate the projector again. green: operation mode. - slow blinking (orange): cooling down. • Do not switch the projector off; Reconnect and restart. red: temperature error. • The projector will go to activate the projector again. - this does not resolve the problem, replace the lamp. See 'Maintenance'. Temperature indicator - Make sure the filter cover is connected (the picture on Standby button/ring around Standby button) - When the LED stops flashing press any button to 'Settings' in the menu bar. green: normal lamp condition. - red: lamp...
...hours to activate the projector again. green: operation mode. - slow blinking (orange): cooling down. • Do not switch the projector off; Reconnect and restart. red: temperature error. • The projector will go to activate the projector again. - this does not resolve the problem, replace the lamp. See 'Maintenance'. Temperature indicator - Make sure the filter cover is connected (the picture on Standby button/ring around Standby button) - When the LED stops flashing press any button to 'Settings' in the menu bar. green: normal lamp condition. - red: lamp...
User Manual
Page 34
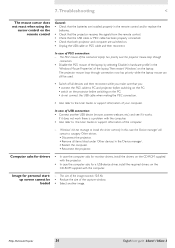
... the projector. Philips Multimedia Projector 34 English User guide bSure1 / bSure 2 In case of the capture window. • Select another USB device (mouse, scanner, webcam, etc.) and see if it does not work there is a problem with the computer. The size of the image exceeds 128 Kb. • Reduce the size of USB connection: • Connect another image. 7.Troubleshooting < The mouse cursor does not react when using the cursor control...
... the projector. Philips Multimedia Projector 34 English User guide bSure1 / bSure 2 In case of the capture window. • Select another USB device (mouse, scanner, webcam, etc.) and see if it does not work there is a problem with the computer. The size of the image exceeds 128 Kb. • Reduce the size of USB connection: • Connect another image. 7.Troubleshooting < The mouse cursor does not react when using the cursor control...


