Leaflet
Page 1
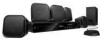
... pictures and powerful surround sound delivered by this elegant system provide unbeatable home entertainment. Philips 5.1 Home theater 1000W RMS power DVD playback HTS3371D Spectacular surround sound with 1080p HDMI upconversion, as well as convenient iPod playback via a single remote Play all your movies and music • DivX Ultra Certified for enhanced playback of...
... pictures and powerful surround sound delivered by this elegant system provide unbeatable home entertainment. Philips 5.1 Home theater 1000W RMS power DVD playback HTS3371D Spectacular surround sound with 1080p HDMI upconversion, as well as convenient iPod playback via a single remote Play all your movies and music • DivX Ultra Certified for enhanced playback of...
Leaflet
Page 2
... format. The DivX media format is conveniently used to 480 Mbps - Functions like movies, trailers and music videos on the one remote. 5.1 Home theater 1000W RMS power DVD playback Highlights HTS3371D/F7 Dock included for iPod/iPhone Use the docking station for your iPod and iPhone, and enjoy music from your living...
... format. The DivX media format is conveniently used to 480 Mbps - Functions like movies, trailers and music videos on the one remote. 5.1 Home theater 1000W RMS power DVD playback Highlights HTS3371D/F7 Dock included for iPod/iPhone Use the docking station for your iPod and iPhone, and enjoy music from your living...
Leaflet
Page 3
... 4 ohm • Subwoofer freq range: 40-150 Hz • Subwoofer type: Passive Accessories • Included accessories: Dock for iPod, Remote Control, 2 x AAA Batteries, CVBS video cable, FM antenna, Product Registration Card, Quick start guide, User Manual, World Wide Warranty leaflet...557 x 307 x 425 mm • Weight incl. www.philips.com Specifications are the property of Koninklijke Philips Electronics N.V. or their respective owners. All Rights reserved. 5.1 Home theater 1000W RMS power DVD playback Specifications HTS3371D/F7 Picture/Display • D/A converter: 12 bit, 108...
... 4 ohm • Subwoofer freq range: 40-150 Hz • Subwoofer type: Passive Accessories • Included accessories: Dock for iPod, Remote Control, 2 x AAA Batteries, CVBS video cable, FM antenna, Product Registration Card, Quick start guide, User Manual, World Wide Warranty leaflet...557 x 307 x 425 mm • Weight incl. www.philips.com Specifications are the property of Koninklijke Philips Electronics N.V. or their respective owners. All Rights reserved. 5.1 Home theater 1000W RMS power DVD playback Specifications HTS3371D/F7 Picture/Display • D/A converter: 12 bit, 108...
User manual
Page 3
...cations 46 Connect audio cables/other devices 15 Connect power cord 17 11 Troubleshooting 48 4 Get started 18 12 Glossary 50 Insert the remote control batteries 18 Find the correct viewing channel 19 Select menu display language 19 Turn on Progressive Scan 20 Change speaker settings 21 Use... Philips EasyLink 22 Select a play source 24 5 Play 25 Play a disc 25 Play video 25 Play music 28 Play photo 29 Play from USB...
...cations 46 Connect audio cables/other devices 15 Connect power cord 17 11 Troubleshooting 48 4 Get started 18 12 Glossary 50 Insert the remote control batteries 18 Find the correct viewing channel 19 Select menu display language 19 Turn on Progressive Scan 20 Change speaker settings 21 Use... Philips EasyLink 22 Select a play source 24 5 Play 25 Play a disc 25 Play video 25 Play music 28 Play photo 29 Play from USB...
User manual
Page 7
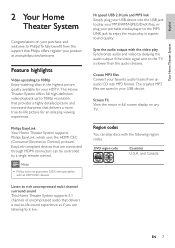
...MP3 Àles Convert your favorite audio tracks from the support that Philips offers, register your portable media player to the MP3 LINK jack to enjoy the music play Synchronize audio and video by a single remote control. Screen Fit View the movie in your purchase, and welcome to...Enjoy watching discs in superb sound quality. EasyLink-compliant devices that delivers a real-to-life sound experience as if you are listening to Philips! Listen to rich uncompressed multi-channel surround sound This Home Theater System supports 5.1 channels of uncompressed audio that are saved in full ...
...MP3 Àles Convert your favorite audio tracks from the support that Philips offers, register your portable media player to the MP3 LINK jack to enjoy the music play Synchronize audio and video by a single remote control. Screen Fit View the movie in your purchase, and welcome to...Enjoy watching discs in superb sound quality. EasyLink-compliant devices that delivers a real-to-life sound experience as if you are listening to Philips! Listen to rich uncompressed multi-channel surround sound This Home Theater System supports 5.1 channels of uncompressed audio that are saved in full ...
User manual
Page 8
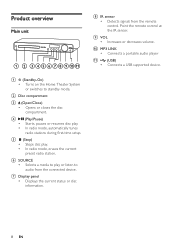
... status or disc information. Product overview Main unit a b cdefghijk a (Standby-On) • Turns on the Home Theater System or switches to audio from the remote control. Point the remote control at the IR sensor. j MP3 LINK • Connects a portable audio player k (USB) • Connects a USB supported device. 8 EN h IR sensor • Detects...
... status or disc information. Product overview Main unit a b cdefghijk a (Standby-On) • Turns on the Home Theater System or switches to audio from the remote control. Point the remote control at the IR sensor. j MP3 LINK • Connects a portable audio player k (USB) • Connects a USB supported device. 8 EN h IR sensor • Detects...

User manual
Page 9
... mode, press up and down to play. In radio mode, press left and right for audio sync, then press VOL +/- English Your Home Theater System Remote control a b c d o e p f q g r h s t i j k u l v m w n a (Standby-On) • Turns on the Home Theater System or switches to standby mode. • Press and hold to access the setting for fast...
... mode, press up and down to play. In radio mode, press left and right for audio sync, then press VOL +/- English Your Home Theater System Remote control a b c d o e p f q g r h s t i j k u l v m w n a (Standby-On) • Turns on the Home Theater System or switches to standby mode. • Press and hold to access the setting for fast...
User manual
Page 12
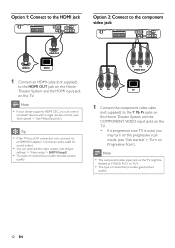
Note • If your device supports HDMI CEC, you may turn on the progressive scan mode. (see 'Get started ' > 'Use Philips EasyLink'). Pr Pb Y VIDEO OUT Pr Pb Y 1 Connect the component video cable (not supplied) to the HDMI OUT jack on this Home Theater System ...; This type of connection provides good picture quality. 12 EN Connect an audio cable for sound output. • You can control compliant devices with a single remote control. (see 'Get started ' > 'Turn on Progressive Scan'). Option 1: Connect to the HDMI jack Option 2: Connect to the component video jack HDMI OUT HDMI ...
Note • If your device supports HDMI CEC, you may turn on the progressive scan mode. (see 'Get started ' > 'Use Philips EasyLink'). Pr Pb Y VIDEO OUT Pr Pb Y 1 Connect the component video cable (not supplied) to the HDMI OUT jack on this Home Theater System ...; This type of connection provides good picture quality. 12 EN Connect an audio cable for sound output. • You can control compliant devices with a single remote control. (see 'Get started ' > 'Turn on Progressive Scan'). Option 1: Connect to the HDMI jack Option 2: Connect to the component video jack HDMI OUT HDMI ...
User manual
Page 18
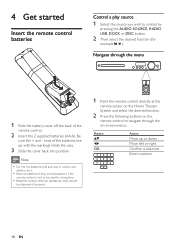
... back of the batteries line up or down Move left or right ConÀrm a selection Enter numbers 18 EN Navigate through the on the remote control to control by pressing the AUDIO SOURCE, RADIO, USB, DOCK or DISC button. 2 Then select the desired function (for example , ). Note • Do not... mix batteries (old and new or carbon and alkaline, etc.). • Remove batteries if they are exhausted or if the remote control is not to be used for a long time. • Batteries contain chemical substances, they should be disposed of properly. 1 Point the...
... back of the batteries line up or down Move left or right ConÀrm a selection Enter numbers 18 EN Navigate through the on the remote control to control by pressing the AUDIO SOURCE, RADIO, USB, DOCK or DISC button. 2 Then select the desired function (for example , ). Note • Do not... mix batteries (old and new or carbon and alkaline, etc.). • Remove batteries if they are exhausted or if the remote control is not to be used for a long time. • Batteries contain chemical substances, they should be disposed of properly. 1 Point the...
User manual
Page 19
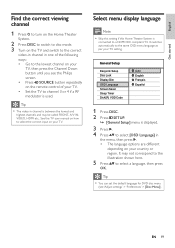
Tip • You can set the default language for DVD disc menu (see the Philips screen. • Press SOURCE button repeatedly on your TV setting. General Setup EasyLink Setup Disc Lock Display Dim OSD Language Screen Saver Sleep Timer DivX(R) ... 4 if a RF modulator is displayed. 3 Press . 4 Press to select [OSD Language] in the menu, then press . • The language options are different depending on the remote control of your TV. It may be called FRONT, A/V IN, VIDEO, HDMI etc.. English Get started Find the correct viewing channel 1 Press to turn on...
Tip • You can set the default language for DVD disc menu (see the Philips screen. • Press SOURCE button repeatedly on your TV setting. General Setup EasyLink Setup Disc Lock Display Dim OSD Language Screen Saver Sleep Timer DivX(R) ... 4 if a RF modulator is displayed. 3 Press . 4 Press to select [OSD Language] in the menu, then press . • The language options are different depending on the remote control of your TV. It may be called FRONT, A/V IN, VIDEO, HDMI etc.. English Get started Find the correct viewing channel 1 Press to turn on...
User manual
Page 22
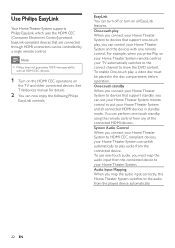
... any of the connected HDMI devices. To use your Home Theater System remote control to devices that are connected through HDMI connectors can turn off or turn on the TV and other connected devices. Note • Philips does not guarantee 100% interoperability with one -touch audio, you must... be controlled by a single remote control. One-touch play When you connect your TV automatically switches to the correct channel to...
... any of the connected HDMI devices. To use your Home Theater System remote control to devices that are connected through HDMI connectors can turn off or turn on the TV and other connected devices. Note • Philips does not guarantee 100% interoperability with one -touch audio, you must... be controlled by a single remote control. One-touch play When you connect your TV automatically switches to the correct channel to...

User manual
Page 24
On the remote control • Press AUDIO SOURCE repeatedly to switch to the connected audio source: Display AUX1 AUX2 COAX IN OPTI IN MP3 LINK Device connected to ...
On the remote control • Press AUDIO SOURCE repeatedly to switch to the connected audio source: Display AUX1 AUX2 COAX IN OPTI IN MP3 LINK Device connected to ...
User manual
Page 25
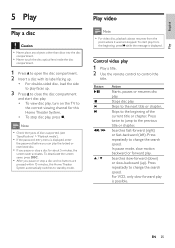
..., slow motion backward or forward play . To deactivate the screen saver, press DISC. • After you pause or stop disc play 1 Play a title. 2 Use the remote control to the previous title or chapter. EN 25 Button / / Action Starts, pauses or resumes disc play the locked or restricted disc. • If you...
..., slow motion backward or forward play . To deactivate the screen saver, press DISC. • After you pause or stop disc play 1 Play a title. 2 Use the remote control to the previous title or chapter. EN 25 Button / / Action Starts, pauses or resumes disc play the locked or restricted disc. • If you...
User manual
Page 26
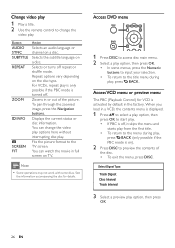
... and starts play from the Àrst title. • To return to the menu during play, press BACK. Change video play 1 Play a title. 2 Use the remote control to change the video play options here without interrupting disc play. You can change the video play.
... and starts play from the Àrst title. • To return to the menu during play, press BACK. Change video play 1 Play a title. 2 Use the remote control to change the video play options here without interrupting disc play. You can change the video play.
User manual
Page 28
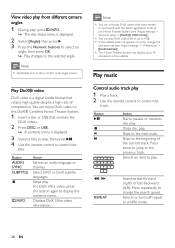
... video play from different camera angles 1 During play, press INFO. » The disc status menu is displayed. 3 Select a title to play, then press . 4 Use the remote control to the beginning of the current track. Displays DivX Ultra video information. Skips to control the title. You can display up to 4GB. •... press . 3 Press the Numeric buttons to select an angle, then press OK. » Play changes to the next track. Stops play 1 Play a track. 2 Use the remote control to control the track. Play music Control audio track play .
... video play from different camera angles 1 During play, press INFO. » The disc status menu is displayed. 3 Select a title to play, then press . 4 Use the remote control to the beginning of the current track. Displays DivX Ultra video information. Skips to control the title. You can display up to 4GB. •... press . 3 Press the Numeric buttons to select an angle, then press OK. » Play changes to the next track. Stops play 1 Play a track. 2 Use the remote control to control the track. Play music Control audio track play .
User manual
Page 30
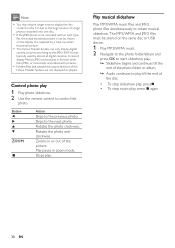
... of the disc. • To stop slideshow play, press . • To stop music play, press again. 30 EN Stops play 1 Play photo slideshow. 2 Use the remote control to control the photo. Play musical slideshow Play MP3/WMA music Àles and JPEG photo Àles simultaneously to the previous photo. Button...
... of the disc. • To stop slideshow play, press . • To stop music play, press again. 30 EN Stops play 1 Play photo slideshow. 2 Use the remote control to control the photo. Play musical slideshow Play MP3/WMA music Àles and JPEG photo Àles simultaneously to the previous photo. Button...
User manual
Page 32
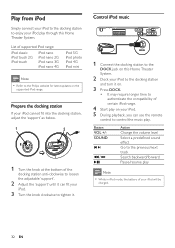
... touch iPod nano iPod nano 2G iPod nano 3G iPod nano 4G iPod 5G iPod photo iPod 4G iPod mini Note • Refer to the Philips website for latest updates on your iPod. 5 During playback, you can Àt your iPod will be charged. 32 EN Prepare the docking station If your.... 1 2 1 Turn the knob at the bottom of the docking station anti-clockwise to loosen the adjustable 'support'. 2 Adjust the 'support' until it can use the remote control to control the music play. Button VOL +/SOUND / Action Change the volume level Select a predeÀned sound effect Go to the previous/next...
... touch iPod nano iPod nano 2G iPod nano 3G iPod nano 4G iPod 5G iPod photo iPod 4G iPod mini Note • Refer to the Philips website for latest updates on your iPod. 5 During playback, you can Àt your iPod will be charged. 32 EN Prepare the docking station If your.... 1 2 1 Turn the knob at the bottom of the docking station anti-clockwise to loosen the adjustable 'support'. 2 Adjust the 'support' until it can use the remote control to control the music play. Button VOL +/SOUND / Action Change the volume level Select a predeÀned sound effect Go to the previous/next...

User manual
Page 33
FM (75 Ω) ANTENNA Listen to radio 1 Press RADIO. 2 Use the remote control to the wall. The preset number for other radiation source to prevent interference. Note • Check the radio antenna connection if no stereo signal ...
FM (75 Ω) ANTENNA Listen to radio 1 Press RADIO. 2 Use the remote control to the wall. The preset number for other radiation source to prevent interference. Note • Check the radio antenna connection if no stereo signal ...


