Leaflet
Page 1
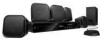
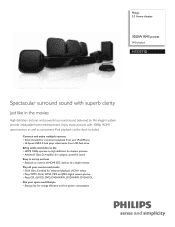
... videos • Plays WMV, DivX, WMA, MP3 and JPEG digital camera photos • Plays CD, (S)VCD, DVD, DVD+R/RW, DVD-R/RW, DVD+R DL Fits your space and lifestyle • Energy Star for energy efficiency and low power consumption Philips 5.1 Home theater 1000W RMS power DVD playback HTS3371D Spectacular surround sound with 1080p HDMI upconversion, as well as convenient iPod playback via a single remote Play all HDMI CEC devices via the dock included. Enjoy sharp pictures...
... videos • Plays WMV, DivX, WMA, MP3 and JPEG digital camera photos • Plays CD, (S)VCD, DVD, DVD+R/RW, DVD-R/RW, DVD+R DL Fits your space and lifestyle • Energy Star for energy efficiency and low power consumption Philips 5.1 Home theater 1000W RMS power DVD playback HTS3371D Spectacular surround sound with 1080p HDMI upconversion, as well as convenient iPod playback via a single remote Play all HDMI CEC devices via the dock included. Enjoy sharp pictures...
Leaflet
Page 3
... music playback Tuner/Reception/Transmission • Tuner Bands: FM Connectivity • Front / Side connections: Hi-Speed USB, MP3 Line-in • Rear Connections: HDMI output, Component Video output, Composite video (CVBS) output, Dock connector, AUX in, FM Antenna, Easy-Fit Speaker Connectors, Digital coaxial in, Digital optical in • Dock for iPod compatibility: iPod 5th gen, iPod classic, iPod mini, iPod mini 2nd gen, iPod nano 1st gen, iPod nano 2nd gen, iPod nano 3rd gen, iPod touch, iPod with color display Power • Power supply: 120V, 60Hz • Standby power...
... music playback Tuner/Reception/Transmission • Tuner Bands: FM Connectivity • Front / Side connections: Hi-Speed USB, MP3 Line-in • Rear Connections: HDMI output, Component Video output, Composite video (CVBS) output, Dock connector, AUX in, FM Antenna, Easy-Fit Speaker Connectors, Digital coaxial in, Digital optical in • Dock for iPod compatibility: iPod 5th gen, iPod classic, iPod mini, iPod mini 2nd gen, iPod nano 1st gen, iPod nano 2nd gen, iPod nano 3rd gen, iPod touch, iPod with color display Power • Power supply: 120V, 60Hz • Standby power...
User manual
Page 3
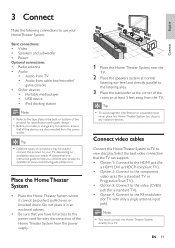
...Home Theater System 11 Update software 45 Connect video cables 11 Care 45 Connect speakers and subwoofer 14 Connect radio antenna 14 10 SpeciÀcations 46 Connect audio cables/other devices 15 Connect power cord 17 11 Troubleshooting 48 4 Get started 18 12 Glossary 50 Insert the remote control batteries 18 Find the correct viewing channel 19 Select menu display language 19 Turn on Progressive Scan 20 Change speaker settings 21 Use Philips EasyLink 22 Select a play source 24 5 Play 25 Play a disc 25 Play video 25 Play music 28 Play photo 29 Play...
...Home Theater System 11 Update software 45 Connect video cables 11 Care 45 Connect speakers and subwoofer 14 Connect radio antenna 14 10 SpeciÀcations 46 Connect audio cables/other devices 15 Connect power cord 17 11 Troubleshooting 48 4 Get started 18 12 Glossary 50 Insert the remote control batteries 18 Find the correct viewing channel 19 Select menu display language 19 Turn on Progressive Scan 20 Change speaker settings 21 Use Philips EasyLink 22 Select a play source 24 5 Play 25 Play a disc 25 Play video 25 Play music 28 Play photo 29 Play...
User manual
Page 5
... contains a large number of overheating! If you are designed to provide reasonable protection against harmful interference in a particular installation. Notice for USA This equipment has been tested and found to comply with the instruction manual, may void user authority to operate this copyright protection technology must be determined by turning the equipment off and on, the user is used in accordance with...
... contains a large number of overheating! If you are designed to provide reasonable protection against harmful interference in a particular installation. Notice for USA This equipment has been tested and found to comply with the instruction manual, may void user authority to operate this copyright protection technology must be determined by turning the equipment off and on, the user is used in accordance with...
User manual
Page 6
.... HDMI, and HDMI logo and High-DeÀnition Multimedia Interface are fully compatible with this model 525p and 625p DVD player, please contact our customer service center. "Made for iPod" means that not all versions of Microsoft Corporation in the U.S. Philips and Philips Shield are trademarks of Universal Serial Bus Implementers Forum, inc. Dolby, Pro Logic and the double-D symbol are used under...
.... HDMI, and HDMI logo and High-DeÀnition Multimedia Interface are fully compatible with this model 525p and 625p DVD player, please contact our customer service center. "Made for iPod" means that not all versions of Microsoft Corporation in the U.S. Philips and Philips Shield are trademarks of Universal Serial Bus Implementers Forum, inc. Dolby, Pro Logic and the double-D symbol are used under...
User manual
Page 7
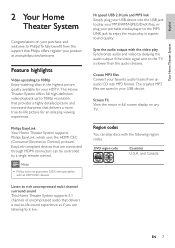
.... Listen to rich uncompressed multi-channel surround sound This Home Theater System supports 5.1 channels of uncompressed audio that delivers a more true-to it live. Region codes You can be controlled by delaying the audio output if the video signal sent to enjoy the music play Synchronize audio and video by a single remote control. To fully beneÀt from an audio CD into the USB jack to play discs with the following region codes. EasyLink-compliant devices that Philips offers, register your...
.... Listen to rich uncompressed multi-channel surround sound This Home Theater System supports 5.1 channels of uncompressed audio that delivers a more true-to it live. Region codes You can be controlled by delaying the audio output if the video signal sent to enjoy the music play Synchronize audio and video by a single remote control. To fully beneÀt from an audio CD into the USB jack to play discs with the following region codes. EasyLink-compliant devices that Philips offers, register your...

User manual
Page 9
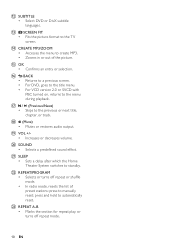
... radio mode, press up and down to turn off the Home Theater System and all HDMI CEC compliant devices. h (Stop) • Stops disc play . to the disc source. In radio mode, automatically tunes radio stations during Àrst-time setup. EN 9 d SETUP • Accesses or exits the setup menu. j AUDIO SYNC • Selects an audio language or channel. • Press and hold to tune the radio frequency. c Source buttons • AUDIO SOURCE: Selects an audio input source. • RADIO: Switches to FM band. • USB: Switches to the USB source. • DOCK: Switches...
... radio mode, press up and down to turn off the Home Theater System and all HDMI CEC compliant devices. h (Stop) • Stops disc play . to the disc source. In radio mode, automatically tunes radio stations during Àrst-time setup. EN 9 d SETUP • Accesses or exits the setup menu. j AUDIO SYNC • Selects an audio language or channel. • Press and hold to tune the radio frequency. c Source buttons • AUDIO SOURCE: Selects an audio input source. • RADIO: Switches to FM band. • USB: Switches to the USB source. • DOCK: Switches...
User manual
Page 10
... volume. v REPEAT/PROGRAM • Selects or turns off repeat mode. 10 EN q / (Previous/Next) • Skips to standby. w REPEAT A-B • Marks the section for repeat play, or turns off repeat or shufÁe mode. • In radio mode, resets the list of the picture. o OK • ConÀrms an entry or selection. r (Mute) • Mutes or restores audio output. u SLEEP • Sets a delay after which the Home Theater System switches...
... volume. v REPEAT/PROGRAM • Selects or turns off repeat mode. 10 EN q / (Previous/Next) • Skips to standby. w REPEAT A-B • Marks the section for repeat play, or turns off repeat or shufÁe mode. • In radio mode, resets the list of the picture. o OK • ConÀrms an entry or selection. r (Mute) • Mutes or restores audio output. u SLEEP • Sets a delay after which the Home Theater System switches...
User manual
Page 11
... help you make or change any radiation devices. Do not place it cannot be used to connect this Home Theater System near the TV. 2 Place the speakers system at normal listening ear-level and directly parallel to view disc play. Note • You must connect this Home Theater System to TV to the listening area. 3 Place the subwoofer at the corner of the Home Theater System from the TV. Connect video cables Connect...
... help you make or change any radiation devices. Do not place it cannot be used to connect this Home Theater System near the TV. 2 Place the speakers system at normal listening ear-level and directly parallel to view disc play. Note • You must connect this Home Theater System to TV to the listening area. 3 Place the subwoofer at the corner of the Home Theater System from the TV. Connect video cables Connect...
User manual
Page 12
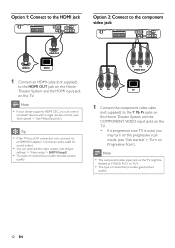
Connect an audio cable for sound output. • You can control compliant devices with a single remote control. (see 'Adjust settings' > 'Video setup' > [HDMI Setup]). • This type of connection provides good picture quality. 12 EN Note • The component video input jack on the TV. Note • If your device supports HDMI CEC, you may turn on the TV. • If a progressive scan TV is used, you can optimize the video output. (see 'Get started ' > 'Turn on Progressive...
Connect an audio cable for sound output. • You can control compliant devices with a single remote control. (see 'Adjust settings' > 'Video setup' > [HDMI Setup]). • This type of connection provides good picture quality. 12 EN Note • The component video input jack on the TV. Note • If your device supports HDMI CEC, you may turn on the TV. • If a progressive scan TV is used, you can optimize the video output. (see 'Get started ' > 'Turn on Progressive...
User manual
Page 19
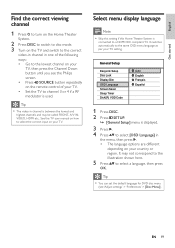
... set the default language for DVD disc menu (see the Philips screen. • Press SOURCE button repeatedly on the remote control of the following ways: • Go to the lowest channel on your TV, then press the Channel Down button until you see 'Adjust settings' > 'Preferences' > [Disc Menu]). See the TV user manual on how to select the correct input on your TV setting. Select menu display language Note • Skip this setting if this Home Theater System is used...
... set the default language for DVD disc menu (see the Philips screen. • Press SOURCE button repeatedly on the remote control of the following ways: • Go to the lowest channel on your TV, then press the Channel Down button until you see 'Adjust settings' > 'Preferences' > [Disc Menu]). See the TV user manual on how to select the correct input on your TV setting. Select menu display language Note • Skip this setting if this Home Theater System is used...

User manual
Page 20
... EN Turn off the progressive scan mode as follows: 1) Press to open the disc compartment. 2) Press . 3) Press AUDIO SYNC. 8 Press SETUP to the component video jack'). Note • If a blank/distorted screen is displayed, wait for 15 seconds for both this Home Theater System and the TV using component video connection. (see the TV user manual). 2 Switch the TV to the correct viewing channel for this Home Theater System. 3 Press DISC. 4 Press SETUP. 5 Press to select [Video Setup] in the menu...
... EN Turn off the progressive scan mode as follows: 1) Press to open the disc compartment. 2) Press . 3) Press AUDIO SYNC. 8 Press SETUP to the component video jack'). Note • If a blank/distorted screen is displayed, wait for 15 seconds for both this Home Theater System and the TV using component video connection. (see the TV user manual). 2 Switch the TV to the correct viewing channel for this Home Theater System. 3 Press DISC. 4 Press SETUP. 5 Press to select [Video Setup] in the menu...
User manual
Page 22
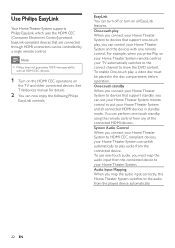
... the DVD content. Use Philips EasyLink Your Home Theater System supports Philips EasyLink, which uses the HDMI CEC (Consumer Electronics Control) protocol. To enable One-touch play audio from any of the connected HDMI devices. To use your Home Theater System remote control to put your TV automatically switches to the correct channel to your Home Theater System and the devices with all HDMI CEC devices. 1 Turn on the HDMI CEC operations on all connected HDMI devices in the disc...
... the DVD content. Use Philips EasyLink Your Home Theater System supports Philips EasyLink, which uses the HDMI CEC (Consumer Electronics Control) protocol. To enable One-touch play audio from any of the connected HDMI devices. To use your Home Theater System remote control to put your TV automatically switches to the correct channel to your Home Theater System and the devices with all HDMI CEC devices. 1 Turn on the HDMI CEC operations on all connected HDMI devices in the disc...
User manual
Page 23
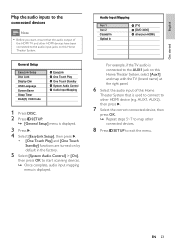
... Aux 1 Aux 2 Coaxial In Optical In [TV] [DVD 3400] other(non-HDMI) For example, if the TV audio is displayed. General Setup EasyLink Setup Disc Lock Display Dim OSD Language Screen Saver Sleep Timer DivX(R) VOD Code EasyLink One Touch Play One Touch Standby System Audio Control Audio Input Mapping 1 Press DISC. 2 Press SETUP. » [General Setup] menu is displayed. 3 Press . 4 Select [EasyLink Setup], then press . • [One Touch Play] and [One Touch Standby] functions are turned on by default in the factory. 5 Select...
... Aux 1 Aux 2 Coaxial In Optical In [TV] [DVD 3400] other(non-HDMI) For example, if the TV audio is displayed. General Setup EasyLink Setup Disc Lock Display Dim OSD Language Screen Saver Sleep Timer DivX(R) VOD Code EasyLink One Touch Play One Touch Standby System Audio Control Audio Input Mapping 1 Press DISC. 2 Press SETUP. » [General Setup] menu is displayed. 3 Press . 4 Select [EasyLink Setup], then press . • [One Touch Play] and [One Touch Standby] functions are turned on by default in the factory. 5 Select...
User manual
Page 25
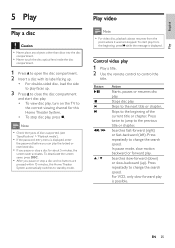
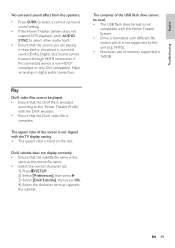
... this Home Theater System automatically switches to standby mode. Press repeatedly to control the title. EN 25 Control video play 1 Play a title. 2 Use the remote control to change the search speed. Press repeatedly to change the search speed. English Play 5 Play Play a disc Caution • Never place any objects other than discs into the disc compar tment. • Never touch the disc optical lens inside the disc compar tment. 1 Press to open the disc compartment. 2 Insert a disc...
... this Home Theater System automatically switches to standby mode. Press repeatedly to control the title. EN 25 Control video play 1 Play a title. 2 Use the remote control to change the search speed. Press repeatedly to change the search speed. English Play 5 Play Play a disc Caution • Never place any objects other than discs into the disc compar tment. • Never touch the disc optical lens inside the disc compar tment. 1 Press to open the disc compartment. 2 Insert a disc...
User manual
Page 28
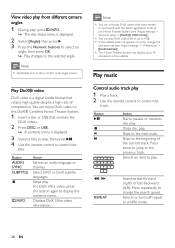
... control the track. Selects or turns off repeat or shufÁe mode. 28 EN Play music Control audio track play 1 Play a track. 2 Use the remote control to the beginning of the current track. Button Action Starts, pauses or resumes disc play. Button AUDIO SYNC SUBTITLE INFO Action Selects an audio language or channel. Select DVD or DivX subtitle languages. Skips to the previous track. Press twice to jump to the next track. You can display...
... control the track. Selects or turns off repeat or shufÁe mode. 28 EN Play music Control audio track play 1 Play a track. 2 Use the remote control to the beginning of the current track. Button Action Starts, pauses or resumes disc play. Button AUDIO SYNC SUBTITLE INFO Action Selects an audio language or channel. Select DVD or DivX subtitle languages. Skips to the previous track. Press twice to jump to the next track. You can display...

User manual
Page 40
.... [HDMI Audio] Selects the HDMI audio setting when you play a video disc. 1) To start , press OK. 2) Select a speaker in the menu, then press to set the delay time. 3) Press OK to conÀrm and exit. Note • CD upsampling is not supported, it will be downmixed to two-channel sound (linear-PCM). • [Off] - If the audio format on the disc is only available in stereo mode. [Audio Sync] Sets the default delay time for audio output when you connect...
.... [HDMI Audio] Selects the HDMI audio setting when you play a video disc. 1) To start , press OK. 2) Select a speaker in the menu, then press to set the delay time. 3) Press OK to conÀrm and exit. Note • CD upsampling is not supported, it will be downmixed to two-channel sound (linear-PCM). • [Off] - If the audio format on the disc is only available in stereo mode. [Audio Sync] Sets the default delay time for audio output when you connect...
User manual
Page 44
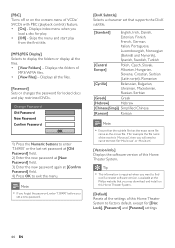
... a newest software version is 'Movie.avi', then you may download and install on the content menu of VCDs/ SVCDs with PBC (playback control) feature. • [On] - Displays all the Àles. [Password] Sets or changes the password for [Disc Lock], [Password] and [Parental] settings. 44 EN Skips the menu and start play from the Àrst title. [MP3/JPEG Display] Selects to exit the menu. Change Password Old Password New Password Confirm Password OK...
... a newest software version is 'Movie.avi', then you may download and install on the content menu of VCDs/ SVCDs with PBC (playback control) feature. • [On] - Displays all the Àles. [Password] Sets or changes the password for [Disc Lock], [Password] and [Parental] settings. 44 EN Skips the menu and start play from the Àrst title. [MP3/JPEG Display] Selects to exit the menu. Change Password Old Password New Password Confirm Password OK...
User manual
Page 48
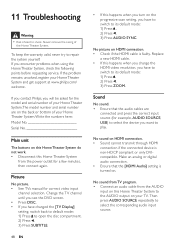
... unit The buttons on this Home Theater System do not work. • Disconnect this happens when you have to switch to its default mode: 1) Press . 2) Press . 3) Press AUDIO SYNC. Picture No picture. • See TVs manual for example, AUDIO SOURCE, USB) to select the device you want to the AUDIO output on the progressive scan setting, you turn on your TV. Change the TV channel until you see the DVD screen. • Press DISC. •...
... unit The buttons on this Home Theater System do not work. • Disconnect this happens when you have to switch to its default mode: 1) Press . 2) Press . 3) Press AUDIO SYNC. Picture No picture. • See TVs manual for example, AUDIO SOURCE, USB) to select the device you want to the AUDIO output on the progressive scan setting, you turn on your TV. Change the TV channel until you see the DVD screen. • Press DISC. •...
User manual
Page 49
... character set: 1) Press SETUP. 2) Select [Preferences], then press . 3) Select [DivX Subtitle], then press OK. 4) Select the character set that the DivX video Àle is not supported by this Home Theater System. • Drive is formatted with different Àle system which is complete. Make an analog or digital audio connection. Play DivX video Àles cannot be read. • The USB Áash drive format is not compatible with...
... character set: 1) Press SETUP. 2) Select [Preferences], then press . 3) Select [DivX Subtitle], then press OK. 4) Select the character set that the DivX video Àle is not supported by this Home Theater System. • Drive is formatted with different Àle system which is complete. Make an analog or digital audio connection. Play DivX video Àles cannot be read. • The USB Áash drive format is not compatible with...


