Leaflet
Page 1
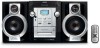
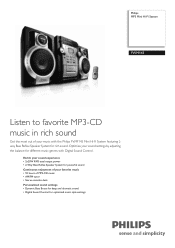
... total output power • 2-Way Bass Reflex Speaker System for powerful sound Continuous enjoyment of MP3-CD music • AM/FM tuner • Stereo cassette deck Personalized sound settings • Dynamic Bass Boost for deep and dramatic sound • Digital Sound Control for rich sound. Optimize your favorite music • 10 hours of your sound settings by adjusting the balance for different music genres with the Philips FWM143 Mini Hi-Fi System featuring 2way Bass Reflex Speaker System for optimized music style settings
... total output power • 2-Way Bass Reflex Speaker System for powerful sound Continuous enjoyment of MP3-CD music • AM/FM tuner • Stereo cassette deck Personalized sound settings • Dynamic Bass Boost for deep and dramatic sound • Digital Sound Control for rich sound. Optimize your favorite music • 10 hours of your sound settings by adjusting the balance for different music genres with the Philips FWM143 Mini Hi-Fi System featuring 2way Bass Reflex Speaker System for optimized music style settings
Leaflet
Page 2
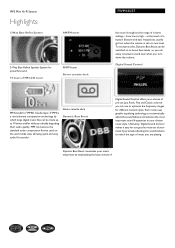
... of your music by precisely adjusting the sound balance to optimise the frequency ranges for different musical styles. MP3 Mini Hi-Fi System Highlights 2-Way Bass Reflex System AM/FM tuner 2-Way Bass Reflex Speaker System for you get lost when the volume is a revolutionary compression technology by which large digital music files can be switched on the world wide web, allowing quick and easy audio file transfer...
... of your music by precisely adjusting the sound balance to optimise the frequency ranges for different musical styles. MP3 Mini Hi-Fi System Highlights 2-Way Bass Reflex System AM/FM tuner 2-Way Bass Reflex Speaker System for you get lost when the volume is a revolutionary compression technology by which large digital music files can be switched on the world wide web, allowing quick and easy audio file transfer...
Leaflet
Page 3
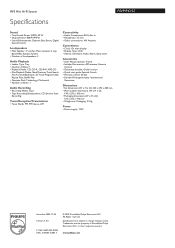
... Philips Electronics N.V. Specifications are the property of decks: 1 Audio Recording • Recording Media: Tape • Tape Recording Enhancement: CD Synchro Start Recording Tuner/Reception/Transmission • Tuner Bands: FM, FM Stereo, AM Connectivity • Audio Connections: RCA Aux in • Headphone: 3.5 mm • Other connections: AM Antenna Convenience • Clock: On main display • Display Type: LCD • Alarms: CD Alarm, Radio Alarm, Sleep timer Accessories • User Manual: Spanish, French • Included Accessories: AM antenna, Remote Control...
... Philips Electronics N.V. Specifications are the property of decks: 1 Audio Recording • Recording Media: Tape • Tape Recording Enhancement: CD Synchro Start Recording Tuner/Reception/Transmission • Tuner Bands: FM, FM Stereo, AM Connectivity • Audio Connections: RCA Aux in • Headphone: 3.5 mm • Other connections: AM Antenna Convenience • Clock: On main display • Display Type: LCD • Alarms: CD Alarm, Radio Alarm, Sleep timer Accessories • User Manual: Spanish, French • Included Accessories: AM antenna, Remote Control...
User manual
Page 4
... benefits listed below the Serial No. Dear PHILIPS product owner: Thank you should not be placed on this apparatus. C A U T I ON RISK OF ELECTRIC SHOCK DO NOT OPEN CAUTION: TO REDUCE THE RISK OF ELECTRIC SHOCK, DO NOT REMOVE COVER (OR BACK). CAUTION: To prevent electric shock, match wide blade of the privileges to accessories from our convenient home...
... benefits listed below the Serial No. Dear PHILIPS product owner: Thank you should not be placed on this apparatus. C A U T I ON RISK OF ELECTRIC SHOCK DO NOT OPEN CAUTION: TO REDUCE THE RISK OF ELECTRIC SHOCK, DO NOT REMOVE COVER (OR BACK). CAUTION: To prevent electric shock, match wide blade of the privileges to accessories from our convenient home...
User manual
Page 7
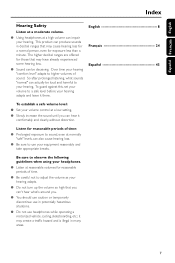
... to adjust the volume as your hearing adapts. ● Do not turn up the volume so high that may create a traffic hazard and is illegal in many areas. 7 Listen for reasonable periods of time: ● Prolonged exposure to sound, even at a high volume can impair your hearing. This product can produce sounds in potentially hazardous situations. ● Do not use your...
... to adjust the volume as your hearing adapts. ● Do not turn up the volume so high that may create a traffic hazard and is illegal in many areas. 7 Listen for reasonable periods of time: ● Prolonged exposure to sound, even at a high volume can impair your hearing. This product can produce sounds in potentially hazardous situations. ● Do not use your...
User manual
Page 8
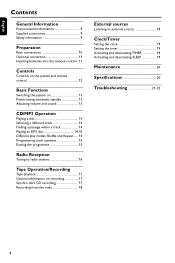
... Rear connections 10 Optional connection 11 Inserting batteries into the remote control . 11 Controls Controls on the system and remote control 12 Basic Functions Switching the system on 13 Power-saving automatic standby 13 Adjusting volume and sound 13 CD/MP3 Operation Playing a disc 14 Selecting a different track 14 Finding a passage within a track 14 Playing an MP3 disc 14-15 Different play modes: Shuffle and Repeat ..... 15 Programming track numbers 15 Erasing the programme 15 Radio Reception Tuning to radio stations 16 Tape Operation...
... Rear connections 10 Optional connection 11 Inserting batteries into the remote control . 11 Controls Controls on the system and remote control 12 Basic Functions Switching the system on 13 Power-saving automatic standby 13 Adjusting volume and sound 13 CD/MP3 Operation Playing a disc 14 Selecting a different track 14 Finding a passage within a track 14 Playing an MP3 disc 14-15 Different play modes: Shuffle and Repeat ..... 15 Programming track numbers 15 Erasing the programme 15 Radio Reception Tuning to radio stations 16 Tape Operation...
User manual
Page 9
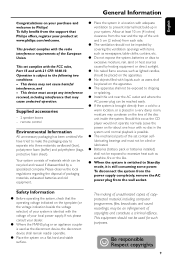
... of the disc unit inside the system. This product complies with the radio interference requirements of copyrights and constitute a criminal offence. English General Information Congratulations on for such purposes. 9 Allow at www.philips.com/welcome. This device may cause undesired operation. This set contain selflubricating bearings and must accept any interference received, including interference that Philips offers, register your local power supply.
... of the disc unit inside the system. This product complies with the radio interference requirements of copyrights and constitute a criminal offence. English General Information Congratulations on for such purposes. 9 Allow at www.philips.com/welcome. This device may cause undesired operation. This set contain selflubricating bearings and must accept any interference received, including interference that Philips offers, register your local power supply.
User manual
Page 10
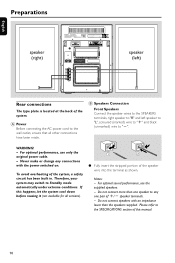
... +/- For optimal sound performance, use only the original power cable. - To avoid overheating of the system. If this manual. 10 Please refer to the SPECIFICATIONS section of the speaker wire into the terminal as shown. Notes: - For optimal performance, use the supplied speakers. - Do not connect more than the speakers supplied. Do not connect speakers with the power switched on. Therefore, your system may switch to "R" and left ) Rear connections The type plate...
... +/- For optimal sound performance, use only the original power cable. - To avoid overheating of the system. If this manual. 10 Please refer to the SPECIFICATIONS section of the speaker wire into the terminal as shown. Notes: - For optimal performance, use the supplied speakers. - Do not connect more than the speakers supplied. Do not connect speakers with the power switched on. Therefore, your system may switch to "R" and left ) Rear connections The type plate...
User manual
Page 11
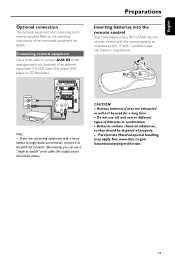
Connecting external equipment Use a cinch cable to connect AUX IN to the operating instructions of the connected equipment for a long time. - Preparations Inserting batteries into the remote control Insert two batteries type R03 or AAA into the remote control with a mono output (a single audio out terminal), connect it to double" cinch cable (the output sound still remain mono). Do not use a "single to the AUX left terminal. Batteries contain chemical substances, so they are not...
Connecting external equipment Use a cinch cable to connect AUX IN to the operating instructions of the connected equipment for a long time. - Preparations Inserting batteries into the remote control Insert two batteries type R03 or AAA into the remote control with a mono output (a single audio out terminal), connect it to double" cinch cable (the output sound still remain mono). Do not use a "single to the AUX left terminal. Batteries contain chemical substances, so they are not...
User manual
Page 12
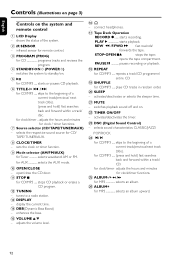
switches the system to a radio station. # DISPLAY - adjusts the hours and minutes for Tuner selects waveband: AM or FM. sets the clock or timer function. 9 Mode selector (AM/FM/AUX) for clock / timer functions. 7 Source selector (CD/ TAPE/TUNER/AUX) - STOP 9 for CD/MP3 ..... enhances the bass. % VOLUME 3/4 - adjusts the volume level. ^n - plays CD tracks in random order. ) SLEEP - selects sound characteristics: CLASSIC/JAZZ/ POP/ROCK. ≤ í/ë for CD/MP3 ..... skips to the beginning of a current track...
switches the system to a radio station. # DISPLAY - adjusts the hours and minutes for Tuner selects waveband: AM or FM. sets the clock or timer function. 9 Mode selector (AM/FM/AUX) for clock / timer functions. 7 Source selector (CD/ TAPE/TUNER/AUX) - STOP 9 for CD/MP3 ..... enhances the bass. % VOLUME 3/4 - adjusts the volume level. ^n - plays CD tracks in random order. ) SLEEP - selects sound characteristics: CLASSIC/JAZZ/ POP/ROCK. ≤ í/ë for CD/MP3 ..... skips to the beginning of a current track...
User manual
Page 13
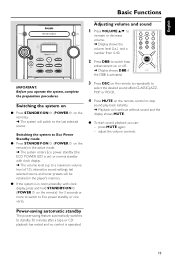
... source. press MUTE again; - adjust the volume controls. Power-saving automatic standby The power-saving feature automatically switches to standby 30 minutes after a tape or CD playback has ended and no control is on the remote). ➜ The system will switch to stop sound play-back instantly. ➜ Playback will be retained in the player's memory. ● If the system is in the active mode. ➜ The system enters Eco power standby (the ECO POWER...
... source. press MUTE again; - adjust the volume controls. Power-saving automatic standby The power-saving feature automatically switches to standby 30 minutes after a tape or CD playback has ended and no control is on the remote). ➜ The system will switch to stop sound play-back instantly. ➜ Playback will be retained in the player's memory. ● If the system is in the active mode. ➜ The system enters Eco power standby (the ECO POWER...
User manual
Page 14
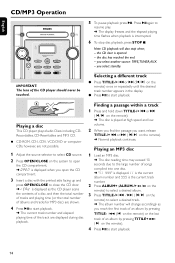
... facing up and press OPEN/CLOSE to start playback. 14 you select another source: TAPE,TUNER, AUX. - Press 2; again to start playback. Playing a disc This CD player plays Audio Discs including CDRecordables, CD-Rewritables and MP3 CD. ¶ CD-ROM, CD-I, CDV, VCD, DVD or computer CDs, however, are shown. 4 Press 2; XX is the current album number and YYY is the current track number. 2 Press ALBUM+ (ALBUM-/+ 5 /6 on the remote) to select a desired...
... facing up and press OPEN/CLOSE to start playback. 14 you select another source: TAPE,TUNER, AUX. - Press 2; again to start playback. Playing a disc This CD player plays Audio Discs including CDRecordables, CD-Rewritables and MP3 CD. ¶ CD-ROM, CD-I, CDV, VCD, DVD or computer CDs, however, are shown. 4 Press 2; XX is the current album number and YYY is the current track number. 2 Press ALBUM+ (ALBUM-/+ 5 /6 on the remote) to select a desired...
User manual
Page 15
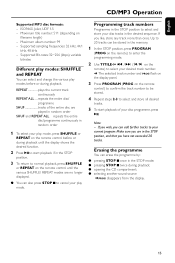
... 9 twice during playback; ● opening the CD compartment; ● selecting another sound source ➜PROG disappears from the display. 15 Maximum title number: 511 (depending on the remote control until the display shows the desired function. 2 Press 2; Supported Bit-rates: 32~256 (kbps), variable bitrates Different play modes: SHUFFLE and REPEAT You can add further tracks to select your disc tracks in the memory...
... 9 twice during playback; ● opening the CD compartment; ● selecting another sound source ➜PROG disappears from the display. 15 Maximum title number: 511 (depending on the remote control until the display shows the desired function. 2 Press 2; Supported Bit-rates: 32~256 (kbps), variable bitrates Different play modes: SHUFFLE and REPEAT You can add further tracks to select your disc tracks in the memory...

User manual
Page 17
..., use only NORMAL (IEC type I) tapes on which the tabs have the tape in front of a tape.To switch off the set automatically. Altering the VOLUME or DBB controls will not affect the recording in either direction. 7 To stop fast winding, press STOP•OPEN 9/. Synchro start CD recording 1 Adjust the source selector to select CD source. 2 Insert a disc and if desired, programme track numbers. 3 Press STOP•OPEN...
..., use only NORMAL (IEC type I) tapes on which the tabs have the tape in front of a tape.To switch off the set automatically. Altering the VOLUME or DBB controls will not affect the recording in either direction. 7 To stop fast winding, press STOP•OPEN 9/. Synchro start CD recording 1 Adjust the source selector to select CD source. 2 Insert a disc and if desired, programme track numbers. 3 Press STOP•OPEN...

User manual
Page 18
... audio out terminals of the external equipment (TV,VCR, Laser Disc player, DVD player or CD Recorder) to the AUX IN terminals of your system. 2 Adjust the source selector to select TU/AUX. 3 Adjust the mode selector to "Tape Operation/Recording". 18 For Recording, please refer to select AUX. ➜ "AUX" is displayed. Note: - Press again to resume. 6 To stop recording, press STOP•OPENÇç. All the sound control...
... audio out terminals of the external equipment (TV,VCR, Laser Disc player, DVD player or CD Recorder) to the AUX IN terminals of your system. 2 Adjust the source selector to select TU/AUX. 3 Adjust the mode selector to "Tape Operation/Recording". 18 For Recording, please refer to select AUX. ➜ "AUX" is displayed. Note: - Press again to resume. 6 To stop recording, press STOP•OPENÇç. All the sound control...
User manual
Page 19
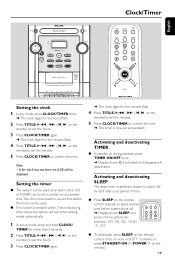
... be set to switch on at a preset time.The clock time needs to be set first before system shuts off. ➜ Display shows SLEEP and series of time options for the minutes flash. 4 Press TITILE-/+ ¡1 / 2™ (í/ë on the remote)to set period of time ● Press SLEEP on the remote). 19 Activating and deactivating TIMER ● In standby or during timer setup, the system will be used . ● If no button...
... be set to switch on at a preset time.The clock time needs to be set first before system shuts off. ➜ Display shows SLEEP and series of time options for the minutes flash. 4 Press TITILE-/+ ¡1 / 2™ (í/ë on the remote)to set period of time ● Press SLEEP on the remote). 19 Activating and deactivating TIMER ● In standby or during timer setup, the system will be used . ● If no button...
User manual
Page 20
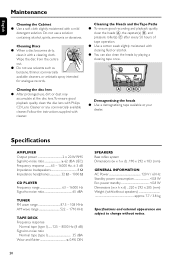
... hours of tape operation. ● Use a cotton swab slightly moistened with /without speakers approx. 7.7 / 3.8 kg Specifications and external appearance are subject to change without notice. Wipe the disc from the centre out. ● Do not use a solution containing alcohol, spirits, ammonia or abrasives. Cleaning the disc lens ● After prolonged use, dirt or dust may accumulate at your dealer. Specifications AMPLIFIER Output power 2 x 20...
... hours of tape operation. ● Use a cotton swab slightly moistened with /without speakers approx. 7.7 / 3.8 kg Specifications and external appearance are subject to change without notice. Wipe the disc from the centre out. ● Do not use a solution containing alcohol, spirits, ammonia or abrasives. Cleaning the disc lens ● After prolonged use, dirt or dust may accumulate at your dealer. Specifications AMPLIFIER Output power 2 x 20...
User manual
Page 21
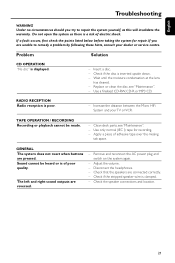
... not react when buttons are reversed. - Use a finalised CD-RW, CD-R or MP3 CD. Increase the distance between the Micro HiFi System and your dealer or service centre. Adjust the volume. - Check that the speakers are connected correctly. - Do not open the system as this will invalidate the warranty. If a fault occurs, first check the points listed below before taking the system for recording. - Problem CD OPERATION "No disc" is a risk...
... not react when buttons are reversed. - Use a finalised CD-RW, CD-R or MP3 CD. Increase the distance between the Micro HiFi System and your dealer or service centre. Adjust the volume. - Check that the speakers are connected correctly. - Do not open the system as this will invalidate the warranty. If a fault occurs, first check the points listed below before taking the system for recording. - Problem CD OPERATION "No disc" is a risk...
User manual
Page 23
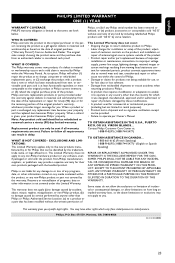
... installation or repair of antenna/signal source systems outside of the product. • Product repair and/or part replacement because of improper installation or maintenance, connections to improper voltage supply, power line surge, lightning damage, retained images or screen markings resulting from viewing fixed stationary content for extended periods, product cosmetic appearance items due to normal wear and tear, unauthorized repair or other cause not within the control of Philips...
... installation or repair of antenna/signal source systems outside of the product. • Product repair and/or part replacement because of improper installation or maintenance, connections to improper voltage supply, power line surge, lightning damage, retained images or screen markings resulting from viewing fixed stationary content for extended periods, product cosmetic appearance items due to normal wear and tear, unauthorized repair or other cause not within the control of Philips...
Quick start guide
Page 2
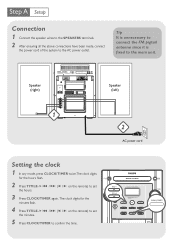
... pigtail antenna since it is fixed to the AC power outlet. The clock digits for the hours flash. 2 Press TITILE-/+ ¡1 / 2 on the remote) to confirm the time. 2 AC power cord Speaker (right) Speaker (left) 1 Setting the clock 1 In any mode, press CLOCK/TIMER twice.The clock digits for the minutes flash. 4 Press TITILE-/+ ¡1 / 2 on the remote) to set the minutes. 5 Press CLOCK/TIMER to set the hours. 3 Press CLOCK/TIMER again. Setup Connection 1 Connect the speaker wires to the SPEAKERS terminals...
... pigtail antenna since it is fixed to the AC power outlet. The clock digits for the hours flash. 2 Press TITILE-/+ ¡1 / 2 on the remote) to confirm the time. 2 AC power cord Speaker (right) Speaker (left) 1 Setting the clock 1 In any mode, press CLOCK/TIMER twice.The clock digits for the minutes flash. 4 Press TITILE-/+ ¡1 / 2 on the remote) to set the minutes. 5 Press CLOCK/TIMER to set the hours. 3 Press CLOCK/TIMER again. Setup Connection 1 Connect the speaker wires to the SPEAKERS terminals...


