Leaflet
Page 1
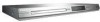
The Philips DVD player delivers your movies and music • Plays CD, (S)VCD, DVD, DVD+R/RW, DVD-R/RW • DivX Certified for optimized image quality Play all Your dream player with flawless, true-to-life picture quality and the ability to play ...; Progressive Scan component video for standard playback of DivX videos • Plays DivX, MP3, WMA and JPEG digital camera photos Fits any space, any disc! Philips DVD player DivX playback DVP3140 Simply plays it all your movies and music entertainment experience.
The Philips DVD player delivers your movies and music • Plays CD, (S)VCD, DVD, DVD+R/RW, DVD-R/RW • DivX Certified for optimized image quality Play all Your dream player with flawless, true-to-life picture quality and the ability to play ...; Progressive Scan component video for standard playback of DivX videos • Plays DivX, MP3, WMA and JPEG digital camera photos Fits any space, any disc! Philips DVD player DivX playback DVP3140 Simply plays it all your movies and music entertainment experience.
Leaflet
Page 2
...- 320 kbps • Compression format: MP3, Dolby Digital, PCM, WMA Still Picture Playback • Playback Media: DVD+R/+RW, DVD-R/-RW, CD- www.philips.com Trademarks are written at one time. Plays it all Play virtually any media format you to the screen first, ...original sound curves. A full image is captured from the original analogue sound wave form, giving a much richer audio reproduction. DVD player DivX playback Specifications DVP3140/37 Highlights Picture/Display • D/A converter: 12 bit, 108 MHz • Picture enhancement: Progressive scan, Video upsampling Sound...
...- 320 kbps • Compression format: MP3, Dolby Digital, PCM, WMA Still Picture Playback • Playback Media: DVD+R/+RW, DVD-R/-RW, CD- www.philips.com Trademarks are written at one time. Plays it all Play virtually any media format you to the screen first, ...original sound curves. A full image is captured from the original analogue sound wave form, giving a much richer audio reproduction. DVD player DivX playback Specifications DVP3140/37 Highlights Picture/Display • D/A converter: 12 bit, 108 MHz • Picture enhancement: Progressive scan, Video upsampling Sound...
User manual
Page 6
...Trademarks are trademarks, or registered trademarks of Koninklijke Philips Electronics N.V. Retain this device. DVP 3140 Serial No 6 01-45_dvp3140_37_eng1.indd 6 LASER Type Semiconductor laser InGaAlP (DVD) AIGaAs (CD) Wave length 658 nm (DVD) 790 nm (CD) Output Power 7.0 mW (DVD) 10.0 mW (VCD/CD) Beam divergence...LOCATION: ON THE BACKPLATE OF THE SET NEVER MAKE OR CHANGE CONNECTIONS WITH THE POWER SWITCHED ON. and are trademarks of your DVD Video player and enter below the Serial No. Due to possible eye injury, only a qualified service person should remove the ...
...Trademarks are trademarks, or registered trademarks of Koninklijke Philips Electronics N.V. Retain this device. DVP 3140 Serial No 6 01-45_dvp3140_37_eng1.indd 6 LASER Type Semiconductor laser InGaAlP (DVD) AIGaAs (CD) Wave length 658 nm (DVD) 790 nm (CD) Output Power 7.0 mW (DVD) 10.0 mW (VCD/CD) Beam divergence...LOCATION: ON THE BACKPLATE OF THE SET NEVER MAKE OR CHANGE CONNECTIONS WITH THE POWER SWITCHED ON. and are trademarks of your DVD Video player and enter below the Serial No. Due to possible eye injury, only a qualified service person should remove the ...
User manual
Page 8
... 4: Selecting the matching color system 20 Step 5: Setting the language 21 On-screen display (OSD) language...21 Audio, Subtitle and DVD menu languages 21 Playback from Disc Playable discs...22 Supported formats...22 Playback Features Starting disc playback 23 Basic playback control 23 Pausing playback......23 Selecting title/chapter/track ...23 Stopping playback ...23 Operations for video playback (DVD/VCD/SVCD 24 Using the Disc Menu ...24 Zooming in ...24 Resuming playback from the last stopped point 24 Slow Motion...24 Forward...
... 4: Selecting the matching color system 20 Step 5: Setting the language 21 On-screen display (OSD) language...21 Audio, Subtitle and DVD menu languages 21 Playback from Disc Playable discs...22 Supported formats...22 Playback Features Starting disc playback 23 Basic playback control 23 Pausing playback......23 Selecting title/chapter/track ...23 Stopping playback ...23 Operations for video playback (DVD/VCD/SVCD 24 Using the Disc Menu ...24 Zooming in ...24 Resuming playback from the last stopped point 24 Slow Motion...24 Forward...

User manual
Page 9
English Contents Viewing the disc playback information 26 Title/Chapter/Track selection ...26 Time Search ...26 Angle ...26 Special DVD Features 27 Playing a Title...27 Changing the Audio Language...27 Subtitle ...27 Special VCD and SVCD Feature 27 Playback Control (PBC)...27 Playing a...General Operation ...28 Playback selection ...29 Zoom picture (JPEG) ...29 Playback with multi-angles (JPEG) ...29 DVD Menu Options Using the Language setup menu 30 OSD Language...30 Subtitle / Audio / DVD Menu...30 Setting DivX® Subtitle font ...30 Using the Video setup menu 31-33 Setting the aspect ...
English Contents Viewing the disc playback information 26 Title/Chapter/Track selection ...26 Time Search ...26 Angle ...26 Special DVD Features 27 Playing a Title...27 Changing the Audio Language...27 Subtitle ...27 Special VCD and SVCD Feature 27 Playback Control (PBC)...27 Playing a...General Operation ...28 Playback selection ...29 Zoom picture (JPEG) ...29 Playback with multi-angles (JPEG) ...29 DVD Menu Options Using the Language setup menu 30 OSD Language...30 Subtitle / Audio / DVD Menu...30 Setting DivX® Subtitle font ...30 Using the Video setup menu 31-33 Setting the aspect ...
User manual
Page 10
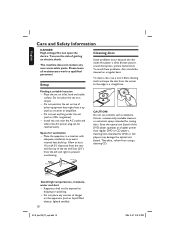
... and where the AC power plug can be exposed to prevent overheating. 5cm (2.0") 10cm (4.0") 10cm (4.0") CAUTION! Finding a suitable location - Space for DVD or CD players may damage the optical unit (laser). Place the apparatus in a straight line. Allow at a higher power than regular... DVD or CD players, cleaning CDs intended for ventilation - Since the optical unit (laser) of the DVD player operates at least 10 cm (4.0") clearance from the rear and the top of other equipment that...
... and where the AC power plug can be exposed to prevent overheating. 5cm (2.0") 10cm (4.0") 10cm (4.0") CAUTION! Finding a suitable location - Space for DVD or CD players may damage the optical unit (laser). Place the apparatus in a straight line. Allow at a higher power than regular... DVD or CD players, cleaning CDs intended for ventilation - Since the optical unit (laser) of the DVD player operates at least 10 cm (4.0") clearance from the rear and the top of other equipment that...
User manual
Page 11
and Canada regions Discs that can be possible to play CD-R/RW or DVD-R/RW in all cases due to the type of disc or condition of the recording. - Tips: -...disc and try a different one. Improper formatted disc will not played on the disc package. Check the regional code number on this DVD player. If the number does not match the player's region number (see table below), the player may not be played ALL ... MUTE SUBTITLE ZOOM REPEAT AUDIO REPEAT A-B 01-45_dvp3140_37_eng1.indd 11 General Information Region codes This DVD player is designed to playback the disc. Region U.S.A.
and Canada regions Discs that can be possible to play CD-R/RW or DVD-R/RW in all cases due to the type of disc or condition of the recording. - Tips: -...disc and try a different one. Improper formatted disc will not played on the disc package. Check the regional code number on this DVD player. If the number does not match the player's region number (see table below), the player may not be played ALL ... MUTE SUBTITLE ZOOM REPEAT AUDIO REPEAT A-B 01-45_dvp3140_37_eng1.indd 11 General Information Region codes This DVD player is designed to playback the disc. Region U.S.A.
User manual
Page 12
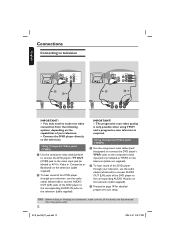
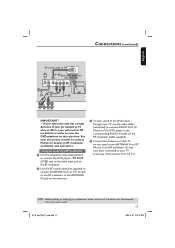
... from the power outlet. 12 01-45_dvp3140_37_eng1.indd 12 2006-11-07 4:55:37 PM IMPORTANT! - B To hear sound of the DVD player to make sure that all the devices are disconnected from the following options, depending on the television (cable supplied). Using Composite Video ...jacks (CVBS) A Use the composite video cable (yellow) to connect the DVD player's TV OUT (CVBS) jack to television English COMPONENT VIDEO IN S-VIDEO IN V (Pr/Cr) AUDIO OUT VIDEO IN U (Pb/Cb) Y...
... from the power outlet. 12 01-45_dvp3140_37_eng1.indd 12 2006-11-07 4:55:37 PM IMPORTANT! - B To hear sound of the DVD player to make sure that all the devices are disconnected from the following options, depending on the television (cable supplied). Using Composite Video ...jacks (CVBS) A Use the composite video cable (yellow) to connect the DVD player's TV OUT (CVBS) jack to television English COMPONENT VIDEO IN S-VIDEO IN V (Pr/Cr) AUDIO OUT VIDEO IN U (Pb/Cb) Y...
User manual
Page 13
... jack on the RF modulator. (It may have been connected to your electronics retailer or contact Philips for details on RF modulator availability and operations. Disconnect it from the power outlet. 13 01-...55:39 PM Using an accessory RF modulator A Use the composite video cable (yellow) to connect the DVD player's TV OUT (CVBS) jack to the ANTENNA IN jack on the television. TIPS: Before making or...(or labeled as 75 ohm or RF In,) you will need an RF modulator in order to view the DVD playback on the television. If your TV, use the audio cables (white/red) to connect AUDIO OUT ...
... jack on the RF modulator. (It may have been connected to your electronics retailer or contact Philips for details on RF modulator availability and operations. Disconnect it from the power outlet. 13 01-...55:39 PM Using an accessory RF modulator A Use the composite video cable (yellow) to connect the DVD player's TV OUT (CVBS) jack to the ANTENNA IN jack on the television. TIPS: Before making or...(or labeled as 75 ohm or RF In,) you will need an RF modulator in order to view the DVD playback on the television. If your TV, use the audio cables (white/red) to connect AUDIO OUT ...
User manual
Page 14
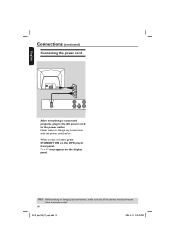
... on the display panel. TIPS: Before making or changing any connections, make or change any connections with the power switched on. "- - -" may appear on the DVD player front panel. Never make sure that all the devices are disconnected from the power outlet. 14 01-45_dvp3140_37_eng1.indd 14 2006-11-13 2:29...
... on the display panel. TIPS: Before making or changing any connections, make or change any connections with the power switched on. "- - -" may appear on the DVD player front panel. Never make sure that all the devices are disconnected from the power outlet. 14 01-45_dvp3140_37_eng1.indd 14 2006-11-13 2:29...
User manual
Page 15
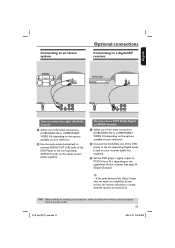
...digital output to the corresponding Digital Audio In jack on your receiver (cable not supplied). Tip: - B Connect the COAXIAL jack of the DVD player to PCM-Only or ALL depending on the capabilities of your receiver (see page 34 {Digital Output}). TIPS: Before making or changing...IN) depending on the options available on your television. If the audio format of the Digital Output does not match the capabilities of the DVD Player to the corresponding AUDIO IN jacks on the stereo system (cable supplied). English Connecting to an stereo system Optional connections Connecting to ...
...digital output to the corresponding Digital Audio In jack on your receiver (cable not supplied). Tip: - B Connect the COAXIAL jack of the DVD player to PCM-Only or ALL depending on the capabilities of your receiver (see page 34 {Digital Output}). TIPS: Before making or changing...IN) depending on the options available on your television. If the audio format of the Digital Output does not match the capabilities of the DVD Player to the corresponding AUDIO IN jacks on the stereo system (cable supplied). English Connecting to an stereo system Optional connections Connecting to ...
User manual
Page 16
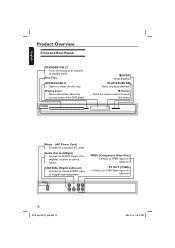
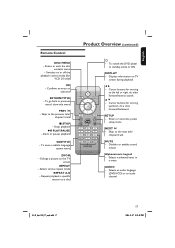
... of a digital audio equipment YPbPr (Component Video Out) - Point the remote control towards this sensor Mains ~ (AC Power Cord) - Connect to YPbPr input of the DVD player. „ STOP - Opens or closes the disc tray. Connect to a standard AC outlet Audio Out (Left/Right) - English Product Overview Front and Rear Panels...
... of a digital audio equipment YPbPr (Component Video Out) - Point the remote control towards this sensor Mains ~ (AC Power Cord) - Connect to YPbPr input of the DVD player. „ STOP - Opens or closes the disc tray. Connect to a standard AC outlet Audio Out (Left/Right) - English Product Overview Front and Rear Panels...
User manual
Page 17
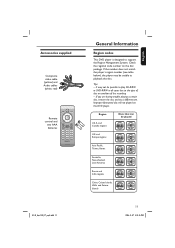
... to previous menu/ show title menu PREV í - S T - Enters or exits the system setup menu NEXT ë - Selects an audio language (DVD/VCD) or an audio channel 01-45_dvp3140_37_eng1.indd 17 17 2006-11-07 4:55:42 PM Starts or pauses playback SUBTITLE - Cursor buttons for moving ...
... to previous menu/ show title menu PREV í - S T - Enters or exits the system setup menu NEXT ë - Selects an audio language (DVD/VCD) or an audio channel 01-45_dvp3140_37_eng1.indd 17 17 2006-11-07 4:55:42 PM Starts or pauses playback SUBTITLE - Cursor buttons for moving ...
User manual
Page 18
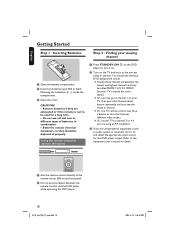
... chooses different video modes. Î Or, set it to channel 1 on your TV, then press the Channel down button repeatedly until you see the blue DVD background screen. Î Usually these channel are using an RF modulator. CAUTION! - English Getting Started Step 1 : Inserting Batteries Step 2 : Finding your TV's manual ...18 01-45_dvp3140_37_eng1.indd 18 2006-11-16 1:44:58 PM Using the remote control to operate the system A Press STANDBY-ON 2 on the DVD player to turn it on the front panel. You should be called FRONT, A/V IN, VIDEO. Do not use old and new or different types...
... chooses different video modes. Î Or, set it to channel 1 on your TV, then press the Channel down button repeatedly until you see the blue DVD background screen. Î Usually these channel are using an RF modulator. CAUTION! - English Getting Started Step 1 : Inserting Batteries Step 2 : Finding your TV's manual ...18 01-45_dvp3140_37_eng1.indd 18 2006-11-16 1:44:58 PM Using the remote control to operate the system A Press STANDBY-ON 2 on the DVD player to turn it on the front panel. You should be called FRONT, A/V IN, VIDEO. Do not use old and new or different types...
User manual
Page 19
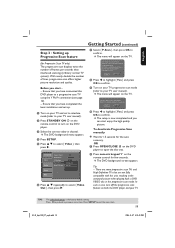
...higher picture resolution and quality. Press SETUP to select { Video }, then press X. Ensure that are not fully compatible with this DVD player to confirm. Confirm again to use new setting Revert to your TV user manual). There are some progressive scan TVs and... High-Definition TVs that you can start ... - The DVD background screen appears. Press W to go back to select { Video Out }, then press X. Language Video Audio AAssppeeccttRRaattiioo VViieewwMMooddee TTVVSSyysstteemm VViiddeeooOOuutt ...
...higher picture resolution and quality. Press SETUP to select { Video }, then press X. Ensure that are not fully compatible with this DVD player to confirm. Confirm again to use new setting Revert to your TV user manual). There are some progressive scan TVs and... High-Definition TVs that you can start ... - The DVD background screen appears. Press W to go back to select { Video Out }, then press X. Language Video Audio AAssppeeccttRRaattiioo VViieewwMMooddee TTVVSSyysstteemm VViiddeeooOOuutt ...
User manual
Page 20
C Press S T repeatedly to previous menu item. It will change the video signal of the DVD player, disc and TV should match in order for the disc to play. Tip: - Press W to go back to select { TV System }. { NTSC } Select this ...
C Press S T repeatedly to previous menu item. It will change the video signal of the DVD player, disc and TV should match in order for the disc to play. Tip: - Press W to go back to select { TV System }. { NTSC } Select this ...

User manual
Page 21
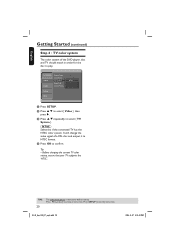
... Started (continued) Step 5 : Setting the language The language options are different depending on your preferred language or sound track from audio, subtitles and DVD menu languages. The menu language (on the disc, the disc's default language will remain as you set it. Press W to go back to ... of the options below, then press X. { Audio } Select this to change disc sound track language. { Subtitle } Select this to change the subtitle language. { DVD Menu } Select this to confirm. D Use S T to select a language and press OK to change the language of the disc menu. B Press S T to...
... Started (continued) Step 5 : Setting the language The language options are different depending on your preferred language or sound track from audio, subtitles and DVD menu languages. The menu language (on the disc, the disc's default language will remain as you set it. Press W to go back to ... of the options below, then press X. { Audio } Select this to change disc sound track language. { Subtitle } Select this to change the subtitle language. { DVD Menu } Select this to confirm. D Use S T to select a language and press OK to change the language of the disc menu. B Press S T to...

User manual
Page 22
...the INVALID KEY appears on the TV screen when a button is pressed, it means the function is for DVD are designed with regional restrictions. Playable discs Using this DVD player due to the configuration and characteristics of recording and authoring software that was used. 22 01-45_dvp3140_37_eng1....indd 22 2006-11-07 4:55:44 PM Global Motion Compensation (GMC) playback. The file extensions has to be '.mp3', '.wma' - DVD±R (DVD Recordable) Audio/Video format or MP3/WMA/JPEG/DivX® files. CD-R (CD-Recordable) Audio/Video format or MP3/WMA/JPEG/DivX®...
...the INVALID KEY appears on the TV screen when a button is pressed, it means the function is for DVD are designed with regional restrictions. Playable discs Using this DVD player due to the configuration and characteristics of recording and authoring software that was used. 22 01-45_dvp3140_37_eng1....indd 22 2006-11-07 4:55:44 PM Global Motion Compensation (GMC) playback. The file extensions has to be '.mp3', '.wma' - DVD±R (DVD Recordable) Audio/Video format or MP3/WMA/JPEG/DivX® files. CD-R (CD-Recordable) Audio/Video format or MP3/WMA/JPEG/DivX®...

User manual
Page 23
... disc loading, playing or ejecting. - Pausing playback A During playback, press PLAY/PAUSE u to turn on the DVD player. Press DISPLAY to display the disc information text line for the DVD player (e.g. 'EXT', '0', 'AV'). The player will automatically switch to Power Standby mode if you want to play...For more playback features, see page 24 'Using the Disc Menu'. Unless otherwise stated, all operations described are based on the front of the DVD player. B To resume normal playback, press PLAY/PAUSE u again. Always refer to the instructions supplied with the label facing up . English...
... disc loading, playing or ejecting. - Pausing playback A During playback, press PLAY/PAUSE u to turn on the DVD player. Press DISPLAY to display the disc information text line for the DVD player (e.g. 'EXT', '0', 'AV'). The player will automatically switch to Power Standby mode if you want to play...For more playback features, see page 24 'Using the Disc Menu'. Unless otherwise stated, all operations described are based on the front of the DVD player. B To resume normal playback, press PLAY/PAUSE u again. Always refer to the instructions supplied with the label facing up . English...

User manual
Page 24
...B To return to normal speed, press PLAY/ PAUSE u. Zooming in This function allows you load in the disc. Playback will be muted (DVD/VCD) or intermittent (CD). Sound will continue. During the message appears on the remote. Playback restarts from the beginning. To remove the message... TV screen, press PREV to select the required speed: 2X, 4X, 8X, 16X or 32x (backward or forward). Load one of discs. For DivX®,DVD,VCD,SVCD A Press S T during playback and select a different speed. Always refer to select the required speed: 1/2, 1/4, 1/8 or 1/16 (forward or ...
...B To return to normal speed, press PLAY/ PAUSE u. Zooming in This function allows you load in the disc. Playback will be muted (DVD/VCD) or intermittent (CD). Sound will continue. During the message appears on the remote. Playback restarts from the beginning. To remove the message... TV screen, press PREV to select the required speed: 2X, 4X, 8X, 16X or 32x (backward or forward). Load one of discs. For DivX®,DVD,VCD,SVCD A Press S T during playback and select a different speed. Always refer to select the required speed: 1/2, 1/4, 1/8 or 1/16 (forward or ...


