Leaflet
Page 3
... N.V. Trademarks are subject to change without notice. www.philips.com Hard disk/DVD recorder 160 GB Specifications DVDR3576H/37 Picture/Display • D/A converter: 10 bit, 54 MHz • A/D converter: 10 bit, 54 MHz • Picture ...consumption: < 5.5 W • Power consumption: 23 W Accessories • Included accessories: 2 x AAA Batteries, Quick start guide, Remote Control, User Manual, A/V Cable, RF antenna cable, Warranty Leaflet • Remote Control 12NC: Black Slim Sofa Dimensions • Weight incl. Packaging: 4.6 kg • Packaging dimensions (WxHxD): 520 x 147 x...
... N.V. Trademarks are subject to change without notice. www.philips.com Hard disk/DVD recorder 160 GB Specifications DVDR3576H/37 Picture/Display • D/A converter: 10 bit, 54 MHz • A/D converter: 10 bit, 54 MHz • Picture ...consumption: < 5.5 W • Power consumption: 23 W Accessories • Included accessories: 2 x AAA Batteries, Quick start guide, Remote Control, User Manual, A/V Cable, RF antenna cable, Warranty Leaflet • Remote Control 12NC: Black Slim Sofa Dimensions • Weight incl. Packaging: 4.6 kg • Packaging dimensions (WxHxD): 520 x 147 x...
User manual
Page 5
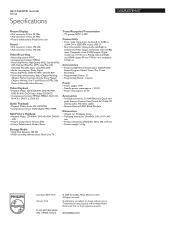
... high-quality video with a cleaning cloth. For online reference, please visit our web site at least for proper heat dissipation. philips.com/welcome Cleaning the cabinet • Wipe the front panel and other exterior surfaces of the recording / replaying program may occur... motion, do not adhere to the surfaces of the laser optical pickup unit. Introduction Connections Basic Setup Recording PRECAUTIONS Supplied Accessories remote control with batteries (AAAx2) RF coaxial cable RCA audio/video cables user manual User Manual quick start guide Maintenance Servicing •...
... high-quality video with a cleaning cloth. For online reference, please visit our web site at least for proper heat dissipation. philips.com/welcome Cleaning the cabinet • Wipe the front panel and other exterior surfaces of the recording / replaying program may occur... motion, do not adhere to the surfaces of the laser optical pickup unit. Introduction Connections Basic Setup Recording PRECAUTIONS Supplied Accessories remote control with batteries (AAAx2) RF coaxial cable RCA audio/video cables user manual User Manual quick start guide Maintenance Servicing •...
User manual
Page 6
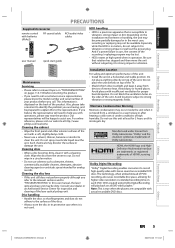
CONTENTS Introduction PRECAUTIONS 2 FEATURES 8 Symbols Used in this User Manual 9 FUNCTIONAL OVERVIEW 10 Front Panel 10 Rear Panel 11 Remote Control 12 Front Panel Display 14 Connections ANTENNA CABLE CONNECTION 15 RF MODULATOR CONNECTION 16 CONNECTION TO A CABLE / SATELLITE BOX 17 CONNECTION TO A TV 18 ...
CONTENTS Introduction PRECAUTIONS 2 FEATURES 8 Symbols Used in this User Manual 9 FUNCTIONAL OVERVIEW 10 Front Panel 10 Rear Panel 11 Remote Control 12 Front Panel Display 14 Connections ANTENNA CABLE CONNECTION 15 RF MODULATOR CONNECTION 16 CONNECTION TO A CABLE / SATELLITE BOX 17 CONNECTION TO A TV 18 ...

User manual
Page 10
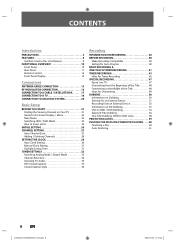
... a RCA audio cable. 11. RECORD button Press once to start a recording. FUNCTIONAL OVERVIEW Front Panel 1 2 3* 4 5 6* 7 8 USB 13 12 11 10 9 (*) The unit can plug your remote control so that you can control the unit from your USB device here, and play back the contents in recording, dubbing, or playing back. 6. Display...
... a RCA audio cable. 11. RECORD button Press once to start a recording. FUNCTIONAL OVERVIEW Front Panel 1 2 3* 4 5 6* 7 8 USB 13 12 11 10 9 (*) The unit can plug your remote control so that you can control the unit from your USB device here, and play back the contents in recording, dubbing, or playing back. 6. Display...

User manual
Page 12
... the indications in the battery compartment. • Remove batteries from the unit are no obstacles between the remote control and the infrared sensor window on the unit. • Remote operation may have different voltages. • Make sure that is shining on the batteries to the marks...used for a month or more. • When disposing of the unit. • Remote control for different devices can result in the operating range of the remote control. 1 Open the cover. 2 Insert batteries. Using a Remote Control Keep in your country or area. • Do not recharge, short-circuit, heat...
... the indications in the battery compartment. • Remove batteries from the unit are no obstacles between the remote control and the infrared sensor window on the unit. • Remote operation may have different voltages. • Make sure that is shining on the batteries to the marks...used for a month or more. • When disposing of the unit. • Remote control for different devices can result in the operating range of the remote control. 1 Open the cover. 2 Insert batteries. Using a Remote Control Keep in your country or area. • Do not recharge, short-circuit, heat...
User manual
Page 21
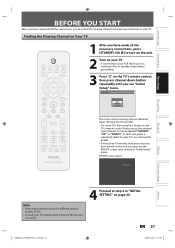
... varies for the recorder. • For some TVs, there may see "Initial Setup" menu. In such case, press it is successful. PHILIPS screen saver: Recording Playback Editing Function Setup Others 4 Proceed to step 2 in standby mode before proceeding. 3 Press "2" on the TV...'s remote control, then press channel down button repeatedly until you see the PHILIPS screen saver instead of "Initial Setup" menu. Refer to your TV's user manual for details. • If more...
... varies for the recorder. • For some TVs, there may see "Initial Setup" menu. In such case, press it is successful. PHILIPS screen saver: Recording Playback Editing Function Setup Others 4 Proceed to step 2 in standby mode before proceeding. 3 Press "2" on the TV...'s remote control, then press channel down button repeatedly until you see the PHILIPS screen saver instead of "Initial Setup" menu. Refer to your TV's user manual for details. • If more...

User manual
Page 32
... Analog Mode / Digital Mode You can select more channels, called major channel. Channel Selection Select channels by using [CH / ] or [the Number buttons] found on remote control. [CH / ] Use [CH / ] to change manually by a signal network. For 1-digit number e.g.) 2 ch: [0] + [2], [2] + [•] or ...-2 smallest CH major channel minor channel : change automatically : change the channel. [the Number buttons] Press the channel number with the remote control. Enter the channel number with [the Number buttons] to select a channel you switch the analog mode to the digital mode,...
... Analog Mode / Digital Mode You can select more channels, called major channel. Channel Selection Select channels by using [CH / ] or [the Number buttons] found on remote control. [CH / ] Use [CH / ] to change manually by a signal network. For 1-digit number e.g.) 2 ch: [0] + [2], [2] + [•] or ...-2 smallest CH major channel minor channel : change automatically : change the channel. [the Number buttons] Press the channel number with the remote control. Enter the channel number with [the Number buttons] to select a channel you switch the analog mode to the digital mode,...

User manual
Page 53
...DVC is in the DVC (digital video camcorder) to HDD or DVD. DV icon 2. Select "DV Input" to control your DVC with the remote control of your DVC for more information. Select "Stereo2" to dub the sound with the IEEE1394 standards.) 2) Press [SOURCE / USB] repeatedly to...1/ 1 1/ 1 +RW E3 (DV-IN) 5 AB-1234 0:12:34 34 DVD SP 2h00m DVD SP 7 2h00m 6 The following instructions are described with the remote control of this unit. 3. With "DV Audio" selected, press [OK] to operate, then press [OK]. - Introduction Connections Basic Setup Recording DUBBING Information on DV...
...DVC is in the DVC (digital video camcorder) to HDD or DVD. DV icon 2. Select "DV Input" to control your DVC with the remote control of your DVC for more information. Select "Stereo2" to dub the sound with the IEEE1394 standards.) 2) Press [SOURCE / USB] repeatedly to...1/ 1 1/ 1 +RW E3 (DV-IN) 5 AB-1234 0:12:34 34 DVD SP 2h00m DVD SP 7 2h00m 6 The following instructions are described with the remote control of this unit. 3. With "DV Audio" selected, press [OK] to operate, then press [OK]. - Introduction Connections Basic Setup Recording DUBBING Information on DV...
User manual
Page 54
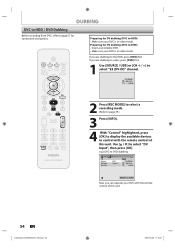
... to DVD): • Insert a recordable DVD. • Make sure your DVC is in video mode. Preparing for DV dubbing (DVC to control with the remote control of this unit. 54 EN E2H42UD_DVDR3576H-37_EN.indd 54 2007/12/28 11:15:21 Use [K / L] to select "E3 (DV-IN)" channel. Preparing...to page 39.) 3 Press [INFO]. 4 With "Control" highlighted, press [OK] to display the available devices to HDD): • Make sure your DVC with the remote control of this unit. If you are dubbing to DVD dubbing 1/ 1 1/ 1 Control DV Audio Start Rec DVD Stereo1 +RW E3 (DV-IN) AB-1234 0:...
... to DVD): • Insert a recordable DVD. • Make sure your DVC is in video mode. Preparing for DV dubbing (DVC to control with the remote control of this unit. 54 EN E2H42UD_DVDR3576H-37_EN.indd 54 2007/12/28 11:15:21 Use [K / L] to select "E3 (DV-IN)" channel. Preparing...to page 39.) 3 Press [INFO]. 4 With "Control" highlighted, press [OK] to display the available devices to HDD): • Make sure your DVC with the remote control of this unit. If you are dubbing to DVD dubbing 1/ 1 1/ 1 Control DV Audio Start Rec DVD Stereo1 +RW E3 (DV-IN) AB-1234 0:...

User manual
Page 110
... select the TV aspect ratio to connect this feature, you have a standard TV: Select "4:3 Letter Box", so that black bars appear on the unit or remote control within 15 seconds, then press [OK]. Progressive Scan ON OFF 2) Use [{ / B] to select a setting, then press [OK]. SETUPS Video (cont'd) 1 Progressive Scan (Default : OFF...
... select the TV aspect ratio to connect this feature, you have a standard TV: Select "4:3 Letter Box", so that black bars appear on the unit or remote control within 15 seconds, then press [OK]. Progressive Scan ON OFF 2) Use [{ / B] to select a setting, then press [OK]. SETUPS Video (cont'd) 1 Progressive Scan (Default : OFF...

User manual
Page 114
... supply for the unit and re-connect the DVC. • Signal input or DVC operation from the DVC to this unit. Other types of the remote control are damaged. • Check if a correct external input channel is selected on automatically without any device other than the DVC. The unit turns... operation is connected securely. • Batteries of signals are made securely and correctly. No picture, sound or menu appears on the type of the remote control are experiencing. Remove the disc and leave the unit turned on for both this unit and the DVC, and make sure that the AC...
... supply for the unit and re-connect the DVC. • Signal input or DVC operation from the DVC to this unit. Other types of the remote control are damaged. • Check if a correct external input channel is selected on automatically without any device other than the DVC. The unit turns... operation is connected securely. • Batteries of signals are made securely and correctly. No picture, sound or menu appears on the type of the remote control are experiencing. Remove the disc and leave the unit turned on for both this unit and the DVC, and make sure that the AC...
User manual
Page 117
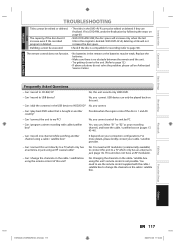
...cable / satellite box on the cable / satellite box. You need to HDD/DVD? This unit does not have an RF modulator. - No, this unit's remote control is deleted. USB device can . No, you can only be weak. Can I record one channel while watching another country? No. No. Can I ... Editing Function Setup Others E2H42UD_DVDR3576H-37_EN.indd 117 EN 117 2007/12/28 11:16:33 Check if the disc is no obstacle between the remote and the unit. • Try getting closer to the unit. (Refer to USB device? Frequently Asked Questions - Can I play back DVD-video ...
...cable / satellite box on the cable / satellite box. You need to HDD/DVD? This unit does not have an RF modulator. - No, this unit's remote control is deleted. USB device can . No, you can only be weak. Can I record one channel while watching another country? No. No. Can I ... Editing Function Setup Others E2H42UD_DVDR3576H-37_EN.indd 117 EN 117 2007/12/28 11:16:33 Check if the disc is no obstacle between the remote and the unit. • Try getting closer to the unit. (Refer to USB device? Frequently Asked Questions - Can I play back DVD-video ...
Quick start guide
Page 1
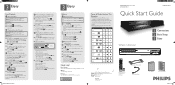
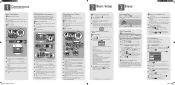
... 3 Enjoy USB HDD & DVD Player / Recorder with Digital Tuner RCA Audio / Video Cables Remote Control with your USB device. B Deleting Selected Titles (HDD only) ⁞ Press HDD ... "Yes", then press OK . Use K / L / s / B to step 2. If you are playing back the titles in your Philips recorder. Use K / L / s / B to select a desired title, then press OK . Use K / L to skip ...time, then press OK . To stop the E Playing Back a USB Device with Digital Tuner DVDR3576H/37 Quick Start Guide What's in DVD, press DVD first. ⁞ Insert a disc. ...
... 3 Enjoy USB HDD & DVD Player / Recorder with Digital Tuner RCA Audio / Video Cables Remote Control with your USB device. B Deleting Selected Titles (HDD only) ⁞ Press HDD ... "Yes", then press OK . Use K / L / s / B to step 2. If you are playing back the titles in your Philips recorder. Use K / L / s / B to select a desired title, then press OK . Use K / L to skip ...time, then press OK . To stop the E Playing Back a USB Device with Digital Tuner DVDR3576H/37 Quick Start Guide What's in DVD, press DVD first. ⁞ Insert a disc. ...
Quick start guide
Page 2
...just one touch of your local store. Entry screen for the clock setting will start recording the TV broadcast. Place the disc on the TV's remote control, then press channel down button repeatedly until you are automatically scanned and memorized. Align the disc to close the disc tray. Press OPEN/... Disconnect RF coaxial cable from antenna input jack of your TV. Use RF coaxial cable to connect ANTENNA OUT jack of this unit. Your Philips recorder is the correct viewing channel (external input channel) for each press. Press STOP to stop pause live TV.
...just one touch of your local store. Entry screen for the clock setting will start recording the TV broadcast. Place the disc on the TV's remote control, then press channel down button repeatedly until you are automatically scanned and memorized. Align the disc to close the disc tray. Press OPEN/... Disconnect RF coaxial cable from antenna input jack of your TV. Use RF coaxial cable to connect ANTENNA OUT jack of this unit. Your Philips recorder is the correct viewing channel (external input channel) for each press. Press STOP to stop pause live TV.


