
User manual
Page 3
...; 1996 Digital Theater Systems, Inc. "Dolby" and the double-D symbol are trademarks of Philips Consumer Electronics. Manufactured under license from Digital Theater Systems, Inc. All rights reserved. Copyright 2001 Philips Consumer Electronics. No. 5,451,942 and other world-wide patents issued and pending. Confidential Unpublished... a Disc 16 Searching, Track/Chapter Selection 17 Slow Motion, Still Picture/Frame-by-frame playback 18 Scan, Shuffle 19 DVD Player Controls Front Panel 20 Rear Panel 21 Remote Control Buttons 22-23 Menu Bars 24 On-screen Symbols, Status Window 25 ...
...; 1996 Digital Theater Systems, Inc. "Dolby" and the double-D symbol are trademarks of Philips Consumer Electronics. Manufactured under license from Digital Theater Systems, Inc. All rights reserved. Copyright 2001 Philips Consumer Electronics. No. 5,451,942 and other world-wide patents issued and pending. Confidential Unpublished... a Disc 16 Searching, Track/Chapter Selection 17 Slow Motion, Still Picture/Frame-by-frame playback 18 Scan, Shuffle 19 DVD Player Controls Front Panel 20 Rear Panel 21 Remote Control Buttons 22-23 Menu Bars 24 On-screen Symbols, Status Window 25 ...
User manual
Page 6
... feature is not available on the Disc, you enjoy this manual describe the Disc Menus. Disc Menus... Some instructions explain how to use the DVD Player's menu (or the System Menu) to set up features of the TV screen if you can access these features available. watch a director's... • Random Playback • Repeat (A-B segment, Chapter, Title, Track, Disc) • Screen Saver • Subtitles in the top left corner of the DVD Player or the Disc. The possibilities are playing is not available on the current Disc or not available at the top and bottom of the CD...
... feature is not available on the Disc, you enjoy this manual describe the Disc Menus. Disc Menus... Some instructions explain how to use the DVD Player's menu (or the System Menu) to set up features of the TV screen if you can access these features available. watch a director's... • Random Playback • Repeat (A-B segment, Chapter, Title, Track, Disc) • Screen Saver • Subtitles in the top left corner of the DVD Player or the Disc. The possibilities are playing is not available on the current Disc or not available at the top and bottom of the CD...
User manual
Page 7
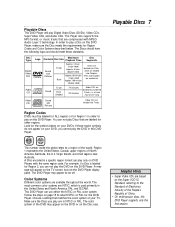
...world. The most common color systems are NTSC, which are divided into Chapters. The color system of the DVD may appear on the DVD or on the TV screen, but not the DVD Player display panel. Playable Discs 7 The number inside the globe refers to the Standard of Electronics Industry of ...based on your TV. The Discs should have the following logos and should meet these region symbols do not appear on DVD Players with MPEG Audio Layer 3 technology. This DVD Player can not play are compressed with the same region code. Make sure the Discs you cannot play on page 15 ...
...world. The most common color systems are NTSC, which are divided into Chapters. The color system of the DVD may appear on the DVD or on the TV screen, but not the DVD Player display panel. Playable Discs 7 The number inside the globe refers to the Standard of Electronics Industry of ...based on your TV. The Discs should have the following logos and should meet these region symbols do not appear on DVD Players with MPEG Audio Layer 3 technology. This DVD Player can not play are compressed with the same region code. Make sure the Discs you cannot play on page 15 ...

User manual
Page 8
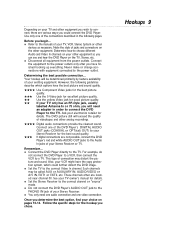
... commercially available cleaners, or anti-static spray intended for about one hour with no barriers between the remote control and the DVD Player. q When placing the DVD Player in a cabinet, allow about one inch of space all operations. Other cleaning methods may cloud over if you suddenly move the... DVD Player from cold to excessive moisture, rain, sand, or heat sources. q Place the DVD Player on the lens. Do not mix old and new batteries or different types of packaging materials, ...
... commercially available cleaners, or anti-static spray intended for about one hour with no barriers between the remote control and the DVD Player. q When placing the DVD Player in a cabinet, allow about one inch of space all operations. Other cleaning methods may cloud over if you suddenly move the... DVD Player from cold to excessive moisture, rain, sand, or heat sources. q Place the DVD Player on the lens. Do not mix old and new batteries or different types of packaging materials, ...
User manual
Page 9
... Audio In jacks of your Stereo Receiver or TV. q You only need an adapter in the following guidelines describe which could connect the DVD Player. Hookups 9 Digital audio connections provide the clearest sound. Also, your VCR might have finished hooking up everything. Connect one video connection....details. Never make or change connections with equipment connected to the PHONO IN jack of your Stereo Receiver. q Do not connect the DVD Player's AUDIO OUT jack to the power outlet. Before you have the copy protection system, which options have the best picture and sound...
... Audio In jacks of your Stereo Receiver or TV. q You only need an adapter in the following guidelines describe which could connect the DVD Player. Hookups 9 Digital audio connections provide the clearest sound. Also, your VCR might have finished hooking up everything. Connect one video connection....details. Never make or change connections with equipment connected to the PHONO IN jack of your Stereo Receiver. q Do not connect the DVD Player's AUDIO OUT jack to the power outlet. Before you have the copy protection system, which options have the best picture and sound...
User manual
Page 10
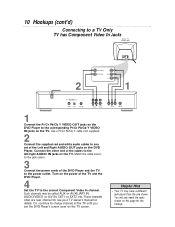
... this page for details. Such channels may have a different jack panel than the one set of the Left and Right AUDIO OUT jacks on the DVD Player. 10 Hookups (cont'd) Connecting to a TV Only TV has Component Video In Jacks Back of TV (example only) RIGHT AUDIO IN Y LEFT AUDIO IN Cb... OUT L PR/CR PB/CB Y VIDEO OUT (Y/C) S-VIDEO OUT 1 Connect the Pr/Cr Pb/Cb Y VIDEO OUT jacks on the DVD Player to change channels at the TV until you see the DVD Player's screen saver on the TV screen. Or, continue to the corresponding Pr/Cr Pb/Cb Y VIDEO IN jacks on the...
... this page for details. Such channels may have a different jack panel than the one set of the Left and Right AUDIO OUT jacks on the DVD Player. 10 Hookups (cont'd) Connecting to a TV Only TV has Component Video In Jacks Back of TV (example only) RIGHT AUDIO IN Y LEFT AUDIO IN Cb... OUT L PR/CR PB/CB Y VIDEO OUT (Y/C) S-VIDEO OUT 1 Connect the Pr/Cr Pb/Cb Y VIDEO OUT jacks on the DVD Player to change channels at the TV until you see the DVD Player's screen saver on the TV screen. Or, continue to the corresponding Pr/Cr Pb/Cb Y VIDEO IN jacks on the...
User manual
Page 11
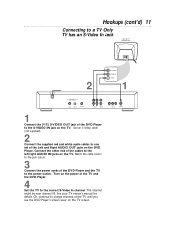
... jack colors. 3 Connect the power cords of the DVD Player to the S-VIDEO IN jack on the TV. Or, continue to change channels at the TV until you see the DVD Player's screen saver on the TV. Connect the other end of the TV and the DVD Player. 4 Set the TV to the correct S-Video In... channel. Turn on the DVD Player. This channel might be near channel 00. Use an S-Video cable (not...
... jack colors. 3 Connect the power cords of the DVD Player to the S-VIDEO IN jack on the TV. Or, continue to change channels at the TV until you see the DVD Player's screen saver on the TV. Connect the other end of the TV and the DVD Player. 4 Set the TV to the correct S-Video In... channel. Turn on the DVD Player. This channel might be near channel 00. Use an S-Video cable (not...
User manual
Page 12
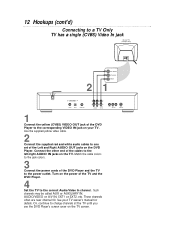
.... Use the supplied yellow video cable. 2 Connect the supplied red and white audio cables to one set of the DVD Player and the TV to the corresponding VIDEO IN jack on the DVD Player. These channels often are near channel 00. Such channels may be called AUX or AUXILIARY IN, AUDIO/VIDEO or A/V IN..., EXT1 or EXT2, etc. Or, continue to change channels at the TV until you see the DVD Player's screen saver on the power of the TV and the DVD Player. 4 Set the TV to the jack colors. 3 Connect the power cords of the Left and Right AUDIO OUT jacks on...
.... Use the supplied yellow video cable. 2 Connect the supplied red and white audio cables to one set of the DVD Player and the TV to the corresponding VIDEO IN jack on the DVD Player. These channels often are near channel 00. Such channels may be called AUX or AUXILIARY IN, AUDIO/VIDEO or A/V IN..., EXT1 or EXT2, etc. Or, continue to change channels at the TV until you see the DVD Player's screen saver on the power of the TV and the DVD Player. 4 Set the TV to the jack colors. 3 Connect the power cords of the Left and Right AUDIO OUT jacks on...
User manual
Page 13
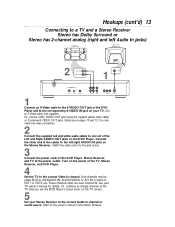
...AUXILIARY IN, AUDIO/VIDEO or A/V IN, S-Video In, EXT1 or EXT2, etc. Or, continue to change channels at the TV until you see the DVD Player's screen saver on the TV screen. 5 Set your Stereo Receiver to one video connection. 2 Connect the supplied red and white audio cables to the correct... S-Video cable to the S-VIDEO OUT jack of the cables to the correct Video In channel. See your TV. Connect the other end of the DVD Player and to the corresponding S-VIDEO IN jack on your TV owner's manual for details. Hookups (cont'd) 13 Connecting to a TV and a Stereo Receiver ...
...AUXILIARY IN, AUDIO/VIDEO or A/V IN, S-Video In, EXT1 or EXT2, etc. Or, continue to change channels at the TV until you see the DVD Player's screen saver on the TV screen. 5 Set your Stereo Receiver to one video connection. 2 Connect the supplied red and white audio cables to the correct... S-Video cable to the S-VIDEO OUT jack of the cables to the correct Video In channel. See your TV. Connect the other end of the DVD Player and to the corresponding S-VIDEO IN jack on your TV owner's manual for details. Hookups (cont'd) 13 Connecting to a TV and a Stereo Receiver ...

User manual
Page 14
...OUT jacks. Use a digital audio cable (not supplied). 2 Connect an S-Video cable to the S-VIDEO OUT jack of the TV, Stereo Receiver, and DVD Player. 5 Set the TV to the correct Video In channel. Or, change TV channels until you used the DIGITAL AUDIO OUT jacks. 14 Hookups (cont'd) Connecting...to the corresponding digital audio in jack on pages 10 and 12. Follow the instructions supplied with the subwoofer. 4 Connect the power cords of the DVD Player's DIGITAL AUDIO OUT jacks (COAXIAL or OPT(ical) OUT) to the correct Audio In channel or sound source. Details are on your TV manual...
...OUT jacks. Use a digital audio cable (not supplied). 2 Connect an S-Video cable to the S-VIDEO OUT jack of the TV, Stereo Receiver, and DVD Player. 5 Set the TV to the correct Video In channel. Or, change TV channels until you used the DIGITAL AUDIO OUT jacks. 14 Hookups (cont'd) Connecting...to the corresponding digital audio in jack on pages 10 and 12. Follow the instructions supplied with the subwoofer. 4 Connect the power cords of the DVD Player's DIGITAL AUDIO OUT jacks (COAXIAL or OPT(ical) OUT) to the correct Audio In channel or sound source. Details are on your TV manual...

User manual
Page 15
... ON/OFF to turn it on the display briefly. 4 SOUND PLAY OPEN / CLOSE PAUSE PREV NEXT STOP 2-3 Black Level Shift If you choose for the DVD Player and TV. will be selected. Press o or p to select On or Off, then press OK. 4 Press the SYSTEM MENU button to select Black level ... both NTSC and PAL and you play should have the same color system (NTSC or PAL) that appears is the current setting. 4 To change the DVD Player's NTSC/PAL setting, follow these steps. 1 Press the SYSTEM MENU button. So, if your TV. Slight picture distortions may select NTSC, PAL, or Auto in...
... ON/OFF to turn it on the display briefly. 4 SOUND PLAY OPEN / CLOSE PAUSE PREV NEXT STOP 2-3 Black Level Shift If you choose for the DVD Player and TV. will be selected. Press o or p to select On or Off, then press OK. 4 Press the SYSTEM MENU button to select Black level ... both NTSC and PAL and you play should have the same color system (NTSC or PAL) that appears is the current setting. 4 To change the DVD Player's NTSC/PAL setting, follow these steps. 1 Press the SYSTEM MENU button. So, if your TV. Slight picture distortions may select NTSC, PAL, or Auto in...

User manual
Page 16
...code. Load your Disc in the tray, with some DVDs. Playback will stop playback at which you last stopped playback on a DVD, press PLAY B. 16 Playing a Disc DVD AUDIO CD VIDEO CD 1 Press the POWER ON/OFF button on the front of the DVD Player to open the disc tray. If the Disc is two...-sided, make sure the side you want to the last four discs you see Resume IB on the DVD Player's display. The num- Helpful Hints • If the Disc is 1 (one). The Player's region code is Locked by 1 SOUND PLAY OPEN / CLOSE PAUSE PREV NEXT STOP 2-3 2 Press OPEN/CLOSE on the ...
...code. Load your Disc in the tray, with some DVDs. Playback will stop playback at which you last stopped playback on a DVD, press PLAY B. 16 Playing a Disc DVD AUDIO CD VIDEO CD 1 Press the POWER ON/OFF button on the front of the DVD Player to open the disc tray. If the Disc is two...-sided, make sure the side you want to the last four discs you see Resume IB on the DVD Player's display. The num- Helpful Hints • If the Disc is 1 (one). The Player's region code is Locked by 1 SOUND PLAY OPEN / CLOSE PAUSE PREV NEXT STOP 2-3 2 Press OPEN/CLOSE on the ...

User manual
Page 19
... all the Tracks in random order. 2 To return to ensure Scan and Shuffle operate as described above. SHUFFLE OFF will appear briefly on the DVD Player display panel. SCAN OFF will appear briefly on pages 36-39. SCAN will appear briefly on the Disc. 1 Press the SCAN button. SHUFFLE ... display panel. 2 1-2 DVD AUDIO CD VIDEO CD Shuffle On a DVD, this shuffles the playing order of Chapters within a Title, if the Title includes more than one Chapter. Scan, Shuffle 19 DVD AUDIO CD VIDEO CD Scan Scanning plays the first 10 seconds of each Chapter/Track on the DVD Player display panel.
... all the Tracks in random order. 2 To return to ensure Scan and Shuffle operate as described above. SHUFFLE OFF will appear briefly on the DVD Player display panel. SCAN OFF will appear briefly on pages 36-39. SCAN will appear briefly on the Disc. 1 Press the SCAN button. SHUFFLE ... display panel. 2 1-2 DVD AUDIO CD VIDEO CD Shuffle On a DVD, this shuffles the playing order of Chapters within a Title, if the Title includes more than one Chapter. Scan, Shuffle 19 DVD AUDIO CD VIDEO CD Scan Scanning plays the first 10 seconds of each Chapter/Track on the DVD Player display panel.
User manual
Page 20
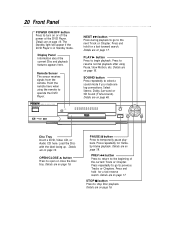
...during playback to go to stop Disc playback. Press to resume normal playback after using the remote to operate the DVD Player. SOUND PLAY OPEN / CLOSE PAUSE PREV NEXT STOP Disc Tray Insert a DVD, Video CD, or Audio CD here. Details are on page 18. Details are on or off the power... to previous Tracks or Chapters. 20 Front Panel POWER ON/OFF button Press to turn on page 16. The Standby light will appear if the DVD Player is in Standby mode. Details are on page 16. Select Stereo, Dolby Surround or 3D Sound (TruSurround). Details are on page 46. Press ...
...during playback to go to stop Disc playback. Press to resume normal playback after using the remote to operate the DVD Player. SOUND PLAY OPEN / CLOSE PAUSE PREV NEXT STOP Disc Tray Insert a DVD, Video CD, or Audio CD here. Details are on page 18. Details are on or off the power... to previous Tracks or Chapters. 20 Front Panel POWER ON/OFF button Press to turn on page 16. The Standby light will appear if the DVD Player is in Standby mode. Details are on page 16. Select Stereo, Dolby Surround or 3D Sound (TruSurround). Details are on page 46. Press ...

User manual
Page 21
... power to the S-Video In jack of the jacks on your Subwoofer (not supplied). S-VIDEO OUT (Y/C) Connect an optional S-Video cable here and to the DVD Player.
... power to the S-Video In jack of the jacks on your Subwoofer (not supplied). S-VIDEO OUT (Y/C) Connect an optional S-Video cable here and to the DVD Player.

User manual
Page 22
... during playback to directly select a Chapter or Track for reverse or forward searching. Or, press to put the DVD Player in a menu. RETURN / RESUME Button Press to go back to pause DVD playback. SYSTEM MENU Button Press to access or remove the menu of each Track or Chapter on the current... are on page 19. Details are on page 27. REPEAT A-B Button Press to select an item in which play the first 10 seconds of the DVD Player. Details are on page 16. Details are on page 24. back from those available on a Disc. Press p to select a subtitle language from the ...
... during playback to directly select a Chapter or Track for reverse or forward searching. Or, press to put the DVD Player in a menu. RETURN / RESUME Button Press to go back to pause DVD playback. SYSTEM MENU Button Press to access or remove the menu of each Track or Chapter on the current... are on page 19. Details are on page 27. REPEAT A-B Button Press to select an item in which play the first 10 seconds of the DVD Player. Details are on page 16. Details are on page 24. back from those available on a Disc. Press p to select a subtitle language from the ...

User manual
Page 24
...shortcut buttons on the remote control to select features, you want playback to begin. Also set up Languages, Access Control, Playback Control, and DVD Player display messages here. Sound Mode Select to remove all the Menu Bars from the TV screen. Details are on page 46. Details are ... here. For example, some Discs let you connected to select an item. Details are on the screen, press the o p B s buttons to the DVD Player. Press SYSTEM MENU repeatedly to slow the speed of DVD playback. Details are available. Smart Picture Choose a color setting that you prefer.
...shortcut buttons on the remote control to select features, you want playback to begin. Also set up Languages, Access Control, Playback Control, and DVD Player display messages here. Sound Mode Select to remove all the Menu Bars from the TV screen. Details are on page 46. Details are ... here. For example, some Discs let you connected to select an item. Details are on the screen, press the o p B s buttons to the DVD Player. Press SYSTEM MENU repeatedly to slow the speed of DVD playback. Details are available. Smart Picture Choose a color setting that you prefer.

User manual
Page 26
...CD case for the Title. 2 Press the s B o p buttons on the remote control to select items in the menu, then press OK to continue. Use the DVD Player's remote control buttons as directed by the Video CD. 2 Press RETURN to go to remove the menu. 1,3 2 VIDEO CD Playback Control (PBC) This feature is.... 1 Load a Video CD with Playback Control. The Video CD will be compatible with PBC and press the PLAY B button. 26 Disc Menus, Playback Control DVD Title/Disc menus 1 Press the DISC MENU button. The Video CD must be selected; Continue until you set up all the features you want. 3 If...
...CD case for the Title. 2 Press the s B o p buttons on the remote control to select items in the menu, then press OK to continue. Use the DVD Player's remote control buttons as directed by the Video CD. 2 Press RETURN to go to remove the menu. 1,3 2 VIDEO CD Playback Control (PBC) This feature is.... 1 Load a Video CD with Playback Control. The Video CD will be compatible with PBC and press the PLAY B button. 26 Disc Menus, Playback Control DVD Title/Disc menus 1 Press the DISC MENU button. The Video CD must be selected; Continue until you set up all the features you want. 3 If...

User manual
Page 30
.... to enter the same code, exactly, twice. Philips cannot guarantee the availability of Access Control with all Discs, and therefore denies any four numbers you set your code for the very first time; Make sure your Discs play according to the DVD Player. When doing this the first time, enter any... to enter the four-digit code twice when you allow children access to your old four-digit code. or cancel the code. 30 Access Control DVD VIDEO CD Access Control limits viewing of Discs. exactly - Setting or Changing the 4-digit Code 1 Press the SYSTEM MENU button. Then, enter it . 6...
.... to enter the same code, exactly, twice. Philips cannot guarantee the availability of Access Control with all Discs, and therefore denies any four numbers you set your code for the very first time; Make sure your Discs play according to the DVD Player. When doing this the first time, enter any... to enter the four-digit code twice when you allow children access to your old four-digit code. or cancel the code. 30 Access Control DVD VIDEO CD Access Control limits viewing of Discs. exactly - Setting or Changing the 4-digit Code 1 Press the SYSTEM MENU button. Then, enter it . 6...

User manual
Page 32
... You may have a different ID for each side. When the list is full and a new Disc is added, the last Disc in the DVD Player and the DVD Player power is On. The Access Control message will be removed from the list. 1 Insert a Disc. Details are on page 30. The next ...on the TV screen. Then, press the Number buttons to stop playback. If you insert the Disc, playback begins automatically and { appears on the DVD Player, the Disc will appear when you are coded with rating information or Parental Control levels. Press SYSTEM MENU, then press PLAY B to start playback...
... You may have a different ID for each side. When the list is full and a new Disc is added, the last Disc in the DVD Player and the DVD Player power is On. The Access Control message will be removed from the list. 1 Insert a Disc. Details are on page 30. The next ...on the TV screen. Then, press the Number buttons to stop playback. If you insert the Disc, playback begins automatically and { appears on the DVD Player, the Disc will appear when you are coded with rating information or Parental Control levels. Press SYSTEM MENU, then press PLAY B to start playback...


