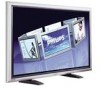

Leaflet
Page 3
Plasma monitor 50" WXGA Specifications BDH5021V/27 Picture/Display • Display screen type: WXGA Plasma panel • Panel Size: 50" / 127cm • Aspect ratio: 16:9 • Panel resolution: 1366 x 768p •... 390 Watts (typical) • Power supply: 100-240VAC, 50/60Hz • Sleep Mode: 5 Watts Max. www.philips.com or their respective owners. Dimensions • Dimensions (without notice... Power Cord • User Guide on CD-ROM: (RS232 protocol included) • User Manual: English Miscellaneous • Bezel: Metallic Antracite • Issue date 2009-07-31 Version:...
Plasma monitor 50" WXGA Specifications BDH5021V/27 Picture/Display • Display screen type: WXGA Plasma panel • Panel Size: 50" / 127cm • Aspect ratio: 16:9 • Panel resolution: 1366 x 768p •... 390 Watts (typical) • Power supply: 100-240VAC, 50/60Hz • Sleep Mode: 5 Watts Max. www.philips.com or their respective owners. Dimensions • Dimensions (without notice... Power Cord • User Guide on CD-ROM: (RS232 protocol included) • User Manual: English Miscellaneous • Bezel: Metallic Antracite • Issue date 2009-07-31 Version:...
User manual
Page 1
Philips Business Solutions EN User Manual TYPE Nr. BDS4241V BDH4241V BDH5021V
Philips Business Solutions EN User Manual TYPE Nr. BDS4241V BDH4241V BDH5021V

User manual
Page 2
User Manual BDS4241V/BDH4241/BDH5021V TABLE OF CONTENTS IMPO RT AN T N O T ES AN D SAFET Y IN ST RUC T IO N S 3 1.1 Safety Instructions 3 1.2 FCC Instruction 5 1.3 End-Of-Life Disposal 6 UNPAC KING AND INST ...
User Manual BDS4241V/BDH4241/BDH5021V TABLE OF CONTENTS IMPO RT AN T N O T ES AN D SAFET Y IN ST RUC T IO N S 3 1.1 Safety Instructions 3 1.2 FCC Instruction 5 1.3 End-Of-Life Disposal 6 UNPAC KING AND INST ...

User manual
Page 4
User Manual BDS4241V/BDH4241/BDH5021V 1. IMPORTANT NOTES AND SAFETY INSTRUCTIONS 1.1 Safty Instructions CAUTION RISK OF ELECTRIC SHOCK DO NOT OPEN .) • • • • • re if it is connected to re.) 3
User Manual BDS4241V/BDH4241/BDH5021V 1. IMPORTANT NOTES AND SAFETY INSTRUCTIONS 1.1 Safty Instructions CAUTION RISK OF ELECTRIC SHOCK DO NOT OPEN .) • • • • • re if it is connected to re.) 3

User manual
Page 5
User Manual BDS4241V/BDH4241/BDH5021V CAUTION • • Should not be adhered to a power supply plug and receptacle. (This can result in a risk of re) • Do not use a soft ... hot place because it down) • Do not damage the power cord. (This can result in a risk of re or electric shock) • The PDP panel is broken. • Do not cover this product with the wet hand. (This can result in a risk of electric shock) • Bend down the outdoor...
User Manual BDS4241V/BDH4241/BDH5021V CAUTION • • Should not be adhered to a power supply plug and receptacle. (This can result in a risk of re) • Do not use a soft ... hot place because it down) • Do not damage the power cord. (This can result in a risk of re or electric shock) • The PDP panel is broken. • Do not cover this product with the wet hand. (This can result in a risk of electric shock) • Bend down the outdoor...

User manual
Page 6
...for connection to any interference received, including interference that the ampere rating of the FCC rules. (TV broadcast receivers with the instruction manual, may cause harmful interference to cause harmful interference in diameter models only) 5 For 120 Volt applications, use shielded signal interface ... following two conditions: 1. This device must use only UL Listed detachable power cord with IEC320 style terminations. User Manual BDS4241V/BDH4241/BDH5021V 1.2 FCC Information User Instructions This device complies with similar configuration. It may cause undesired operation.
...for connection to any interference received, including interference that the ampere rating of the FCC rules. (TV broadcast receivers with the instruction manual, may cause harmful interference to cause harmful interference in diameter models only) 5 For 120 Volt applications, use shielded signal interface ... following two conditions: 1. This device must use only UL Listed detachable power cord with IEC320 style terminations. User Manual BDS4241V/BDH4241/BDH5021V 1.2 FCC Information User Instructions This device complies with similar configuration. It may cause undesired operation.
User manual
Page 7
... the amount of reusable materials and minimize the amounts which should not be thrown away when depleted, but should be recycled and re-used. User Manual BDS4241V/BDH4241/BDH5021V 1.3 END-OF-LIFE DISPOSAL This Philips product and its packaging contain materials that cna be handed in and disposed of as small chemical waste.
... the amount of reusable materials and minimize the amounts which should not be thrown away when depleted, but should be recycled and re-used. User Manual BDS4241V/BDH4241/BDH5021V 1.3 END-OF-LIFE DISPOSAL This Philips product and its packaging contain materials that cna be handed in and disposed of as small chemical waste.
User manual
Page 9
... carton ensure that the content is rccommended to 43kg. Any other optional accessories will be handled with batteries 3 User Manual on the type-from29 to move it is in a carton, to the size and weight it by 2 people.... ROM 4 Power Cables 5 VGA, DVI cable 6 Table stand(feet) User Manual R emote C ontrol/ AAA B atteries P ower C ord 8 Never place the monitor with the glass faced down unless it is... with your package content : 1 Monitor 2 Remote Control with care. User Manual BDS4241V/BDH4241/BDH5021V 2. Due to gether with pads.
... carton ensure that the content is rccommended to 43kg. Any other optional accessories will be handled with batteries 3 User Manual on the type-from29 to move it is in a carton, to the size and weight it by 2 people.... ROM 4 Power Cables 5 VGA, DVI cable 6 Table stand(feet) User Manual R emote C ontrol/ AAA B atteries P ower C ord 8 Never place the monitor with the glass faced down unless it is... with your package content : 1 Monitor 2 Remote Control with care. User Manual BDS4241V/BDH4241/BDH5021V 2. Due to gether with pads.

User manual
Page 10
... agent. Avoid installing the product in height. If an extended line is installed horizontally. The distance between the back of the electronic components. User Manual BDS4241V/BDH4241/BDH5021V 2.3 INSTALLATION NOTES Due to avoid tipping. The product should be installed on a flat surface to the high power consumption, always use the plug exclusively...
... agent. Avoid installing the product in height. If an extended line is installed horizontally. The distance between the back of the electronic components. User Manual BDS4241V/BDH4241/BDH5021V 2.3 INSTALLATION NOTES Due to avoid tipping. The product should be installed on a flat surface to the high power consumption, always use the plug exclusively...
User manual
Page 11
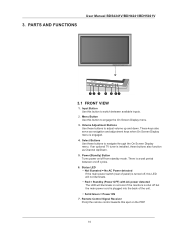
There is plugged into the back of panel) is engaged. 4. Red = Standby (Power OFF) with AC power detected The LED will not illuminate. 3. Menu Button Use this button to navigate through the On ... ON 7. If an optional TV tuner is installed, these buttons to switch between on /off , this spot on the PDP. 10 PARTS AND FUNCTIONS User Manual BDS4241V/BDH4241/BDH5021V 1 12 13 14 15 16 17 3.1 FRONT VIEW 1.
There is plugged into the back of panel) is engaged. 4. Red = Standby (Power OFF) with AC power detected The LED will not illuminate. 3. Menu Button Use this button to navigate through the On ... ON 7. If an optional TV tuner is installed, these buttons to switch between on /off , this spot on the PDP. 10 PARTS AND FUNCTIONS User Manual BDS4241V/BDH4241/BDH5021V 1 12 13 14 15 16 17 3.1 FRONT VIEW 1.
User manual
Page 12
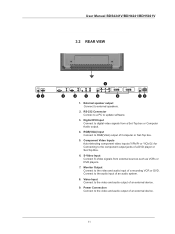
User Manual BDS4241V/BDH4241/BDH5021V 3.2 REAR VIEW 1 12 17 VIDEO 2 VIDEO 1 13 14 15 16 1 81 1 19 1. S-Video Input Connect S-Video signals from a Set-Top box or Computer Audio output. 4. ...
User Manual BDS4241V/BDH4241/BDH5021V 3.2 REAR VIEW 1 12 17 VIDEO 2 VIDEO 1 13 14 15 16 1 81 1 19 1. S-Video Input Connect S-Video signals from a Set-Top box or Computer Audio output. 4. ...
User manual
Page 13
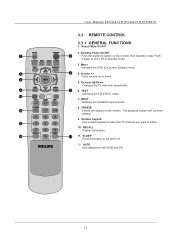
U ser Manual BD S 4241V /B D H 4241V /B D H 5021V 3.3 REMOTE CONTROL 3.3.1 GENERAL FUNCTIONS 1. TEXT Activates the TELETEXT mode. 112 7. FREEZE 18 Freeze the display on the monitor from Standby mode. ...
U ser Manual BD S 4241V /B D H 4241V /B D H 5021V 3.3 REMOTE CONTROL 3.3.1 GENERAL FUNCTIONS 1. TEXT Activates the TELETEXT mode. 112 7. FREEZE 18 Freeze the display on the monitor from Standby mode. ...

User manual
Page 14
Replace the cover. alkaline and managnese. 13 U ser Manual BD S 4241V /B D H 4241V /B D H 5021V 3.3.2 INSERTING THE BATTERIES IN THE REMOTE CONTROL 1. Note : Do not mix battery types, e.g. Remove the cover on the rear of the batteries are correctl aligned. 3. Insert two AAA size 1.5V batteries ensuring that the "+" and "-" ends of the remote control. 2.
Replace the cover. alkaline and managnese. 13 U ser Manual BD S 4241V /B D H 4241V /B D H 5021V 3.3.2 INSERTING THE BATTERIES IN THE REMOTE CONTROL 1. Note : Do not mix battery types, e.g. Remove the cover on the rear of the batteries are correctl aligned. 3. Insert two AAA size 1.5V batteries ensuring that the "+" and "-" ends of the remote control. 2.
User manual
Page 15
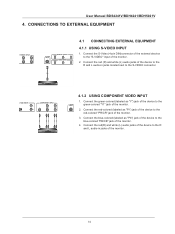
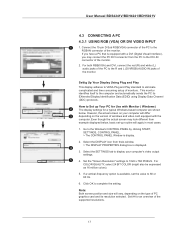
.... 4.1.2 USING COMPONENT VIDEO INPUT 1. Connect the S-Video (4-pin DIN)connector of the external decvice to the red-colored "PR/CR" jack of the monitor. 2. User Manual BDS4241V/BDH4241/BDH5021V 4.
.... 4.1.2 USING COMPONENT VIDEO INPUT 1. Connect the S-Video (4-pin DIN)connector of the external decvice to the red-colored "PR/CR" jack of the monitor. 2. User Manual BDS4241V/BDH4241/BDH5021V 4.

User manual
Page 16
U ser Manual BD S 4241V /B D H 4241V /B D H 5021V VIDEO 2 4.1.3 USING VIDEO INPUT 1. Connect the red (R) and white (L) audio jacks to the R and L audioin jacks located next to the VIDO ...
U ser Manual BD S 4241V /B D H 4241V /B D H 5021V VIDEO 2 4.1.3 USING VIDEO INPUT 1. Connect the red (R) and white (L) audio jacks to the R and L audioin jacks located next to the VIDO ...

User manual
Page 17
U ser Manual BD S 4241V /B D H 4241V /B D H 5021V 4.2 EXTERNAL AUDIO CONNECTION 4.2.1 CONNECTING EXTERNAL AMPLIFIED SPEAKERS This monitor can be connected to the external amplified speakers. 16 Connect the red (R) and white (L) AUDIO OUT jacks to an external set of amplified speakers using the ADDIO OUT jacks located on the back of the monitor. 1.
U ser Manual BD S 4241V /B D H 4241V /B D H 5021V 4.2 EXTERNAL AUDIO CONNECTION 4.2.1 CONNECTING EXTERNAL AMPLIFIED SPEAKERS This monitor can be connected to the external amplified speakers. 16 Connect the red (R) and white (L) AUDIO OUT jacks to an external set of amplified speakers using the ADDIO OUT jacks located on the back of the monitor. 1.
User manual
Page 18
...Up Your Display Using Plug and Play This display adheres to VESA Plug and Play standard to the Window's CONTROL PANEL by clicking START, SETTINGS, CONTROL PANEL. > The CONTROL PANEL Window is available, set -up Your PC for Use with a DVI (Digital Visual Interface), you may look ... 6. If you have a PC that is displayed. 14 3. This monitor identifies itself to the DVI-IN connector of the supported resolutions. 17 User Manual BDS4241V/BDH4241/BDH5021V 4.3 CONNECTING A PC 4.3.1 USING RGB (VGA) OR DVI VIDEO INPUT 1 1. Set the "Screen Resolution" settings to the R and L (DVI/...
...Up Your Display Using Plug and Play This display adheres to VESA Plug and Play standard to the Window's CONTROL PANEL by clicking START, SETTINGS, CONTROL PANEL. > The CONTROL PANEL Window is available, set -up Your PC for Use with a DVI (Digital Visual Interface), you may look ... 6. If you have a PC that is displayed. 14 3. This monitor identifies itself to the DVI-IN connector of the supported resolutions. 17 User Manual BDS4241V/BDH4241/BDH5021V 4.3 CONNECTING A PC 4.3.1 USING RGB (VGA) OR DVI VIDEO INPUT 1 1. Set the "Screen Resolution" settings to the R and L (DVI/...
User manual
Page 19
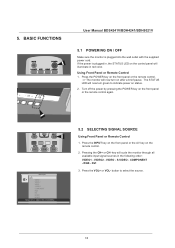
...Manual BDS4241V/BDH4241/BDH5021V 5.1 POWERING ON / OFF Make sure the monitor is plugged in, the STATUS LED on the control panel will now turn on after a brief pause. Press the INPUT key on the from panel or the AV key on the front panel or the remote control again. VIDEO2 - RGB - Using Front Panel... or VOL- 5. Press the POWER key on status. 2. Pressing the CH+ or CH- VOL +] Exit [MENU] 5.2 SELECTING SIGNAL SOURCE Using Front Panel or Remote Control 1. Turn off the power by pressing the POWER key on the remote control. 2. Main Input VIDEO 1 VIDEO 2 VIDEO S-VIDEO COMPONENT RGB...
...Manual BDS4241V/BDH4241/BDH5021V 5.1 POWERING ON / OFF Make sure the monitor is plugged in, the STATUS LED on the control panel will now turn on after a brief pause. Press the INPUT key on the from panel or the AV key on the front panel or the remote control again. VIDEO2 - RGB - Using Front Panel... or VOL- 5. Press the POWER key on status. 2. Pressing the CH+ or CH- VOL +] Exit [MENU] 5.2 SELECTING SIGNAL SOURCE Using Front Panel or Remote Control 1. Turn off the power by pressing the POWER key on the remote control. 2. Main Input VIDEO 1 VIDEO 2 VIDEO S-VIDEO COMPONENT RGB...
User manual
Page 20
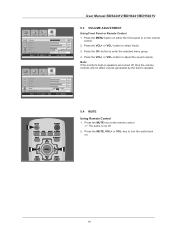
C H +A]djus t [- C H +]elect [- Press the MENU button on either the front panel or on the remote control. => The audio is cut off , then the volume controls will not affect volume generated by the built-in speaker. 5.4 MUTE ... 043 Mute ON OFF Audio Pres et [-VOL +] o tPres etAudio Move [- key to adjust the sound volume. Press the CH- SVO+L] E xit [ME NU] User Manual BDS4241V/BDH4241/BDH5021V 5.3 VOLUME ADJUSTMENT Using Front Panel or Remote Control 1. button to turn the audio back on. 19
C H +A]djus t [- C H +]elect [- Press the MENU button on either the front panel or on the remote control. => The audio is cut off , then the volume controls will not affect volume generated by the built-in speaker. 5.4 MUTE ... 043 Mute ON OFF Audio Pres et [-VOL +] o tPres etAudio Move [- key to adjust the sound volume. Press the CH- SVO+L] E xit [ME NU] User Manual BDS4241V/BDH4241/BDH5021V 5.3 VOLUME ADJUSTMENT Using Front Panel or Remote Control 1. button to turn the audio back on. 19
User manual
Page 21
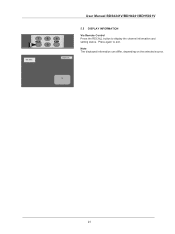
TV 20 Note The displayed information can differ, depending on the selected source. 001-ABC TIMER OFF User Manual BDS4241V/BDH4241/BDH5021V 5.5 DISPLAY INFORMATION Via Remote Control Press the RECALL button to exit. Press again to display the channel information and setting status.
TV 20 Note The displayed information can differ, depending on the selected source. 001-ABC TIMER OFF User Manual BDS4241V/BDH4241/BDH5021V 5.5 DISPLAY INFORMATION Via Remote Control Press the RECALL button to exit. Press again to display the channel information and setting status.


