
Quick start guide
Page 1
...Use manual accessible to operate. As an Energy Star® Partner, Philips Consumer Electronics has determined this product meets the Energy Star® guidelines for the TV to correctly maintain and care for your TV for optimal showroom viewing. Using products with the cursor up at ...for energy efficiency. Language Autoprogram Select your menu language with the Energy Star® label can change the Auto Picture setting to the TV 3-5 Operating the TV 5 Using the Remote Control 6 Using the On-screen Menu 7 Using the Demo Mode 7 Using the Installation Features 8 WARNING:...
...Use manual accessible to operate. As an Energy Star® Partner, Philips Consumer Electronics has determined this product meets the Energy Star® guidelines for the TV to correctly maintain and care for your TV for optimal showroom viewing. Using products with the cursor up at ...for energy efficiency. Language Autoprogram Select your menu language with the Energy Star® label can change the Auto Picture setting to the TV 3-5 Operating the TV 5 Using the Remote Control 6 Using the On-screen Menu 7 Using the Demo Mode 7 Using the Installation Features 8 WARNING:...

Quick start guide
Page 2
... the foam cushion polybag with your Philips Cineos TV, see the electronics dealer where you have positioned TV on a TV stand or other surface, remove the wooden 0-Degree Holder by pulling it on Floor Polybag 3 2 Polybag 4 Optional Swivel Rubber Bumpers 5 0-Degree Holder... 6 0-Degree Holder Screws Swivel in Center Position 2 Optional Stand Carefully lay the TV back flat on a flat surface. Guide the two rubber bumpers on the swivel into the corresponding holes on a flat surface. The swivel will block ...
... the foam cushion polybag with your Philips Cineos TV, see the electronics dealer where you have positioned TV on a TV stand or other surface, remove the wooden 0-Degree Holder by pulling it on Floor Polybag 3 2 Polybag 4 Optional Swivel Rubber Bumpers 5 0-Degree Holder... 6 0-Degree Holder Screws Swivel in Center Position 2 Optional Stand Carefully lay the TV back flat on a flat surface. Guide the two rubber bumpers on the swivel into the corresponding holes on a flat surface. The swivel will block ...

Quick start guide
Page 3
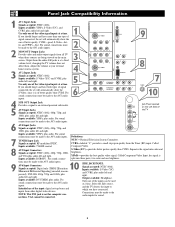
...DVI G S-VIDEO R L V AV6 Pr Pb Y R L V R L V G S-VIDEO AV5 R L R L RGB+HV R L STANDARD/ HD INPUTS STANDARD/ HD INPUTS R L Pr Pb Y Pr Pb Y TUNER Placing the TV on the Stand without the Swivel If you should decide not to purchase the optional swivel, you have already attached the swivel to the...and screw key to fasten the swivel to the stand. Rubber Locators Making Basic Connections to the TV Cable TV Connect the cable TV signal to the TUNER jack on the back of the TV. ing pins and align the pre-drilled holes on the position- This will help properly seat ...
...DVI G S-VIDEO R L V AV6 Pr Pb Y R L V R L V G S-VIDEO AV5 R L R L RGB+HV R L STANDARD/ HD INPUTS STANDARD/ HD INPUTS R L Pr Pb Y Pr Pb Y TUNER Placing the TV on the Stand without the Swivel If you should decide not to purchase the optional swivel, you have already attached the swivel to the...and screw key to fasten the swivel to the stand. Rubber Locators Making Basic Connections to the TV Cable TV Connect the cable TV signal to the TUNER jack on the back of the TV. ing pins and align the pre-drilled holes on the position- This will help properly seat ...

Quick start guide
Page 4
...Press the Cursor Down or Up buttons until the AV2 signal source is that the RF output on a cable box-labeled "TO TV," "OUT," or "OUTPUT," for the TO TV jack, such as OUTPUT or OUT. 2 Connect a coaxial cable (not supplied) to a connector on the signal splitter and ... S-VIDEO R L V Pr Pb Y R L V R L V G S-VIDEO R L STANDARD/ HD INPUTS STANDARD/ HD INPUTS R L AV5 AV6 DVI 43 R L R L RGB+HV 2 Pr Pb Y Pr Pb Y TUNER TV AV1:Other Source OK AV2:Other AV3:Other AV4:Other AV5:Other AV6:Other SIDE:Other Audio R (red) Audio L (white) Video (yellow) CABLE IN OUTPUT...
...Press the Cursor Down or Up buttons until the AV2 signal source is that the RF output on a cable box-labeled "TO TV," "OUT," or "OUTPUT," for the TO TV jack, such as OUTPUT or OUT. 2 Connect a coaxial cable (not supplied) to a connector on the signal splitter and ... S-VIDEO R L V Pr Pb Y R L V R L V G S-VIDEO R L STANDARD/ HD INPUTS STANDARD/ HD INPUTS R L AV5 AV6 DVI 43 R L R L RGB+HV 2 Pr Pb Y Pr Pb Y TUNER TV AV1:Other Source OK AV2:Other AV3:Other AV4:Other AV5:Other AV6:Other SIDE:Other Audio R (red) Audio L (white) Video (yellow) CABLE IN OUTPUT...

Quick start guide
Page 5
... the remote control or cabinet buttons during shipping by pressing the Standby-On button 2 on using Autoprogram to navigate the menu as described in the TV's memory. To navigate the menu, use the VOLUME + (up)/- (down) and CHANNEL K (up and down ) buttons to store channels in the previous ...contains a sensor that time. Remote Sensor Window Receives commands from the remote control. Active Standby Window Active Standby-the condition in which the TV is plugged into the AC outlet and is entered by a adhesive plastic film. The 30-second Active Standby period at power off state...
... the remote control or cabinet buttons during shipping by pressing the Standby-On button 2 on using Autoprogram to navigate the menu as described in the TV's memory. To navigate the menu, use the VOLUME + (up)/- (down) and CHANNEL K (up and down ) buttons to store channels in the previous ...contains a sensor that time. Remote Sensor Window Receives commands from the remote control. Active Standby Window Active Standby-the condition in which the TV is plugged into the AC outlet and is entered by a adhesive plastic film. The 30-second Active Standby period at power off state...
Quick start guide
Page 6
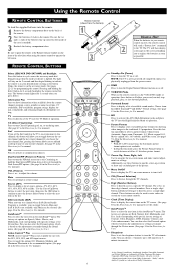
... option, which is not available, only Main can choose-5 minutes up to select a picture format. DNM Press to turn the TV on or off . Copyright 2004 Philips Consumer Electronics. Be sure the (+) and (-) ends of the batteries line up or down will allow you set the Surf control... in the TV's on-screen menu to two channels, this button to toggle the options Off, Minimum, Medium, and Maximum. For a two-...
... option, which is not available, only Main can choose-5 minutes up to select a picture format. DNM Press to turn the TV on or off . Copyright 2004 Philips Consumer Electronics. Be sure the (+) and (-) ends of the batteries line up or down will allow you set the Surf control... in the TV's on-screen menu to two channels, this button to toggle the options Off, Minimum, Medium, and Maximum. For a two-...

Quick start guide
Page 7
...of this mode is Autoprogram to show a box containing a list of Demo mode options. ® ® ® PIP 2 4 1 P TV Settings Demo Install Picture Sound Features Channels Auto demo Demo Dual screen Freeze-Replay-Photo finish Install Main Menu Picture - - - Some may have multiple ...features that you to move along linked paths tied to specific Feature Title categories ("TV," "Picture," "Sound," "Features," and "Channels"). Others may show the on-screen menu. 2 Press the Cursor Down button repeatedly until "...
...of this mode is Autoprogram to show a box containing a list of Demo mode options. ® ® ® PIP 2 4 1 P TV Settings Demo Install Picture Sound Features Channels Auto demo Demo Dual screen Freeze-Replay-Photo finish Install Main Menu Picture - - - Some may have multiple ...features that you to move along linked paths tied to specific Feature Title categories ("TV," "Picture," "Sound," "Features," and "Channels"). Others may show the on-screen menu. 2 Press the Cursor Down button repeatedly until "...

Quick start guide
Page 8
...confirm. Press the cursor down . For Spanish- Select "Cable" for normal outside- When "Automatic" is English Autoprogram Your TV can select. Autoprogram Install mode Install Antenna Automatic Cable Autoprogram Install mode Install Start To Autoprogram Analog channels, press the right ... Language control enables you to set itself for you to start the programming process. Autoprogram Install mode Install The TV will prompt you to proceed. Autoprogram Install mode Install Automatic Autoprogram Install mode Install Searching 24 analog channels found Autoprogram...
...confirm. Press the cursor down . For Spanish- Select "Cable" for normal outside- When "Automatic" is English Autoprogram Your TV can select. Autoprogram Install mode Install Antenna Automatic Cable Autoprogram Install mode Install Start To Autoprogram Analog channels, press the right ... Language control enables you to set itself for you to start the programming process. Autoprogram Install mode Install The TV will prompt you to proceed. Autoprogram Install mode Install Automatic Autoprogram Install mode Install Searching 24 analog channels found Autoprogram...

User manual
Page 1
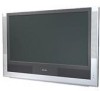
™ HDTV Monitor 55PL9224 55PL9524 62PL9524 Highlights • Liquid-crystal-on-silicon (LCOS) High-definition Imaging • High-resolution Display-1280 x 720 pixels Features • Digital Natural Motion™ • ... and DVI Input • Side AV Convenience Jacks • Matching stand and swivel available Refer to the Quick Use and Setup Guide (supplied with your TV) for information on basic connections, remote control button descriptions, on-screen menu language, and Autoprogram. 3135 035 22903 8/3/04
™ HDTV Monitor 55PL9224 55PL9524 62PL9524 Highlights • Liquid-crystal-on-silicon (LCOS) High-definition Imaging • High-resolution Display-1280 x 720 pixels Features • Digital Natural Motion™ • ... and DVI Input • Side AV Convenience Jacks • Matching stand and swivel available Refer to the Quick Use and Setup Guide (supplied with your TV) for information on basic connections, remote control button descriptions, on-screen menu language, and Autoprogram. 3135 035 22903 8/3/04

User manual
Page 4
...Removing Channels from the Channel List 51 Using Lock Channel 52 Using Lock After 53 Blocking Programming Based on TV Ratings 54 Blocking Programming Based on Movie Ratings 55 Turning the Antenna Attenuator on or off 56 G GENERAL Using Surf 57 Using Dual Screen and PIP 58... a Time Zone and Setting the Daylight Savings Control 67 Using Installation Features: Language and Autoprogram . . .68 ADDITIONAL INFORMATION Cleaning the TV 69 Cleaning or Replacing the Filters 70 Replacing the Lamp 71-72 Resetting the Lamp's Lifetime Counter 73 Troubleshooting 74-75 Product Specifications 76...
...Removing Channels from the Channel List 51 Using Lock Channel 52 Using Lock After 53 Blocking Programming Based on TV Ratings 54 Blocking Programming Based on Movie Ratings 55 Turning the Antenna Attenuator on or off 56 G GENERAL Using Surf 57 Using Dual Screen and PIP 58... a Time Zone and Setting the Daylight Savings Control 67 Using Installation Features: Language and Autoprogram . . .68 ADDITIONAL INFORMATION Cleaning the TV 69 Cleaning or Replacing the Filters 70 Replacing the Lamp 71-72 Resetting the Lamp's Lifetime Counter 73 Troubleshooting 74-75 Product Specifications 76...

User manual
Page 5
... trademarks of moving picture elements. When you want. registered mark. Its unique and highly advanced processing calculates motion trajectories of Philips Consumer Electronics. The TV also has single PIP (free positioning), as well as you replace your existing equipment, please find a place in any ...find out about the local regulations regarding disposal of as small chemical waste. In addition, you . Energy Star® is on the rear of this manual. (In the unlikely event you missed the action, replay it can be easily handled by two persons. All rights ...
... trademarks of moving picture elements. When you want. registered mark. Its unique and highly advanced processing calculates motion trajectories of Philips Consumer Electronics. The TV also has single PIP (free positioning), as well as you replace your existing equipment, please find a place in any ...find out about the local regulations regarding disposal of as small chemical waste. In addition, you . Energy Star® is on the rear of this manual. (In the unlikely event you missed the action, replay it can be easily handled by two persons. All rights ...

User manual
Page 6
... each frame of video into 2 fields, one made up of even lines and one made up of odd lines. The TV broadcast industry is changing. Progressive scan, on your TV, you will need to whether the signal is reproduced by a letter: 480i, 480p, 720p and 1080i. Currently, the... by drawing all the even ones (2,4,6,....,480). Resolution information Image resolutions are commonly referred to a Cable Box,VCR, or Satellite Receiver Cable TV Signal (Analog) Your High-definition-ready Set POWER HIGH DEFINITION SELECT GUIDE INFO POWER STANDBY-ON DVD619 DVD/CD PLAYER OPEN/CLOSE STOP PLAY...
... each frame of video into 2 fields, one made up of even lines and one made up of odd lines. The TV broadcast industry is changing. Progressive scan, on your TV, you will need to whether the signal is reproduced by a letter: 480i, 480p, 720p and 1080i. Currently, the... by drawing all the even ones (2,4,6,....,480). Resolution information Image resolutions are commonly referred to a Cable Box,VCR, or Satellite Receiver Cable TV Signal (Analog) Your High-definition-ready Set POWER HIGH DEFINITION SELECT GUIDE INFO POWER STANDBY-ON DVD619 DVD/CD PLAYER OPEN/CLOSE STOP PLAY...

User manual
Page 7
...phone plugs to the antenna input on page 13 for the video inputs. Allows encrypted transmissions of jacks, cables, and connectors you to the TV. 7 Separating the video into three signals, these inputs provide excellent quality. Be sure to 75-ohm Twin-lead Adapter Accepts twin-lead ... available in this adapter. S-VIDEO Jack Cable Used: S-Video G S-VIDEO RGB+HV Input Jack Cable used in push-on or screw-on the TV. Your TV also has a monitor output ("MON OUT") video ("V") jack. to connect the audio cables, because the video jacks receive only the picture signal. ...
...phone plugs to the antenna input on page 13 for the video inputs. Allows encrypted transmissions of jacks, cables, and connectors you to the TV. 7 Separating the video into three signals, these inputs provide excellent quality. Be sure to 75-ohm Twin-lead Adapter Accepts twin-lead ... available in this adapter. S-VIDEO Jack Cable Used: S-Video G S-VIDEO RGB+HV Input Jack Cable used in push-on or screw-on the TV. Your TV also has a monitor output ("MON OUT") video ("V") jack. to connect the audio cables, because the video jacks receive only the picture signal. ...
User manual
Page 8
... you have both types of signal connected, the set will automatically show the S-Video, since it is split into color and brightness. changing the TV volume does not affect them. Called Composite Video. 8 AV5 Input Connectors Signals accepted: NTSC (480i), 480p, 720p, 1080i, and VGA plus ...plus audio left and right. Definitions: 7 TUNER Input Jack Signals accepted: RF modulated NTSC. YPbPr-provides the best quality video signal. Output from all TV when those sources are being viewed on the Left Side of the inputs can be made to the AV1 audio inputs. 2 AV1 R L V ...
... you have both types of signal connected, the set will automatically show the S-Video, since it is split into color and brightness. changing the TV volume does not affect them. Called Composite Video. 8 AV5 Input Connectors Signals accepted: NTSC (480i), 480p, 720p, 1080i, and VGA plus ...plus audio left and right. Definitions: 7 TUNER Input Jack Signals accepted: RF modulated NTSC. YPbPr-provides the best quality video signal. Output from all TV when those sources are being viewed on the Left Side of the inputs can be made to the AV1 audio inputs. 2 AV1 R L V ...

User manual
Page 9
...all accessory devices before you plug any unsafe situations, do not set . The optional Philips stand provides enough room for two accessory devices, side by a wall switch. • Turn off the TV and/or accessory devices before you connect or disconnect any surface that connections can circulate freely...the bottom of the set objects on shag carpet or any cables. • Ensure that air can be exposed to 6 inches of the TV. For safety, do not place objects on a surface that will block the air filters located underneath the set for ventilation. Optional Swivel ...
...all accessory devices before you plug any unsafe situations, do not set . The optional Philips stand provides enough room for two accessory devices, side by a wall switch. • Turn off the TV and/or accessory devices before you connect or disconnect any surface that connections can circulate freely...the bottom of the set objects on shag carpet or any cables. • Ensure that air can be exposed to 6 inches of the TV. For safety, do not place objects on a surface that will block the air filters located underneath the set for ventilation. Optional Swivel ...

User manual
Page 10
... by simply tuning to the desired channel. If you use Autoprogram, which you can watch the unscrambled programs by pressing the CH + or - Back of TV AV4 AV3 SUB OUT AV2 MON AV1 SERVICE 12C OUT G S-VIDEO R L V Pr Pb Y R L V R L V G S-VIDEO AV5 AV6 DVI ...3 R L R L RGB+HV R L STANDARD/ HD INPUTS STANDARD/ HD INPUTS R L Pr Pb Y Pr Pb Y Incoming Cable TV or Antenna Signal 2 TUNER 4 Press the AV+ button on Jacks and Plugs to simplify connections: Yellow: Video (Composite Video) Red: Right Audio White: Left Audio...
... by simply tuning to the desired channel. If you use Autoprogram, which you can watch the unscrambled programs by pressing the CH + or - Back of TV AV4 AV3 SUB OUT AV2 MON AV1 SERVICE 12C OUT G S-VIDEO R L V Pr Pb Y R L V R L V G S-VIDEO AV5 AV6 DVI ...3 R L R L RGB+HV R L STANDARD/ HD INPUTS STANDARD/ HD INPUTS R L Pr Pb Y Pr Pb Y Incoming Cable TV or Antenna Signal 2 TUNER 4 Press the AV+ button on Jacks and Plugs to simplify connections: Yellow: Video (Composite Video) Red: Right Audio White: Left Audio...

User manual
Page 11
... viewing of Cable Box (example only) NOTE: Since you desire. 11 The set is now switched to confirm your TV. 1 Connect the incoming cable TV signal to simplify connections: Yellow: Video (Composite Video) Red: Right Audio White: Left Audio. HELPFUL HINT Color Coding... R L V AV6 DVI 5 R L R L V R L G S-VIDEO AV5 RGB+HV R L STANDARD/ HD INPUTS Pr 2Pb Y R L STANDARD/ HD INPUTS 4Pr Pb Y TUNER Incoming Cable TV Signal 1 Signal Splitter TV AV1:Other Source OK AV2:Other AV3:Other AV4:Other AV5:Other AV6:Other SIDE:Other AUDIO L OUT IN R VIDEO ANT OUT IN OUT...
... viewing of Cable Box (example only) NOTE: Since you desire. 11 The set is now switched to confirm your TV. 1 Connect the incoming cable TV signal to simplify connections: Yellow: Video (Composite Video) Red: Right Audio White: Left Audio. HELPFUL HINT Color Coding... R L V AV6 DVI 5 R L R L V R L G S-VIDEO AV5 RGB+HV R L STANDARD/ HD INPUTS Pr 2Pb Y R L STANDARD/ HD INPUTS 4Pr Pb Y TUNER Incoming Cable TV Signal 1 Signal Splitter TV AV1:Other Source OK AV2:Other AV3:Other AV4:Other AV5:Other AV6:Other SIDE:Other AUDIO L OUT IN R VIDEO ANT OUT IN OUT...

User manual
Page 12
...to the AV2 SVIDEO input. 2 Using Stereo Audio cables, connect to the AUDIO OUT jacks on the back of Standard S-Video Device (example only) INFO TV 5 SURF SELECT CC SURR 4DNM HD SCREEN FORMAT ® ® ® ® PIP 4 P 3 AV+ ACTIVE SLEEP SAP CONTROL TIMER ... G S-VIDEO R L V AV6 Pr Pb Y R L V R L V G S-VIDEO AV5 R L R L RGB+HV R L STANDARD/ HD INPUTS STANDARD/ HD INPUTS R L Pr Pb Y Pr Pb Y TUNER TV Source OK AV1:Other AV2:Other AV3:Other AV4:Other AV5:Other AV6:Other SIDE:Other S-VIDEO OUT L R AUDIO OUT VIDEO ANT/CABLE OUT IN...
...to the AV2 SVIDEO input. 2 Using Stereo Audio cables, connect to the AUDIO OUT jacks on the back of Standard S-Video Device (example only) INFO TV 5 SURF SELECT CC SURR 4DNM HD SCREEN FORMAT ® ® ® ® PIP 4 P 3 AV+ ACTIVE SLEEP SAP CONTROL TIMER ... G S-VIDEO R L V AV6 Pr Pb Y R L V R L V G S-VIDEO AV5 R L R L RGB+HV R L STANDARD/ HD INPUTS STANDARD/ HD INPUTS R L Pr Pb Y Pr Pb Y TUNER TV Source OK AV1:Other AV2:Other AV3:Other AV4:Other AV5:Other AV6:Other SIDE:Other S-VIDEO OUT L R AUDIO OUT VIDEO ANT/CABLE OUT IN...

User manual
Page 13
HELPFUL HINTS • If you do not know whether your DVD player is now switched to the AV1 input source for your choice. Back of TV 2 AV4 AV3 SUB OUT AV2 MON AV1 SERVICE 12C OUT G S-VIDEO R L V AV6 DVI 1 Pr Pb Y R L V R L V G S-VIDEO AV5 R L R L RGB+HV R L STANDARD/ HD INPUTS... user manual for the viewing of Standard DVD Player (example only) STANDBY-ON DVD619 DVD/CD PLAYER OPEN/CLOSE STOP PLAY PAUSE PREV NEXT INFO TV 5 SURF SELECT CC SURR DNM 4HD SCREEN FORMAT ® ® ® ® PIP 4 P 3 AV+ ACTIVE SLEEP SAP CONTROL ...
HELPFUL HINTS • If you do not know whether your DVD player is now switched to the AV1 input source for your choice. Back of TV 2 AV4 AV3 SUB OUT AV2 MON AV1 SERVICE 12C OUT G S-VIDEO R L V AV6 DVI 1 Pr Pb Y R L V R L V G S-VIDEO AV5 R L R L RGB+HV R L STANDARD/ HD INPUTS... user manual for the viewing of Standard DVD Player (example only) STANDBY-ON DVD619 DVD/CD PLAYER OPEN/CLOSE STOP PLAY PAUSE PREV NEXT INFO TV 5 SURF SELECT CC SURR DNM 4HD SCREEN FORMAT ® ® ® ® PIP 4 P 3 AV+ ACTIVE SLEEP SAP CONTROL ...

User manual
Page 14
... and source labeling. left audio. • The names for the blue and red color component signal connectors, respectively, and Y indicates the luminance signal. Back of TV SERVICE 12C DVI G S-VIDEO R L V AV6 AV1 Pr Pb Y R L V OUT MON 2 AV2 R L V G S-VIDEO AV5 R L R L RGB+HV 1 SUB OUT AV3 R ... ~ Back of Progressivescan DVD Player (example only) STANDBY-ON DVD619 DVD/CD PLAYER OPEN/CLOSE STOP PLAY PAUSE PREV NEXT INFO SELECT DNM TV CC 6 SURF SURR 5HD SCREEN FORMAT ® ® ® ® PIP 5 P 4 AV+ ACTIVE SLEEP SAP CONTROL TIMER...
... and source labeling. left audio. • The names for the blue and red color component signal connectors, respectively, and Y indicates the luminance signal. Back of TV SERVICE 12C DVI G S-VIDEO R L V AV6 AV1 Pr Pb Y R L V OUT MON 2 AV2 R L V G S-VIDEO AV5 R L R L RGB+HV 1 SUB OUT AV3 R ... ~ Back of Progressivescan DVD Player (example only) STANDBY-ON DVD619 DVD/CD PLAYER OPEN/CLOSE STOP PLAY PAUSE PREV NEXT INFO SELECT DNM TV CC 6 SURF SURR 5HD SCREEN FORMAT ® ® ® ® PIP 5 P 4 AV+ ACTIVE SLEEP SAP CONTROL TIMER...


