Leaflet
Page 1
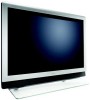
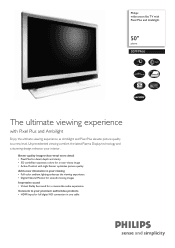
... audio/video products • HDMI input for a cinema-like audio experience Connects to a new level. Philips widescreen flat TV with Pixel Plus and Ambilight 50" plasma 50PF9966 The ultimate viewing experience with Light Sensor optimizes picture quality Add a new dimension to your viewing • Full-color ambient lighting enhances the viewing experience • Digital Natural Motion for smooth moving images Impressive sound • Virtual Dolby Surround for full digital HD connection in one cable...
... audio/video products • HDMI input for a cinema-like audio experience Connects to a new level. Philips widescreen flat TV with Pixel Plus and Ambilight 50" plasma 50PF9966 The ultimate viewing experience with Light Sensor optimizes picture quality Add a new dimension to your viewing • Full-color ambient lighting enhances the viewing experience • Digital Natural Motion for smooth moving images Impressive sound • Virtual Dolby Surround for full digital HD connection in one cable...
Leaflet
Page 2
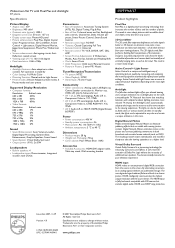
... White Sliver 11092 Accessories • Included Accessories: HDMI-DVI adapter cable, Table top stand, Wall mounting bracket • 50PF9966/37 Product highlights Pixel Plus Pixel Plus is fully backward compatible with Light Sensor uses a sensor to adjust the picture brightness depending on the room light conditions. In standby mode, the lights can also be operated to any source. 3D Combfilter The 3D comb filter separates brightness and color signals better in your viewing pleasure...
... White Sliver 11092 Accessories • Included Accessories: HDMI-DVI adapter cable, Table top stand, Wall mounting bracket • 50PF9966/37 Product highlights Pixel Plus Pixel Plus is fully backward compatible with Light Sensor uses a sensor to adjust the picture brightness depending on the room light conditions. In standby mode, the lights can also be operated to any source. 3D Combfilter The 3D comb filter separates brightness and color signals better in your viewing pleasure...
User manual
Page 4
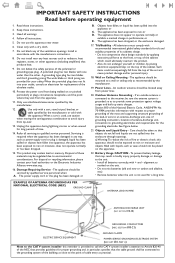
... for a long time. Read these instructions. 3. Do not defeat the safety purpose of these design standards by applying excessive pull force to rain; Protect the power cord from the top of the obsolete outlet. 10. Unplug this reminder is not used , use this apparatus. 22. Tilt/Stability - If an outside antenna is connected to the receiver, be taken so...
... for a long time. Read these instructions. 3. Do not defeat the safety purpose of these design standards by applying excessive pull force to rain; Protect the power cord from the top of the obsolete outlet. 10. Unplug this reminder is not used , use this apparatus. 22. Tilt/Stability - If an outside antenna is connected to the receiver, be taken so...
User manual
Page 5
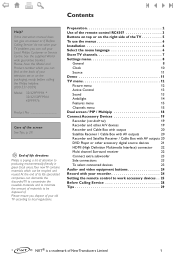
... 5 To use the menus 6 Installation 6 Select the menu language 6 Store TV channels 7 Settings menu 8 General 8 Clock 10 Source 11 Demo 11 TV menu 12 Picture menu 12 Active Control 13 Sound 13 Ambilight 14 Features menu 15 Channels menu 15 Dual screen / PIP / Multipip 18 Connect Accessory Devices 19 Recorder (vcr-dvd+rw) 19 Recorder and other accessory digital source devices 21 HDMI (High Definition Multimedia Interface) connector 22 Multi channel Surround receiver 22 Connect extra subwoofer...
... 5 To use the menus 6 Installation 6 Select the menu language 6 Store TV channels 7 Settings menu 8 General 8 Clock 10 Source 11 Demo 11 TV menu 12 Picture menu 12 Active Control 13 Sound 13 Ambilight 14 Features menu 15 Channels menu 15 Dual screen / PIP / Multipip 18 Connect Accessory Devices 19 Recorder (vcr-dvd+rw) 19 Recorder and other accessory digital source devices 21 HDMI (High Definition Multimedia Interface) connector 22 Multi channel Surround receiver 22 Connect extra subwoofer...

User manual
Page 6
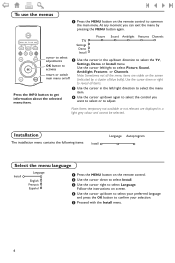
... the screen. A blue LED and the screen light on the separate template. For best picture quality use only the supplied aerial cables between the TV and recorder, and between recorder and aerial connector. ( Insert the power plug supplied into the aerial socket x at the top or side (according to local regulations. è Turn the TV on the remote control. When you press a button on : Press the power button POWER at...
... the screen. A blue LED and the screen light on the separate template. For best picture quality use only the supplied aerial cables between the TV and recorder, and between recorder and aerial connector. ( Insert the power plug supplied into the aerial socket x at the top or side (according to local regulations. è Turn the TV on the remote control. When you press a button on : Press the power button POWER at...
User manual
Page 7
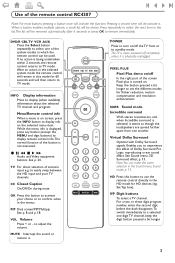
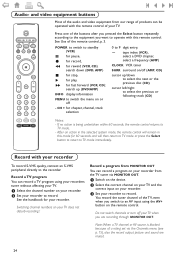
... resolution enhancement. Audio and Video equipment buttons. POWER DVD/R CBL TV VCR AUX ® INFO Ò TV SELECT º PIXEL PLUS ‡ π † CC SURR HD SURF SCREEN FORMAT ® ® OK ® ® PIP MENU + + VOL MUTE CH - - 1 2 3 4 5 6 7 8 9 AV+ 0 - CC Closed Caption On/Off/On during mute OK Press this button to activate your TV channels. MUTE Interrupt the sound or restore it . Use...
... resolution enhancement. Audio and Video equipment buttons. POWER DVD/R CBL TV VCR AUX ® INFO Ò TV SELECT º PIXEL PLUS ‡ π † CC SURR HD SURF SCREEN FORMAT ® ® OK ® ® PIP MENU + + VOL MUTE CH - - 1 2 3 4 5 6 7 8 9 AV+ 0 - CC Closed Caption On/Off/On during mute OK Press this button to activate your TV channels. MUTE Interrupt the sound or restore it . Use...
User manual
Page 8
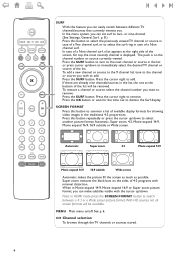
... screen. Press the SURF button to turn to the next channel or source in Movie expand 14:9, Movie expand 16:9 or Super zoom picture format, you want to dismiss the Surf display. To remove a channel or source: select the channel number you can set surf to add. Press the OK button or wait for showing video images in case of a Two channel surf, or to switch between different TV channels/sources...
... screen. Press the SURF button to turn to the next channel or source in Movie expand 14:9, Movie expand 16:9 or Super zoom picture format, you want to dismiss the Surf display. To remove a channel or source: select the channel number you can set surf to add. Press the OK button or wait for showing video images in case of a Two channel surf, or to switch between different TV channels/sources...
User manual
Page 9
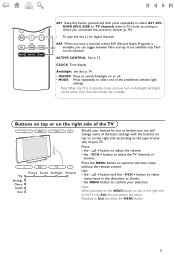
... digital channels. Only then less modes are available. Buttons on top or on the right side of the TV V MENU P/CH B V MENU P/CH B TV Settings Demo Install Exit Picture Sound Ambilight Features Should your TV. SAP When you tune a channels where SAP (Second Audio Program) is in standby mode, and you turn on top or the right side of the TV, only Exit lets you can still change...
... digital channels. Only then less modes are available. Buttons on top or on the right side of the TV V MENU P/CH B V MENU P/CH B TV Settings Demo Install Exit Picture Sound Ambilight Features Should your TV. SAP When you tune a channels where SAP (Second Audio Program) is in standby mode, and you turn on top or the right side of the TV, only Exit lets you can still change...
User manual
Page 10
... select the TV, OK button to confirm your selection. ( Proceed with the Install menu. 6 POWER Picture Sound Ambilight Features Channels DVD/R CBL TV VCR AUX ® INFO Ò TV SELECT º PIXEL PLUS ‡ π † CC SURR HD TV Settings Demo Install SURF SCREEN FORMAT ® ® OK ® ® PIP MENU cursor to select adjustments é Use the cursor in a light grey colour and cannot be...
... select the TV, OK button to confirm your selection. ( Proceed with the Install menu. 6 POWER Picture Sound Ambilight Features Channels DVD/R CBL TV VCR AUX ® INFO Ò TV SELECT º PIXEL PLUS ‡ π † CC SURR HD TV Settings Demo Install SURF SCREEN FORMAT ® ® OK ® ® PIP MENU cursor to select adjustments é Use the cursor in a light grey colour and cannot be...
User manual
Page 12
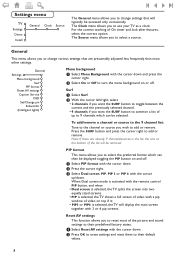
... a list of On timer and lock after features, select the correct option. Settings menu TV Settings Demo Install General Clock Source The General menu allows you to use your TV as a clock. Press the SURF button and press the cursor right to change various settings that will display the main screen together with 3 or 6 pip screens. " Select Dual screen, PIP, PIP 3 or PIP 6 with the cursor down . General Settings Menu background Surf PIP format Reset AV settings Caption Service OSD Set/Change...
... a list of On timer and lock after features, select the correct option. Settings menu TV Settings Demo Install General Clock Source The General menu allows you to use your TV as a clock. Press the SURF button and press the cursor right to change various settings that will display the main screen together with 3 or 6 pip screens. " Select Dual screen, PIP, PIP 3 or PIP 6 with the cursor down . General Settings Menu background Surf PIP format Reset AV settings Caption Service OSD Set/Change...
User manual
Page 13
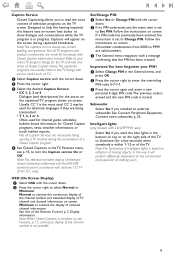
.... Set/Change PIN & Select Set or Change PIN with the cursor down. é Press the cursor right to turn the Caption service On or Off. See Connect Peripheral Equipment, Connect extra subwoofer, p. 23. OSD (On Screen Display) & Select OSD with the cursor down . é Press the cursor right. See Use of reduced channel information. Note: This television provides display of a Closed Caption program. ' See Closed Captions in progress. Follow the instructions...
.... Set/Change PIN & Select Set or Change PIN with the cursor down. é Press the cursor right to turn the Caption service On or Off. See Connect Peripheral Equipment, Connect extra subwoofer, p. 23. OSD (On Screen Display) & Select OSD with the cursor down . é Press the cursor right. See Use of reduced channel information. Note: This television provides display of a Closed Caption program. ' See Closed Captions in progress. Follow the instructions...
User manual
Page 15
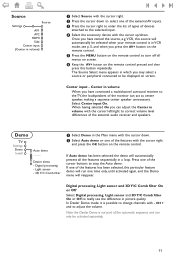
... center speaker unnecessary. Demo TV Settings Demo Install Auto demo ........... Source Settings Source AV1 AV2 HDMI Side Center input (Center in volume) & Select Source with the cursor left/right to correct volume level differences of the external audio receiver and speakers. Center in the Main menu with the cursor down to select one of the cursor buttons to adjust the volume. Light sensor - 3D Y/C Comb filter & Select Demo in volume When you have connected a multichannel surround receiver to...
... center speaker unnecessary. Demo TV Settings Demo Install Auto demo ........... Source Settings Source AV1 AV2 HDMI Side Center input (Center in volume) & Select Source with the cursor left/right to correct volume level differences of the external audio receiver and speakers. Center in the Main menu with the cursor down to select one of the cursor buttons to adjust the volume. Light sensor - 3D Y/C Comb filter & Select Demo in volume When you have connected a multichannel surround receiver to...
User manual
Page 16
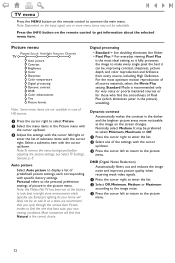
... enter the list of Pixel Plus (which typically use florescent lighting. Note: To remove the menu background before adjusting the picture settings, see Select TV Settings, General, p. 8. For the most ideal setting, as it fully processes the image to find the smoothness of submenu items with the cursor left to return to summon the main menu. Note: Dependent on the screen changes. Standard Mode is...
... enter the list of Pixel Plus (which typically use florescent lighting. Note: To remove the menu background before adjusting the picture settings, see Select TV Settings, General, p. 8. For the most ideal setting, as it fully processes the image to find the smoothness of submenu items with the cursor left to return to summon the main menu. Note: Dependent on the screen changes. Standard Mode is...

User manual
Page 17
... scale is switched off; Sound Sound TV Auto sound Equalizer Volume Balance Headphone volume Sound mode (Alt audio) (Mono/Stereo) (3D surround effect) Audio Only AVL Delta volume & Press the cursor right to display a list of the picture. Note: Active Control is divided into two parts: in the Sound menu, all menus on the Remote Control. Picture format This menu item performs the same as the SCREEN FORMAT button on screen. é The Active Control menu appears. Remember, control settings are being...
... scale is switched off; Sound Sound TV Auto sound Equalizer Volume Balance Headphone volume Sound mode (Alt audio) (Mono/Stereo) (3D surround effect) Audio Only AVL Delta volume & Press the cursor right to display a list of the picture. Note: Active Control is divided into two parts: in the Sound menu, all menus on the Remote Control. Picture format This menu item performs the same as the SCREEN FORMAT button on screen. é The Active Control menu appears. Remember, control settings are being...
User manual
Page 22
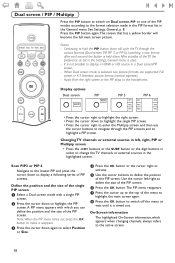
... the PIP menu times out, press the OK button to the format selection made in the PIP format list in the Settings, General menu is used. - On-Screen information The highlighted On-Screen information,which you can define the position and the size of the PIP modes according to make it is selected, two picture formats are supported: Full screen or 4:3 letterbox picture format (vertical squeeze). - Scan PIP3 or PIP 6 Navigate to change the TV channels or external sources...
... the PIP menu times out, press the OK button to the format selection made in the PIP format list in the Settings, General menu is used. - On-Screen information The highlighted On-Screen information,which you can define the position and the size of the PIP modes according to make it is selected, two picture formats are supported: Full screen or 4:3 letterbox picture format (vertical squeeze). - Scan PIP3 or PIP 6 Navigate to change the TV channels or external sources...

User manual
Page 26
... produce center sound, the loudspeakers connected to the audio receiver will be heard when a TV channel or external source is advised to switch your monitor. - Multi channel Surround receiver AUDIO CENTRE R SUBW. In case no signal is nothing wrong with HDMI-equipped devices like a PC, DVD-R, AV receiver... To get an optimal viewing, it is blocked via the multi channel Surround receiver. Note: No sound will produce Surround Sound.The volume has...
... produce center sound, the loudspeakers connected to the audio receiver will be heard when a TV channel or external source is advised to switch your monitor. - Multi channel Surround receiver AUDIO CENTRE R SUBW. In case no signal is nothing wrong with HDMI-equipped devices like a PC, DVD-R, AV receiver... To get an optimal viewing, it is blocked via the multi channel Surround receiver. Note: No sound will produce Surround Sound.The volume has...
User manual
Page 28
... record a TV program using the AV+ button on or off - " Set your recorder to record. See Use of the audio and video equipment from the TV tuner via the Channels menu (see p. 15), also the record output picture and sound are recording through MONITOR OUT. CH + for chapter, channel, track selection 0 to TV mode immediately. After an action in the selected system mode, the remote control will then return...
... record a TV program using the AV+ button on or off - " Set your recorder to record. See Use of the audio and video equipment from the TV tuner via the Channels menu (see p. 15), also the record output picture and sound are recording through MONITOR OUT. CH + for chapter, channel, track selection 0 to TV mode immediately. After an action in the selected system mode, the remote control will then return...
User manual
Page 29
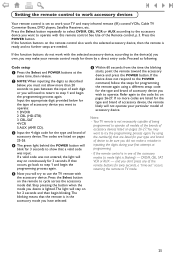
... your remote control ready for programming the remote again using the number(s) that the remote is in the accessory mode you will try the programming process again. Code setup & Press the Select and POWER buttons at programming. - Your TV remote is not necessarily capable of being programmed to operate all models of the brands of each digit or you have selected. § Within 60 seconds from the time the blinking...
... your remote control ready for programming the remote again using the number(s) that the remote is in the accessory mode you will try the programming process again. Code setup & Press the Select and POWER buttons at programming. - Your TV remote is not necessarily capable of being programmed to operate all models of the brands of each digit or you have selected. § Within 60 seconds from the time the blinking...
User manual
Page 32
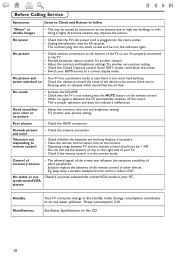
..., Specifications on the television again. power switched on Check the clearance around the vents of the device to be certain there are working. Try another auto picture setting. • Check the Closed Captions control. synchronized VGA picture Standby Miscellaneous Your TV consumes energy in your HDMI-source to a correct display mode. No sound • Increase the VOLUME. • Check that the TV's AC power cord is plugged into the mains socket and turn...
..., Specifications on the television again. power switched on Check the clearance around the vents of the device to be certain there are working. Try another auto picture setting. • Check the Closed Captions control. synchronized VGA picture Standby Miscellaneous Your TV consumes energy in your HDMI-source to a correct display mode. No sound • Increase the VOLUME. • Check that the TV's AC power cord is plugged into the mains socket and turn...
User manual
Page 34
...... Philips is free. It will direct you need to the duration of merchantability and fitness for a particular purpose. Box 520890, Miami, FL 33152, (402) 536-4171 30 All parts, including repaired and replaced parts, are expressed or implied, including any implied warranties of products damaged by signal conditions or cable or antenna systems outside of the product. • product repair and/or part replacement...
...... Philips is free. It will direct you need to the duration of merchantability and fitness for a particular purpose. Box 520890, Miami, FL 33152, (402) 536-4171 30 All parts, including repaired and replaced parts, are expressed or implied, including any implied warranties of products damaged by signal conditions or cable or antenna systems outside of the product. • product repair and/or part replacement...


