User manual
Page 3
... TV on/off or to standby Switch channels Adjust volume Watch channels from a set-top box Watch connected devices Watch a DVD 6 Use more of your TV Use the quick access menu Change picture and sound settings Use Auto Mode Create and use lists of favorite channels Set the clock Use child control and rating locks View closed captions (subtitles) View photos and play music on a USB device Use your TV in HD mode Use your TV as a PC monitor Use Philips EasyLink Use the demo mode 7 Install channels Select your menu language Set your location to home Automatically install channels Optimize the signal...
... TV on/off or to standby Switch channels Adjust volume Watch channels from a set-top box Watch connected devices Watch a DVD 6 Use more of your TV Use the quick access menu Change picture and sound settings Use Auto Mode Create and use lists of favorite channels Set the clock Use child control and rating locks View closed captions (subtitles) View photos and play music on a USB device Use your TV in HD mode Use your TV as a PC monitor Use Philips EasyLink Use the demo mode 7 Install channels Select your menu language Set your location to home Automatically install channels Optimize the signal...
User manual
Page 5
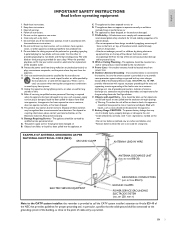
... SAFETY INSTRUCTIONS Read before operating equipment 1. Install in wire to an antennadischarge unit, size of grounding connectors, location of antennadischarge unit, connection to the point of cable entry as marked on the top of the obsolete outlet. 10. When the provided plug does not fit into the appliance; The appliance should be mounted to a wall or ceiling only as power-supply cord or plug...
... SAFETY INSTRUCTIONS Read before operating equipment 1. Install in wire to an antennadischarge unit, size of grounding connectors, location of antennadischarge unit, connection to the point of cable entry as marked on the top of the obsolete outlet. 10. When the provided plug does not fit into the appliance; The appliance should be mounted to a wall or ceiling only as power-supply cord or plug...
User manual
Page 6
... world. Failure to operate the equipment. VESA, FDMI and the VESA Mounting Compliant logo are trademarks of the Video Electronics Standards Association. ® Kensington and Micro Saver are registered US trademarks of ACCO World corporation with issued registrations and pending applications in accordance with the limits for a Class B digital device, pursuant to part 15 of light (red, green or blue) may...
... world. Failure to operate the equipment. VESA, FDMI and the VESA Mounting Compliant logo are trademarks of the Video Electronics Standards Association. ® Kensington and Micro Saver are registered US trademarks of ACCO World corporation with issued registrations and pending applications in accordance with the limits for a Class B digital device, pursuant to part 15 of light (red, green or blue) may...

User manual
Page 9
... from a different time zone. l Number buttons Select a channel, page or setting. t SLEEP Sets a delay after which the TV switches to the next or previous channel. u ACTIVE CONTROL The TV continuously measures and corrects incoming signals to the previously viewed channel. c FAV Displays a list of the information depends on the broadcaster.You might see 'Change picture format' on or off . o VOL +/Increases or decreases volume. f OPTION Activates the quick access menu (see 'Use Auto Mode' on page 13...
... from a different time zone. l Number buttons Select a channel, page or setting. t SLEEP Sets a delay after which the TV switches to the next or previous channel. u ACTIVE CONTROL The TV continuously measures and corrects incoming signals to the previously viewed channel. c FAV Displays a list of the information depends on the broadcaster.You might see 'Change picture format' on or off . o VOL +/Increases or decreases volume. f OPTION Activates the quick access menu (see 'Use Auto Mode' on page 13...
User manual
Page 10
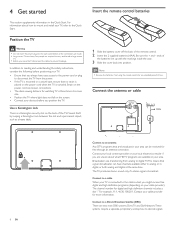
... handle a large screen TV. • Before you always have channels available either in analog or in your area can have easy access to the power cord or plug to prevent breakage. Be sure the + and - Use a Kensington lock There is broadcast. ends of the remote control. 2 Insert the 2 supplied batteries (AAA). Connect to a cable When your TV is three times its screen size. • Position the TV where light does not...
... handle a large screen TV. • Before you always have channels available either in analog or in your area can have easy access to the power cord or plug to prevent breakage. Be sure the + and - Use a Kensington lock There is broadcast. ends of the remote control. 2 Insert the 2 supplied batteries (AAA). Connect to a cable When your TV is three times its screen size. • Position the TV where light does not...
User manual
Page 11
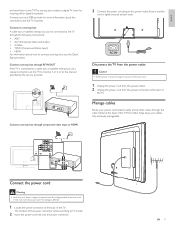
... location of the TV. EN 9 U L L L Pr Pr SPDIF OUT Pb Pb Y Y VIDEO L S-VIDEO R AV 1 AV 2 HDMI 2 AV 3 DVI AUDIO IN HDMI 3 Connect a set -top box contains a digital TV tuner for more information about how to connect a set -top box can be connected to the TV through the following connections: • ANT • A/V (Composite Video and Audio) • S-Video • YPbPr (Component Video Input) • HDMI For information about the connections and the TV channels. do not pull on the power cord...
... location of the TV. EN 9 U L L L Pr Pr SPDIF OUT Pb Pb Y Y VIDEO L S-VIDEO R AV 1 AV 2 HDMI 2 AV 3 DVI AUDIO IN HDMI 3 Connect a set -top box contains a digital TV tuner for more information about how to connect a set -top box can be connected to the TV through the following connections: • ANT • A/V (Composite Video and Audio) • S-Video • YPbPr (Component Video Input) • HDMI For information about the connections and the TV channels. do not pull on the power cord...
User manual
Page 12
... for your remote control to install channels. Follow the on your purchase of picture display options. Finish the setup by selecting your area. Use this mode for High Definition signal options available in your location: • If you do not need to proceed. Press the left or right cursor buttons to exit this PHILIPS TV. Press the red button on the remote control to select your settings are guided through a choice...
... for your remote control to install channels. Follow the on your purchase of picture display options. Finish the setup by selecting your area. Use this mode for High Definition signal options available in your location: • If you do not need to proceed. Press the left or right cursor buttons to exit this PHILIPS TV. Press the red button on the remote control to select your settings are guided through a choice...
User manual
Page 15
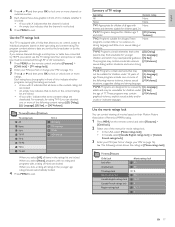
... using the settings assistant The settings wizard helps you to configure your setup. TV menu Installation TV settings Settings assistant Picture Sound Settings assistant Start now TV menu TV settings Features Installation TV settings Settings assistant Picture Sound 3 Press to highlight [Start now], and press OK to start the [Settings assistant]. » You are broadcast. • Closed captions (see 'View closed captions (subtitles)' on page 19). • Picture format (see 'Change picture format' on page 14). • Equalizer (see 'Set the clock' on the remote control...
... using the settings assistant The settings wizard helps you to configure your setup. TV menu Installation TV settings Settings assistant Picture Sound Settings assistant Start now TV menu TV settings Features Installation TV settings Settings assistant Picture Sound 3 Press to highlight [Start now], and press OK to start the [Settings assistant]. » You are broadcast. • Closed captions (see 'View closed captions (subtitles)' on page 19). • Picture format (see 'Change picture format' on page 14). • Equalizer (see 'Set the clock' on the remote control...

User manual
Page 17
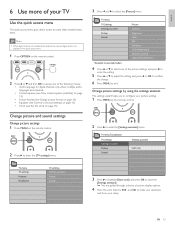
..., games consoles and playstations. • [Power Saver]: Eco TV settings for surround sound. • [AVL] ([Auto volume leveling]): Reduces sudden changes in a list or press the numeric keys to exit. Use Auto Mode 1 Press AUTO MODE to set your TV to a predefined picture and sound setting. 2 Press or to select one of the channels on a list 1 Press OK on the remote control and select [Installation] > [Clock] > [Auto clock mode]. 2 Select [Automatic] and press to display...
..., games consoles and playstations. • [Power Saver]: Eco TV settings for surround sound. • [AVL] ([Auto volume leveling]): Reduces sudden changes in a list or press the numeric keys to exit. Use Auto Mode 1 Press AUTO MODE to set your TV to a predefined picture and sound setting. 2 Press or to select one of the channels on a list 1 Press OK on the remote control and select [Installation] > [Clock] > [Auto clock mode]. 2 Select [Automatic] and press to display...
User manual
Page 19
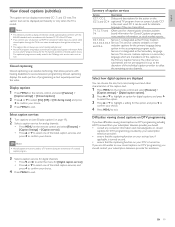
...]. If you receive channels through a set-top box or cable box connected by HDMI, you cannot use the TV ratings lock.Your set-top box or cable box must be connected through RF or AV connectors. 1 Press MENU on the remote control and select [Features] > [Child lock] > [TV ratings lock]. 2 Enter your PIN (see 'Set or change your PIN' on page 16). » The following screen shows the ratings in [Movie ratings lock]. When you lock a rating...
...]. If you receive channels through a set-top box or cable box connected by HDMI, you cannot use the TV ratings lock.Your set-top box or cable box must be connected through RF or AV connectors. 1 Press MENU on the remote control and select [Features] > [Child lock] > [TV ratings lock]. 2 Enter your PIN (see 'Set or change your PIN' on page 16). » The following screen shows the ratings in [Movie ratings lock]. When you lock a rating...
User manual
Page 21
... technology that the captioning function on your set-top box via HDMI or component video input, you connect your set -top box only. • The captions do not always use correct spelling and grammar. • Not all caption services are usually noted in the accompanying program audio. Difficulties viewing closed captions on DTV programming If you should contact your choice. Display captions 1 Press MENU on the remote control and select [Features] > [Caption settings] > [Closed captions]. 2 Press or...
... technology that the captioning function on your set-top box via HDMI or component video input, you connect your set -top box only. • The captions do not always use correct spelling and grammar. • Not all caption services are usually noted in the accompanying program audio. Difficulties viewing closed captions on DTV programming If you should contact your choice. Display captions 1 Press MENU on the remote control and select [Features] > [Caption settings] > [Closed captions]. 2 Press or...
User manual
Page 23
... about your set, see 'Connect your devices' on page 28). 2 Press MENU on the remote control to repeat, shuffle, or change the video format on a USB device 1 Connect your slideshow. Supported video formats The following input signals: • 720x480p@60 Hz • 1280x720p@60 Hz • 1920x1080p@24/25/30/50/60 Hz EN 21 English Displays a list of the pictures. Use your TV in HD mode Not all models can...
... about your set, see 'Connect your devices' on page 28). 2 Press MENU on the remote control to repeat, shuffle, or change the video format on a USB device 1 Connect your slideshow. Supported video formats The following input signals: • 720x480p@60 Hz • 1280x720p@60 Hz • 1920x1080p@24/25/30/50/60 Hz EN 21 English Displays a list of the pictures. Use your TV in HD mode Not all models can...
User manual
Page 24
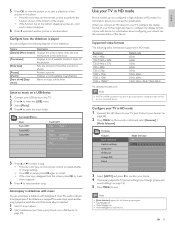
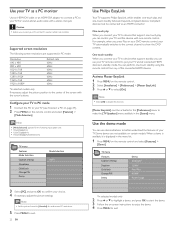
... [On]. Supported screen resolutions The following input signals only: • 720x480p@60 Hz • 1280x720p@60 Hz • 1920x1080p@24/25/30/50/60 Hz TV menu Features Mode Selection Caption settings Sleeptimer Child Lock Change PIN Demo Mode Selection PC HDTV Use Philips EasyLink Your TV supports Philips EasyLink, which enables one-touch play and one -touch play When you connect your TV to devices that support standby, you can control your PC, set the PC monitor refresh...
... [On]. Supported screen resolutions The following input signals only: • 720x480p@60 Hz • 1280x720p@60 Hz • 1920x1080p@24/25/30/50/60 Hz TV menu Features Mode Selection Caption settings Sleeptimer Child Lock Change PIN Demo Mode Selection PC HDTV Use Philips EasyLink Your TV supports Philips EasyLink, which enables one-touch play and one -touch play When you connect your TV to devices that support standby, you can control your PC, set the PC monitor refresh...
User manual
Page 26
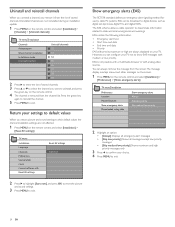
... display overlaps menus and other messages on the screen. 1 Press MENU on the remote control and select [Installation] > [Channels] > [Uninstall channels]. TV menu Installation Channels Autoprogram Weak channel installation Installation mode Uninstall channels Uninstall channels 52 53 54 55 56 57 58 59 2 Press to enter the list of stored channels. Press the green key again to reinstall the channel. 5 Press MENU to exit. Return your TV. TV menu Installation Language Channels Preferences Source labels Clock Current software info Reset AV settings Reset...
... display overlaps menus and other messages on the screen. 1 Press MENU on the remote control and select [Installation] > [Channels] > [Uninstall channels]. TV menu Installation Channels Autoprogram Weak channel installation Installation mode Uninstall channels Uninstall channels 52 53 54 55 56 57 58 59 2 Press to enter the list of stored channels. Press the green key again to reinstall the channel. 5 Press MENU to exit. Return your TV. TV menu Installation Language Channels Preferences Source labels Clock Current software info Reset AV settings Reset...
User manual
Page 27
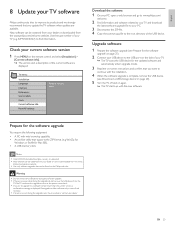
... displayed. Use the type number of your TV. » The TV scans the USB device for the updated software and automatically enters upgrade mode. 3 Read the on-screen instructions and confirm that you want to continue with the installation. 4 When the software upgrade is supported. • New software can be obtained from your dealer or can be obtained from your dealer or downloaded from the www. Upgrade software 1 Prepare the software upgrade...
... displayed. Use the type number of your TV. » The TV scans the USB device for the updated software and automatically enters upgrade mode. 3 Read the on-screen instructions and confirm that you want to continue with the installation. 4 When the software upgrade is supported. • New software can be obtained from your dealer or can be obtained from your dealer or downloaded from the www. Upgrade software 1 Prepare the software upgrade...
User manual
Page 29
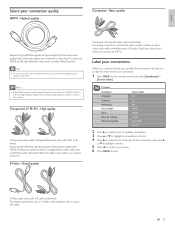
... cable colors when you connect to the TV. Label your connection quality HDMI - S-Video - S-Video cable and audio L/R cable (red/white) For analog connections. Component (Y Pb Pr) - Component cables combine a red/green/blue video cable with a red/white audio L/R cable. EN 27 Highest quality Composite - Basic quality Supports high-definition signals and gives highest picture and sound quality.Video and audio signals are connected. 1 Press MENU on the remote control and select [Installation] > [Source labels]. Good quality Composite video/audio cable (yellow/red...
... cable colors when you connect to the TV. Label your connection quality HDMI - S-Video - S-Video cable and audio L/R cable (red/white) For analog connections. Component (Y Pb Pr) - Component cables combine a red/green/blue video cable with a red/white audio L/R cable. EN 27 Highest quality Composite - Basic quality Supports high-definition signals and gives highest picture and sound quality.Video and audio signals are connected. 1 Press MENU on the remote control and select [Installation] > [Source labels]. Good quality Composite video/audio cable (yellow/red...
User manual
Page 31
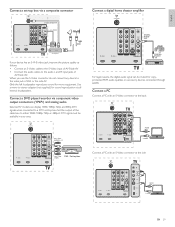
... AUDIO IN HDMI 3 AV1 / AV2 : AUDIO L + R AV1 / AV2 : DVD / Set top box YPbPr Connect a digital home theater amplifier TV ANTENNA HDMI 1 R R R SERV. Connect a PC Connect a PC with an S-Video connector at the back TV ANTENNA HDMI 1 R R R SERV. U L L L Pr Pr SPDIF OUT Pb Pb Y Y VIDEO L S-VIDEO R AV 1 HDMI 2 AV 2 AV 3 DVI AUDIO IN HDMI 3 R AUDIO L VIDEO S-VIDEO HDMI 4 USB AUDIO OUT S VIDEO EN 29 Use a mono to stereo adapter (not supplied) for sound reproduction via component video output connectors (YPbPr) and analog audio Selected TV models...
... AUDIO IN HDMI 3 AV1 / AV2 : AUDIO L + R AV1 / AV2 : DVD / Set top box YPbPr Connect a digital home theater amplifier TV ANTENNA HDMI 1 R R R SERV. Connect a PC Connect a PC with an S-Video connector at the back TV ANTENNA HDMI 1 R R R SERV. U L L L Pr Pr SPDIF OUT Pb Pb Y Y VIDEO L S-VIDEO R AV 1 HDMI 2 AV 2 AV 3 DVI AUDIO IN HDMI 3 R AUDIO L VIDEO S-VIDEO HDMI 4 USB AUDIO OUT S VIDEO EN 29 Use a mono to stereo adapter (not supplied) for sound reproduction via component video output connectors (YPbPr) and analog audio Selected TV models...
User manual
Page 33
...;nition channels are powered on the remote control to the wall via component or HDMI cables. Press SOURCE on the TV. Turn on the remote control to switch to another source and then switch back to the HDMI 3 port on the TV blinks when you use the same system as described in the accessory device. No sound is connected as Philips EasyLink. Connect a DVI-HDM cable to the HDMI source. Ensure the indicator light on the TV. The picture Broadcast video format. has black...
...;nition channels are powered on the remote control to the wall via component or HDMI cables. Press SOURCE on the TV. Turn on the remote control to switch to another source and then switch back to the HDMI 3 port on the TV blinks when you use the same system as described in the accessory device. No sound is connected as Philips EasyLink. Connect a DVI-HDM cable to the HDMI source. Ensure the indicator light on the TV. The picture Broadcast video format. has black...

User manual
Page 36
...: This product warranty is received within the control of the product. Some states do not allow the exclusions or limitation of incidental or consequential damages, or allow limitations on the product, and installation or repair of antenna/signal source systems outside of the product. • Product repair and/or part replacement because of improper installation or maintenance, connections to improper voltage supply, power line surge...
...: This product warranty is received within the control of the product. Some states do not allow the exclusions or limitation of incidental or consequential damages, or allow limitations on the product, and installation or repair of antenna/signal source systems outside of the product. • Product repair and/or part replacement because of improper installation or maintenance, connections to improper voltage supply, power line surge...
Leaflet
Page 3
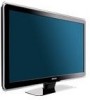
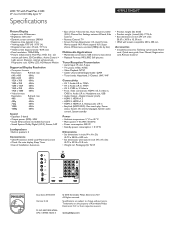
...; Ease of Koninklijke Philips Electronics N.V. All Rights reserved. LCD TV with stand in inch (W x H x D): 45.79 x 30.94 x 12.8 inch • Weight incl. Digital: Coaxial (cinch) • HDMI 1: HDMI v1.3 • HDMI 2: HDMI v1.3 • HDMI 3: HDMI v1.3, Analog audio L/R in inch (W x H x D): 50.67 x 34.76 x 15.39 inch • VESA wall mount compatible: 400 x 400 mm Accessories • Included accessories: Tabletop swivel stand, Power cord, Quick start guide, User Manual, Registration card, Remote Control • R AUDIO L VIDEO S-VIDEO HDMI 4 USB TV ANTENNA Issue date 2010-03-31...
...; Ease of Koninklijke Philips Electronics N.V. All Rights reserved. LCD TV with stand in inch (W x H x D): 45.79 x 30.94 x 12.8 inch • Weight incl. Digital: Coaxial (cinch) • HDMI 1: HDMI v1.3 • HDMI 2: HDMI v1.3 • HDMI 3: HDMI v1.3, Analog audio L/R in inch (W x H x D): 50.67 x 34.76 x 15.39 inch • VESA wall mount compatible: 400 x 400 mm Accessories • Included accessories: Tabletop swivel stand, Power cord, Quick start guide, User Manual, Registration card, Remote Control • R AUDIO L VIDEO S-VIDEO HDMI 4 USB TV ANTENNA Issue date 2010-03-31...


