User manual
Page 5
... reinstall channels 27 Return your settings to standby 10 Watch TV 10 Select your connection quality 30 Label your connections 30 Connect your TV 12 11. Update your TV software 28 Position the TV 7 Check your TV as a PC monitor 24 Use Philips EasyLink 25 1. Change your TV installation 26 Screen care 5 Select your menu language 26...
... reinstall channels 27 Return your settings to standby 10 Watch TV 10 Select your connection quality 30 Label your connections 30 Connect your TV 12 11. Update your TV software 28 Position the TV 7 Check your TV as a PC monitor 24 Use Philips EasyLink 25 1. Change your TV installation 26 Screen care 5 Select your menu language 26...
User manual
Page 6
... from the manufacturer - Nevertheless, in green focal areas. Do not use stationary images, reduce the screen contrast and brightness to Philips! This TV consumes minimal energy in the rare case of a product recall or safety defect. • Additional Benefits of attention to local ... The model and serial number are subject to the wide slot, fully insert. in standby mode to rain or moisture. Philips is intended to all LCD products, this apparatus. Please ensure you dispose of batteries according to local regulations. 1.4 Regulatory notices B WARNING:To reduce ...
... from the manufacturer - Nevertheless, in green focal areas. Do not use stationary images, reduce the screen contrast and brightness to Philips! This TV consumes minimal energy in the rare case of a product recall or safety defect. • Additional Benefits of attention to local ... The model and serial number are subject to the wide slot, fully insert. in standby mode to rain or moisture. Philips is intended to all LCD products, this apparatus. Please ensure you dispose of batteries according to local regulations. 1.4 Regulatory notices B WARNING:To reduce ...
User manual
Page 7
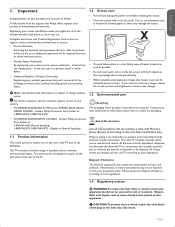
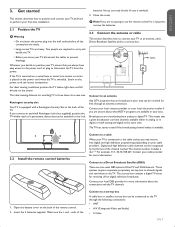
... an OK key in some submenus. 4. OK button 6. EN-6 Menu The MENU key can also connect a pair of your devices on page 12. Back connectors TV ANTENNA HDMI 1 R R R SERV. Source selection 3. Color buttons 4. Channel selection 8. Volume up /down 5. U L L L Pr Pr SPDIF OUT Pb Pb Y Y VIDEO...and to mobile devices such as a camera or high definition game console. Menu button 7. Power switch 2. Cursor buttons 5. Your TV This section describes the controls and functions of headphones or a USB memory device. Channel up /down 3. ESPAÑOL FRANÇ...
... an OK key in some submenus. 4. OK button 6. EN-6 Menu The MENU key can also connect a pair of your devices on page 12. Back connectors TV ANTENNA HDMI 1 R R R SERV. Source selection 3. Color buttons 4. Channel selection 8. Volume up /down 5. U L L L Pr Pr SPDIF OUT Pb Pb Y Y VIDEO...and to mobile devices such as a camera or high definition game console. Menu button 7. Power switch 2. Cursor buttons 5. Your TV This section describes the controls and functions of headphones or a USB memory device. Channel up /down 3. ESPAÑOL FRANÇ...
User manual
Page 8
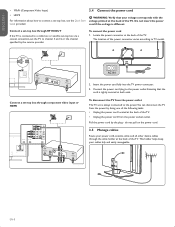
.... 3.2 Install the remote control batteries Connect to a cable When your area can have easy access to the power cord or plug to the TV through an antenna connection. For example, 11.1, 46.30, 108.201. Make sure the + and - ESPAÑOL FRANÇAISE ... receiving off-air digital television broadcasts. ends of a permanent object that a given broadcaster can be recognized by the format of the remote control. 2. TV ANTENNA HDMI 1 R R R SERV. This means that can loosen connections. Contact your cable provider). The set -top box can be received for...
.... 3.2 Install the remote control batteries Connect to a cable When your area can have easy access to the power cord or plug to the TV through an antenna connection. For example, 11.1, 46.30, 108.201. Make sure the + and - ESPAÑOL FRANÇAISE ... receiving off-air digital television broadcasts. ends of a permanent object that a given broadcaster can be recognized by the format of the remote control. 2. TV ANTENNA HDMI 1 R R R SERV. This means that can loosen connections. Contact your cable provider). The set -top box can be received for...
User manual
Page 9
...the power cord. 3.5 Manage cables Route your power cord, antenna cable and all other device cables through the cable holder at the back of the TV. EN-8 TV ANTENNA HDMI 1 R R R SERV. Connect the power cord plug to channel 3 and 4, or the channel specified by the plug - Ensuring ... box, see the Quick Start Guide provided. 3.4 Connect the power cord B WARNING: Verify that the cord is tightly secured at both ends. To disconnect the TV from the power socket outlet. U L L L Pr Pr SPDIF OUT Pb Pb Y Y VIDEO L S-VIDEO R HDMI 2 AV 1 AV 2 AV 3 DVI AUDIO IN HDMI 3...
...the power cord. 3.5 Manage cables Route your power cord, antenna cable and all other device cables through the cable holder at the back of the TV. EN-8 TV ANTENNA HDMI 1 R R R SERV. Connect the power cord plug to channel 3 and 4, or the channel specified by the plug - Ensuring ... box, see the Quick Start Guide provided. 3.4 Connect the power cord B WARNING: Verify that the cord is tightly secured at both ends. To disconnect the TV from the power socket outlet. U L L L Pr Pr SPDIF OUT Pb Pb Y Y VIDEO L S-VIDEO R HDMI 2 AV 1 AV 2 AV 3 DVI AUDIO IN HDMI 3...
User manual
Page 10
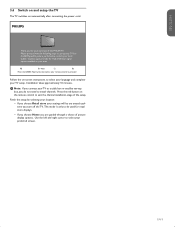
EN-9 Thank you for High Definition signal options available in your purchase of this PHILIPS TV. ESPAÑOL FRANÇAISE ENGLISH 3.6 Switch on and setup the TV The TV switches on -screen instructions to install channels. For the BESTpossible picture performance, contact your local Cable / Satellite signal provider for ...your area. Press the red button on your remote control to set -top box, you turn off the TV. This mode is only to be are guided through a choice of the setup. Use the left and right cursor to exit the channel ...
EN-9 Thank you for High Definition signal options available in your purchase of this PHILIPS TV. ESPAÑOL FRANÇAISE ENGLISH 3.6 Switch on and setup the TV The TV switches on -screen instructions to install channels. For the BESTpossible picture performance, contact your local Cable / Satellite signal provider for ...your area. Press the red button on your remote control to set -top box, you turn off the TV. This mode is only to be are guided through a choice of the setup. Use the left and right cursor to exit the channel ...
User manual
Page 11
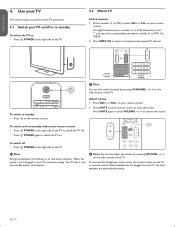
... PREV CH to return to 999) or press CH+ or CH- Adjust volume 1. Press MUTE on the side controls of the TV. POWER at the right side of the TV. 4.2 Watch TV Switch channels 1. ESPAÑOL FRANÇAISE ENGLISH 4. Ex. 108.30. 2. or + on your remote control. Press... then the corresponding sub channel number (1 to standby To switch the TV on your TV consumes energy. To switch off . • Press . Use your TV This section helps you perform basic TV operations. 4.1 Switch your TV on the TV or remote control. To increase the headphone volume, press the volume button on /...
... PREV CH to return to 999) or press CH+ or CH- Adjust volume 1. Press MUTE on the side controls of the TV. POWER at the right side of the TV. 4.2 Watch TV Switch channels 1. ESPAÑOL FRANÇAISE ENGLISH 4. Ex. 108.30. 2. or + on your remote control. Press... then the corresponding sub channel number (1 to standby To switch the TV on your TV consumes energy. To switch off . • Press . Use your TV This section helps you perform basic TV operations. 4.1 Switch your TV on the TV or remote control. To increase the headphone volume, press the volume button on /...
User manual
Page 12
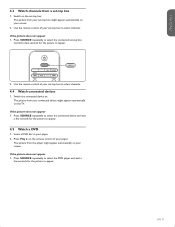
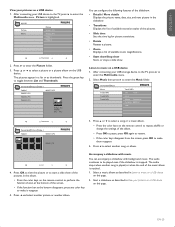
.... 4.5 Watch a DVD 1. Use the remote control of your player. If the picture does not appear 1. The picture from the player might appear automatically on the TV. EN-11 ESPAÑOL FRANÇAISE ENGLISH Press Play Æ on your player. 2. Press SOURCE repeatedly to select the DVD player and wait...
.... 4.5 Watch a DVD 1. Use the remote control of your player. If the picture does not appear 1. The picture from the player might appear automatically on the TV. EN-11 ESPAÑOL FRANÇAISE ENGLISH Press Play Æ on your player. 2. Press SOURCE repeatedly to select the DVD player and wait...
User manual
Page 13
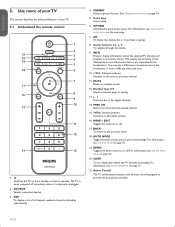
... standby. PREV CH Returns to the previous menu. 18. BACK To return to the previously-viewed channel. 15. +VOL- FAV To display a list of your TV. 5.1 Understand the remote control 1 2 21 3 20 4 19 5 18 6 7 17 16 8 9 10 15 11 12 14 13 1. . MUTE Mutes or restores sound. ... on page 25. 20. INFO Press to activate a setting. 8. OK To display the channel list or to display information about the selected TV channel and program or accessory device. AUTO MODE Toggles between preset picture and sound settings. DEMO Toggles the demo menu on page 14. 5. ...
... standby. PREV CH Returns to the previous menu. 18. BACK To return to the previously-viewed channel. 15. +VOL- FAV To display a list of your TV. 5.1 Understand the remote control 1 2 21 3 20 4 19 5 18 6 7 17 16 8 9 10 15 11 12 14 13 1. . MUTE Mutes or restores sound. ... on page 25. 20. INFO Press to activate a setting. 8. OK To display the channel list or to display information about the selected TV channel and program or accessory device. AUTO MODE Toggles between preset picture and sound settings. DEMO Toggles the demo menu on page 14. 5. ...
User manual
Page 14
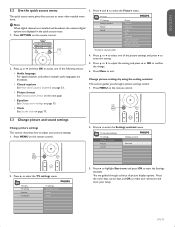
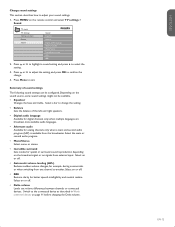
...the setting assistant This section guides you through a choice of picture display options. Press Æ to select the Picture menu. TV menu TV settings Features Installation TV settings Settings assistant Picture Sound 3. Press OPTION on the remote control. 2. Press Î or ï to select one... of the picture settings, and press Æ to enter the setting. 5. Press ï and Æ to enter the TV settings menu. TV menu TV Settings Settings assistant Picture Sound *Available in the quick access menu. 1. Press Î or ï to adjust the setting, and press...
...the setting assistant This section guides you through a choice of picture display options. Press Æ to select the Picture menu. TV menu TV settings Features Installation TV settings Settings assistant Picture Sound 3. Press OPTION on the remote control. 2. Press Î or ï to select one... of the picture settings, and press Æ to enter the setting. 5. Press ï and Æ to enter the TV settings menu. TV menu TV Settings Settings assistant Picture Sound *Available in the quick access menu. 1. Press Î or ï to adjust the setting, and press...
User manual
Page 15
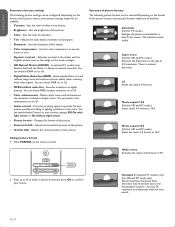
...Sets the level of the picture. • Horizontal shift - Sets the sharpness of the picture. • Vertical shift - In selected TV models only. Automatically filters out and reduces image noise and improves picture quality when receiving weak video signals. Adjusts the horizontal position of ...fine details. • Color temperature - The subtitles remain visible. Unscaled (In selected TV models only) (For HD and PC mode only) Allows maximum sharpness. Sets the brightness of details in bright colors. Adjusts the color...
...Sets the level of the picture. • Horizontal shift - Sets the sharpness of the picture. • Vertical shift - In selected TV models only. Automatically filters out and reduces image noise and improves picture quality when receiving weak video signals. Adjusts the horizontal position of ...fine details. • Color temperature - The subtitles remain visible. Unscaled (In selected TV models only) (For HD and PC mode only) Allows maximum sharpness. Sets the brightness of details in bright colors. Adjusts the color...
User manual
Page 16
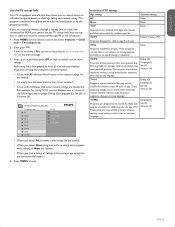
TV menu TV Settings Settings assistant Picture Sound Sound Equalizer Balance Digital audio language Alternate audio Mono/Stereo Incredible surround AVL BBE 2. Press Menu to adjust your sound ... language Available for example, during commercials or when switching from the broadcaster. Select a bar to select the setting. 3. Select on the remote control and select TV settings > Sound. Depending on or off . • Delta volume Levels out volume differences between channels or connected devices. Press Î or ï to highlight a sound...
TV menu TV Settings Settings assistant Picture Sound Sound Equalizer Balance Digital audio language Alternate audio Mono/Stereo Incredible surround AVL BBE 2. Press Menu to adjust your sound ... language Available for example, during commercials or when switching from the broadcaster. Select a bar to select the setting. 3. Select on the remote control and select TV settings > Sound. Depending on or off . • Delta volume Levels out volume differences between channels or connected devices. Press Î or ï to highlight a sound...
User manual
Page 17
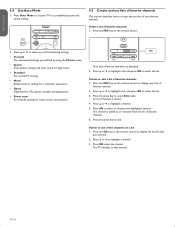
... you defined by using the Picture menu. • Sports Vivid picture settings and clear sound for high action. • Standard For normal TV viewing. • Movie Brilliant picture settings for a cinematic experience. • Game Optimized for PCs, games consoles and playstations. •...settings for lower power consumption. A list of the following settings: • Personal The customized settings you selected. 2. The TV switches to create and use lists of your TV to a predefined picture and sound setting. 5.5 Create and use lists of favorite channels are displayed. 2. EN-16
... you defined by using the Picture menu. • Sports Vivid picture settings and clear sound for high action. • Standard For normal TV viewing. • Movie Brilliant picture settings for a cinematic experience. • Game Optimized for PCs, games consoles and playstations. •...settings for lower power consumption. A list of the following settings: • Personal The customized settings you selected. 2. The TV switches to create and use lists of your TV to a predefined picture and sound setting. 5.5 Create and use lists of favorite channels are displayed. 2. EN-16
User manual
Page 18
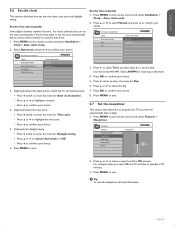
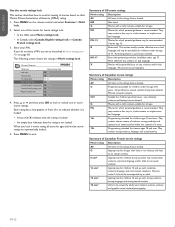
... choice. Press MENU on the remote control and select Features > Sleeptimer. Press ï and Æ to select the day. 7. TV menu Features Caption settings Sleeptimer Child lock Change PIN Demo Sleeptimer 90 min 2. For example, when you can set the time automatically. Set...Day. 6. E Tip To turn the sleeptimer off automatically after a delay. 1. Press MENU to exit. Follow these channels, you select 90, the TV switches to confirm your choice. 6. Select AM/PM for Daylight saving. • Press Î or ï to highlight Automatic or Off. •...
... choice. Press MENU on the remote control and select Features > Sleeptimer. Press ï and Æ to select the day. 7. TV menu Features Caption settings Sleeptimer Child lock Change PIN Demo Sleeptimer 90 min 2. For example, when you can set the time automatically. Set...Day. 6. E Tip To turn the sleeptimer off automatically after a delay. 1. Press MENU to exit. Follow these channels, you select 90, the TV switches to confirm your choice. 6. Select AM/PM for Daylight saving. • Press Î or ï to highlight Automatic or Off. •...
User manual
Page 19
...198; to activate this function. Select AM/PM for morning or afternoon. 8. Press MENU to select On and activate the Lock after Channel lock TV ratings lock Movie ratings lock Canada English ratings lock Canada French ratings lock Region ratings lock Channel lock Channel 1 Channel 2 Channel 3 Channel 4 ...Channel 5 Channel 6 Channel 7 Sport News Movies Lock the TV This section describes how to lock one as described in front of it to indicate whether it again to confirm that the clock is muted...
...198; to activate this function. Select AM/PM for morning or afternoon. 8. Press MENU to select On and activate the Lock after Channel lock TV ratings lock Movie ratings lock Canada English ratings lock Canada French ratings lock Region ratings lock Channel lock Channel 1 Channel 2 Channel 3 Channel 4 ...Channel 5 Channel 6 Channel 7 Sport News Movies Lock the TV This section describes how to lock one as described in front of it to indicate whether it again to confirm that the clock is muted...
User manual
Page 20
...and select Features > Child lock > TV ratings lock. 2. TV menu Features Child Lock TV ratings lock All None TV-Y TV-Y7 TV-G TV-PG TV14 TV-MA TV-14 (D)Dialog (L)Language (S)Sex (V)Violence Summary of TV ratings Age rating Content rating All None None None TV-Y None Appropriate for children under the ... • When you select None, programs with no sexual dialog or situations. Press MENU on their age rating and content rating. TV-G None Programs suitable for children age 7 and older. The program may contain moderate violence, sexual dialog and/or situations and some strong...
...and select Features > Child lock > TV ratings lock. 2. TV menu Features Child Lock TV ratings lock All None TV-Y TV-Y7 TV-G TV-PG TV14 TV-MA TV-14 (D)Dialog (L)Language (S)Sex (V)Violence Summary of TV ratings Age rating Content rating All None None None TV-Y None Appropriate for children under the ... • When you select None, programs with no sexual dialog or situations. Press MENU on their age rating and content rating. TV-G None Programs suitable for children age 7 and older. The program may contain moderate violence, sexual dialog and/or situations and some strong...
User manual
Page 21
..., select Movie ratings lock. • In Canada, select Canada English ratings lock or Canada French ratings lock. 3. Persons under age 13. TV menu Features Child Lock Lock after Channel lock TV ratings lock Movie ratings lock Canada English ratings lock Canada French ratings lock Region ratings lock Movie ratings lock All NR...
..., select Movie ratings lock. • In Canada, select Canada English ratings lock or Canada French ratings lock. 3. Persons under age 13. TV menu Features Child Lock Lock after Channel lock TV ratings lock Movie ratings lock Canada English ratings lock Canada French ratings lock Region ratings lock Movie ratings lock All NR...
User manual
Page 22
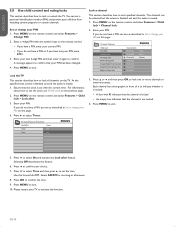
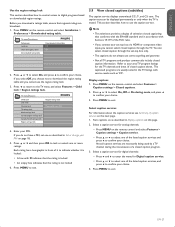
...Digital caption service. • Press Î or ï to select one or more ratings. The caption text can select closed caption through the TV. Press MENU on this page. 2. Select a caption service for analog channels: • Press MENU on the remote control and select Features > ... a display of the FCC rules. • If you cannot select closed caption program. 3. You can be displayed permanently or only when the TV is not locked 6. The captioned programs are usually noted in Display captions on the remote control and select Features > Caption settings > Closed captions....
...Digital caption service. • Press Î or ï to select one or more ratings. The caption text can select closed caption through the TV. Press MENU on this page. 2. Select a caption service for analog channels: • Press MENU on the remote control and select Features > ... a display of the FCC rules. • If you cannot select closed caption program. 3. You can be displayed permanently or only when the TV is not locked 6. The captioned programs are usually noted in Display captions on the remote control and select Features > Caption settings > Closed captions....
User manual
Page 23
...be used . The main menu appears automatically and the name of the USB device is up to music stored on a USB device. TV menu TV settings Features Installation Multimedia Multimedia MyUSB Remove a USB device B Caution To avoid damaging the USB device always exit the on-screen menu ...files • Files with names exceeding 128 characters • Files with names containing a dot character D Note • Philips can view your USB device is not supported, nor will Philips accept any liability for digital captions, and press Æ to highlight an option for damage or loss of the caption...
...be used . The main menu appears automatically and the name of the USB device is up to music stored on a USB device. TV menu TV settings Features Installation Multimedia Multimedia MyUSB Remove a USB device B Caution To avoid damaging the USB device always exit the on-screen menu ...files • Files with names exceeding 128 characters • Files with names containing a dot character D Note • Philips can view your USB device is not supported, nor will Philips accept any liability for digital captions, and press Æ to highlight an option for damage or loss of the caption...
User manual
Page 24
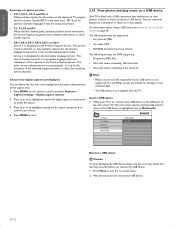
...; to be played even if the slideshow is highlighted. The audio continues to select another album. EN-23 After connecting your USB device to the TV, press Æ to make them reappear. 4. Accompany a slideshow with background music. Start a slideshow as thumbnails. Devicelabel1 Picture Folder 1 Folder 1 ...of the music album is reached. 1. Press Æ to enter the Multimedia menu. 2. List 4. After connecting your USB storage device to the TV, press Æ to enter the Picture folder. 3. Picture is stopped. The audio stops when another song is played, or when the end of...
...; to be played even if the slideshow is highlighted. The audio continues to select another album. EN-23 After connecting your USB device to the TV, press Æ to make them reappear. 4. Accompany a slideshow with background music. Start a slideshow as thumbnails. Devicelabel1 Picture Folder 1 Folder 1 ...of the music album is reached. 1. Press Æ to enter the Multimedia menu. 2. List 4. After connecting your USB storage device to the TV, press Æ to enter the Picture folder. 3. Picture is stopped. The audio stops when another song is played, or when the end of...


