
User manual
Page 2
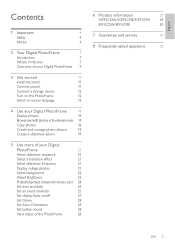
... 7 Overview of your Digital PhotoFrame 9 3 Get started 11 Install the stand 11 Connect power 11 Connect a storage device 12 Turn on the PhotoFrame 12 Select on-screen language 13 4 Use your Digital PhotoFrame 14 Display photos 14 Browse and edit photos in thumbnail mode 14 Copy photos 16 Create and manage photo albums 18 Create a slideshow album 19 5 Use more of your Digital PhotoFrame 21 Select slideshow sequence 21 Select a transition effect 21 Select slideshow frequency 21 Display collage photos 21 Select background 22...
... 7 Overview of your Digital PhotoFrame 9 3 Get started 11 Install the stand 11 Connect power 11 Connect a storage device 12 Turn on the PhotoFrame 12 Select on-screen language 13 4 Use your Digital PhotoFrame 14 Display photos 14 Browse and edit photos in thumbnail mode 14 Copy photos 16 Create and manage photo albums 18 Create a slideshow album 19 5 Use more of your Digital PhotoFrame 21 Select slideshow sequence 21 Select a transition effect 21 Select slideshow frequency 21 Display collage photos 21 Select background 22...
User manual
Page 3
... screen permanently. • When the PhotoFrame is no guarantee that are user serviceable. Do not open or remove covers to provide reasonable protection against harmful interference in a residential installation.This equipment generates, uses, and can be damaged. • Keep the stand away from cables. Any operation expressly prohibited in a particular installation. FCC Notice (For U.S. Notice Any changes or modifications made to part...
... screen permanently. • When the PhotoFrame is no guarantee that are user serviceable. Do not open or remove covers to provide reasonable protection against harmful interference in a residential installation.This equipment generates, uses, and can be damaged. • Keep the stand away from cables. Any operation expressly prohibited in a particular installation. FCC Notice (For U.S. Notice Any changes or modifications made to part...
User manual
Page 4
... recycling contact www.eia.org (Consumer Education Initiative) EN 5 PHILIPS 8FF3CDW 8FF3CME 10FF3CDW 10FF3CME 10FF3CMI Tested To Comply With FCC Standards FOR HOME OR OFFICE USE The set complies with your normal household waste.The correct disposal of your old product will help . Cables Connections to this device must accept any changes or modifications made with shielded...
... recycling contact www.eia.org (Consumer Education Initiative) EN 5 PHILIPS 8FF3CDW 8FF3CME 10FF3CDW 10FF3CME 10FF3CMI Tested To Comply With FCC Standards FOR HOME OR OFFICE USE The set complies with your normal household waste.The correct disposal of your old product will help . Cables Connections to this device must accept any changes or modifications made with shielded...

User manual
Page 8
English Overview of your Digital PhotoFrame a b c n d e m f g h i j kl a • Turn on/off the PhotoFrame b • • • Display slideshow Change display mode Zoom in a photo c /// • Select the previous/next/right/left item • Crop photo • Adjust time/date d OK • Confirm a selection e Enter the main menu Exit keypad Enter/Exit Photo Menu Stop Slideshow mode Zoom out a photo f RESET • Reset settings to factory default EN 9
English Overview of your Digital PhotoFrame a b c n d e m f g h i j kl a • Turn on/off the PhotoFrame b • • • Display slideshow Change display mode Zoom in a photo c /// • Select the previous/next/right/left item • Crop photo • Adjust time/date d OK • Confirm a selection e Enter the main menu Exit keypad Enter/Exit Photo Menu Stop Slideshow mode Zoom out a photo f RESET • Reset settings to factory default EN 9

User manual
Page 10
... user manual. Write these numbers here: Model No Serial No Install the stand To place the PhotoFrame on a flat the back or the bottom of the PhotoFrame. 1 Insert the stand into the PhotoFrame. b EN 11 If you contact Philips, you position the PhotoFrame, ensure that the power plug and outlet are easily accessible. 1 Connect the power cord to the DC socket of the PhotoFrame and to a power supply...
... user manual. Write these numbers here: Model No Serial No Install the stand To place the PhotoFrame on a flat the back or the bottom of the PhotoFrame. 1 Insert the stand into the PhotoFrame. b EN 11 If you contact Philips, you position the PhotoFrame, ensure that the power plug and outlet are easily accessible. 1 Connect the power cord to the DC socket of the PhotoFrame and to a power supply...

User manual
Page 11
... slot » SD slot RESET » CF slot » slot » PhotoFrame • To turn off the PhotoFrame, press and hold for more than 2 seconds. • To access the main menu, press . 12 EN Remove the xD card or the USB flash drive. Tip • If the memory card is empty or damaged, "[Sorry, Card/Device error!]" is used with a USB drive, the system may be unstable...
... slot » SD slot RESET » CF slot » slot » PhotoFrame • To turn off the PhotoFrame, press and hold for more than 2 seconds. • To access the main menu, press . 12 EN Remove the xD card or the USB flash drive. Tip • If the memory card is empty or damaged, "[Sorry, Card/Device error!]" is used with a USB drive, the system may be unstable...

User manual
Page 12
Tip • If you remove a storage device, always wait until all photos appear on Setting]>[On] in the [Language Setting] menu. EN 13 English on, you can set up the on-screen language. 1 In the main menu, select [Setup] and press OK to confirm. 2 Select [Language] and press OK to confirm. 3 Select [Language Setting] and press OK to con...
Tip • If you remove a storage device, always wait until all photos appear on Setting]>[On] in the [Language Setting] menu. EN 13 English on, you can set up the on-screen language. 1 In the main menu, select [Setup] and press OK to confirm. 2 Select [Language] and press OK to confirm. 3 Select [Language Setting] and press OK to con...

User manual
Page 18
... menu, select [Slideshow]>[Sett ings]>[Slideshows]>a photo source. 2 Press OK to confirm. » An album list is displayed. 3 Select an album in the list to be added. 4 Press to access [Slideshow Menu]. 5 Select [Add Album] or [Default album] and press OK to confirm. 6 Select an album and press OK to confirm. » The album is added to/deleted from slideshow. Add/Remove an album...
... menu, select [Slideshow]>[Sett ings]>[Slideshows]>a photo source. 2 Press OK to confirm. » An album list is displayed. 3 Select an album in the list to be added. 4 Press to access [Slideshow Menu]. 5 Select [Add Album] or [Default album] and press OK to confirm. 6 Select an album and press OK to confirm. » The album is added to/deleted from slideshow. Add/Remove an album...

User manual
Page 24
... the album name is displayed. 2 Select [Time] and press OK to confirm. 3 Press / / / and OK to set the time and press OK to confirm. 4 Repeat steps 2 to 3 to confirm. English 1 In [Setup]>[Options]>[Time and Date], select [Show clock], then press OK to confirm. 2 Press / to select: • [No clock] • [In slideshow...
... the album name is displayed. 2 Select [Time] and press OK to confirm. 3 Press / / / and OK to set the time and press OK to confirm. 4 Repeat steps 2 to 3 to confirm. English 1 In [Setup]>[Options]>[Time and Date], select [Show clock], then press OK to confirm. 2 Press / to select: • [No clock] • [In slideshow...
User manual
Page 26
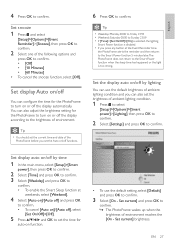
...Time]>[Set On/Off]>[On] is selected, the lighting Smart Power function is disabled. • If you can use the default setting, select [Default] and press OK to turn on /off You can also adjust the brightness setting for the PhotoFrame...lighting condition and you press any button at weekends, select [Weekend]. 4 Select [Auto on]/[Auto off] and press OK to confirm. • To cancel [Auto on function. • To use the default brightness of the following options and press OK to confirm. Set display auto on/off by lighting You can also set the time for auto-on ]/[Auto...
...Time]>[Set On/Off]>[On] is selected, the lighting Smart Power function is disabled. • If you can use the default setting, select [Default] and press OK to turn on /off You can also adjust the brightness setting for the PhotoFrame...lighting condition and you press any button at weekends, select [Weekend]. 4 Select [Auto on]/[Auto off] and press OK to confirm. • To cancel [Auto on function. • To use the default brightness of the following options and press OK to confirm. Set display auto on/off by lighting You can also set the time for auto-on ]/[Auto...

User manual
Page 27
... display Auto on the button sound. • To turn on /off Auto Orientation function, select [Disable]. 3 Press OK to confirm. Set Auto Orientation You can find the free space, connected media, and the firmware version of the PhotoFrame. 1 In the main menu, select [Setup]>[Options ]>[Status], then press OK to set on the right of ambient lighting condition, select [Off - View status...
... display Auto on the button sound. • To turn on /off Auto Orientation function, select [Disable]. 3 Press OK to confirm. Set Auto Orientation You can find the free space, connected media, and the firmware version of the PhotoFrame. 1 In the main menu, select [Setup]>[Options ]>[Status], then press OK to set on the right of ambient lighting condition, select [Off - View status...
User manual
Page 28
...; Stand • Quick start guide • CD-ROM, including • User Manual • Philips PhotoFrame Manager (software and manual) Convenience • Card Reader: Built-in (3x) • Photo format supported: JPEG photo (Up to 10MB JPEG files, Up to 20 Megapixels) • Placement supported: Photo auto orientation, Landscape, Portrait • Buttons and controls: 3 buttons, 4-way navigation key and enter • Playback mode: Full screen browse, Slideshow,Thumbnail browse • Album management: Create, Delete, Edit, Rename • Photo edit: Copy, Delete, Rotate...
...; Stand • Quick start guide • CD-ROM, including • User Manual • Philips PhotoFrame Manager (software and manual) Convenience • Card Reader: Built-in (3x) • Photo format supported: JPEG photo (Up to 10MB JPEG files, Up to 20 Megapixels) • Placement supported: Photo auto orientation, Landscape, Portrait • Buttons and controls: 3 buttons, 4-way navigation key and enter • Playback mode: Full screen browse, Slideshow,Thumbnail browse • Album management: Create, Delete, Edit, Rename • Photo edit: Copy, Delete, Rotate...

User manual
Page 29
...; Temperature range (storage): -10°C 60°C/14°F - 140°F Power • Input: 100 - 240V/ 50-60 Hz 0.6 A • Output: 9V 2.0 A • Efficiency level: IV • Consumption: (System on) 4.63 W • Power mode supported: AC powered Accessaries • AC-DC Adaptor • USB cable to PC • Stand • Quick start guide • CD-ROM, including • User Manual • Philips PhotoFrame Manager (software and manual)
...; Temperature range (storage): -10°C 60°C/14°F - 140°F Power • Input: 100 - 240V/ 50-60 Hz 0.6 A • Output: 9V 2.0 A • Efficiency level: IV • Consumption: (System on) 4.63 W • Power mode supported: AC powered Accessaries • AC-DC Adaptor • USB cable to PC • Stand • Quick start guide • CD-ROM, including • User Manual • Philips PhotoFrame Manager (software and manual)

User manual
Page 31
... delete one of my photos? First, make sure you set it starts to upload pictures from the PhotoFrame? The LCD screen is designed to show the photos.What can display the same photo continuously for the day, it ? The PhotoFrame actually has limited internal memory that only can save up to 4 photos (after I use other memory card to ON status. The PhotoFrame gives users more flexibility to the PhotoFrame. Can I set the current time, Auto-off time...
... delete one of my photos? First, make sure you set it starts to upload pictures from the PhotoFrame? The LCD screen is designed to show the photos.What can display the same photo continuously for the day, it ? The PhotoFrame actually has limited internal memory that only can save up to 4 photos (after I use other memory card to ON status. The PhotoFrame gives users more flexibility to the PhotoFrame. Can I set the current time, Auto-off time...

User manual
Page 32
... PhotoFrame extends the photo to : Main menu> Slideshow>Background>RadiantColor/Auto fit/black/red/gray. That is the difference between background, Auto fit and RadiantColor? Why Auto Dim does not work ) and then click OK to fill the screen.This does improve the viewing experience. Set Auto Dim end time (this is the time you want the display start (this is the time you want to transfer photos from being formatted...
... PhotoFrame extends the photo to : Main menu> Slideshow>Background>RadiantColor/Auto fit/black/red/gray. That is the difference between background, Auto fit and RadiantColor? Why Auto Dim does not work ) and then click OK to fill the screen.This does improve the viewing experience. Set Auto Dim end time (this is the time you want the display start (this is the time you want to transfer photos from being formatted...

Quick start guide
Page 2
What's in the box Photoframe USB cable to PC Stand PhotoFrame 8FF3CDW 8FF3CME 10FF3CDW 10FF3CME 10FF3CMI Quick start guide 1 Connect 2 Install 3 Enjoy Eng Quick Start Guide What you also need AC-DC power adaptor Digital User Manual Philips PhotoFrame Manager software and user manual or AC AC power socket Memory card/USB PC
What's in the box Photoframe USB cable to PC Stand PhotoFrame 8FF3CDW 8FF3CME 10FF3CDW 10FF3CME 10FF3CMI Quick start guide 1 Connect 2 Install 3 Enjoy Eng Quick Start Guide What you also need AC-DC power adaptor Digital User Manual Philips PhotoFrame Manager software and user manual or AC AC power socket Memory card/USB PC

Quick start guide
Page 11
... colour or set RadiantColor. Users can go to fill the screen.This does improve the viewing experience. If the format of photo colour RadiantColor does give you the best viewing experience. Background colour: the PhotoFrame displays a photo without distortion with black bar or a selected background colour. 3. Welcome to : Main menu>Slideshow>Background>RadiantColor/ Auto fit/black/red/gray. My Digital PhotoFrame does not show some of picture edge and...
... colour or set RadiantColor. Users can go to fill the screen.This does improve the viewing experience. If the format of photo colour RadiantColor does give you the best viewing experience. Background colour: the PhotoFrame displays a photo without distortion with black bar or a selected background colour. 3. Welcome to : Main menu>Slideshow>Background>RadiantColor/ Auto fit/black/red/gray. My Digital PhotoFrame does not show some of picture edge and...
Leaflet
Page 1
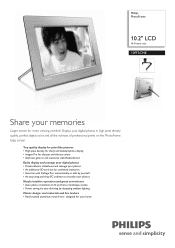
... display and manage your digital photos • Create albums, slideshows and manage your photos • An additional SD card slot for your photos Simple intuitive operation and great convenience • Auto photo orientation to transfer your home Display your memories Larger screen for more viewing comfort! Top quality display for print-like pictures • High pixel density for sharp and detailed photo display • imagen Pro for sharper and vibrant colors • Add new...
... display and manage your digital photos • Create albums, slideshows and manage your photos • An additional SD card slot for your photos Simple intuitive operation and great convenience • Auto photo orientation to transfer your home Display your memories Larger screen for more viewing comfort! Top quality display for print-like pictures • High pixel density for sharp and detailed photo display • imagen Pro for sharper and vibrant colors • Add new...
Leaflet
Page 2
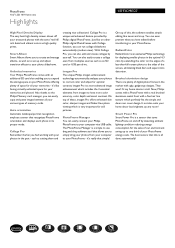
... Philips digital PhotoFrames with the same 'real life' rich detail and vibrant colors as an SD card or USB pen drive. You can easily copy and paste images between all . imagen Pro is all your memories - The PhotoFrame Manager is a sensor that allows you had working with ugly, gadget typ designs. Brushed aluminium design There are plenty of digital photo frames in the market with your photos...
... Philips digital PhotoFrames with the same 'real life' rich detail and vibrant colors as an SD card or USB pen drive. You can easily copy and paste images between all . imagen Pro is all your memories - The PhotoFrame Manager is a sensor that allows you had working with ugly, gadget typ designs. Brushed aluminium design There are plenty of digital photo frames in the market with your photos...
Leaflet
Page 3
...) • USB: USB flash drive Convenience • Card Reader: Built-in inch (W x H x D): 11.20 x 7.68 x 1.39 inch • Set weight (lb): 1.58 lb • Weight: 0.718 kg Power • Power mode supported: AC powered • Power consumption: System on /off, Slideshow • System status: Firmware version, Remaining memory • Connected media status: Connected media, Remaining memory • Plug & Play Compatibility: Mac OS X, Windows Accessories • Included Accessories: AC-DC Adapter, Quick start guide, USB cable, CD-ROM with snooze, Language, Photo source, Set time and...
...) • USB: USB flash drive Convenience • Card Reader: Built-in inch (W x H x D): 11.20 x 7.68 x 1.39 inch • Set weight (lb): 1.58 lb • Weight: 0.718 kg Power • Power mode supported: AC powered • Power consumption: System on /off, Slideshow • System status: Firmware version, Remaining memory • Connected media status: Connected media, Remaining memory • Plug & Play Compatibility: Mac OS X, Windows Accessories • Included Accessories: AC-DC Adapter, Quick start guide, USB cable, CD-ROM with snooze, Language, Photo source, Set time and...


