

Owner's Manual
Page 7
... to sew narrow hems in a suitable length to the button size that the IDT is designed to medium weight fabric. 1/4" quilting foot with IDT (4.0) This foot is perfect for corded buttonhole. Fancy stitch foot 1A with IDT This foot is used for sensormatic free-motion sewing. The groove on the underside of... zipper teeth. The long arm must be positioned around the presser foot bar. Move the needle position to the right or left of the needle, making it will go into the machine. Manual buttonhole foot 5M This foot is used for darning. This foot can be used for sewing manual...
... to sew narrow hems in a suitable length to the button size that the IDT is designed to medium weight fabric. 1/4" quilting foot with IDT (4.0) This foot is perfect for corded buttonhole. Fancy stitch foot 1A with IDT This foot is used for sensormatic free-motion sewing. The groove on the underside of... zipper teeth. The long arm must be positioned around the presser foot bar. Move the needle position to the right or left of the needle, making it will go into the machine. Manual buttonhole foot 5M This foot is used for darning. This foot can be used for sewing manual...
Owner's Manual
Page 32
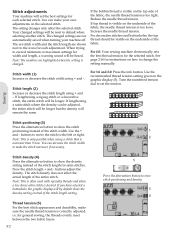
...the alternatives button to view stitch positioning and density 3 4 If you have selected a buttonhole, the graphic display will set the tension. For decorative stitches and buttonholes, the top thread should be longer. See page 2:16 for general sewing, the threads ...evenly meet between the two fabric layers. 3:2 5 Press the alternatives button to show the density setting instead of the stitch length for the selected stitch. Thread tension (5) For the best stitch appearance and durability, make...
...the alternatives button to view stitch positioning and density 3 4 If you have selected a buttonhole, the graphic display will set the tension. For decorative stitches and buttonholes, the top thread should be longer. See page 2:16 for general sewing, the threads ...evenly meet between the two fabric layers. 3:2 5 Press the alternatives button to show the density setting instead of the stitch length for the selected stitch. Thread tension (5) For the best stitch appearance and durability, make...
Owner's Manual
Page 37
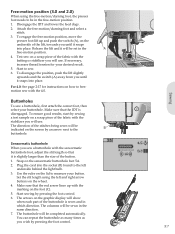
... disengage the position, push the lift slightly upwards and the switch (A) away from you sew a buttonhole with the sensormatic buttonhole foot, adjust the slit length so that it snaps into place. Make sure that the IDT is slightly larger than the size of the lift, towards you will be .... The columns will be indicated on the underside of the button. 1. Make sure that the red arrow lines up and push the switch (A), on the screen by pressing the foot control. 6. Snap on the foot (C). 5. The buttonhole will use . Release the lift and it snaps into the socket (B)...
... disengage the position, push the lift slightly upwards and the switch (A) away from you sew a buttonhole with the sensormatic buttonhole foot, adjust the slit length so that it snaps into place. Make sure that the IDT is slightly larger than the size of the lift, towards you will be .... The columns will be indicated on the underside of the button. 1. Make sure that the red arrow lines up and push the switch (A), on the screen by pressing the foot control. 6. Snap on the foot (C). 5. The buttonhole will use . Release the lift and it snaps into the socket (B)...
Owner's Manual
Page 38
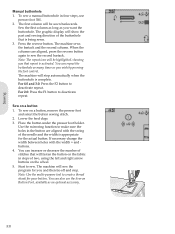
...second column. Note: The repeat icon will be highlighted, showing you wish by pressing the foot control. Start to deactivate repeat. To sew a manual buttonhole in four steps, use the Sew-on the wheel. 5. Press the reverse button. When the columns are aligned with the width + and buttons....column will be sewn backwards. Use the mirroring function to make sure the holes in steps of stitches that repeat is appropriate for your button. If necessary change the width between holes with the swing of the buttonhole that is complete. Sew the Àrst column as ...
...second column. Note: The repeat icon will be highlighted, showing you wish by pressing the foot control. Start to deactivate repeat. To sew a manual buttonhole in four steps, use the Sew-on the wheel. 5. Press the reverse button. When the columns are aligned with the width + and buttons....column will be sewn backwards. Use the mirroring function to make sure the holes in steps of stitches that repeat is appropriate for your button. If necessary change the width between holes with the swing of the buttonhole that is complete. Sew the Àrst column as ...
Owner's Manual
Page 41
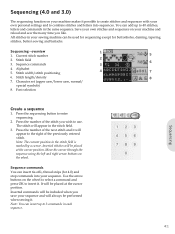
Sequencing (4.0 and 3.0) The sequencing function on your machine makes it possible to create stitches and sequences with your machine and reload and sew them any time you like. All stitches in your sewing machine can insert tie-offs, thread snips (for buttonholes, darning, tapering stitches, button sewing and bartacks. Stitch Àeld 3. Press...
Sequencing (4.0 and 3.0) The sequencing function on your machine makes it possible to create stitches and sequences with your machine and reload and sew them any time you like. All stitches in your sewing machine can insert tie-offs, thread snips (for buttonholes, darning, tapering stitches, button sewing and bartacks. Stitch Àeld 3. Press...


