
Pfaff Tiptronic 2040 Support Question
Pfaff Tiptronic 2040 Support Question
Find answers below for this question about Pfaff Tiptronic 2040.Need a Pfaff Tiptronic 2040 manual? We have 1 online manual for this item!
Question posted by mararenee on September 20th, 2020
How To Use The Buttonhole Foot?
Current Answers
Answer #1: Posted by Troubleshooter101 on September 20th, 2020 10:00 PM

Member since:
September 30th, 2015 Points: 2,927,030

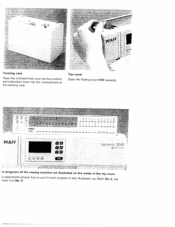
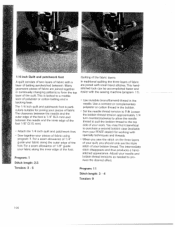
The button hole foot is a sewing machine foot which simply clips onto the machine. Remove your current presser foot, and then clip the buttonhole foot on. You can make a buttonhole with a 1 step or 4 step buttonhole setting on your machine. The 4 step buttonhole setting your your sewing machine should look something like the image below.
First you need to decide how big you need your buttonhole to be for the button to fit through. To do that, place your button in the buttonhole presser foot (or if it is too big, next to the attachment) at the end which is closest to you. Note the markings on the side of the attachment are there to help you remember the size of your button. You don't have to only make buttonholes at a marked level. Don't forget that this is the standard way to measure for a flat button. Raised buttons marry need more room, so it's always best to practice on a scrap of fabric first to make sure the button will go through.
Please check this link for reference:-
https://www.thesewingdirectory.co.uk/how-to-use-a-buttonhole-foot/
Please check this video tutorial
Thanks
Please respond to my effort to provide you with the best possible solution by using the "Acceptable Solution" and/or the "Helpful" buttons when the answer has proven to be helpful. Please feel free to submit further info for your question, if a solution was not provided. I appreciate the opportunity to serve you!
Troublshooter101
Answer #2: Posted by Sunny0110 on September 23rd, 2020 8:43 AM

Member since:
September 23rd, 2020 Points: 100
First you need to decide how big you need your buttonhole to be for the button to fit through. To do that, place your button in the buttonhole presser foot (or if it is too big, next to the attachment) at the end which is closest to you. Note the markings on the side of the attachment are there to help you remember the size of your button. You don't have to only make buttonholes at a marked level. Don't forget that this is the standard way to measure for a flat button. Raised buttons marry need more room, so it's always best to practice on a scrap of fabric first to make sure the button will go through.
A one step buttonhole will do the whole buttonhole for you, but the 4 step buttonhole needs you to manually change stitches. So I will show you how to do that below.
Set the attachment at the length of your button and select stitch 'a/c'. This will sew a side to side. You need this to be anchored in well or when you open your buttonhole it could break and the material could rip. So I would sew at least 6 times.
Next, select stitch 'd'. This sews a right sided zigzag stitch and brings you to the front of your buttonhole. Note that your stitch length will effect your zigzag. You will rarely find a satin stitch used on a buttonhole, but I would recommend a short stitch length.
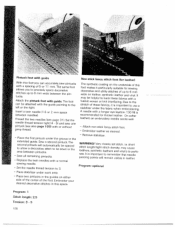
Step 3 is a repeat of step 1, but this time you are just at the other end of the buttonhole. Finally, select stitch 'b'. This is a left sided zigzag that will bring you back to where you started. I prefer to always sew a buttonhole twice over so I know it can withstand heavy usage. So once you have sewn it twice it should look like the image below.
The only thing you have left to do is open up your buttonhole. Ideally using a seam ripper (or scissors) slide down the centre of the material being careful not to cut the end stitches.
Tip - If you are worried about cutting too far place a pin in the fabric across either end of the button hole. You seam ripper will stop when it hits the pin.
Your buttonhole is now complete, so let's move on to the button itself. To use the button attaching foot you must either lower or cover your feed dogs depending on your machine type. This is because you need to stitch on the spot so you don't want your machine pulling your fabric away from you. If you have covered your feed dogs, don't forget to pull your bobbin thread up through the opening in the cover.
Select a zigzag stitch then by hand, lower and raise the needle until you have the stitch width needed for the needle to go into each buttonhole. You may need to jiggle the angle of the button under the foot to get it lining up perfectly.
Then start sewing. The amount of times you go through the button will depend on its use, but I would recommend again, a minimum 6 times into each button hole. If your button has to go through a thick fabric or lots of layers you may wish for your button to be freer from the fabric so that once it is pulled through, it sits comfortably on top. You are more likely to be able to do this by machine if you can lower your feed dogs as often the cover for feed dogs takes up too much space, so a spacing item wont fit.
If you do have plenty of space under the button and presser foot, simply place something narrower than the width of the holes under the button between the holes (eg. A chopstick), to raise the button away from the fabric as you stitch. To reduce the chance of it slipping, lower the needle by hand for the first couple of stitches. I prefer to reinforce this by looping thread around the thread under the button a few times and tying a knot by hand immediately after removing the item, before it has time to slacken.
Your button is now ready for use!
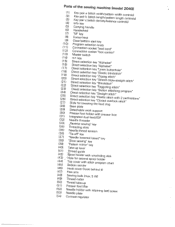
Related Pfaff Tiptronic 2040 Manual Pages


Similar Questions

my wifes performance icon sewing machine started freezing up after sewing for a few minutes. it migh...


I have the complete owners book for above listed machine. Love machine, it in last week it has devel...

what to do?