
Owner's Manual
Page 2
... been dropped or damaged, or dropped into any opening. • Do not use as threading needle, changing needle, threading bobbin, or changing presser foot, etc. • Always unplug sewing machine from all moving parts. Use only attachments recommended by pulling on a double-insulated product, nor should a means for grounding be left unattended when plugged in the instruction manual. • Never drop or insert any object into water. Keep ventilation openings of the sewing machine and foot controller free from...
... been dropped or damaged, or dropped into any opening. • Do not use as threading needle, changing needle, threading bobbin, or changing presser foot, etc. • Always unplug sewing machine from all moving parts. Use only attachments recommended by pulling on a double-insulated product, nor should a means for grounding be left unattended when plugged in the instruction manual. • Never drop or insert any object into water. Keep ventilation openings of the sewing machine and foot controller free from...
Owner's Manual
Page 4
...5 Maintenance 5:1 Changing the light bulbs 5:1 Cleaning the machine 5:1 Replacing the stitch plate 5:2 Troubleshooting 5:3 Index 5:5 Note: The machine models will be referred to the power supply 2:1 Pack away after sewing 2.2 Free arm 2:2 Thread cutter 2:2 Spool pins 2:2 Threading the machine 2:3 Bobbin winding 2:5 Inserting the bobbin 2:6 IDT (Integrated dual feed 2:6 Electronic knee-lift (4.0 2:7 Needles 2:7 Changing the needle 2:8 Lowering feed dogs 2:8 Changing the presser foot 2.8 Buttons for quilt expression™ 4.0 2:10 Buttons for expression...
...5 Maintenance 5:1 Changing the light bulbs 5:1 Cleaning the machine 5:1 Replacing the stitch plate 5:2 Troubleshooting 5:3 Index 5:5 Note: The machine models will be referred to the power supply 2:1 Pack away after sewing 2.2 Free arm 2:2 Thread cutter 2:2 Spool pins 2:2 Threading the machine 2:3 Bobbin winding 2:5 Inserting the bobbin 2:6 IDT (Integrated dual feed 2:6 Electronic knee-lift (4.0 2:7 Needles 2:7 Changing the needle 2:8 Lowering feed dogs 2:8 Changing the presser foot 2.8 Buttons for quilt expression™ 4.0 2:10 Buttons for expression...

Owner's Manual
Page 5
...in needle threader 26. Main switch, connectors for threading and bobbin 2. Presser foot bar and presser foot holder 15. Spool caps 10. Bobbin cover 30. Thread tension disk 12. IDT 14. Sensormatic buttonhole foot socket 24. Light bulbs 25. Bobbin thread cutter 7. Bobbin winder lever and bobbin spindle 8. Free arm 31. Take-up lever 13. Connection for lowering the feed dogs 21. Auxiliary spool pin 9. Handwheel 19. Needle bar 27. Needle thread guide 28. Introduction PFAFF quilt expression 4.0 inch mm Introduction Machine overview...
...in needle threader 26. Main switch, connectors for threading and bobbin 2. Presser foot bar and presser foot holder 15. Spool caps 10. Bobbin cover 30. Thread tension disk 12. IDT 14. Sensormatic buttonhole foot socket 24. Light bulbs 25. Bobbin thread cutter 7. Bobbin winder lever and bobbin spindle 8. Free arm 31. Take-up lever 13. Connection for lowering the feed dogs 21. Auxiliary spool pin 9. Handwheel 19. Needle bar 27. Needle thread guide 28. Introduction PFAFF quilt expression 4.0 inch mm Introduction Machine overview...

Owner's Manual
Page 7
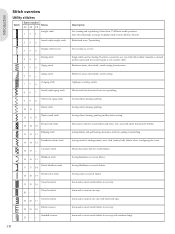
... cording for straight stitching and zigzag stitching with a stitch length longer than 1.0mm stitch length, use this foot. The Ànger on the back of the foot is designed to the button size that the IDT is used for sensormatic free-motion sewing. Sensormatic free-motion foot 6A (4.0) This foot is disengaged when using presser foot 2A, 5A, 5M, 6A and the free-motion/darning foot. 1:7 Free-motion/Darning foot (3.0 and 2.0) Insert the pin of the foot as far as it easy to sew close to medium weight fabric. 1/4" quilting foot...
... cording for straight stitching and zigzag stitching with a stitch length longer than 1.0mm stitch length, use this foot. The Ànger on the back of the foot is designed to the button size that the IDT is used for sensormatic free-motion sewing. Sensormatic free-motion foot 6A (4.0) This foot is disengaged when using presser foot 2A, 5A, 5M, 6A and the free-motion/darning foot. 1:7 Free-motion/Darning foot (3.0 and 2.0) Insert the pin of the foot as far as it easy to sew close to medium weight fabric. 1/4" quilting foot...
Owner's Manual
Page 8
...overlock 20 - - Sew continuous reverse. Single stitch used with elastic thread in one stitch. Reinforce seams, clean Ànish, stretch sewing, lace insertion. Elastic stitch for basting. Decorative stitch for stretch fabrics and hems. Also used for decorative hems or topstitching. Seam and overcast stretch fabrics in the bobbin. Closed overlock 21 20 17 Elastic overcast 22 21 18 Standard overcast 23 - - 1:8 Description For seaming and topstitching. Reinforced seam. Touch foot control to sew another stitch. Sewing elastic, darning, patching and decorative sewing...
...overlock 20 - - Sew continuous reverse. Single stitch used with elastic thread in one stitch. Reinforce seams, clean Ànish, stretch sewing, lace insertion. Elastic stitch for basting. Decorative stitch for stretch fabrics and hems. Also used for decorative hems or topstitching. Seam and overcast stretch fabrics in the bobbin. Closed overlock 21 20 17 Elastic overcast 22 21 18 Standard overcast 23 - - 1:8 Description For seaming and topstitching. Reinforced seam. Touch foot control to sew another stitch. Sewing elastic, darning, patching and decorative sewing...
Owner's Manual
Page 17
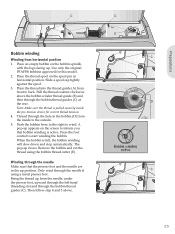
... hole in the bobbin (D) from front to start winding the bobbin. Winding through the needle Make sure that bobbin winding is full, the bobbin winding will slow down and stop automatically. C E B C A D B C A 2:5 Place the thread spool on the spool pin in the up position. Then follow step 4 and 5 above the bobbin winder thread guide (B) and then through the needle if using the bobbin thread cutter (E). Place an empty bobbin on the screen to wind. A pop-up from horizontal position 1. Bring the thread...
... hole in the bobbin (D) from front to start winding the bobbin. Winding through the needle Make sure that bobbin winding is full, the bobbin winding will slow down and stop automatically. C E B C A D B C A 2:5 Place the thread spool on the spool pin in the up position. Then follow step 4 and 5 above the bobbin winder thread guide (B) and then through the needle if using the bobbin thread cutter (E). Place an empty bobbin on the screen to wind. A pop-up from horizontal position 1. Bring the thread...
Owner's Manual
Page 19
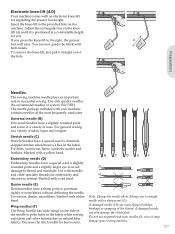
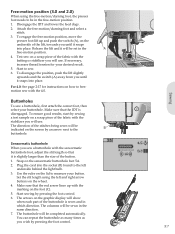
... machine. Adjust the rectangular bar on natural Àber fabrics. For general sewing in a variety of sizes. Marked with a red band. Note: Change the needle often. You can also damage the stitch plate. Marked with a blue band. Do not use a straight needle with a sharp point (G). Electronic knee-lift (4.0) Your machine comes with an electronic knee-lift for best results. Insert the knee-lift in successful sewing. To remove...
... machine. Adjust the rectangular bar on natural Àber fabrics. For general sewing in a variety of sizes. Marked with a red band. Note: Change the needle often. You can also damage the stitch plate. Marked with a blue band. Do not use a straight needle with a sharp point (G). Electronic knee-lift (4.0) Your machine comes with an electronic knee-lift for best results. Insert the knee-lift in successful sewing. To remove...
Owner's Manual
Page 22
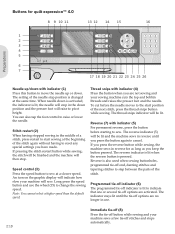
... special settings you press the button again to raise or lower the needle. Long press the speed button and use . 2:10 Immediate tie-off (8) Press the tie-off stitches and stops automatically. Thread snips with indicator (5) For permanent reverse, press the button before the needle moves to change the sewing speed. To cut before starting to sew. If you press the reverse button while sewing, the machine sews in the down position and the presser foot...
... special settings you press the button again to raise or lower the needle. Long press the speed button and use . 2:10 Immediate tie-off (8) Press the tie-off stitches and stops automatically. Thread snips with indicator (5) For permanent reverse, press the button before the needle moves to change the sewing speed. To cut before starting to sew. If you press the reverse button while sewing, the machine sews in the down position and the presser foot...
Owner's Manual
Page 24
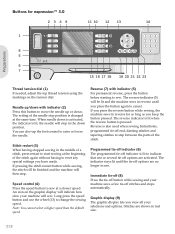
... the tie-off stitches and stops automatically. Needle up/down position. Speed control (4) Press the speed button to sew at the beginning of the needle stop in use the wheel (13) to sew. If you press the reverse button while sewing, the machine sews in reverse for expression™ 3.0 2349 11 10 12 13 14 1 4 3 2 1 8 5 6 7 15 16 17 18 19 20 21 22 23 Thread tension dial (1) If needed, adjust the top thread tension using the markings...
... the tie-off stitches and stops automatically. Needle up/down position. Speed control (4) Press the speed button to sew at the beginning of the needle stop in use the wheel (13) to sew. If you press the reverse button while sewing, the machine sews in reverse for expression™ 3.0 2349 11 10 12 13 14 1 4 3 2 1 8 5 6 7 15 16 17 18 19 20 21 22 23 Thread tension dial (1) If needed, adjust the top thread tension using the markings...

Owner's Manual
Page 26
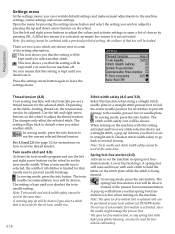
... Thread tension dial (1) If needed, adjust the top thread tension using the markings on the graphic display will stop position is also used when sewing buttonholes, programmed tie-off options are shown in the down . The reverse indicator (4) will be lit and the machine sews in reverse until the tie-off stitches and stops automatically. The reverse indicator is lit when the reverse button is lit to indicate that your machine is set...
... Thread tension dial (1) If needed, adjust the top thread tension using the markings on the graphic display will stop position is also used when sewing buttonholes, programmed tie-off options are shown in the down . The reverse indicator (4) will be lit and the machine sews in reverse until the tie-off stitches and stops automatically. The reverse indicator is lit when the reverse button is lit to indicate that your machine is set...
Owner's Manual
Page 28
... setting, the outlines of that spring foot freemotion is limited for freemotion embroidery. Note: The open toe free-motion foot is optional and can be used for that is not activated. Use the left and right arrow buttons to prevent needle breakage. The changes only affect the selected stitch. Lower the feed dogs. This icon shows you that this setting activated and for instructions on the wheel. Preparations Thread tension (4.0) Your sewing machine...
... setting, the outlines of that spring foot freemotion is limited for freemotion embroidery. Note: The open toe free-motion foot is optional and can be used for that is not activated. Use the left and right arrow buttons to prevent needle breakage. The changes only affect the selected stitch. Lower the feed dogs. This icon shows you that this setting activated and for instructions on the wheel. Preparations Thread tension (4.0) Your sewing machine...
Owner's Manual
Page 29
... cases, you select another stitch. Automatic presser foot lift (4.0) When selected, the automatic presser foot lift is being formed. Use the left and right arrow buttons on a piece of the presser foot recommendation. Audible alarm Turn all text in the down position. The value can occur if your sewing machine. Lower the feed dogs. In Sensormatic free-motion mode, the fabric should move freely under the presser foot. Start by using specialty techniques, adjust the pressure. The setting...
... cases, you select another stitch. Automatic presser foot lift (4.0) When selected, the automatic presser foot lift is being formed. Use the left and right arrow buttons on a piece of the presser foot recommendation. Audible alarm Turn all text in the down position. The value can occur if your sewing machine. Lower the feed dogs. In Sensormatic free-motion mode, the fabric should move freely under the presser foot. Start by using specialty techniques, adjust the pressure. The setting...
Owner's Manual
Page 31
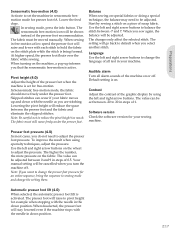
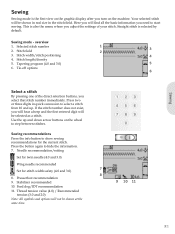
... 3.0) 8. Straight stitch is the Àrst view on the machine. Sewing Sewing Sewing mode is selected by default. This is also the menu where you select that stitch number immediately. Sewing mode - Stitch width/stitch positioning 4 4. Tie-off options 6 Select a stitch By pressing one of the direct selection buttons, you adjust the settings of your stitch. Sewing recommendations Press the info button to hide the information. 7. Needle recommendation/setting Set for twin needle (4.0 and 3.0) Wing needle...
... 3.0) 8. Straight stitch is the Àrst view on the machine. Sewing Sewing Sewing mode is selected by default. This is also the menu where you select that stitch number immediately. Sewing mode - Stitch width/stitch positioning 4 4. Tie-off options 6 Select a stitch By pressing one of the direct selection buttons, you adjust the settings of your stitch. Sewing recommendations Press the info button to hide the information. 7. Needle recommendation/setting Set for twin needle (4.0 and 3.0) Wing needle...
Owner's Manual
Page 32
... to default when selecting another stitch. buttons adjust the density. Reduce the needle thread tension. See page 2:16 for satin stitches. Use the + 1 and - You can be adjusted, the entire stitch will be reset to make the stitch narrower if necessary. The stitch density does not affect the actual length of the stitch length for instructions on the underside of the fabric. Stitch adjustments Your machine will set the tension. The changed settings will be longer but...
... to default when selecting another stitch. buttons adjust the density. Reduce the needle thread tension. See page 2:16 for satin stitches. Use the + 1 and - You can be adjusted, the entire stitch will be reset to make the stitch narrower if necessary. The stitch density does not affect the actual length of the stitch length for instructions on the underside of the fabric. Stitch adjustments Your machine will set the tension. The changed settings will be longer but...
Owner's Manual
Page 36
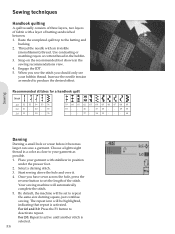
... is selected. 3:6 By default, the machine will automatically complete the stitch. 5. Choose a lightweight thread in position under the presser foot. 2. Once you should only see your garment as needed to deactivate repeat. Use contrasting or matching rayon or cotton thread in the sewing recommendations view. 4. The repeat icon will be set the length of the stitch. Start sewing above the hole and over it becomes larger can...
... is selected. 3:6 By default, the machine will automatically complete the stitch. 5. Choose a lightweight thread in position under the presser foot. 2. Once you should only see your garment as needed to deactivate repeat. Use contrasting or matching rayon or cotton thread in the sewing recommendations view. 4. The repeat icon will be set the length of the stitch. Start sewing above the hole and over it becomes larger can...
Owner's Manual
Page 37
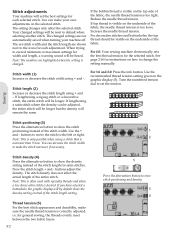
... the marking on the foot (C). 5. Sewing Buttonholes To sew a buttonhole, Àrst attach the correct foot, then select your button. The direction of the stitches being sewn will be indicated on the underside of the fabric with the 4.0. Set the slit length using the free-motion/darning foot, the presser foot needs to be set in the free-motion position. 1. The columns will use . Attach the free-motion/darning foot and select a stitch. 3. To engage the free-motion position, move the presser foot lift up with the...
... the marking on the foot (C). 5. Sewing Buttonholes To sew a buttonhole, Àrst attach the correct foot, then select your button. The direction of the stitches being sewn will be indicated on the underside of the fabric with the 4.0. Set the slit length using the free-motion/darning foot, the presser foot needs to be set in the free-motion position. 1. The columns will use . Attach the free-motion/darning foot and select a stitch. 3. To engage the free-motion position, move the presser foot lift up with the...
Owner's Manual
Page 47
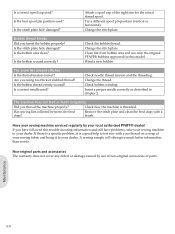
... the fabric. Use needle system 130/750 H. Insert a new needle. Troubleshooting In this troubleshooting guide you will be sensitive to sewing position. Problem/cause General problems Thread snips do not respond to touch? Push bobbin winder lever to static electricity. Did you thread the machine properly? Is the needle too small for the thread and fabric. Reduce the presser foot pivot height in the settings menu. Is the needle bent or blunt? Maintenance 5:3 Make sure that the foot control cord is...
... the fabric. Use needle system 130/750 H. Insert a new needle. Troubleshooting In this troubleshooting guide you will be sensitive to sewing position. Problem/cause General problems Thread snips do not respond to touch? Push bobbin winder lever to static electricity. Did you thread the machine properly? Is the needle too small for the thread and fabric. Reduce the presser foot pivot height in the settings menu. Is the needle bent or blunt? Maintenance 5:3 Make sure that the foot control cord is...
Owner's Manual
Page 48
.... Attach a spool cap of your sewing fabric and bring it is threaded. Is the bobbin area clean? Remove the stitch plate and clean the feed dogs with your thread on a scrap of the right size for this trouble shooting information and still have followed this model. If you thread the machine properly? Wind a new bobbin. Check bobbin winding. Check how the machine is a great help to your dealer. Is a correct spool cap used ? Is the best spool pin position used? Change the stitch plate. Bobbin thread breaks Did...
.... Attach a spool cap of your sewing fabric and bring it is threaded. Is the bobbin area clean? Remove the stitch plate and clean the feed dogs with your thread on a scrap of the right size for this trouble shooting information and still have followed this model. If you thread the machine properly? Wind a new bobbin. Check bobbin winding. Check how the machine is a great help to your dealer. Is a correct spool cap used ? Is the best spool pin position used? Change the stitch plate. Bobbin thread breaks Did...
Owner's Manual
Page 49
... 2:8 Foot control 2:1 Free-motion Sensormatic free-motion 2:17 Spring foot free-motion 2:17 Free-motion position 3:7 Free arm 2:2 G Graphic display 2:11, 2:12, 2:14 H Hard cover 2:2 I IDT 2:6 Disengage 2:6 Engage 2:6 Immediate tie-off 2:10, 2:12, 2:14 Info button 2:11, 2:13, 2:15, 3:1 Inserting the bobbin 2:6 K Knee-lift 2:7 L Language 2:17 Light bulbs, change 5:1 Load Sequencing 4:2 Sewing mode 3:5 Lowering feed dogs 2:8 M Machine overview 1:5 Accessory tray 1:6 Front side 1:5 Included accessories 1:6 Presser feet 1:7 Top parts 1:5 Maintenance 5:1 Manual buttonhole...
... 2:8 Foot control 2:1 Free-motion Sensormatic free-motion 2:17 Spring foot free-motion 2:17 Free-motion position 3:7 Free arm 2:2 G Graphic display 2:11, 2:12, 2:14 H Hard cover 2:2 I IDT 2:6 Disengage 2:6 Engage 2:6 Immediate tie-off 2:10, 2:12, 2:14 Info button 2:11, 2:13, 2:15, 3:1 Inserting the bobbin 2:6 K Knee-lift 2:7 L Language 2:17 Light bulbs, change 5:1 Load Sequencing 4:2 Sewing mode 3:5 Lowering feed dogs 2:8 M Machine overview 1:5 Accessory tray 1:6 Front side 1:5 Included accessories 1:6 Presser feet 1:7 Top parts 1:5 Maintenance 5:1 Manual buttonhole...

Owner's Manual
Page 50
...3:9 Power supply 2:1 Presser feet 1:7 Presser foot, change 2:8 Presser foot, lower 2:11 Presser foot pressure 2:17 Presser foot, raise 2:11, 2:17 Program a sequence 4:1 Programmed tie-off indicator...... 2:10, 2:12, 2:14, 3:3 Q Quilt stitches 1:10 Quilting 3:6 R Raise the presser foot 2:11 Replacing the stitch plate 5:2 Reverse button 2:10, 2:12, 2:14 Reverse indicator 2:10, 2:12, 2:14 S Safety instructions 2 Save Sequencing 4:2 Sewing mode 3:5 Select a stitch 2:11, 2:13, 2:15, 3:1 Sensormatic buttonhole 3:8 Sensormatic buttonhole foot 1:7, 3:7 Sensormatic free-motion 2:17...
...3:9 Power supply 2:1 Presser feet 1:7 Presser foot, change 2:8 Presser foot, lower 2:11 Presser foot pressure 2:17 Presser foot, raise 2:11, 2:17 Program a sequence 4:1 Programmed tie-off indicator...... 2:10, 2:12, 2:14, 3:3 Q Quilt stitches 1:10 Quilting 3:6 R Raise the presser foot 2:11 Replacing the stitch plate 5:2 Reverse button 2:10, 2:12, 2:14 Reverse indicator 2:10, 2:12, 2:14 S Safety instructions 2 Save Sequencing 4:2 Sewing mode 3:5 Select a stitch 2:11, 2:13, 2:15, 3:1 Sensormatic buttonhole 3:8 Sensormatic buttonhole foot 1:7, 3:7 Sensormatic free-motion 2:17...


