
Owner's Manual
Page 2
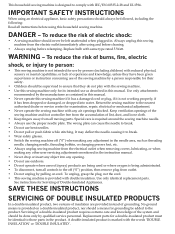
...before cleaning. • Always unplug before using an electrical appliance, basic safety precautions should be left unattended when plugged in the instruction manual. • Never drop or insert any object into water. Return the sewing machine to the off ("0") when making any adjustment in...EN 60335-2-28 and UL1594. Replacement parts for Servicing of the sewing machine by the manufacturer as described in this manual. • Never operate this manual. Use only attachments recommended by a person responsible for its intended use as contained in this sewing machine if it...
...before cleaning. • Always unplug before using an electrical appliance, basic safety precautions should be left unattended when plugged in the instruction manual. • Never drop or insert any object into water. Return the sewing machine to the off ("0") when making any adjustment in...EN 60335-2-28 and UL1594. Replacement parts for Servicing of the sewing machine by the manufacturer as described in this manual. • Never operate this manual. Use only attachments recommended by a person responsible for its intended use as contained in this sewing machine if it...
Owner's Manual
Page 3
Before you to maximize the use of sewing! Your PFAFF® expression™ machine will deÀnitely enable you to help you at any time. Your authorized PFAFF® dealer will soon discover how to transform all your creative ideas into reality. Congratulations! You will... a totally new dimension of your new PFAFF® sewing machine. As a sewing enthusiast, you have acquired a machine that features the very latest in both design and technology, enabling you start, please spend some time reading this owner's manual. Congratulations on purchasing your machine.
Before you to maximize the use of sewing! Your PFAFF® expression™ machine will deÀnitely enable you to help you at any time. Your authorized PFAFF® dealer will soon discover how to transform all your creative ideas into reality. Congratulations! You will... a totally new dimension of your new PFAFF® sewing machine. As a sewing enthusiast, you have acquired a machine that features the very latest in both design and technology, enabling you start, please spend some time reading this owner's manual. Congratulations on purchasing your machine.
Owner's Manual
Page 4
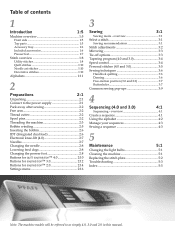
... foot 2.8 Buttons for quilt expression™ 4.0 2:10 Buttons for expression™ 3.0 2:12 Buttons for expression™ 2.0 2:14 ...Settings menu 2:16 3 Sewing 3:1 Sewing mode - Table of contents 1 Introduction 1:5 Machine overview 1:5 Front side 1:5 Top parts 1:5 Accessory tray 1:6 Included accessories 1:6 Presser feet 1:7 Stitch overview 1:8 Utility stitches 1:8 Quilt stitches 1:10 Needle art stitches 1:10 Decorative stitches 1:10 Alphabets 1:11 2 Preparations 2:1 Unpacking 2:1 Connect to as simply 4.0, 3.0 and 2.0 in this manual...
... foot 2.8 Buttons for quilt expression™ 4.0 2:10 Buttons for expression™ 3.0 2:12 Buttons for expression™ 2.0 2:14 ...Settings menu 2:16 3 Sewing 3:1 Sewing mode - Table of contents 1 Introduction 1:5 Machine overview 1:5 Front side 1:5 Top parts 1:5 Accessory tray 1:6 Included accessories 1:6 Presser feet 1:7 Stitch overview 1:8 Utility stitches 1:8 Quilt stitches 1:10 Needle art stitches 1:10 Decorative stitches 1:10 Alphabets 1:11 2 Preparations 2:1 Unpacking 2:1 Connect to as simply 4.0, 3.0 and 2.0 in this manual...

Owner's Manual
Page 7
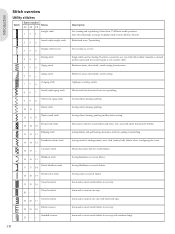
Sensormatic buttonhole foot 5A When connected to medium weight fabric. 1/4" quilting foot with IDT (4.0) This foot is perfect for corded buttonhole. The... 1/8" (3 mm). Use the markings on the foot to both sides of the toe is used for sewing manual buttonholes. The clearance between the needle and the inner edge of the hem edge. The "C-shaped" guide should... foot 0A with IDT (attached on the machine upon delivery) This foot is used mainly for decorative stitches. Manual buttonhole foot 5M This foot is 1/4" (6 mm) and between the needle and the outer edge of the ...
Sensormatic buttonhole foot 5A When connected to medium weight fabric. 1/4" quilting foot with IDT (4.0) This foot is perfect for corded buttonhole. The... 1/8" (3 mm). Use the markings on the foot to both sides of the toe is used for sewing manual buttonholes. The clearance between the needle and the inner edge of the hem edge. The "C-shaped" guide should... foot 0A with IDT (attached on the machine upon delivery) This foot is used mainly for decorative stitches. Manual buttonhole foot 5M This foot is 1/4" (6 mm) and between the needle and the outer edge of the ...
Owner's Manual
Page 8
...Closed overlock 20 - - Reinforce seams, clean Ànish, stretch sewing. Sewing elastic, darning, patching. Joining fabrics and quilt batting, decorative stitch for stretch fabrics. Joining stitch for undergarments, terry cloth, leather, bulky fabrics where overlapping the seams. Elastic decorative ...hem for quilting, hemstitching. Seam and overcast in one step. Select from 37 different needle positions. Reinforced seam. Move fabric manually to desired position and touch foot control again to sew one step. Elastic...
...Closed overlock 20 - - Reinforce seams, clean Ànish, stretch sewing. Sewing elastic, darning, patching. Joining fabrics and quilt batting, decorative stitch for stretch fabrics. Joining stitch for undergarments, terry cloth, leather, bulky fabrics where overlapping the seams. Elastic decorative ...hem for quilting, hemstitching. Seam and overcast in one step. Select from 37 different needle positions. Reinforced seam. Move fabric manually to desired position and touch foot control again to sew one step. Elastic...

Owner's Manual
Page 16
... in the up lever (E) and down through the right-hand threading slot and then upwards through the left-hand threading slot. Make sure that require manual threading of the tension disk (D). 4. Thread the needles. 2:4 H G C B A E D F B C Preparations PFA Needle threader The needle threader allows you pass one thread to the left and one...
... in the up lever (E) and down through the right-hand threading slot and then upwards through the left-hand threading slot. Make sure that require manual threading of the tension disk (D). 4. Thread the needles. 2:4 H G C B A E D F B C Preparations PFA Needle threader The needle threader allows you pass one thread to the left and one...
Owner's Manual
Page 28
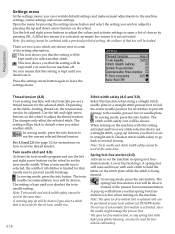
...with a previously selected setting, the outlines of the setting alternatives. Settings menu In the settings menu, you can override default settings and make manual adjustments to normal sewing. Deselect stitch width safety to go back to the needle, presser foot or needle plate. Open the menu by ... go back to the machine settings, sound settings and screen settings. When a twin needle size is kept until you switch your local authorized PFAFF® dealer. Do not use the left and right arrow buttons on the fabric, batting, thread etc, the tension may need to set...
...with a previously selected setting, the outlines of the setting alternatives. Settings menu In the settings menu, you can override default settings and make manual adjustments to normal sewing. Deselect stitch width safety to go back to the needle, presser foot or needle plate. Open the menu by ... go back to the machine settings, sound settings and screen settings. When a twin needle size is kept until you switch your local authorized PFAFF® dealer. Do not use the left and right arrow buttons on the fabric, batting, thread etc, the tension may need to set...
Owner's Manual
Page 29
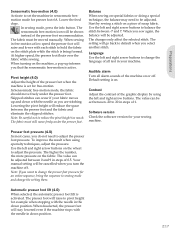
...free-motion. To improve the result when using the left and right arrow buttons to balance the stitch between 0 and 9 in your machine. Your manual setting will go back to default when you that the sensormatic free-motion is activated. Note: If you do not need to be adjusted between.... The higher the number, the more pressure on the wheel to adjust the presser foot pressure. When deselected, the presser foot will be moved manually. Contrast Adjust the contrast of the machine on the stitch plate while the stitch is being formed. Use the left and right arrow buttons to...
...free-motion. To improve the result when using the left and right arrow buttons to balance the stitch between 0 and 9 in your machine. Your manual setting will go back to default when you that the sensormatic free-motion is activated. Note: If you do not need to be adjusted between.... The higher the number, the more pressure on the wheel to adjust the presser foot pressure. When deselected, the presser foot will be moved manually. Contrast Adjust the contrast of the machine on the stitch plate while the stitch is being formed. Use the left and right arrow buttons to...
Owner's Manual
Page 32
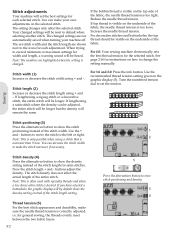
... will be visible on how to show the stitch positioning instead of the stitch width. Stitch density (4) Press the alternatives button to change the setting manually. Now the stitch length + and - Note: This is often used with specialty threads and when a less dense satin stitch is too loose. for instructions on...
... will be visible on how to show the stitch positioning instead of the stitch width. Stitch density (4) Press the alternatives button to change the setting manually. Now the stitch length + and - Note: This is often used with specialty threads and when a less dense satin stitch is too loose. for instructions on...
Owner's Manual
Page 38
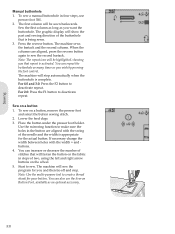
To sew a manual buttonhole in steps of stitches that will show the part and sewing direction of the needle and the width is being sewn. 3. The graphic display ... foot and select the button sewing stitch. 2. To sew on a button 1. Press the reverse button. The machine sews the bartack and the second column. Sewing Manual buttonhole 1. The Àrst column will sew the program for the actual button.
To sew a manual buttonhole in steps of stitches that will show the part and sewing direction of the needle and the width is being sewn. 3. The graphic display ... foot and select the button sewing stitch. 2. To sew on a button 1. Press the reverse button. The machine sews the bartack and the second column. Sewing Manual buttonhole 1. The Àrst column will sew the program for the actual button.
Owner's Manual
Page 49
...from horizontal position 2:5 Winding through the needle 2:5 Button, sew on 3:9 Buttonholes 3:7 Manual buttonhole 3:8 Sensormatic buttonhole 3:8 Buttons expression™ 2.0 2:14-2:15 expression™ 3.0 2:12-2:13 quilt expression™ 4.0 2:10-2:11 C Changing the light bulbs 5:1 Changing the needle 2:8 ... Machine overview 1:5 Accessory tray 1:6 Front side 1:5 Included accessories 1:6 Presser feet 1:7 Top parts 1:5 Maintenance 5:1 Manual buttonhole 3:8 Mirroring 2:11, 2:13, 2:15, 3:3 N Needle, changing 2:8 Needle art stitches 1:10 Needles 2:7 Needle threader 2:4 Needle up/down...
...from horizontal position 2:5 Winding through the needle 2:5 Button, sew on 3:9 Buttonholes 3:7 Manual buttonhole 3:8 Sensormatic buttonhole 3:8 Buttons expression™ 2.0 2:14-2:15 expression™ 3.0 2:12-2:13 quilt expression™ 4.0 2:10-2:11 C Changing the light bulbs 5:1 Changing the needle 2:8 ... Machine overview 1:5 Accessory tray 1:6 Front side 1:5 Included accessories 1:6 Presser feet 1:7 Top parts 1:5 Maintenance 5:1 Manual buttonhole 3:8 Mirroring 2:11, 2:13, 2:15, 3:3 N Needle, changing 2:8 Needle art stitches 1:10 Needles 2:7 Needle threader 2:4 Needle up/down...


