Owner's Manual
Page 4
... Machine overview 1:8 Front side 1:8 Rear side 1:9 Top parts 1:9 Accessory tray 1:9 Parts of the embroidery unit 1:10 Included accessories 1:10 Presser feet 1:11 Stitch overview 1:12 Utility stitches 1:12 Decorative stitches 1:16...machine 2:14 Soft Touch Buttons and indicators 2:15 3 PFAFF® creative™ Color Touch Screen 3:1 Start view 3:2 Main parts 3:2 Task bar 3:2 Option bar 3:3 Common icons 3:3 Selection menu 3:4 Embroidery edit 3:6 Embroidery text editor 3:6 Embroidery stitch-out 3:7 Sequencing 3:7 Stitch Creator 3:8 Settings menu...
... Machine overview 1:8 Front side 1:8 Rear side 1:9 Top parts 1:9 Accessory tray 1:9 Parts of the embroidery unit 1:10 Included accessories 1:10 Presser feet 1:11 Stitch overview 1:12 Utility stitches 1:12 Decorative stitches 1:16...machine 2:14 Soft Touch Buttons and indicators 2:15 3 PFAFF® creative™ Color Touch Screen 3:1 Start view 3:2 Main parts 3:2 Task bar 3:2 Option bar 3:3 Common icons 3:3 Selection menu 3:4 Embroidery edit 3:6 Embroidery text editor 3:6 Embroidery stitch-out 3:7 Sequencing 3:7 Stitch Creator 3:8 Settings menu...
Owner's Manual
Page 6
... hoop 8:11 Thread color edit 8:11 Shape Creator 8:12 Embroidery stitch editor 8:20 Resize 8:23 Embroidery text editor 8:25 Embroidery edit pop-ups 8:27 9 Embroidery mode - 7 Embroidery preparations 7:1 Embroidery unit overview 7:2 Embroidery hoop overview 7:2 Built-in designs 7:3 creative sensation™ Embroidery collection 7:3 Connect the embroidery unit 7:3 Remove the embroidery unit 7:4 Attaching the Dynamic spring foot for embroidery 7:4 To hoop the fabric 7:5 Slide on the hoop 7:5 Getting...
... hoop 8:11 Thread color edit 8:11 Shape Creator 8:12 Embroidery stitch editor 8:20 Resize 8:23 Embroidery text editor 8:25 Embroidery edit pop-ups 8:27 9 Embroidery mode - 7 Embroidery preparations 7:1 Embroidery unit overview 7:2 Embroidery hoop overview 7:2 Built-in designs 7:3 creative sensation™ Embroidery collection 7:3 Connect the embroidery unit 7:3 Remove the embroidery unit 7:4 Attaching the Dynamic spring foot for embroidery 7:4 To hoop the fabric 7:5 Slide on the hoop 7:5 Getting...
Owner's Manual
Page 9
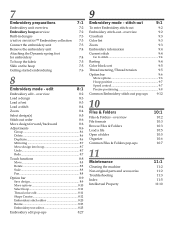
...33 34 39 40 41 45 44 43 42 46 47 48 Accessory tray 46 48 Introduction Embroidery unit overview (type BE20) 49. Embroidery unit connection socket Top parts 35. Bobbin spindle 41. Embroidery unit accesssory tray 52. Embroidery unit socket 53. Handle 33. Bobbin winder thread guide 37. Bobbin thread guides 39. Bobbin ... the accessories in the tray so they are easily accessible. 46. Thread guide 38. Auxiliary spool pin 43. Spool pin 45. Embroidery unit release button 50. Spool caps 44. Removable tray for threading and bobbin winding 36. Level adjusting feet 51.
...33 34 39 40 41 45 44 43 42 46 47 48 Accessory tray 46 48 Introduction Embroidery unit overview (type BE20) 49. Embroidery unit connection socket Top parts 35. Bobbin spindle 41. Embroidery unit accesssory tray 52. Embroidery unit socket 53. Handle 33. Bobbin winder thread guide 37. Bobbin thread guides 39. Bobbin ... the accessories in the tray so they are easily accessible. 46. Thread guide 38. Auxiliary spool pin 43. Spool pin 45. Embroidery unit release button 50. Spool caps 44. Removable tray for threading and bobbin winding 36. Level adjusting feet 51.
Owner's Manual
Page 40
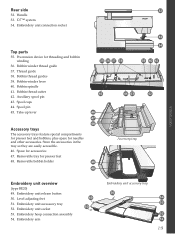
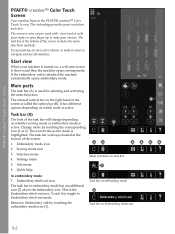
PFAFF® creative™ Color Touch Screen PFAFF® creative™ Color Touch Screen Your machine features the PFAFF® creative™ Color Touch Screen. The task bar at the bottom of the B screen is called the option bar (B). Task bar (A) The look of the screen includes the main functions and help In embroidery mode 7. Embroidery mode icon 1 2 3 4 5 6 2. Return...
PFAFF® creative™ Color Touch Screen PFAFF® creative™ Color Touch Screen Your machine features the PFAFF® creative™ Color Touch Screen. The task bar at the bottom of the B screen is called the option bar (B). Task bar (A) The look of the screen includes the main functions and help In embroidery mode 7. Embroidery mode icon 1 2 3 4 5 6 2. Return...
Owner's Manual
Page 44
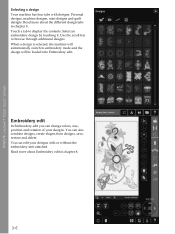
... chapter 8. 3:6 Touch a tab to browse through additional designs. Select an embroidery design by touching it. PFAFF® creative™ Color Touch Screen Selecting a design Your machine has four tabs with or without the embroidery unit attached. You can edit your designs. Read more about Embroidery edit in chapter 8. You can also combine designs, create shapes from...
... chapter 8. 3:6 Touch a tab to browse through additional designs. Select an embroidery design by touching it. PFAFF® creative™ Color Touch Screen Selecting a design Your machine has four tabs with or without the embroidery unit attached. You can edit your designs. Read more about Embroidery edit in chapter 8. You can also combine designs, create shapes from...
Owner's Manual
Page 96
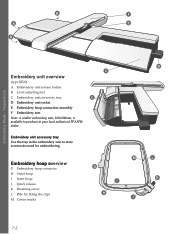
... Use the tray in the embroidery unit to purchase at your local authorized PFAFF® dealer. Embroidery hoop overview G Embroidery hoop connector H Outer hoop I H J D L K 7:2 B F A E B Embroidery Mode - Preparations C Embroidery unit overview (type BE20) A Embroidery unit release button B Level adjusting feet C Embroidery unit accessory tray C D Embroidery unit socket E Embroidery hoop connection assembly F Embroidery arm Note: A smaller embroidery unit, 260x200mm, is available to store accessories used for Àtting the clips...
... Use the tray in the embroidery unit to purchase at your local authorized PFAFF® dealer. Embroidery hoop overview G Embroidery hoop connector H Outer hoop I H J D L K 7:2 B F A E B Embroidery Mode - Preparations C Embroidery unit overview (type BE20) A Embroidery unit release button B Level adjusting feet C Embroidery unit accessory tray C D Embroidery unit socket E Embroidery hoop connection assembly F Embroidery arm Note: A smaller embroidery unit, 260x200mm, is available to store accessories used for Àtting the clips...
Owner's Manual
Page 97
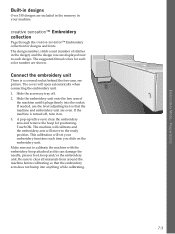
.... If the machine is a covered socket behind the free-arm, see picture. creative sensation™ Embroidery collection Page through the creative sensation™ Embroidery collection for positioning. The cover will set your machine. Slide the embroidery unit onto the free arm of stitches in your embroidery functions each color number are shown. The design number, stitch count (number of...
.... If the machine is a covered socket behind the free-arm, see picture. creative sensation™ Embroidery collection Page through the creative sensation™ Embroidery collection for positioning. The cover will set your machine. Slide the embroidery unit onto the free arm of stitches in your embroidery functions each color number are shown. The design number, stitch count (number of...
Owner's Manual
Page 98
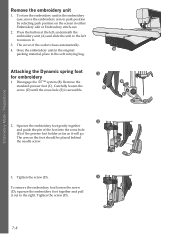
... the screw (D). 7:4 Disengage the IDT™ system (B). Preparations 3. Tighten the screw (D). 3 D To remove the embroidery foot loosen the screw (D), squeeze the embroidery foot together and pull it . 3. Press the button at the left, underneath the embroidery unit (A) and slide the unit to the left to remove it out to park position by selecting park position...
... the screw (D). 7:4 Disengage the IDT™ system (B). Preparations 3. Tighten the screw (D). 3 D To remove the embroidery foot loosen the screw (D), squeeze the embroidery foot together and pull it . 3. Press the button at the left, underneath the embroidery unit (A) and slide the unit to the left to remove it out to park position by selecting park position...
Owner's Manual
Page 99
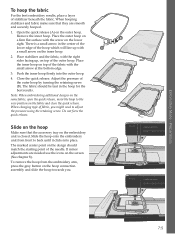
...is closed. Do not force the quick release. Slide the hoop onto the embroidery unit from the embroidery arm, press the grey button on top of the needle. The marked ... starting point of the outer hoop. To remove the hoop from front to the new position on the embroidery unit is a small arrow in the hoop for the best results. Slide on the hoop Make sure that ... inner hoop. Push the inner hoop Àrmly into place. Preparations To hoop the fabric For the best embroidery results, place a layer of the outer hoop by turning the retaining screw (B). Close the quick release. Note...
...is closed. Do not force the quick release. Slide the hoop onto the embroidery unit from the embroidery arm, press the grey button on top of the needle. The marked ... starting point of the outer hoop. To remove the hoop from front to the new position on the embroidery unit is a small arrow in the hoop for the best results. Slide on the hoop Make sure that ... inner hoop. Push the inner hoop Àrmly into place. Preparations To hoop the fabric For the best embroidery results, place a layer of the outer hoop by turning the retaining screw (B). Close the quick release. Note...
Owner's Manual
Page 100
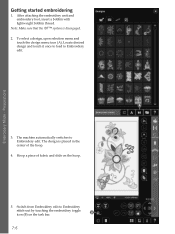
Getting started embroidering 1. Locate desired design and touch it once to load to Embroidery stitch-out by touching the embroidery toggle icon (B) on the hoop. 5. Switch from Embroidery edit to Embroidery edit. Embroidery Mode - Hoop a piece of the hoop. 4. Note: Make sure that the IDT&#... design, open selection menu and touch the design menu icon (A). Preparations A 3. The machine automatically switches to Embroidery edit. B 7:6 The design is disengaged. 2. After attaching the embroidery unit and embroidery foot, insert a bobbin with lightweight bobbin thread.
Getting started embroidering 1. Locate desired design and touch it once to load to Embroidery stitch-out by touching the embroidery toggle icon (B) on the hoop. 5. Switch from Embroidery edit to Embroidery edit. Embroidery Mode - Hoop a piece of the hoop. 4. Note: Make sure that the IDT&#... design, open selection menu and touch the design menu icon (A). Preparations A 3. The machine automatically switches to Embroidery edit. B 7:6 The design is disengaged. 2. After attaching the embroidery unit and embroidery foot, insert a bobbin with lightweight bobbin thread.
Owner's Manual
Page 104
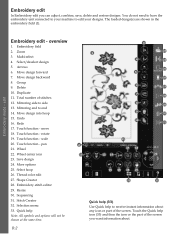
.... Touch the Quick help to edit your designs. The loaded design(s) are shown in the embroidery Àeld (1). Select/deselect design 5. Delete 10. Mirroring end to side 13. move 18. You do not need to have the embroidery unit connected to your machine to receive instant information about . Multi-select 4. Move design forward...
.... Touch the Quick help to edit your designs. The loaded design(s) are shown in the embroidery Àeld (1). Select/deselect design 5. Delete 10. Mirroring end to side 13. move 18. You do not need to have the embroidery unit connected to your machine to receive instant information about . Multi-select 4. Move design forward...
Owner's Manual
Page 112
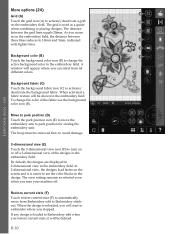
...hoop must be removed Àrst, to avoid damage. 3-dimensional view (E) Touch the 3-dimensional view icon (D) to park position for storing the embroidery unit. The distance between these lines reduces to change the color of the designs in the design. A window will be deleted. 8:10 When activated ...a fabric texture will appear where you can select from Embroidery edit to Embroidery edit when you restore current state, it is reloaded, you stopped. If any design is used as selected even when you zoom...
...hoop must be removed Àrst, to avoid damage. 3-dimensional view (E) Touch the 3-dimensional view icon (D) to park position for storing the embroidery unit. The distance between these lines reduces to change the color of the designs in the design. A window will be deleted. 8:10 When activated ...a fabric texture will appear where you can select from Embroidery edit to Embroidery edit when you restore current state, it is reloaded, you stopped. If any design is used as selected even when you zoom...
Owner's Manual
Page 113
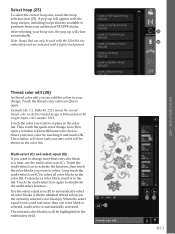
... more than one color block at a time, use the multi-select icon (C). Long touch the multi-select icon (C) to purchase from your authorized PFAFF® dealer. Touch the multi-select icon again to open a window with the hoop choices, including hoops that can edit the colors in your...open . Touch the color you want to automatically select all color blocks in the Àrst loaded design is used with the 350x360 size 26 embroidery unit are available to select all color blocks with a lighter background. Select your design. A pop-up will close and your hoop size, the pop...
... more than one color block at a time, use the multi-select icon (C). Long touch the multi-select icon (C) to purchase from your authorized PFAFF® dealer. Touch the multi-select icon again to open a window with the hoop choices, including hoops that can edit the colors in your...open . Touch the color you want to automatically select all color blocks in the Àrst loaded design is used with the 350x360 size 26 embroidery unit are available to select all color blocks with a lighter background. Select your design. A pop-up will close and your hoop size, the pop...
Owner's Manual
Page 129
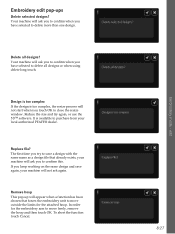
... too complex, the resize process will ask you touch OK to delete all designs? Reduce the size and try to save again, your local authorized PFAFF® dealer. Replace Àle? Remove hoop This pop-up will appear when a function has been chosen that already exists, your machine will not start... conÀrm when you keep working on the same design and save a design with the same name as a design Àle that forces the embroidery unit to conÀrm this. Your machine will ask you to delete more than one design. Delete all designs or when using delete long touch.
... too complex, the resize process will ask you touch OK to delete all designs? Reduce the size and try to save again, your local authorized PFAFF® dealer. Replace Àle? Remove hoop This pop-up will appear when a function has been chosen that already exists, your machine will not start... conÀrm when you keep working on the same design and save a design with the same name as a design Àle that forces the embroidery unit to conÀrm this. Your machine will ask you to delete more than one design. Delete all designs or when using delete long touch.
Owner's Manual
Page 132
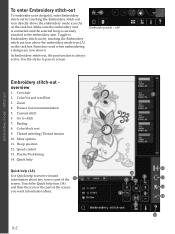
... embroidering a design are now shown. Color list and scroll bar 3. To enter Embroidery stitch-out To embroider your design(s), enter Embroidery stitch-out by touching the Embroidery stitch-out icon above the embroidery mode icon (A) on the task bar. Make sure the embroidery unit is connected and the selected hoop is always active. Basting 8. Precise Positioning...
... embroidering a design are now shown. Color list and scroll bar 3. To enter Embroidery stitch-out To embroider your design(s), enter Embroidery stitch-out by touching the Embroidery stitch-out icon above the embroidery mode icon (A) on the task bar. Make sure the embroidery unit is connected and the selected hoop is always active. Basting 8. Precise Positioning...
Owner's Manual
Page 142
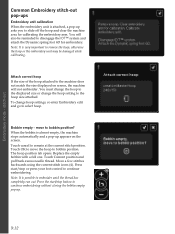
... continue embroidering without closing the bobbin empty pop-up asks you to bobbin position? Touch cancel to remove the hoop, otherwise the hoop or the embroidery unit may be reminded to bobbin position. Touch OK to move to slide off the hoop and clear the machine area for...: It is almost empty, the machine stops automatically and a pop-up appears on screen, the machine will also be damaged while calibrating. stitch-out Common Embroidery stitch-out pop-ups Embroidery unit calibration When the embroidery unit is very important to remain at the current stitch position.
... continue embroidering without closing the bobbin empty pop-up asks you to bobbin position? Touch cancel to remove the hoop, otherwise the hoop or the embroidery unit may be reminded to bobbin position. Touch OK to move to slide off the hoop and clear the machine area for...: It is almost empty, the machine stops automatically and a pop-up appears on screen, the machine will also be damaged while calibrating. stitch-out Common Embroidery stitch-out pop-ups Embroidery unit calibration When the embroidery unit is very important to remain at the current stitch position.
Owner's Manual
Page 156
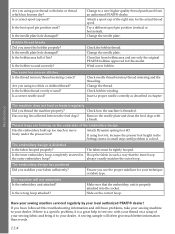
... followed this model. Is the bobbin area full of your sewing fabric and bring it to your dealer. Clean lint from an authorized PFAFF® dealer. The fabric must be tightly hooped. Ensure you insert the bobbin properly? Make sure that the inner hoop always exactly ... Dynamic spring foot 6D. If you using poor thread with slubs or thread which has become dry? A sewing sample will not embroider Is the embroidery unit attached? Change to a new higher quality thread purchased from bobbin area and use the proper stabilizer for the actual thread spool. Wind a new...
... followed this model. Is the bobbin area full of your sewing fabric and bring it to your dealer. Clean lint from an authorized PFAFF® dealer. The fabric must be tightly hooped. Ensure you insert the bobbin properly? Make sure that the inner hoop always exactly ... Dynamic spring foot 6D. If you using poor thread with slubs or thread which has become dry? A sewing sample will not embroider Is the embroidery unit attached? Change to a new higher quality thread purchased from bobbin area and use the proper stabilizer for the actual thread spool. Wind a new...
Owner's Manual
Page 157
...14 Allow lower needle position 9:10 Alphabets 1:22 Appliqué, create 8:15 Attaching the Dynamic spring foot 6D 2:11 Attaching the Dynamic spring foot for embroidery .... 7:4 Attaching the Sensormatic buttonhole foot 4:16 Attach presser foot 2:11 Audio preview application 10:7 Audio repeat 3:15 Automatic presser foot lift 3:11 Automatic... Touch Screen 1:8 Computer 10:4 Computer, connect to 2:12 Connect machine to computer 2:12 Connect to and remove from USB port 2:12 Connect the embroidery unit 7:3 Connect to the power supply 2:2 Control point, deÀnition 8:13 11:5 Index
...14 Allow lower needle position 9:10 Alphabets 1:22 Appliqué, create 8:15 Attaching the Dynamic spring foot 6D 2:11 Attaching the Dynamic spring foot for embroidery .... 7:4 Attaching the Sensormatic buttonhole foot 4:16 Attach presser foot 2:11 Audio preview application 10:7 Audio repeat 3:15 Automatic presser foot lift 3:11 Automatic... Touch Screen 1:8 Computer 10:4 Computer, connect to 2:12 Connect machine to computer 2:12 Connect to and remove from USB port 2:12 Connect the embroidery unit 7:3 Connect to the power supply 2:2 Control point, deÀnition 8:13 11:5 Index
Owner's Manual
Page 158
... assembly 1:9, 7:2 Embroidery hoop overview 7:2 Embroidery information 9:4 Embroidery Machine Communication CD ........ 1:10, 2:12 Embroidery Machine Communication module.......... 2:14 Embroidery needle 2:10 Embroidery stitch editor 8:20 Embroidery stitch-out 9:2-9:14 Embroidery stitch-out pop-ups 9:12 Embroidery text editor 8:25 Embroidery time 9:4 Embroidery unit accessory tray 7:2 Embroidery unit, connect 7:3 Embroidery unit connection socket 1:9 Embroidery unit overview 1:9, 7:2 Embroidery unit release button 1:9, 7:2 Embroidery unit, remove 7:4 Embroidery unit socket...
... assembly 1:9, 7:2 Embroidery hoop overview 7:2 Embroidery information 9:4 Embroidery Machine Communication CD ........ 1:10, 2:12 Embroidery Machine Communication module.......... 2:14 Embroidery needle 2:10 Embroidery stitch editor 8:20 Embroidery stitch-out 9:2-9:14 Embroidery stitch-out pop-ups 9:12 Embroidery text editor 8:25 Embroidery time 9:4 Embroidery unit accessory tray 7:2 Embroidery unit, connect 7:3 Embroidery unit connection socket 1:9 Embroidery unit overview 1:9, 7:2 Embroidery unit release button 1:9, 7:2 Embroidery unit, remove 7:4 Embroidery unit socket...
Owner's Manual
Page 160
... Embroidery edit 8:2 Embroidery hoop 7:2 Embroidery stitch-out 9:2 Embroidery unit 1:9, 7:2 Files & Folders 10:2 Machine 1:8 Precise positioning 9:8 Sequencing 5:2 Sewing mode 4:2 Shape Creator 8:12 Stitch Creator 6:2 Stitches 1:12 Owner's name 3:9 P Pack away after sewing 2:2 Pan 6:6, 8:8 Park position 7:4, 8:10, 9:7 Patchwork program 4:13, 4:19 PDF Guides 2:14 Personal designs 8:3, 10:4 Personal Àles 10:4 Personal fonts 10:4 Personal menu 3:5 PFAFF® creative...
... Embroidery edit 8:2 Embroidery hoop 7:2 Embroidery stitch-out 9:2 Embroidery unit 1:9, 7:2 Files & Folders 10:2 Machine 1:8 Precise positioning 9:8 Sequencing 5:2 Sewing mode 4:2 Shape Creator 8:12 Stitch Creator 6:2 Stitches 1:12 Owner's name 3:9 P Pack away after sewing 2:2 Pan 6:6, 8:8 Park position 7:4, 8:10, 9:7 Patchwork program 4:13, 4:19 PDF Guides 2:14 Personal designs 8:3, 10:4 Personal Àles 10:4 Personal fonts 10:4 Personal menu 3:5 PFAFF® creative...


