
Owner's Manual
Page 4
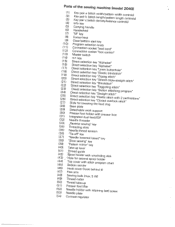
Parts of the sewing machine (model 2040) (1) (2> (3) (4) Key Key Key Info pair pair pair key a b c (stitch (stitch (stitch width/pattern width controls) length/pattern length controls) density/balance controls) (5) Carrying handle (6) ...hread guide (42) (43) (44) (45) Spool holder with unwinding 'HTooplecfoovresrewcoitnhdstsiptcoholprhooglrdaemr Bobbin winder disk chart (46) (47) Hook cover (hook behind it) Free arm (48) Sewing bulb (max. 5 W) (49) Thread cutter (50) Thread take-up (51) Presser foot lifter (52> (53) Needle Needle holder plate with retaining (set) screw (...
Parts of the sewing machine (model 2040) (1) (2> (3) (4) Key Key Key Info pair pair pair key a b c (stitch (stitch (stitch width/pattern width controls) length/pattern length controls) density/balance controls) (5) Carrying handle (6) ...hread guide (42) (43) (44) (45) Spool holder with unwinding 'HTooplecfoovresrewcoitnhdstsiptcoholprhooglrdaemr Bobbin winder disk chart (46) (47) Hook cover (hook behind it) Free arm (48) Sewing bulb (max. 5 W) (49) Thread cutter (50) Thread take-up (51) Presser foot lifter (52> (53) Needle Needle holder plate with retaining (set) screw (...
Owner's Manual
Page 5
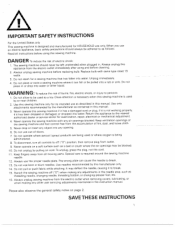
... blocked. Do not use the proper needle plate. The wrong plate can fall or be blocked. 10. Always unplug sewing machine before cleaning. 2. Use only attachments recommended by or near children. 2. repair, Return the appliance to be left unattended...any adjustments in this manual. 3. Switch the sewing machine off ("0") position, then remove plug from the electric outlet immediately after using this sewing machine is required around the sewing machine needle. 1 2. Close attention is necessary when this sewing machine, DANGER To reduce the risk of lint, dust...
... blocked. Do not use the proper needle plate. The wrong plate can fall or be blocked. 10. Always unplug sewing machine before cleaning. 2. Use only attachments recommended by or near children. 2. repair, Return the appliance to be left unattended...any adjustments in this manual. 3. Switch the sewing machine off ("0") position, then remove plug from the electric outlet immediately after using this sewing machine is required around the sewing machine needle. 1 2. Close attention is necessary when this sewing machine, DANGER To reduce the risk of lint, dust...
Owner's Manual
Page 6
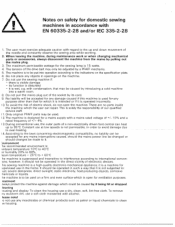
...°C. it is visible damage - leaning ousing and display: To clean the housing use the sewing machine if: - When leaving the machine, during maintenance work or when changing mechanical parts or accessories, always disconnect the machine from the mains by a PFAFF mechanic. 5. No liability will be adjusted by pulling out the mains plug. 3. During conventional...
...°C. it is visible damage - leaning ousing and display: To clean the housing use the sewing machine if: - When leaving the machine, during maintenance work or when changing mechanical parts or accessories, always disconnect the machine from the mains by a PFAFF mechanic. 5. No liability will be adjusted by pulling out the mains plug. 3. During conventional...
Owner's Manual
Page 7
...the model 2040. quality product that out separately. If you have any material in operation we have purchased a high- If you now take any further questions, that is just as uncomplicated as your fas hion ideas. 3 So now you . Sewing by push-button control - Your new sewing machine can do,... and to make full use of creating your PFAFF sewing machine. We wish you need. It applies both to the 2030 model and to study the instruction...
...the model 2040. quality product that out separately. If you have any material in operation we have purchased a high- If you now take any further questions, that is just as uncomplicated as your fas hion ideas. 3 So now you . Sewing by push-button control - Your new sewing machine can do,... and to make full use of creating your PFAFF sewing machine. We wish you need. It applies both to the 2030 model and to study the instruction...
Owner's Manual
Page 20
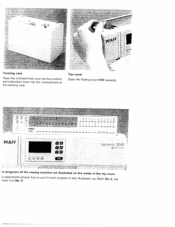
Stitch No. 2, use for each program is also illustrated, e.g. t,,,,,,,.,y -' A iVllJY.I1J)JJ1.' 11If1II!ff Jilt! foot to use ie programs of the sewing machine are illustrated on the inside of the carrying case. I Carrying case Place the enclosed lead cord, the foot control and instruction book into the compartment of the top cover. 4!' Top cover Open the folding cover (44) upwards. ie appropriate esser foot No. PFAFF PFAFF 2040 -% '4 ' -1, -i .-1, -1 -A -1 tiptronic 2040 Mthbh; presser 0.
Stitch No. 2, use for each program is also illustrated, e.g. t,,,,,,,.,y -' A iVllJY.I1J)JJ1.' 11If1II!ff Jilt! foot to use ie programs of the sewing machine are illustrated on the inside of the carrying case. I Carrying case Place the enclosed lead cord, the foot control and instruction book into the compartment of the top cover. 4!' Top cover Open the folding cover (44) upwards. ie appropriate esser foot No. PFAFF PFAFF 2040 -% '4 ' -1, -i .-1, -1 -A -1 tiptronic 2040 Mthbh; presser 0.

Owner's Manual
Page 21
... changeover switch on (switch function I) the sewing lamp lights up and program No. 1 is set to the mains voltage for this sewing machine. - -- - --- -- Operating Instructions Electrical connection Connect the lead cord between the socket (11) of the sewing machine and the wall outlet Connecting the foot control... Connect the plug of the foot control to the connection socket (1 2) of the machine to 11 0 V. 19 The sewing speed is now ready to be used for Europe 220 ...
... changeover switch on (switch function I) the sewing lamp lights up and program No. 1 is set to the mains voltage for this sewing machine. - -- - --- -- Operating Instructions Electrical connection Connect the lead cord between the socket (11) of the sewing machine and the wall outlet Connecting the foot control... Connect the plug of the foot control to the connection socket (1 2) of the machine to 11 0 V. 19 The sewing speed is now ready to be used for Europe 220 ...

Owner's Manual
Page 23
Removing the detachable work support, make sure to sew upwards out of the bobbin. Push the bobbin to the right Note: The bobbin can only be wound if it is flush with lift the it is moved fully to the right 21 When replacing the the detachable work support work support (free arm) In order to the left and it free arm of the sewing machine. L Preparing the machine for bobbing winding Place an empty bobbin so that the black pin of the bobbing winder snaps into the slot of using the free arm, swing the hole.
Removing the detachable work support, make sure to sew upwards out of the bobbin. Push the bobbin to the right Note: The bobbin can only be wound if it is flush with lift the it is moved fully to the right 21 When replacing the the detachable work support work support (free arm) In order to the left and it free arm of the sewing machine. L Preparing the machine for bobbing winding Place an empty bobbin so that the black pin of the bobbing winder snaps into the slot of using the free arm, swing the hole.
Owner's Manual
Page 26
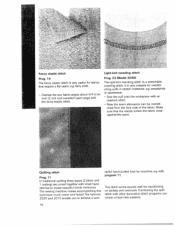
... appearance and durability make sure the needle and bobbin thread tensions are correctly adjusted with regard to each other, i.e. The following is valid for general sewing work: Thread interlace is visible on the underside of the fabric: The needle thread tension is too loose or the bobbin thread tension is too... thread tension is too tight or the bobbin thread tension is too tight The thread tension must be visible on the under side of the machine.
... appearance and durability make sure the needle and bobbin thread tensions are correctly adjusted with regard to each other, i.e. The following is valid for general sewing work: Thread interlace is visible on the underside of the fabric: The needle thread tension is too loose or the bobbin thread tension is too... thread tension is too tight or the bobbin thread tension is too tight The thread tension must be visible on the under side of the machine.
Owner's Manual
Page 34
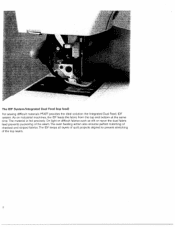
On light or difficult fabrics such as silk or rayon the dual fabric feed prevents puckering of checked and striped fabrics. The material is fed precisely. The IDF System/Integrated Dual Feed (top feed) For sewing difficult materials PFAFF provides the ideal solution: the Integrated Dual Feed, IDF system. The even feeding action also ensures perfect matching of the seam. The IDE keeps all layers of quilt projects aligned to prevent stretching of the top layers. As on industrial machines, the IDF feeds the fabric from the top and bottom at the same time.
On light or difficult fabrics such as silk or rayon the dual fabric feed prevents puckering of checked and striped fabrics. The material is fed precisely. The IDF System/Integrated Dual Feed (top feed) For sewing difficult materials PFAFF provides the ideal solution: the Integrated Dual Feed, IDF system. The even feeding action also ensures perfect matching of the seam. The IDE keeps all layers of quilt projects aligned to prevent stretching of the top layers. As on industrial machines, the IDF feeds the fabric from the top and bottom at the same time.

Owner's Manual
Page 36
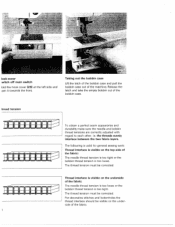
quilting or darning and when the machine must be lowered. B )U can also lower the feed dog by opening the hook cover and moving slide B to the right engage the feed dog move the slide to the left kPP - :/ • : Lowering the feed dog For certain sewing work such as free-motion cleaned, the feed dog has to the left . Push slide A to the right 1. - - • \• •; to engage the feed dog move the slide to be Raise the presser foot before lowering the feed dog.
quilting or darning and when the machine must be lowered. B )U can also lower the feed dog by opening the hook cover and moving slide B to the right engage the feed dog move the slide to the left kPP - :/ • : Lowering the feed dog For certain sewing work such as free-motion cleaned, the feed dog has to the left . Push slide A to the right 1. - - • \• •; to engage the feed dog move the slide to be Raise the presser foot before lowering the feed dog.

Owner's Manual
Page 39
setting on the display may change after the full bobbin is no thread on the bobbin, the bobbin symbol appears on the display The contrast transported. Adjusting the contrast on the display. Bobbin thread monitor (model 2040) If the bobbin is nearing its end [2 yd (2 m) 3 '/ yd (3 m)1 or there is inserted and you start to the machine being This setting can be readjusted with the contrast regulator (54). The symbol disappears after long use or due to sew again. 38
setting on the display may change after the full bobbin is no thread on the bobbin, the bobbin symbol appears on the display The contrast transported. Adjusting the contrast on the display. Bobbin thread monitor (model 2040) If the bobbin is nearing its end [2 yd (2 m) 3 '/ yd (3 m)1 or there is inserted and you start to the machine being This setting can be readjusted with the contrast regulator (54). The symbol disappears after long use or due to sew again. 38
Owner's Manual
Page 73
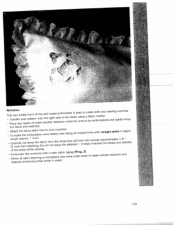
... allowance can create unique new patterns. 76 The tiptronic 2020 and 201 0 enable you to create beautiful family heirlooms. The sewing machine makes accomplishing this technique much easer and faster! Light-knit mending stitch Prog. 23 (Model 2040) The light-knit mending stitch is very useful for... fabrics that the needle enters the fabric close against the seam. Sew the cuff onto the...
... allowance can create unique new patterns. 76 The tiptronic 2020 and 201 0 enable you to create beautiful family heirlooms. The sewing machine makes accomplishing this technique much easer and faster! Light-knit mending stitch Prog. 23 (Model 2040) The light-knit mending stitch is very useful for... fabrics that the needle enters the fabric close against the seam. Sew the cuff onto the...
Owner's Manual
Page 98
... The cording the front edge of the bobbin case slightly to the right (see page 31). - Gently pull the fabric taut while sewing the pi ntucks. defined pintucks. - Inserting a gimp thread creates a similar optical effect by pintucking. - Thread the two needles (see...When you can attach a cording tongue (spe cial accessory) on your 1 30/7 05 H-ZWI; 1.6 or 2.0 machine (e.g. size 80). - The notch between the needle plate and the sewing machine provides space for your pintucks. - Remove the needle plate. - Using a water-soluble marker, draw a place ment ...
... The cording the front edge of the bobbin case slightly to the right (see page 31). - Gently pull the fabric taut while sewing the pi ntucks. defined pintucks. - Inserting a gimp thread creates a similar optical effect by pintucking. - Thread the two needles (see...When you can attach a cording tongue (spe cial accessory) on your 1 30/7 05 H-ZWI; 1.6 or 2.0 machine (e.g. size 80). - The notch between the needle plate and the sewing machine provides space for your pintucks. - Remove the needle plate. - Using a water-soluble marker, draw a place ment ...
Owner's Manual
Page 101
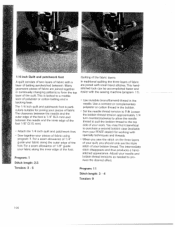
...are joined with small hand stitches. The clearance between the needle and the outer edge of the foot is 1 /4 (6.3 mm) and between . Sew together your pieces of fabric using program 1 For a seam allowance of 1 /4" guide your fabric along the inner edge of the foot Program:...bobbin thread to 7-9. This handstitched look can be accomplished faster and easier with the sewing machine (program 11). - The 1/4 inch quilt and patchwork foot is tacked to purchase a second bobbin case (available from your PFAFF dealer) for joining your pieces of fabric. Adjust your work. 1 /4 inch...
...are joined with small hand stitches. The clearance between the needle and the outer edge of the foot is 1 /4 (6.3 mm) and between . Sew together your pieces of fabric using program 1 For a seam allowance of 1 /4" guide your fabric along the inner edge of the foot Program:...bobbin thread to 7-9. This handstitched look can be accomplished faster and easier with the sewing machine (program 11). - The 1/4 inch quilt and patchwork foot is tacked to purchase a second bobbin case (available from your PFAFF dealer) for joining your pieces of fabric. Adjust your work. 1 /4 inch...

Owner's Manual
Page 122
... appliqué pieces on base fabric and iron securely. - page 1 24). so that any letters or - - Transfer your pattern to the numbers have to the sewing machine. - satin stitch zigzag in 0.5 mm increments with the "-" 1 28
... appliqué pieces on base fabric and iron securely. - page 1 24). so that any letters or - - Transfer your pattern to the numbers have to the sewing machine. - satin stitch zigzag in 0.5 mm increments with the "-" 1 28
Owner's Manual
Page 123
... areas in water. fabric from stitching. of water-soluble stabilizer and 1 29 away large areas of the areas while sewing. Embroider the contours with a satin stitch When all marked lines with your sewing machine. zigzag (Prog. 3). a fabric marker. to be embroidered and tightly hoop the fabric and stabilizer. - - r ( Richelieu T- -hTiPsrlaavnceesryftewar roytioslutairycepfraostrtmoefrnwofaobtneatror-satohnldeubrelieygehsltetatsbiedimleizboerfrotuihdneedrfeyarbitrshiceeauassyrientaog create...
... areas in water. fabric from stitching. of water-soluble stabilizer and 1 29 away large areas of the areas while sewing. Embroider the contours with a satin stitch When all marked lines with your sewing machine. zigzag (Prog. 3). a fabric marker. to be embroidered and tightly hoop the fabric and stabilizer. - - r ( Richelieu T- -hTiPsrlaavnceesryftewar roytioslutairycepfraostrtmoefrnwofaobtneatror-satohnldeubrelieygehsltetatsbiedimleizboerfrotuihdneedrfeyarbitrshiceeauassyrientaog create...

Owner's Manual
Page 131
...and press the needle plate upwards first on the right then on the left It can now be oiled at the front until you start sewing, check that the needle olate is lying fiat Tip: Changing the needle plate is even easier with the feed dog loweredl Cleaning and oiling... plate against the rear edge of oil to the area in place. The machine otherwise requires no maintenance and must not be easily removed. Position the needle plate changer (lamp changer) as shown above . DO NOT use aggressive cleansers or solventsl c 38 Clean and oil the sewing machine every 1 0 - 1 5 hours of operation.
...and press the needle plate upwards first on the right then on the left It can now be oiled at the front until you start sewing, check that the needle olate is lying fiat Tip: Changing the needle plate is even easier with the feed dog loweredl Cleaning and oiling... plate against the rear edge of oil to the area in place. The machine otherwise requires no maintenance and must not be easily removed. Position the needle plate changer (lamp changer) as shown above . DO NOT use aggressive cleansers or solventsl c 38 Clean and oil the sewing machine every 1 0 - 1 5 hours of operation.

Owner's Manual
Page 132
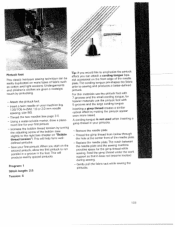
...plug from your PFAFF dealer (order No. 92-329 975-05). Insertion of the bulb is held firmly. Guide the bulb into the holder as far as shown in the lamp changer. Remove the bulb changer from the bulb, the bulb is 5 watts. Bulbs can be purchased from the machine. Remove the... will go . Now turn it half a rotation in a clock-wise direction. Changing the sewing lamp Switch off the main switch. Bulb removal Push the bulb remover, as it will go and turn it until the pins of the sewing machine. Push the bulb upward into the diagonal holder and turn the bulb half...
...plug from your PFAFF dealer (order No. 92-329 975-05). Insertion of the bulb is held firmly. Guide the bulb into the holder as far as shown in the lamp changer. Remove the bulb changer from the bulb, the bulb is 5 watts. Bulbs can be purchased from the machine. Remove the... will go . Now turn it half a rotation in a clock-wise direction. Changing the sewing lamp Switch off the main switch. Bulb removal Push the bulb remover, as it will go and turn it until the pins of the sewing machine. Push the bulb upward into the diagonal holder and turn the bulb half...
Owner's Manual
Page 134
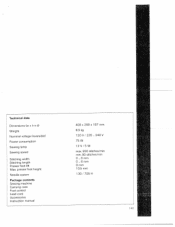
Technical data Dimensions (w x h x d) Weight Nominal voltage (reversible) Power consumption Sewing lamp Sewing speed Stitching width Stitching length Presser foot lift Max. presser foot height Needle system Package contents Sewing machine Carrying case Foot control Lead cord Accessories Instruction manual 408 x 290 x 1 87 mm 8.3 kg 120V/220... 240V 75W 12V/5W max. 950 stitches/mm mm. 80 stitches/mm O...6mm 0..6mm 8mm 10.5mm 1 30 / 705 H 141
Technical data Dimensions (w x h x d) Weight Nominal voltage (reversible) Power consumption Sewing lamp Sewing speed Stitching width Stitching length Presser foot lift Max. presser foot height Needle system Package contents Sewing machine Carrying case Foot control Lead cord Accessories Instruction manual 408 x 290 x 1 87 mm 8.3 kg 120V/220... 240V 75W 12V/5W max. 950 stitches/mm mm. 80 stitches/mm O...6mm 0..6mm 8mm 10.5mm 1 30 / 705 H 141
Owner's Manual
Page 136
Parts of the sewing machine (model 2030) (1) Key pair a (stitch width/pattern width controls) (2) Key pair b (stitch length/pattern length controls)...foot holder with presser foot (31) Integrated dual feed/IDF (32) Needle threader (33) "Reverse sewing" key (34) Threading slots (35) Needle thread tension (36) "lie-off" key (37) "Needle lowered/raised" key (...second spool holder Top cover with stitch program chart Bobbin winder (46) Hook cover (hook behind it) (47) Free arm (48) Sewing bulb (max. 5 W) (49) Thread cutter (50) Thread take-up (51) Presser foot lifter (52) Needle holder with ...
Parts of the sewing machine (model 2030) (1) Key pair a (stitch width/pattern width controls) (2) Key pair b (stitch length/pattern length controls)...foot holder with presser foot (31) Integrated dual feed/IDF (32) Needle threader (33) "Reverse sewing" key (34) Threading slots (35) Needle thread tension (36) "lie-off" key (37) "Needle lowered/raised" key (...second spool holder Top cover with stitch program chart Bobbin winder (46) Hook cover (hook behind it) (47) Free arm (48) Sewing bulb (max. 5 W) (49) Thread cutter (50) Thread take-up (51) Presser foot lifter (52) Needle holder with ...


