
Owner's Manual
Page 4
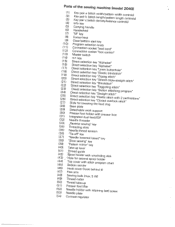
Parts of the sewing machine (model 2040) (1) (2> (3) (4) Key Key Key Info pair pair pair key a b c (stitch (stitch (stitch width/pattern width controls) length/pattern length controls) density/balance controls) (5) Carrying handle (6)... lever (41) hread guide (42) (43) (44) (45) Spool holder with unwinding 'HTooplecfoovresrewcoitnhdstsiptcoholprhooglrdaemr Bobbin winder disk chart (46) (47) Hook cover (hook behind it) Free arm (48) Sewing bulb (max. 5 W) (49) Thread cutter (50) Thread take-up (51) Presser foot lifter (52> (53) Needle Needle holder plate with retaining (set)...
Parts of the sewing machine (model 2040) (1) (2> (3) (4) Key Key Key Info pair pair pair key a b c (stitch (stitch (stitch width/pattern width controls) length/pattern length controls) density/balance controls) (5) Carrying handle (6)... lever (41) hread guide (42) (43) (44) (45) Spool holder with unwinding 'HTooplecfoovresrewcoitnhdstsiptcoholprhooglrdaemr Bobbin winder disk chart (46) (47) Hook cover (hook behind it) Free arm (48) Sewing bulb (max. 5 W) (49) Thread cutter (50) Thread take-up (51) Presser foot lifter (52> (53) Needle Needle holder plate with retaining (set)...
Owner's Manual
Page 5
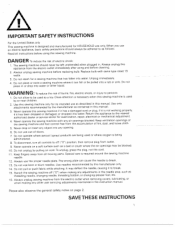
... ("0") when making any opening. 6. Do not place in or drop into water or other user servicing adjustments mentioned in the needle area, such as threading needle, changing needle, threading bobbin, or changing presser foot, etc. 1 6. Never operate this sewing machine, DANGER To reduce the risk of electric shock: 1. Never operate the sewing machine...
... ("0") when making any opening. 6. Do not place in or drop into water or other user servicing adjustments mentioned in the needle area, such as threading needle, changing needle, threading bobbin, or changing presser foot, etc. 1 6. Never operate this sewing machine, DANGER To reduce the risk of electric shock: 1. Never operate the sewing machine...
Owner's Manual
Page 8
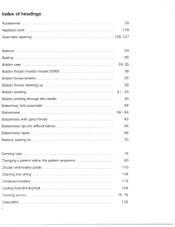
index of headings Accessories Appliqué work Automatic tapering Balance Basting Bobbin case Bobbin thread monitor (model 2040) Bobbin thread tension Bobbin thread, drawing up Bobbin winding Bobbin winding through the needle Buttonhole, fully-automatic Buttonholes Buttonholes with gimp thread Buttonholes, tips for difficult fabrics Buttonholes, types Buttons, sewing on Carrying case Changing a pattern within the pattern sequence Circular embroidery guide Dleaning...
index of headings Accessories Appliqué work Automatic tapering Balance Basting Bobbin case Bobbin thread monitor (model 2040) Bobbin thread tension Bobbin thread, drawing up Bobbin winding Bobbin winding through the needle Buttonhole, fully-automatic Buttonholes Buttonholes with gimp thread Buttonholes, tips for difficult fabrics Buttonholes, types Buttons, sewing on Carrying case Changing a pattern within the pattern sequence Circular embroidery guide Dleaning...
Owner's Manual
Page 10
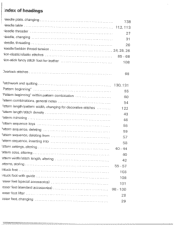
ndex of headings Jeedle plate, changing '.Jeedle table 'Jeedle threader 'Jeedle, changing \Jeedle, threading "Jeedle/bobbin thread tension "Jon-elastic/elastic stitches \ion-stick fancy stitch foot for leather Dverlock stitches 3 atchwork and quilting 'Pattern beginning" 'Pattern beginning" within pattern combination attern ...
ndex of headings Jeedle plate, changing '.Jeedle table 'Jeedle threader 'Jeedle, changing \Jeedle, threading "Jeedle/bobbin thread tension "Jon-elastic/elastic stitches \ion-stick fancy stitch foot for leather Dverlock stitches 3 atchwork and quilting 'Pattern beginning" 'Pattern beginning" within pattern combination attern ...
Owner's Manual
Page 19
... cover with stitch program chart Electrical connection Voltage switchover Accessories Detachable work support Bobbin winding Bobbin case Needle/bobbin thread tension Threading the needle thread Needle threader Pulling up the bobbin thread Presser foot lifter Thread cutter Changing the presser feet Winding a bobbin through the needle Changing needles Threading twin needle Dual Feed/IDF Lowering feed dog Page 1 8 Page 1 8 Page 1 9 Page...
... cover with stitch program chart Electrical connection Voltage switchover Accessories Detachable work support Bobbin winding Bobbin case Needle/bobbin thread tension Threading the needle thread Needle threader Pulling up the bobbin thread Presser foot lifter Thread cutter Changing the presser feet Winding a bobbin through the needle Changing needles Threading twin needle Dual Feed/IDF Lowering feed dog Page 1 8 Page 1 8 Page 1 9 Page...
Owner's Manual
Page 24
... the master switch Hold the end of the thread round the bobbin several I times in a clockwise direction. Wind the start of the thread firmly and press the foot control. As soon as the bobbin is full, the winding action will be stopped automatically. Pull the thread under the thread guide C (from the front and pull it...
... the master switch Hold the end of the thread round the bobbin several I times in a clockwise direction. Wind the start of the thread firmly and press the foot control. As soon as the bobbin is full, the winding action will be stopped automatically. Pull the thread under the thread guide C (from the front and pull it...
Owner's Manual
Page 25
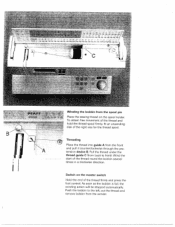
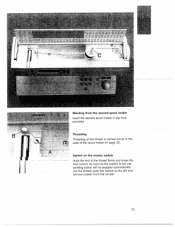
B - - .-. % Winding from the winder. 23 Switch on page 22. As soon as the bobbin is carried out as in the hole provided. Threading Threading of the thread firmly and press the I foot control. Cut the thread, push the bobbin to the left and remove bobbin from the second spool holder Insert the second spool holder in the case of the spool holder on the master switch Hold the end of the thread is full, the winding action will be stopped automatically. -- 5 - -- .2040 . -
B - - .-. % Winding from the winder. 23 Switch on page 22. As soon as the bobbin is carried out as in the hole provided. Threading Threading of the thread firmly and press the I foot control. Cut the thread, push the bobbin to the left and remove bobbin from the second spool holder Insert the second spool holder in the case of the spool holder on the master switch Hold the end of the thread is full, the winding action will be stopped automatically. -- 5 - -- .2040 . -
Owner's Manual
Page 26
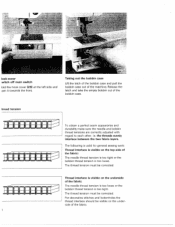
...fabric. For decorative stitches and buttonholes the thread interlace should be visible on the underside of the fabric: The needle thread tension is too loose or the bobbin thread tension is too loose. Release the latch and take the empty bobbin out of the machine. look cover witch... bobbin case and pull the bobbin case out of the bobbin case. Thread interlace is visible on the under side of the fabric: The needle thread tension is too tight or the bobbin thread tension is too tight The thread tension must be corrected. The thread tension must be corrected. the threads ...
...fabric. For decorative stitches and buttonholes the thread interlace should be visible on the underside of the fabric: The needle thread tension is too loose or the bobbin thread tension is too loose. Release the latch and take the empty bobbin out of the machine. look cover witch... bobbin case and pull the bobbin case out of the bobbin case. Thread interlace is visible on the under side of the fabric: The needle thread tension is too tight or the bobbin thread tension is too tight The thread tension must be corrected. The thread tension must be corrected. the threads ...
Owner's Manual
Page 27
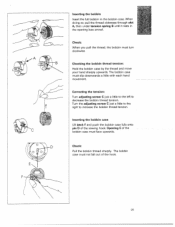
...B until it rests in the bobbin case. The bobbin case must not fall out of the bobbin case must face upwards. Checking the bobbin thread tension: Hold the bobbin case by the thread and move your hand sharply upwards. Check: When you pull the thread, the bobbin must slip downwards a little with...movement Correcting the tension: Turn adjusting screw C just a little to the left to increase the bobbin thread tension. The bobbin case must turn clockwise. Inserting the bobbin case Lift latch F and push the bobbin case fully onto pin D of the sewing hook Opening E of the hook F 25 Check:...
...B until it rests in the bobbin case. The bobbin case must not fall out of the bobbin case must face upwards. Checking the bobbin thread tension: Hold the bobbin case by the thread and move your hand sharply upwards. Check: When you pull the thread, the bobbin must slip downwards a little with...movement Correcting the tension: Turn adjusting screw C just a little to the left to increase the bobbin thread tension. The bobbin case must turn clockwise. Inserting the bobbin case Lift latch F and push the bobbin case fully onto pin D of the sewing hook Opening E of the hook F 25 Check:...
Owner's Manual
Page 30
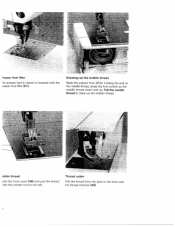
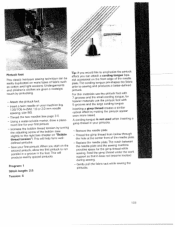
resser foot lifter The presser foot is raised or lowered with the )resser foot lifter (51). obbin thread lose the hook cover (46) and pull the thread ider the presser foot to the front over the thread trimmer (49). Thread cutter Pull the thread from the back to the left. Drawing-up the bobbin thread Raise the presser foot While holding the end of the needle thread, press the foot control so the needle moves down and up the bobbin thread. Pull the needle thread to draw up .
resser foot lifter The presser foot is raised or lowered with the )resser foot lifter (51). obbin thread lose the hook cover (46) and pull the thread ider the presser foot to the front over the thread trimmer (49). Thread cutter Pull the thread from the back to the left. Drawing-up the bobbin thread Raise the presser foot While holding the end of the needle thread, press the foot control so the needle moves down and up the bobbin thread. Pull the needle thread to draw up .
Owner's Manual
Page 32
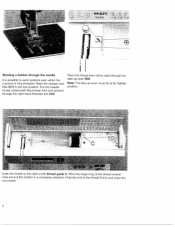
... -up lever must be at its highest position. Hold the end of the thread several imes around the bobbin in a clockwise direction. uide the thread to the top position. "FE PFFF 2040 I Winding a bobbin through the right-hand threader slot (34). Wind the beginning of the thread firmly and press the cot control. Pull the needle...
... -up lever must be at its highest position. Hold the end of the thread several imes around the bobbin in a clockwise direction. uide the thread to the top position. "FE PFFF 2040 I Winding a bobbin through the right-hand threader slot (34). Wind the beginning of the thread firmly and press the cot control. Pull the needle...
Owner's Manual
Page 38
Contents Adjusting the contrast on the display Bobbin thread monitor (model 2040) Selecting the sewing programs Altering pattern sizes Altering the stitch width/needle position Altering the pattern width/stitch length Altering the pattern length/stitch density Balance lnfo key/reverse sewing key Sewing function keys Twin needle Formation of the stitch patterns Page 38 Page 38 Page 39 Page 40 Page 41 Page 42 Page 43 Page 44 Page 45 Page 46 Page 47 Page 48/49 37
Contents Adjusting the contrast on the display Bobbin thread monitor (model 2040) Selecting the sewing programs Altering pattern sizes Altering the stitch width/needle position Altering the pattern width/stitch length Altering the pattern length/stitch density Balance lnfo key/reverse sewing key Sewing function keys Twin needle Formation of the stitch patterns Page 38 Page 38 Page 39 Page 40 Page 41 Page 42 Page 43 Page 44 Page 45 Page 46 Page 47 Page 48/49 37

Owner's Manual
Page 39
setting on the display may change after the full bobbin is no thread on the bobbin, the bobbin symbol appears on the display The contrast transported. Adjusting the contrast on the display. The symbol disappears after long use or due to sew again. 38 Bobbin thread monitor (model 2040) If the bobbin is nearing its end [2 yd (2 m) 3 '/ yd (3 m)1 or there is inserted and you start to the machine being This setting can be readjusted with the contrast regulator (54).
setting on the display may change after the full bobbin is no thread on the bobbin, the bobbin symbol appears on the display The contrast transported. Adjusting the contrast on the display. The symbol disappears after long use or due to sew again. 38 Bobbin thread monitor (model 2040) If the bobbin is nearing its end [2 yd (2 m) 3 '/ yd (3 m)1 or there is inserted and you start to the machine being This setting can be readjusted with the contrast regulator (54).

Owner's Manual
Page 69
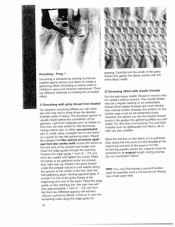
.... Warning! embroidery hoop. - The length of the seam is determined by you. Insert the pin of the presser foot holder. Draw up the bobbin thread and hold the threads when you have covered the width of the damaged area, turn the fabric 90 degrees and stitch over a tear will go into the hole... your work to sew a more consistent length of the hole. Sewing too slowly may cause small knots to the rear until the needle is the thread tension engaged for darning. - Darning in this position is set screw. With thumb and index finger press the darning foot together.
.... Warning! embroidery hoop. - The length of the seam is determined by you. Insert the pin of the presser foot holder. Draw up the bobbin thread and hold the threads when you have covered the width of the damaged area, turn the fabric 90 degrees and stitch over a tear will go into the hole... your work to sew a more consistent length of the hole. Sewing too slowly may cause small knots to the rear until the needle is the thread tension engaged for darning. - Darning in this position is set screw. With thumb and index finger press the darning foot together.

Owner's Manual
Page 71
... be laid in the lowest position. Secure all thread ends. To obtain neat and even gathers you work with elastic thread is important to use a strong thread when gathering to avoid thread breakage when pulling on the gathering threads. - Continue attaching elastic threads to secure the gathering. TIP: If you should... the desired fullness. - When you pull on the ends of gathering is not stretched or pierced by pulling the bobbin (bottom) threads to gather. Sew a few more rows of stitching, using the edge of gathering stitches. TIP: It is particularly suitable for visible,...
... be laid in the lowest position. Secure all thread ends. To obtain neat and even gathers you work with elastic thread is important to use a strong thread when gathering to avoid thread breakage when pulling on the gathering threads. - Continue attaching elastic threads to secure the gathering. TIP: If you should... the desired fullness. - When you pull on the ends of gathering is not stretched or pierced by pulling the bobbin (bottom) threads to gather. Sew a few more rows of stitching, using the edge of gathering stitches. TIP: It is particularly suitable for visible,...
Owner's Manual
Page 75
... fabric to be stretched to three times the desired finished width of the seams. For the remaining parallel seams the material must be set the bobbin-thread tension, the greater the gathering effect you will obtain. Attach the presser foot (the special accessory appli qué foot also works well): ... tension. Mark the first line on the fabric as lightweight knit fabric, silk or satin are much thicker than normal bobbin threads, the tension on this line and knot the threads at the rear end of the seam. Position the edge guide 1 inch (2 - 2.5 cm) from the first row. Place the edge ...
... fabric to be stretched to three times the desired finished width of the seams. For the remaining parallel seams the material must be set the bobbin-thread tension, the greater the gathering effect you will obtain. Attach the presser foot (the special accessory appli qué foot also works well): ... tension. Mark the first line on the fabric as lightweight knit fabric, silk or satin are much thicker than normal bobbin threads, the tension on this line and knot the threads at the rear end of the seam. Position the edge guide 1 inch (2 - 2.5 cm) from the first row. Place the edge ...
Owner's Manual
Page 98
... front edge of the needle tongue pre-shapes the fabric prior to emphasize the pintuck effect, you can attach a cording tongue (spe cial accessory) on "Bobbin thread tension"). The notch between the needle plate and the sewing machine provides space for heavier materials use the pintuck foot with 5 grooves and the large...
... front edge of the needle tongue pre-shapes the fabric prior to emphasize the pintuck effect, you can attach a cording tongue (spe cial accessory) on "Bobbin thread tension"). The notch between the needle plate and the sewing machine provides space for heavier materials use the pintuck foot with 5 grooves and the large...
Owner's Manual
Page 101
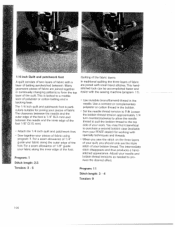
...a contrast or complementary polyester or cotton thread in the needle. Sew together your pieces of fabric using program 1 For a seam allowance of 1 /4" guide your fabric along the outer edge of the foot For a seam allowance of 1 /8 guide your PFAFF dealer) for joining your pieces of ...stitch on the three layers of your quilt you should only see the triple stitch of your bobbin thread. Loosen the bobbin thread tension approximately 1/4 turn counterclockwise to allow the needle thread to pull the bobbin thread to the top side of your work. 1 /4 inch Quilt and patchwork foot A quilt...
...a contrast or complementary polyester or cotton thread in the needle. Sew together your pieces of fabric using program 1 For a seam allowance of 1 /4" guide your fabric along the outer edge of the foot For a seam allowance of 1 /8 guide your PFAFF dealer) for joining your pieces of ...stitch on the three layers of your quilt you should only see the triple stitch of your bobbin thread. Loosen the bobbin thread tension approximately 1/4 turn counterclockwise to allow the needle thread to pull the bobbin thread to the top side of your work. 1 /4 inch Quilt and patchwork foot A quilt...
Owner's Manual
Page 112
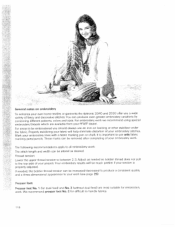
...Presser feet: Presser feet No. For embroidery work we recommend using special embroidery threads which are most suitable for embroidery work : The stitch length and width can be much prettier if your PFAFF dealer. Properly stabilizing your fabric will be increased/decreased to produce a consistent ... results will help eliminate distortion of your embroidery stitches. if needed so bobbin thread does not pull to use an iron-on embroidery To enhance your own home textiles or garments the tiptronic 2040 and 2030 offer you should always use only fabric marking pens/pencils. ...
...Presser feet: Presser feet No. For embroidery work we recommend using special embroidery threads which are most suitable for embroidery work : The stitch length and width can be much prettier if your PFAFF dealer. Properly stabilizing your fabric will be increased/decreased to produce a consistent ... results will help eliminate distortion of your embroidery stitches. if needed so bobbin thread does not pull to use an iron-on embroidery To enhance your own home textiles or garments the tiptronic 2040 and 2030 offer you should always use only fabric marking pens/pencils. ...

Owner's Manual
Page 127
....nftgihtPsesuuisenhryteoetthlthehetaetpptllmahatteieeddpodlinonetwocanutttthohaetuettnhboeeafecdftkhrloeeonfpnttlehaeteedle - Place the presser foot lifter in the darning position. - Tightly hoop your marked embroidery fabric. - Lower the feed dog. - Pull up the bobbin thread and hold it 's done: - The stitches should be very close to each other. - •0 Eyelet embroidery Ecn(dsaiyecpnecelo2ecbrti0eaae4ltpmi0varbecoacrdsoneutsidicdst/ceoeohdrrryyes)v2ee0abnr3yneh0daaeu.navtUsicafieulrsyisilonwyugemositauhubnrtritolelhiiiytnedyeeetnalriesnpytdtacrpnoaldnatebe produced.
....nftgihtPsesuuisenhryteoetthlthehetaetpptllmahatteieeddpodlinonetwocanutttthohaetuettnhboeeafecdftkhrloeeonfpnttlehaeteedle - Place the presser foot lifter in the darning position. - Tightly hoop your marked embroidery fabric. - Lower the feed dog. - Pull up the bobbin thread and hold it 's done: - The stitches should be very close to each other. - •0 Eyelet embroidery Ecn(dsaiyecpnecelo2ecbrti0eaae4ltpmi0varbecoacrdsoneutsidicdst/ceoeohdrrryyes)v2ee0abnr3yneh0daaeu.navtUsicafieulrsyisilonwyugemositauhubnrtritolelhiiiytnedyeeetnalriesnpytdtacrpnoaldnatebe produced.


