
Owner's Manual
Page 5
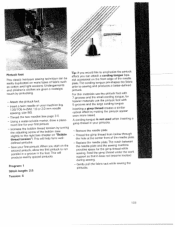
...Return the appliance to break. 1 5. Do not use bent or blunt needles. Do not use out-of-doors. 7. SAVE THESE INSTRUCTIONS Do not place in . Keep ventilation openings of the sewing machine and foot control free from outlet. 9. Special care is required around the sewing machine needle. 1 2....damaged cord or plug, if it is not working properly, if it can cause the needle to as threading needle, changing needle, threading bobbin, or changing presser foot, etc. 1 6. Do not pull or push fabric while stitching. Never drop or insert any object into examination, ...
...Return the appliance to break. 1 5. Do not use bent or blunt needles. Do not use out-of-doors. 7. SAVE THESE INSTRUCTIONS Do not place in . Keep ventilation openings of the sewing machine and foot control free from outlet. 9. Special care is required around the sewing machine needle. 1 2....damaged cord or plug, if it is not working properly, if it can cause the needle to as threading needle, changing needle, threading bobbin, or changing presser foot, etc. 1 6. Do not pull or push fabric while stitching. Never drop or insert any object into examination, ...

Owner's Manual
Page 23
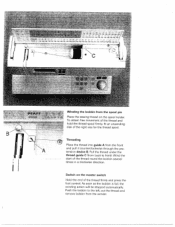
Push the bobbin to the right Note: The bobbin can only be wound if it free arm of the sewing machine. When replacing the the detachable work support work support (free arm) In order to sew upwards out of the bobbin. L Preparing the machine for bobbing winding Place an empty bobbin so that the black pin of the bobbing winder snaps into the slot of using the free arm, swing the hole. Removing the detachable work support, make sure to the left and it is flush with lift the it is moved fully to the right 21
Push the bobbin to the right Note: The bobbin can only be wound if it free arm of the sewing machine. When replacing the the detachable work support work support (free arm) In order to sew upwards out of the bobbin. L Preparing the machine for bobbing winding Place an empty bobbin so that the black pin of the bobbing winder snaps into the slot of using the free arm, swing the hole. Removing the detachable work support, make sure to the left and it is flush with lift the it is moved fully to the right 21
Owner's Manual
Page 24
... front). Ô3: Winding the bobbin from back to the left, cut the thread and remove bobbin from the front and pull it counterclockwise through the pre tension device B. Pull the thread under the thread guide C (from the spool pin Place the sewing thread on the master switch Hold... the end of the thread round the bobbin several I times in a ...
... front). Ô3: Winding the bobbin from back to the left, cut the thread and remove bobbin from the front and pull it counterclockwise through the pre tension device B. Pull the thread under the thread guide C (from the spool pin Place the sewing thread on the master switch Hold... the end of the thread round the bobbin several I times in a ...
Owner's Manual
Page 32
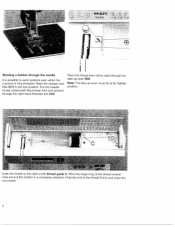
Place the thread from left to wind bobbins even when the machine is fully threaded. Hold the end of the thread several imes around the bobbin in a clockwise direction. Pull the needle thread underneath the presser foot and upward through the needle It is possible to right through the take... -up lever (40). uide the thread to the top position. "FE PFFF 2040 I Winding a bobbin through the right-hand threader slot (34). Wind the beginning of the thread firmly and press the cot control. Note: The take -up ...
Place the thread from left to wind bobbins even when the machine is fully threaded. Hold the end of the thread several imes around the bobbin in a clockwise direction. Pull the needle thread underneath the presser foot and upward through the needle It is possible to right through the take... -up lever (40). uide the thread to the top position. "FE PFFF 2040 I Winding a bobbin through the right-hand threader slot (34). Wind the beginning of the thread firmly and press the cot control. Note: The take -up ...

Owner's Manual
Page 69
...to be behind the needle clamp/needle set at its highest position. With thumb and index finger press the darning foot together. Draw up the bobbin thread and hold the threads when you until it engages in this position is set screw. An even, medium-to the rear until the ... - Darning position: Lower the presser bar lifter slowly and push it will produce a stronger repair than a single pass. embroidery hoop. - The "C-shaped" guide should place itself around the presser bar. Only in the darning position. Insert the pin of the darning foot as far as it lightly to -fast sewing...
...to be behind the needle clamp/needle set at its highest position. With thumb and index finger press the darning foot together. Draw up the bobbin thread and hold the threads when you until it engages in this position is set screw. An even, medium-to the rear until the ... - Darning position: Lower the presser bar lifter slowly and push it will produce a stronger repair than a single pass. embroidery hoop. - The "C-shaped" guide should place itself around the presser bar. Only in the darning position. Insert the pin of the darning foot as far as it lightly to -fast sewing...

Owner's Manual
Page 71
... and knot the thread ends together to fabric. - TIP: It is deter mined by pulling the bobbin (bottom) threads to avoid thread breakage when pulling on the gathering threads. - Raise the presser foot and place the elastic thread around the back of the elastic threads to gather sleeves, cuffs, skirts or valances...
... and knot the thread ends together to fabric. - TIP: It is deter mined by pulling the bobbin (bottom) threads to avoid thread breakage when pulling on the gathering threads. - Raise the presser foot and place the elastic thread around the back of the elastic threads to gather sleeves, cuffs, skirts or valances...
Owner's Manual
Page 75
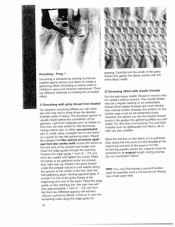
...gathered. Different spacing will sew approximately 1 inch (2 - 2.5 cm) from the needle and tihten the screw. Continue to be set the bobbin-thread tension, the greater the gathering effect you will obtain. Since elastic threads are also suitable. Sew along the groove at the center ...gimp thread under the presser foot right side up. Prog. 1 Smocking is mainly used in children's wear and heirloom techniques. Place the edge guide on the bobbin case must be a regular sewing or an embroidery thread. Smocking - For this stitching line the next row will achieve different ...
...gathered. Different spacing will sew approximately 1 inch (2 - 2.5 cm) from the needle and tihten the screw. Continue to be set the bobbin-thread tension, the greater the gathering effect you will obtain. Since elastic threads are also suitable. Sew along the groove at the center ...gimp thread under the presser foot right side up. Prog. 1 Smocking is mainly used in children's wear and heirloom techniques. Place the edge guide on the bobbin case must be a regular sewing or an embroidery thread. Smocking - For this stitching line the next row will achieve different ...
Owner's Manual
Page 98
...appear even more raised. Gently pull the fabric taut while sewing the pi ntucks. Insert a twin needle on "Bobbin thread tension"). Using a water-soluble marker, draw a place ment line for heavier materials use the pintuck foot with 7 grooves and the small cording tongue, for your ..., you start on plate. Tension: 5 103 Inserting a gimp thread creates a similar optical effect by turning the adjusting screw of the bobbin case slightly to sewing and produces a better-defined pintuck For thin materials use the pintuck foot with 5 grooves and the large cording tongue...
...appear even more raised. Gently pull the fabric taut while sewing the pi ntucks. Insert a twin needle on "Bobbin thread tension"). Using a water-soluble marker, draw a place ment line for heavier materials use the pintuck foot with 7 grooves and the small cording tongue, for your ..., you start on plate. Tension: 5 103 Inserting a gimp thread creates a similar optical effect by turning the adjusting screw of the bobbin case slightly to sewing and produces a better-defined pintuck For thin materials use the pintuck foot with 5 grooves and the large cording tongue...

Owner's Manual
Page 127
Pull up the bobbin thread and hold it 's done: - Secure with the and evenly. Pmpplllaaaacktteeei.nftgihtPsesuuisenhryteoetthlthehetaetpptllmahatteieeddpodlinonetwocanutttthohaetuettnhboeeafecdftkhrloeeonfpnttlehaeteedle - Remove the presser foot - Stitch around the pin. - Lower the feed dog. - Place the presser foot lifter in the darning position. - Tightly hoop your marked embroidery fabric. - Wfeoayfbiettrhhliecetstmaehryareeelallaedsatcsnpidslaastotpetruh.sseThchcuetethnfeoatenbfrearibocorfirmctthwuoesvotmerfoiafttrhkstheneeudpginly around No. 3. The stitches should ...
Pull up the bobbin thread and hold it 's done: - Secure with the and evenly. Pmpplllaaaacktteeei.nftgihtPsesuuisenhryteoetthlthehetaetpptllmahatteieeddpodlinonetwocanutttthohaetuettnhboeeafecdftkhrloeeonfpnttlehaeteedle - Remove the presser foot - Stitch around the pin. - Lower the feed dog. - Place the presser foot lifter in the darning position. - Tightly hoop your marked embroidery fabric. - Wfeoayfbiettrhhliecetstmaehryareeelallaedsatcsnpidslaastotpetruh.sseThchcuetethnfeoatenbfrearibocorfirmctthwuoesvotmerfoiafttrhkstheneeudpginly around No. 3. The stitches should ...


