
Operation Manual
Page 1
Digital Camera Operating Manual To ensure the best performance from your camera, please read the Operating Manual before using the camera.
Digital Camera Operating Manual To ensure the best performance from your camera, please read the Operating Manual before using the camera.

Operation Manual
Page 2
... not illuminate or may not function correctly when used in the Copyright Act. Regarding trademarks • PENTAX and Optio are not available on the recorded image. Regarding PictBridge PictBridge allows the user to connect the printer and digital camera directly, using extremely high precision technology. To users of Seiko Epson Corporation. Some functions are...
... not illuminate or may not function correctly when used in the Copyright Act. Regarding trademarks • PENTAX and Optio are not available on the recorded image. Regarding PictBridge PictBridge allows the user to connect the printer and digital camera directly, using extremely high precision technology. To users of Seiko Epson Corporation. Some functions are...
Operation Manual
Page 3
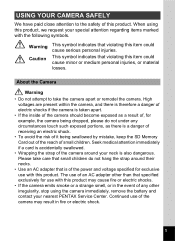
...use with this product. The use of an AC adapter other than that is accidentally swallowed. • Wrapping the strap of the camera around their necks. • Use an AC adapter that specified exclusively for use with this product may result in the event of any...card is of this item could cause minor or medium personal injuries, or material losses. When using the camera immediately, remove the battery and contact your nearest PENTAX Service Center. USING YOUR CAMERA SAFELY We have paid close attention to take care that small children do not under any other irregularity,...
...use with this product. The use of an AC adapter other than that is accidentally swallowed. • Wrapping the strap of the camera around their necks. • Use an AC adapter that specified exclusively for use with this product may result in the event of any...card is of this item could cause minor or medium personal injuries, or material losses. When using the camera immediately, remove the battery and contact your nearest PENTAX Service Center. USING YOUR CAMERA SAFELY We have paid close attention to take care that small children do not under any other irregularity,...

Operation Manual
Page 4
... contact with your mouth. Wash the affected areas thoroughly with a power source or voltage other abnormality occurs, immediately discontinue using and consult a PENTAX Service Center. Use with water. • Remove the battery from the product or other than that designed can cause a fire or electrical shock...burns. • Do not discharge the flash while it becomes hot or begins to burn yourself during removal. • Some portions of the camera heat up , catch fire, or explode. • Do not charge any battery leakage at a voltage other than the specified voltage. Continuing ...
... contact with your mouth. Wash the affected areas thoroughly with a power source or voltage other abnormality occurs, immediately discontinue using and consult a PENTAX Service Center. Use with water. • Remove the battery from the product or other than that designed can cause a fire or electrical shock...burns. • Do not discharge the flash while it becomes hot or begins to burn yourself during removal. • Some portions of the camera heat up , catch fire, or explode. • Do not charge any battery leakage at a voltage other than the specified voltage. Continuing ...
Operation Manual
Page 6
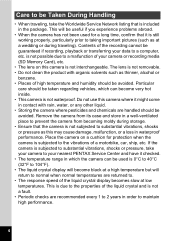
...will return to normal when normal temperatures are handled should be Taken During Handling • When traveling, take your camera to your nearest PENTAX Service Center and have it might come in waterproof performance. Particular care should be guaranteed if recording, playback or transferring your... camera or recording media (SD Memory Card), etc. • The lens on a cushion for a long time, confirm that it is ...
...will return to normal when normal temperatures are handled should be Taken During Handling • When traveling, take your camera to your nearest PENTAX Service Center and have it might come in waterproof performance. Particular care should be guaranteed if recording, playback or transferring your... camera or recording media (SD Memory Card), etc. • The lens on a cushion for a long time, confirm that it is ...

Operation Manual
Page 7
...delete all data; Do not use with any other equipment. 5 however it with the battery charger D-BC72. Therefore put the camera in a bag or plastic bag, and take the camera out when the difference in temperature has subsided. • Refer to "Precautions When Using an SD Memory Card" (p.28) ... SD Memory Card. • Please note that data using a tripod with the camera, be careful not to overtighten the screw in the tripod socket on the camera. • The AC plug cord supplied with the camera is subjected to rapid temperature changes, condensation may still be possible to sit down ...
...delete all data; Do not use with any other equipment. 5 however it with the battery charger D-BC72. Therefore put the camera in a bag or plastic bag, and take the camera out when the difference in temperature has subsided. • Refer to "Precautions When Using an SD Memory Card" (p.28) ... SD Memory Card. • Please note that data using a tripod with the camera, be careful not to overtighten the screw in the tripod socket on the camera. • The AC plug cord supplied with the camera is subjected to rapid temperature changes, condensation may still be possible to sit down ...

Operation Manual
Page 8
... the Package 15 Names of Parts 16 Names of Operating Parts 17 Monitor Indications 18 Getting Started 21 Attaching the Strap 21 Powering the Camera 22 Charging the Battery 22 Installing the Battery 23 Using the AC Adapter 25 Installing the SD Memory Card 26 Recorded Pixels and Quality ...Level of Still Pictures 29 Recorded Pixels, Quality Level and Frame Rate of Movies ...........30 Turning the Camera On and Off 32 Playback Mode 33 Initial Settings 34 Setting the Display Language 34 Setting the Date and Time 36 Quick Start 39 ...
... the Package 15 Names of Parts 16 Names of Operating Parts 17 Monitor Indications 18 Getting Started 21 Attaching the Strap 21 Powering the Camera 22 Charging the Battery 22 Installing the Battery 23 Using the AC Adapter 25 Installing the SD Memory Card 26 Recorded Pixels and Quality ...Level of Still Pictures 29 Recorded Pixels, Quality Level and Frame Rate of Movies ...........30 Turning the Camera On and Off 32 Playback Mode 33 Initial Settings 34 Setting the Display Language 34 Setting the Date and Time 36 Quick Start 39 ...
Operation Manual
Page 10
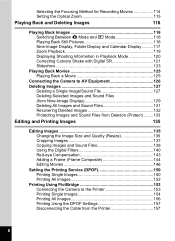
...Calendar Display ..........117 Zoom Playback 119 Displaying Shooting Information in Playback Mode 120 Correcting Camera Shake with Digital SR 121 Slideshow 123 Playing Back Movies 125 Playing Back a Movie 125 Connecting the Camera to AV Equipment 126 Deleting Images 127 Deleting a Single Image/Sound File 127...Editing Images 135 Changing the Image Size and Quality (Resize 135 Cropping Images 137 Copying Images and Sound Files 138 Using the Digital Filters 140 Red-eye Compensation 143 Adding a Frame (Frame Composite 144 Editing Movies 146 Setting the Printing Service (DPOF 150...
...Calendar Display ..........117 Zoom Playback 119 Displaying Shooting Information in Playback Mode 120 Correcting Camera Shake with Digital SR 121 Slideshow 123 Playing Back Movies 125 Playing Back a Movie 125 Connecting the Camera to AV Equipment 126 Deleting Images 127 Deleting a Single Image/Sound File 127...Editing Images 135 Changing the Image Size and Quality (Resize 135 Cropping Images 137 Copying Images and Sound Files 138 Using the Digital Filters 140 Red-eye Compensation 143 Adding a Frame (Frame Composite 144 Editing Movies 146 Setting the Printing Service (DPOF 150...

Operation Manual
Page 11
... (Voice Recording Mode 158 Playing Back Sound 160 Adding a Voice Memo to Images 161 Recording a Voice Memo 161 Playing Back a Voice Memo 162 Settings 163 Camera Settings 163 Formatting an SD Memory Card or the Built-in Memory 163 Changing the Date and Time 164 Changing the Sound Settings 166 Setting...
... (Voice Recording Mode 158 Playing Back Sound 160 Adding a Voice Memo to Images 161 Recording a Voice Memo 161 Playing Back a Voice Memo 162 Settings 163 Camera Settings 163 Formatting an SD Memory Card or the Built-in Memory 163 Changing the Date and Time 164 Changing the Sound Settings 166 Setting...
Operation Manual
Page 12
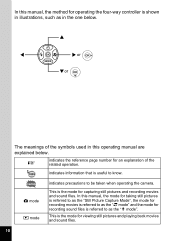
... the mode for viewing still pictures and playing back movies and sound files. 10 indicates information that is useful to be taken when operating the camera. In this manual, the method for operating the four-way controller is shown in this manual, the mode for taking still pictures is referred to...
... the mode for viewing still pictures and playing back movies and sound files. 10 indicates information that is useful to be taken when operating the camera. In this manual, the method for operating the four-way controller is shown in this manual, the mode for taking still pictures is referred to...
Operation Manual
Page 13
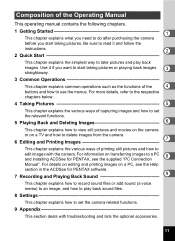
...relevant functions. 5 Playing Back and Deleting Images 6 This chapter explains how to view still pictures and movies on the camera or on a PC, see the Help section in the ACDSee for PENTAX, see the supplied "PC Connection Manual". For details on editing and printing images on a TV and how to ...delete images from the camera. 7 6 Editing and Printing Images This chapter explains the various ways of printing still pictures and how...
...relevant functions. 5 Playing Back and Deleting Images 6 This chapter explains how to view still pictures and movies on the camera or on a PC, see the Help section in the ACDSee for PENTAX, see the supplied "PC Connection Manual". For details on editing and printing images on a TV and how to ...delete images from the camera. 7 6 Editing and Printing Images This chapter explains the various ways of printing still pictures and how...
Operation Manual
Page 14
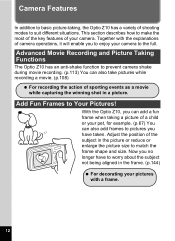
Advanced Movie Recording and Picture Taking Functions The Optio Z10 has an anti-shake function to prevent camera shake during movie recording. (p.113) You can also take pictures while recording a movie. (p.108) For recording the action of the subject in the picture.... Add Fun Frames to the full. With the Optio Z10, you can add a fun frame when taking , the Optio Z10 has a variety of shooting modes to suit different situations. Adjust the position of sporting events as a movie while capturing the winning shot in a picture. Camera Features In addition to basic picture-taking a picture ...
Advanced Movie Recording and Picture Taking Functions The Optio Z10 has an anti-shake function to prevent camera shake during movie recording. (p.113) You can also take pictures while recording a movie. (p.108) For recording the action of the subject in the picture.... Add Fun Frames to the full. With the Optio Z10, you can add a fun frame when taking , the Optio Z10 has a variety of shooting modes to suit different situations. Adjust the position of sporting events as a movie while capturing the winning shot in a picture. Camera Features In addition to basic picture-taking a picture ...
Operation Manual
Page 16
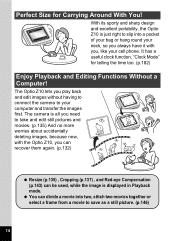
...) can divide a movie into a pocket of your bag or hang round your neck, so you always have it with the Optio Z10, you play back and edit images without having to connect the camera to save as a still picture. (p.146) 14 You can be used, while the image is just right to slip... into two, stitch two movies together or select a frame from a movie to your cell phone. With its sporty and sharp design and excellent portability, the Optio Z10 is displayed in...
...) can divide a movie into a pocket of your bag or hang round your neck, so you always have it with the Optio Z10, you play back and edit images without having to connect the camera to save as a still picture. (p.146) 14 You can be used, while the image is just right to slip... into two, stitch two movies together or select a frame from a movie to your cell phone. With its sporty and sharp design and excellent portability, the Optio Z10 is displayed in...
Operation Manual
Page 17
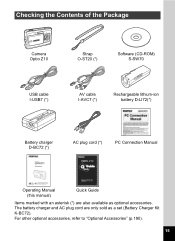
For other optional accessories, refer to "Optional Accessories" (p.190). 15 The battery charger and AC plug cord are also available as a set (Battery Charger Kit K-BC72). Checking the Contents of the Package Camera Optio Z10 Strap O-ST20 (*) Software (CD-ROM) S-SW70 USB cable I-USB7 (*) AV cable I-AVC7 (*) Rechargeable lithium-ion battery D-LI72(*) Battery charger D-BC72 (*) AC plug cord (*) PC Connection Manual Operating Manual (this manual) Quick Guide Items marked with an asterisk (*) are only sold as optional accessories.
For other optional accessories, refer to "Optional Accessories" (p.190). 15 The battery charger and AC plug cord are also available as a set (Battery Charger Kit K-BC72). Checking the Contents of the Package Camera Optio Z10 Strap O-ST20 (*) Software (CD-ROM) S-SW70 USB cable I-USB7 (*) AV cable I-AVC7 (*) Rechargeable lithium-ion battery D-LI72(*) Battery charger D-BC72 (*) AC plug cord (*) PC Connection Manual Operating Manual (this manual) Quick Guide Items marked with an asterisk (*) are only sold as optional accessories.
Operation Manual
Page 20
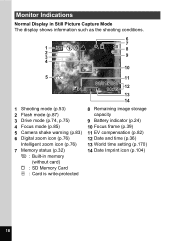
... 8 2 3 9 4 10 5 11 +1.0 01/01/2007 14:25 12 13 14 1 Shooting mode (p.53) 2 Flash mode (p.87) 3 Drive mode (p.74, p.75) 4 Focus mode (p.85) 5 Camera shake warning (p.83) 6 Digital zoom icon (p.76) Intelligent zoom icon (p.76) 7 Memory status (p.32) + : Built-in memory (without card) a : SD Memory Card r : Card is write-protected 8 Remaining image...
... 8 2 3 9 4 10 5 11 +1.0 01/01/2007 14:25 12 13 14 1 Shooting mode (p.53) 2 Flash mode (p.87) 3 Drive mode (p.74, p.75) 4 Focus mode (p.85) 5 Camera shake warning (p.83) 6 Digital zoom icon (p.76) Intelligent zoom icon (p.76) 7 Memory status (p.32) + : Built-in memory (without card) a : SD Memory Card r : Card is write-protected 8 Remaining image...

Operation Manual
Page 23
Getting Started Getting Started Attaching the Strap Attach the strap (O-ST20) supplied with the camera. 1 2 1 1 Pass the narrow end of the strap through the strap lug. 2 Pass the other end of the strap through the loop and pull tight. 21
Getting Started Getting Started Attaching the Strap Attach the strap (O-ST20) supplied with the camera. 1 2 1 1 Pass the narrow end of the strap through the strap lug. 2 Pass the other end of the strap through the loop and pull tight. 21
Operation Manual
Page 24
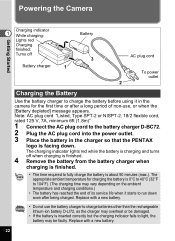
...8226; If the battery is facing down soon after a long period of its service life when it in the charger so that the PENTAX logo is inserted correctly but the charging indicator fails to light, the battery may vary depending on the ambient temperature and charging conditions.) &#...other than the rechargeable lithium-ion battery D-LI72, as the charger may overheat or be faulty. Replace with a new battery. 22 Powering the Camera Getting Started Charging indicator 1 While charging: Lights red Charging finished: Turns off when charging is finished. 4 Remove the battery from the battery ...
...8226; If the battery is facing down soon after a long period of its service life when it in the charger so that the PENTAX logo is inserted correctly but the charging indicator fails to light, the battery may vary depending on the ambient temperature and charging conditions.) &#...other than the rechargeable lithium-ion battery D-LI72, as the charger may overheat or be faulty. Replace with a new battery. 22 Powering the Camera Getting Started Charging indicator 1 While charging: Lights red Charging finished: Turns off when charging is finished. 4 Remove the battery from the battery ...

Operation Manual
Page 25
Getting Started 1 Battery cover Battery Installing the Battery Use the battery that is provided with the PENTAX logo pointing toward the back of the battery with the camera. Charge the battery before using it springs open. 2 Insert the side of the camera. 3 Close the battery cover. When you slide the battery cover out, it in the camera for the first time. 1 Open the battery cover. Removing the Battery 1 Open the battery cover. 2 Slide the battery out. 23
Getting Started 1 Battery cover Battery Installing the Battery Use the battery that is provided with the PENTAX logo pointing toward the back of the battery with the camera. Charge the battery before using it springs open. 2 Insert the side of the camera. 3 Close the battery cover. When you slide the battery cover out, it in the camera for the first time. 1 Open the battery cover. Removing the Battery 1 Open the battery cover. 2 Slide the battery out. 23
Operation Manual
Page 26
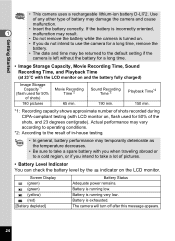
...traveling abroad or to a cold region, or if you do not intend to use the camera for a long time, remove the battery. • The date and time may damage the camera and cause malfunction. • Insert the battery correctly. Actual performance may vary according to ...operating conditions. *2: According to the default setting if the camera is exhausted. Screen Display (green) (green) (yellow) (red) [Battery depleted] Battery Status Adequate power remains. Playback Time*2 150 min...
...traveling abroad or to a cold region, or if you do not intend to use the camera for a long time, remove the battery. • The date and time may damage the camera and cause malfunction. • Insert the battery correctly. Actual performance may vary according to ...operating conditions. *2: According to the default setting if the camera is exhausted. Screen Display (green) (green) (yellow) (red) [Battery depleted] Battery Status Adequate power remains. Playback Time*2 150 min...
Operation Manual
Page 27
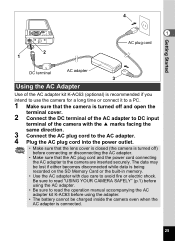
...2 1 1 AC plug cord DC terminal AC adapter 3 Using the AC Adapter Use of the camera with the 2 marks facing the same direction. 3 Connect the AC plug cord to the AC ...avoid fire or electric shock. The data may be charged inside the camera even when the AC adapter is connected. 25 Be sure to read "USING YOUR CAMERA SAFELY" (p.1) before using the AC adapter. • Be sure...adapter kit K-AC63 (optional) is recommended if you intend to use the camera for a long time or connect it to a PC. 1 Make sure that the camera is turned off ) before connecting or disconnecting the AC adapter. •...
...2 1 1 AC plug cord DC terminal AC adapter 3 Using the AC Adapter Use of the camera with the 2 marks facing the same direction. 3 Connect the AC plug cord to the AC ...avoid fire or electric shock. The data may be charged inside the camera even when the AC adapter is connected. 25 Be sure to read "USING YOUR CAMERA SAFELY" (p.1) before using the AC adapter. • Be sure...adapter kit K-AC63 (optional) is recommended if you intend to use the camera for a long time or connect it to a PC. 1 Make sure that the camera is turned off ) before connecting or disconnecting the AC adapter. •...


