
Operation Manual
Page 8
... Operating Parts 17 Monitor Indications 18 Getting Started 21 Attaching the Strap 21 Powering the Camera 22 Charging the Battery 22 Installing the Battery 23 Using the AC Adapter 25 Installing the SD Memory Card 26 Recorded Pixels and Quality Level of Still Pictures 29 Recorded Pixels, Quality Level and Frame Rate of Movies ...........30 Turning the Camera On and Off 32 Playback Mode 33 Initial Settings 34 Setting the Display Language 34 Setting the Date and Time 36 Quick Start 39 Taking...
... Operating Parts 17 Monitor Indications 18 Getting Started 21 Attaching the Strap 21 Powering the Camera 22 Charging the Battery 22 Installing the Battery 23 Using the AC Adapter 25 Installing the SD Memory Card 26 Recorded Pixels and Quality Level of Still Pictures 29 Recorded Pixels, Quality Level and Frame Rate of Movies ...........30 Turning the Camera On and Off 32 Playback Mode 33 Initial Settings 34 Setting the Display Language 34 Setting the Date and Time 36 Quick Start 39 Taking...
Operation Manual
Page 10
...and Q Mode 116 Playing Back Still Pictures 116 Nine-Image Display, Folder Display and Calendar Display ..........117 Zoom Playback 119 Displaying Shooting Information in Playback Mode 120 Correcting Camera Shake with Digital SR 121 Slideshow 123 Playing Back Movies 125 Playing Back a Movie 125 Connecting the Camera to AV Equipment 126 Deleting Images 127 Deleting a Single Image/Sound File 127 Deleting Selected Images and Sound Files (from Nine-Image Display 129 Deleting All Images and Sound Files 131 Recovering Deleted Images 132 Protecting Images and Sound Files from Deletion...
...and Q Mode 116 Playing Back Still Pictures 116 Nine-Image Display, Folder Display and Calendar Display ..........117 Zoom Playback 119 Displaying Shooting Information in Playback Mode 120 Correcting Camera Shake with Digital SR 121 Slideshow 123 Playing Back Movies 125 Playing Back a Movie 125 Connecting the Camera to AV Equipment 126 Deleting Images 127 Deleting a Single Image/Sound File 127 Deleting Selected Images and Sound Files (from Nine-Image Display 129 Deleting All Images and Sound Files 131 Recovering Deleted Images 132 Protecting Images and Sound Files from Deletion...

Operation Manual
Page 11
... Recording a Voice Memo 161 Playing Back a Voice Memo 162 Settings 163 Camera Settings 163 Formatting an SD Memory Card or the Built-in Memory 163 Changing the Date and Time 164 Changing the Sound Settings 166 Setting the Alarm 168 Setting the World Time 170 Changing the Display Language 172 Changing the Image Folder Name 173 Changing the USB Connection Mode 174 Changing the Video Output Format 175 Adjusting the Brightness of the LCD Monitor 176 Using the Power Saving Function 177 Setting Auto Power Off 178 Setting the Guide Display 179 Resetting to Default Settings (Reset...
... Recording a Voice Memo 161 Playing Back a Voice Memo 162 Settings 163 Camera Settings 163 Formatting an SD Memory Card or the Built-in Memory 163 Changing the Date and Time 164 Changing the Sound Settings 166 Setting the Alarm 168 Setting the World Time 170 Changing the Display Language 172 Changing the Image Folder Name 173 Changing the USB Connection Mode 174 Changing the Video Output Format 175 Adjusting the Brightness of the LCD Monitor 176 Using the Power Saving Function 177 Setting Auto Power Off 178 Setting the Guide Display 179 Resetting to Default Settings (Reset...
Operation Manual
Page 15
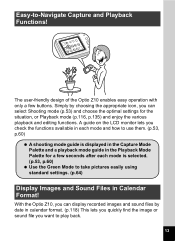
...) A shooting mode guide is selected. (p.53, p.60) Use the Green Mode to take pictures easily using standard settings. (p.64) Display Images and Sound Files in calendar format. (p.118) This lets you quickly find the image or sound file you can display recorded images and sound files by choosing the appropriate icon, you want to -Navigate Capture and Playback Functions! Easy-to play back. 13 With the Optio Z10, you can select Shooting mode (p.53) and choose the optimal settings for a few buttons. Simply by date in...
...) A shooting mode guide is selected. (p.53, p.60) Use the Green Mode to take pictures easily using standard settings. (p.64) Display Images and Sound Files in calendar format. (p.118) This lets you quickly find the image or sound file you can display recorded images and sound files by choosing the appropriate icon, you want to -Navigate Capture and Playback Functions! Easy-to play back. 13 With the Optio Z10, you can select Shooting mode (p.53) and choose the optimal settings for a few buttons. Simply by date in...

Operation Manual
Page 22
... A10 A1 Playback mode (p.60) w : Still Picture Playback Mode (p.59) P : Digital SR (p.121) A2 Folder number (p.173) A3 File number A4 Protect icon (p.133) A5 Voice memo icon (p.162) A6 Battery indicator (p.24) A7 Volume icon (p.162) A8 Memory status (p.32) + : Built-in memory (without card) a : SD Memory Card r : Card is write-protected A9 Captured date and time (p.36) A10 Four-way controller guide A11 Key lock icon (p.65) B1 Bright portion (blinks red) (p.19) B2 Recorded pixels (p.89) B3 Quality (p.91) B4 White balance (p.92...
... A10 A1 Playback mode (p.60) w : Still Picture Playback Mode (p.59) P : Digital SR (p.121) A2 Folder number (p.173) A3 File number A4 Protect icon (p.133) A5 Voice memo icon (p.162) A6 Battery indicator (p.24) A7 Volume icon (p.162) A8 Memory status (p.32) + : Built-in memory (without card) a : SD Memory Card r : Card is write-protected A9 Captured date and time (p.36) A10 Four-way controller guide A11 Key lock icon (p.65) B1 Bright portion (blinks red) (p.19) B2 Recorded pixels (p.89) B3 Quality (p.91) B4 White balance (p.92...
Operation Manual
Page 26
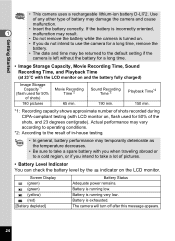
... this message appears. 24 Use of any other type of the shots, and 23 degrees centigrade). Battery is running low. Screen Display (green) (green) (yellow) (red) [Battery depleted] Battery Status Adequate power remains. If the battery is incorrectly oriented, 1 malfunction may result. • Do not remove the battery while the camera is turned on the LCD monitor. Battery is left without the battery for a long time. • Image Storage Capacity, Movie Recording Time, Sound Recording Time, and Playback Time (at...
... this message appears. 24 Use of any other type of the shots, and 23 degrees centigrade). Battery is running low. Screen Display (green) (green) (yellow) (red) [Battery depleted] Battery Status Adequate power remains. If the battery is incorrectly oriented, 1 malfunction may result. • Do not remove the battery while the camera is turned on the LCD monitor. Battery is left without the battery for a long time. • Image Storage Capacity, Movie Recording Time, Sound Recording Time, and Playback Time (at...

Operation Manual
Page 28
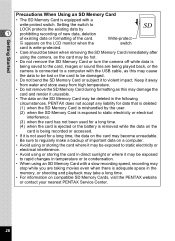
... Memory Card is being recorded or read). Backing Up Data The camera may not be able to back up important data in the camera. Captured images and sound files are saved in the built-in memory if a card is not inserted. (p.32) • Be sure to use this camera to format (initialize) an SD Memory Card that the lens cover is closed (the camera is turned off) before inserting or removing the SD Memory Card...
... Memory Card is being recorded or read). Backing Up Data The camera may not be able to back up important data in the camera. Captured images and sound files are saved in the built-in memory if a card is not inserted. (p.32) • Be sure to use this camera to format (initialize) an SD Memory Card that the lens cover is closed (the camera is turned off) before inserting or removing the SD Memory Card...
Operation Manual
Page 30
... using the camera, as the card may be hot. • Do not remove the SD Memory Card or turn the camera off while data is being saved to the card, images or sound files are taking movies even when there is connected to a computer with a write-protect switch. Keep it away from water and store away from high temperature. • Do not remove the SD Memory Card during formatting as this may damage the card...
... using the camera, as the card may be hot. • Do not remove the SD Memory Card or turn the camera off while data is being saved to the card, images or sound files are taking movies even when there is connected to a computer with a write-protect switch. Keep it away from water and store away from high temperature. • Do not remove the SD Memory Card during formatting as this may damage the card...

Operation Manual
Page 41
... The focus frame in memory. (p.40) Press the Green button to switch to take still pictures. The camera turns on the light conditions. 1 Open the lens cover. x : enlarges the subject w : widens the area that pictures come out well. (p.64) 39 Quick Start Taking Still Pictures Shutter release button Zoom/w/x button 2 Quick Start The standard procedure for one second (Instant Review) and is ready to the Green Mode and let the camera set all the shooting functions automatically. You can change the...
... The focus frame in memory. (p.40) Press the Green button to switch to take still pictures. The camera turns on the light conditions. 1 Open the lens cover. x : enlarges the subject w : widens the area that pictures come out well. (p.64) 39 Quick Start Taking Still Pictures Shutter release button Zoom/w/x button 2 Quick Start The standard procedure for one second (Instant Review) and is ready to the Green Mode and let the camera set all the shooting functions automatically. You can change the...
Operation Manual
Page 52
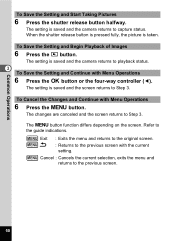
... the guide indications. To Save the Setting and Begin Playback of Images 6 Press the Q button. The changes are canceled and the screen returns to the previous screen. 50 The 3 button function differs depending on the screen. MENU Cancel : Cancels the current selection, exits the menu and returns to Step 3. To Cancel the Changes and Continue with the current setting. Common Operations To Save the Setting and Start Taking Pictures 6 Press the shutter release button halfway. The setting...
... the guide indications. To Save the Setting and Begin Playback of Images 6 Press the Q button. The changes are canceled and the screen returns to the previous screen. 50 The 3 button function differs depending on the screen. MENU Cancel : Cancels the current selection, exits the menu and returns to Step 3. To Cancel the Changes and Continue with the current setting. Common Operations To Save the Setting and Start Taking Pictures 6 Press the shutter release button halfway. The setting...

Operation Manual
Page 54
..., language, world time and video out to the AV equipment p.175 For changing the brightness of the Green button enables you to go straight to the menu. (p.57) [W Setting] Menu Item Format 3 Sound Date Adjust Alarm World Time Language/ Folder Name USB Connection Video Out Brightness Level Power Saving Auto Power Off Guide Display Reset Description Page For formatting the SD Memory Card or built-in memory p.163 For adjusting the operation volume and playback volume, and setting the start-up sound, shutter sound, p.166 key operation sound and self-timer sound For adjusting the date, time...
..., language, world time and video out to the AV equipment p.175 For changing the brightness of the Green button enables you to go straight to the menu. (p.57) [W Setting] Menu Item Format 3 Sound Date Adjust Alarm World Time Language/ Folder Name USB Connection Video Out Brightness Level Power Saving Auto Power Off Guide Display Reset Description Page For formatting the SD Memory Card or built-in memory p.163 For adjusting the operation volume and playback volume, and setting the start-up sound, shutter sound, p.166 key operation sound and self-timer sound For adjusting the date, time...
Operation Manual
Page 55
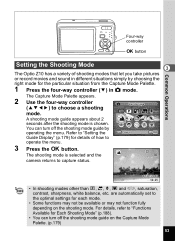
... Capture Mode Palette. 1 Press the four-way controller (3) in A mode. A shooting mode guide appears about 2 seconds after the shooting mode is selected and the camera returns to capture status. 01/01/2007 14:25 • In shooting modes other than R, C, O, Y and 4, saturation, contrast, sharpness, white balance, etc. Common Operations Four-way controller 4 button Setting the Shooting Mode 3 The Optio Z10 has a variety of how to operate the menu. 3 Press the 4 button. 38 The shooting mode is...
... Capture Mode Palette. 1 Press the four-way controller (3) in A mode. A shooting mode guide appears about 2 seconds after the shooting mode is selected and the camera returns to capture status. 01/01/2007 14:25 • In shooting modes other than R, C, O, Y and 4, saturation, contrast, sharpness, white balance, etc. Common Operations Four-way controller 4 button Setting the Shooting Mode 3 The Optio Z10 has a variety of how to operate the menu. 3 Press the 4 button. 38 The shooting mode is...

Operation Manual
Page 94
...J K Auto The camera adjusts the white balance automatically. Shade Use this mode when taking pictures under electric or other tungsten light. Set another white balance if you are not satisfied with white balance set to AWB (Auto). 1 Press the 3 button in A mode. White Balance The White Balance screen appears. MENU Four-way controller 4 button 3 button Rec.Mode Recorded Pixels Quality Level White Balance AF Setting AE Metering Sensitivity MENU ਞExၭit 1/3 8M AWB AUTO 800 ɣ Taking Pictures Adjusting the White Balance You can take pictures in natural colors by...
...J K Auto The camera adjusts the white balance automatically. Shade Use this mode when taking pictures under electric or other tungsten light. Set another white balance if you are not satisfied with white balance set to AWB (Auto). 1 Press the 3 button in A mode. White Balance The White Balance screen appears. MENU Four-way controller 4 button 3 button Rec.Mode Recorded Pixels Quality Level White Balance AF Setting AE Metering Sensitivity MENU ਞExၭit 1/3 8M AWB AUTO 800 ɣ Taking Pictures Adjusting the White Balance You can take pictures in natural colors by...

Operation Manual
Page 98
Taking Pictures MENU Four-way controller 4 button 3 button Rec.Mode Recorded Pixels Quality Level White Balance AF Setting AE Metering Sensitivity MENU ਞExၭit to the { Setting of the surroundings. 4 ISO Sensitivity AUTO The sensitivity is automatically adjusted in the range set to 64-3200. • If you use faster shutter speeds in low light conditions to reduce camera shake, but the image may be affected by assigning it 1/3 8M AWB AUTO 800...
Taking Pictures MENU Four-way controller 4 button 3 button Rec.Mode Recorded Pixels Quality Level White Balance AF Setting AE Metering Sensitivity MENU ਞExၭit to the { Setting of the surroundings. 4 ISO Sensitivity AUTO The sensitivity is automatically adjusted in the range set to 64-3200. • If you use faster shutter speeds in low light conditions to reduce camera shake, but the image may be affected by assigning it 1/3 8M AWB AUTO 800...

Operation Manual
Page 112
... movies. Color Mode Movie SR 7 Press the 4 button. The camera returns to change the quality level. The Movie screen appears. 4 Use the four-way controller (23) to select [Movie]. 3 Press the four-way controller (5). AF w/ recording MENU Cancel OK OK The Quality Level setting is saved. 8 Press the 3 button twice. MENU Four-way controller 4 button 3 button Rec.Mode Recorded Pixels Quality Level White Balance AF Setting AE Metering Sensitivity MENU ਞExၭit 1/3 8M AWB AUTO 800 ɣ Taking Pictures...
... movies. Color Mode Movie SR 7 Press the 4 button. The camera returns to change the quality level. The Movie screen appears. 4 Use the four-way controller (23) to select [Movie]. 3 Press the four-way controller (5). AF w/ recording MENU Cancel OK OK The Quality Level setting is saved. 8 Press the 3 button twice. MENU Four-way controller 4 button 3 button Rec.Mode Recorded Pixels Quality Level White Balance AF Setting AE Metering Sensitivity MENU ਞExၭit 1/3 8M AWB AUTO 800 ɣ Taking Pictures...

Operation Manual
Page 117
... camera returns to use the optical zoom during movie recording. 4 1 Press the 3 button in the recorded sound, depending on the shooting environment. 115 Taking Pictures Four-way controller 3 button Rec.Mode Recorded Pixels Quality Level White Balance AF Setting AE Metering Sensitivity MENU ਞExၭit 1/3 8M AWB AUTO 800 ɣ Setting the Optical Zoom You can set [Optical Zoom] to O (On), the sound of the lens moving may be audible in A mode. The [A Rec.Mode] menu appears. 2 Use...
... camera returns to use the optical zoom during movie recording. 4 1 Press the 3 button in the recorded sound, depending on the shooting environment. 115 Taking Pictures Four-way controller 3 button Rec.Mode Recorded Pixels Quality Level White Balance AF Setting AE Metering Sensitivity MENU ਞExၭit 1/3 8M AWB AUTO 800 ɣ Setting the Optical Zoom You can set [Optical Zoom] to O (On), the sound of the lens moving may be audible in A mode. The [A Rec.Mode] menu appears. 2 Use...

Operation Manual
Page 179
... [W Setting] menu MENU Four-way controller 4 button 3 button Setting 1/3 Format Sound Date Adjust Alarm World Time 01/01/2007 MENU Exit Using the Power Saving Function You can save battery power by pressing any of the buttons. 1 Use the four-way controller (23) to a PC or printer • when using the AC adapter • while recording a movie • while the menu is being displayed Settings 177 Folder Name 2min 3 Use the four-way controller (23) USB Connection 1min Video Out 30sec to dim automatically when no operation is connected...
... [W Setting] menu MENU Four-way controller 4 button 3 button Setting 1/3 Format Sound Date Adjust Alarm World Time 01/01/2007 MENU Exit Using the Power Saving Function You can save battery power by pressing any of the buttons. 1 Use the four-way controller (23) to a PC or printer • when using the AC adapter • while recording a movie • while the menu is being displayed Settings 177 Folder Name 2min 3 Use the four-way controller (23) USB Connection 1min Video Out 30sec to dim automatically when no operation is connected...

Operation Manual
Page 188
... p.135 Last Memory Setting Yes Yes Yes Yes Yes Yes Yes Yes Yes Yes Yes Yes Yes Yes Yes Yes Yes Yes Yes Yes Yes Yes Yes Yes Yes - [W Setting] Menu Items Item Operation Volume Playback Volume Sound Start-up Sound Shutter Sound Operation Sound Self-timer Sound Date Style (date) Date Style (time) Date Adjust Date Time Alarm Alarm Time World time World Time Destination (City) Destination (DST) Hometown (City) Hometown (DST) Language/ Folder Name USB Connection Video Out Brightness Level Power Saving Auto Power Off Guide Display Reset Default Setting 3 3 1 1 1 1 According...
... p.135 Last Memory Setting Yes Yes Yes Yes Yes Yes Yes Yes Yes Yes Yes Yes Yes Yes Yes Yes Yes Yes Yes Yes Yes Yes Yes Yes Yes - [W Setting] Menu Items Item Operation Volume Playback Volume Sound Start-up Sound Shutter Sound Operation Sound Self-timer Sound Date Style (date) Date Style (time) Date Adjust Date Time Alarm Alarm Time World time World Time Destination (City) Destination (DST) Hometown (City) Hometown (DST) Language/ Folder Name USB Connection Video Out Brightness Level Power Saving Auto Power Off Guide Display Reset Default Setting 3 3 1 1 1 1 According...

Operation Manual
Page 197
... button halfway), then compose picture and press the shutter release button fully. The shooting mode is set to C The USB connection with computer does not work properly The USB connection Change the USB connection mode to mode is set Normal pictures will not discharge in the middle of focus if to q taken with printer does not work properly The USB connection mode is set to [PictBridge] Change the USB connection mode to [PC]. (p.174) The USB connection with focus mode set to s modes. You can use the Manual Focus mode...
... button halfway), then compose picture and press the shutter release button fully. The shooting mode is set to C The USB connection with computer does not work properly The USB connection Change the USB connection mode to mode is set Normal pictures will not discharge in the middle of focus if to q taken with printer does not work properly The USB connection mode is set to [PictBridge] Change the USB connection mode to [PC]. (p.174) The USB connection with focus mode set to s modes. You can use the Manual Focus mode...

Operation Manual
Page 209
... 162 Playback Mode 33 Playback Mode Palette ...... 60 Playing back movies ........ 125 Playing back sounds ....... 160 Power Saving 177 Power saving function ..... 177 Power switch 43, 45 Press fully (shutter release button) ..... 40 Press halfway (shutter release button) ..... 40 Printing 153 Protect Z 133 Q Quality Level 29, 91 R Recorded Pixels ... 29, 30, 89, 109 Recording movies 107 Recording sounds 158 Recovering images .......... 132 Red-eye Compensation ... 143 Red-eye reduction cd 87, 88 Resetting settings 180 Resize 135 Rotating 42 S Saturation 102 Saving as still picture...
... 162 Playback Mode 33 Playback Mode Palette ...... 60 Playing back movies ........ 125 Playing back sounds ....... 160 Power Saving 177 Power saving function ..... 177 Power switch 43, 45 Press fully (shutter release button) ..... 40 Press halfway (shutter release button) ..... 40 Printing 153 Protect Z 133 Q Quality Level 29, 91 R Recorded Pixels ... 29, 30, 89, 109 Recording movies 107 Recording sounds 158 Recovering images .......... 132 Red-eye Compensation ... 143 Red-eye reduction cd 87, 88 Resetting settings 180 Resize 135 Rotating 42 S Saturation 102 Saving as still picture...


