Operation Manual
Page 12
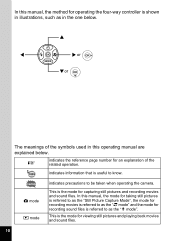
... to as the "O mode". indicates information that is the mode for viewing still pictures and playing back movies and sound files. 10 A mode Q mode indicates precautions to know. This is useful to be taken when operating the camera. This is the mode for capturing still pictures and recording movies and sound files.
... to as the "O mode". indicates information that is the mode for viewing still pictures and playing back movies and sound files. 10 A mode Q mode indicates precautions to know. This is useful to be taken when operating the camera. This is the mode for capturing still pictures and recording movies and sound files.
Operation Manual
Page 20
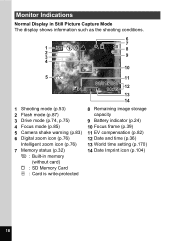
... Capture Mode The display shows information such as the shooting conditions. 6 7 1 38 8 2 3 9 4 10 5 11 +1.0 01/01/2007 14:25 12 13 14 1 Shooting mode (p.53) 2 Flash mode (p.87) 3 Drive mode (p.74, p.75) 4 Focus mode (p.85) 5 Camera shake warning (p.83) 6 Digital zoom icon (p.76) Intelligent zoom icon (p.76) 7 Memory status (p.32) + : Built-in memory...
... Capture Mode The display shows information such as the shooting conditions. 6 7 1 38 8 2 3 9 4 10 5 11 +1.0 01/01/2007 14:25 12 13 14 1 Shooting mode (p.53) 2 Flash mode (p.87) 3 Drive mode (p.74, p.75) 4 Focus mode (p.85) 5 Camera shake warning (p.83) 6 Digital zoom icon (p.76) Intelligent zoom icon (p.76) 7 Memory status (p.32) + : Built-in memory...
Operation Manual
Page 21
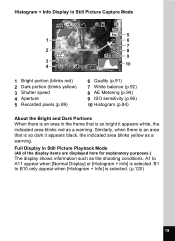
...blinks red as a warning. Histogram + Info Display in Still Picture Capture Mode 1 2 3 1/250 4 F3.3 + 1 . 0+ 1 . 0 38 8M 5 6 7 8 200 9 10 1 Bright portion (blinks red) 2 Dark portion (blinks yellow) 3 Shutter speed 4 Aperture 5 Recorded pixels (p.89) 6 Quality (p.91) 7 White balance (p.92) 8 AE Metering (p.94) ...9 ISO sensitivity (p.96) 10 Histogram (p.84) About the Bright and Dark Portions When there is an area in Still Picture Playback Mode (All of the display items are displayed...
...blinks red as a warning. Histogram + Info Display in Still Picture Capture Mode 1 2 3 1/250 4 F3.3 + 1 . 0+ 1 . 0 38 8M 5 6 7 8 200 9 10 1 Bright portion (blinks red) 2 Dark portion (blinks yellow) 3 Shutter speed 4 Aperture 5 Recorded pixels (p.89) 6 Quality (p.91) 7 White balance (p.92) 8 AE Metering (p.94) ...9 ISO sensitivity (p.96) 10 Histogram (p.84) About the Bright and Dark Portions When there is an area in Still Picture Playback Mode (All of the display items are displayed...

Operation Manual
Page 33
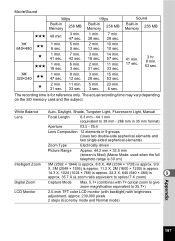
... for posting on a website or attaching to record the rest of the movie in Memory 256 MB 1 min. 7 min. 38 sec. 28 sec. 2 min. 10 min. 13 sec. 10 sec. 3 min. 14 min. 16 sec. 57 sec. 2 min. 11 min. 31 sec. 33 sec. 3 min. 15 min. 28 sec. 53 sec. 5 min.... 23 min. 3 sec. 6 sec. Sound Built-in Memory 256 MB 41 min. 17 sec. 3 hr. 8 min. 53 sec. • The above figures are based on PENTAX standard...
... for posting on a website or attaching to record the rest of the movie in Memory 256 MB 1 min. 7 min. 38 sec. 28 sec. 2 min. 10 min. 13 sec. 10 sec. 3 min. 14 min. 16 sec. 57 sec. 2 min. 11 min. 31 sec. 33 sec. 3 min. 15 min. 28 sec. 53 sec. 5 min.... 23 min. 3 sec. 6 sec. Sound Built-in Memory 256 MB 41 min. 17 sec. 3 hr. 8 min. 53 sec. • The above figures are based on PENTAX standard...

Operation Manual
Page 119
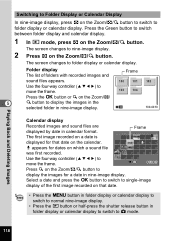
Similarly, if you choose image 1 Select & Delete 100-0010 and press the four-way controller (24), the previous page appears. When 10 or more images have camera shake corrected O (with image) : Still picture with sound C : Movie (first frame appears) O (without sound P : Still picture that can display nine thumbnails of nine thumbnail images 1 ...
Similarly, if you choose image 1 Select & Delete 100-0010 and press the four-way controller (24), the previous page appears. When 10 or more images have camera shake corrected O (with image) : Still picture with sound C : Movie (first frame appears) O (without sound P : Still picture that can display nine thumbnails of nine thumbnail images 1 ...
Operation Manual
Page 120
... 29 30 31 01/2007 Press y on a date is displayed for dates on which a sound file Frame SUN MON TUE WED THU FRI SAT 123456 7 8 9 10 11 12 13 14 15 16 17 18 19 20 was first recorded. 21 22 23 24 25 26 27 Use the four-way controller...
... 29 30 31 01/2007 Press y on a date is displayed for dates on which a sound file Frame SUN MON TUE WED THU FRI SAT 123456 7 8 9 10 11 12 13 14 15 16 17 18 19 20 was first recorded. 21 22 23 24 25 26 27 Use the four-way controller...
Operation Manual
Page 126
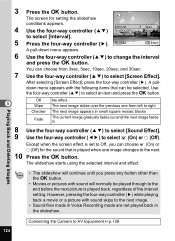
...-way controller (23) to select [Interval]. You can be played through to the end before the next picture is set to the next. 10 Press the 4 button. Use the four-way controller (23) to AV Equipment 1p.126 124 Off No effect 5 Wipe The next image... Back and Deleting Images • The slideshow will normally be selected. After selecting [Screen Effect], press the four-way controller (5). A pull- Connecting the Camera to select an item and press the 4 button. 3 Press the 4 button. The slideshow starts using the selected interval and effect. The screen for the...
...-way controller (23) to select [Interval]. You can be played through to the end before the next picture is set to the next. 10 Press the 4 button. Use the four-way controller (23) to AV Equipment 1p.126 124 Off No effect 5 Wipe The next image... Back and Deleting Images • The slideshow will normally be selected. After selecting [Screen Effect], press the four-way controller (5). A pull- Connecting the Camera to select an item and press the 4 button. 3 Press the 4 button. The slideshow starts using the selected interval and effect. The screen for the...
Operation Manual
Page 147
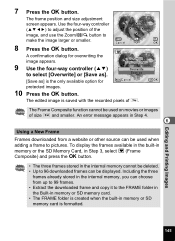
A confirmation dialog for MENU Cancel OK OK protected images. 10 Press the 4 button. To display the frames available in the built-in memory or the SD Memory Card, in Step 3, select Y (Frame Composite) and press ...
A confirmation dialog for MENU Cancel OK OK protected images. 10 Press the 4 button. To display the frames available in the built-in memory or the SD Memory Card, in Step 3, select Y (Frame Composite) and press ...
Operation Manual
Page 150
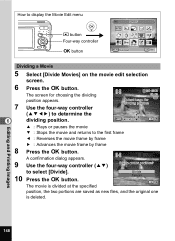
... Cancel OK OK position, the two portions are saved as new files, and the original one is divided at this position? How to select [Divide]. 10 Press the 4 button. The screen for dividing position 168 dividing position. to display the Movie Edit menu Q button Four-way controller 4 button DPOF MENU Cancel...
... Cancel OK OK position, the two portions are saved as new files, and the original one is divided at this position? How to select [Divide]. 10 Press the 4 button. The screen for dividing position 168 dividing position. to display the Movie Edit menu Q button Four-way controller 4 button DPOF MENU Cancel...
Operation Manual
Page 151
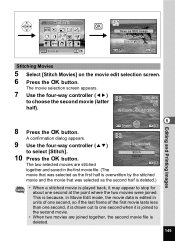
to choose the second movie (latter 100-0042 00:20 half). The movie selection screen appears. 7 Use the four-way controller (45) to select [Stitch]. 10 Press the 4 button. The two selected movies are joined together, the second movie file is deleted. 149 Movie Edit OK Save as the second half ...
to choose the second movie (latter 100-0042 00:20 half). The movie selection screen appears. 7 Use the four-way controller (45) to select [Stitch]. 10 Press the 4 button. The two selected movies are joined together, the second movie file is deleted. 149 Movie Edit OK Save as the second half ...

Operation Manual
Page 157
...paper type and press the 4 button. A confirmation dialog appears after each print setting, images are reset to the defaults when the camera is supported by your printer. 10 Press the 4 button. Press the 3 button to select [Paper Type] and press the four-way controller (5). Paper Size Setting Card...to the print settings screen. 11 Use the four-way controller (23) to cancel printing. • The power indicator lights while the camera is communicating with more E indicates higher print quality. The Paper Type setting is being accessed and during printing. The screen returns to the...
...paper type and press the 4 button. A confirmation dialog appears after each print setting, images are reset to the defaults when the camera is supported by your printer. 10 Press the 4 button. Press the 3 button to select [Paper Type] and press the four-way controller (5). Paper Size Setting Card...to the print settings screen. 11 Use the four-way controller (23) to cancel printing. • The power indicator lights while the camera is communicating with more E indicates higher print quality. The Paper Type setting is being accessed and during printing. The screen returns to the...
Operation Manual
Page 159
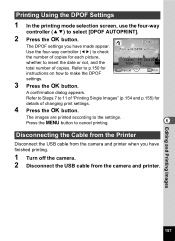
... of "Printing Single Images" (p.154 and p.155) for instructions on how to insert the date or not, and the Copies 01 Date Total 10 total number of changing print settings. 4 Press the 4 button. Press the 3 button to p.150 for details of copies. Refer to cancel ...printing. 6 Disconnecting the Cable from the Printer Disconnect the USB cable from the camera and printer when you have finished printing. 1 Turn off the camera. 2 Disconnect the USB cable from the camera and printer. Editing and Printing Images 157 A confirmation dialog appears. The images are ...
... of "Printing Single Images" (p.154 and p.155) for instructions on how to insert the date or not, and the Copies 01 Date Total 10 total number of changing print settings. 4 Press the 4 button. Press the 3 button to p.150 for details of copies. Refer to cancel ...printing. 6 Disconnecting the Cable from the Printer Disconnect the USB cable from the camera and printer when you have finished printing. 1 Turn off the camera. 2 Disconnect the USB cable from the camera and printer. Editing and Printing Images 157 A confirmation dialog appears. The images are ...
Operation Manual
Page 167
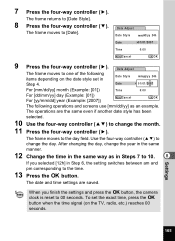
Date Adjust The frame moves to one of the following operations and screens use [mm/dd/yy] as in Steps 7 to 10. 8 If you finish the settings and press the 4 button, the camera clock is reset to 00 seconds. The date and time settings are the same even if another date style has... been selected. 10 Use the four-way controller (23) to change the month. 11 Press the four-way controller (5). Date Adjust The...
Date Adjust The frame moves to one of the following operations and screens use [mm/dd/yy] as in Steps 7 to 10. 8 If you finish the settings and press the 4 button, the camera clock is reset to 00 seconds. The date and time settings are the same even if another date style has... been selected. 10 Use the four-way controller (23) to change the month. 11 Press the four-way controller (5). Date Adjust The...
Operation Manual
Page 169
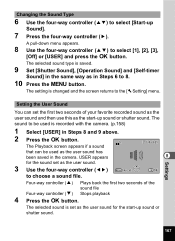
... screen returns to choose a sound file. Setting the User Sound You can be used as the user sound has been saved in Steps 6 to 8. 10 Press the 3 button. The setting is set as the user sound for the sound set as the user sound. 3 Use the four-way controller (... the first two seconds of your favorite recorded sound as the user sound and then use this as in the camera. Settings 167 The selected sound type is recorded with the camera. (p.158) 1 Select [USER] in Steps 8 and 9 above. 2 Press the 4 button. The sound to select [1], [2], [3], [Off] or [USER] and press...
... screen returns to choose a sound file. Setting the User Sound You can be used as the user sound has been saved in Steps 6 to 8. 10 Press the 3 button. The setting is set as the user sound for the sound set as the user sound. 3 Use the four-way controller (... the first two seconds of your favorite recorded sound as the user sound and then use this as in the camera. Settings 167 The selected sound type is recorded with the camera. (p.158) 1 Select [USER] in Steps 8 and 9 above. 2 Press the 4 button. The sound to select [1], [2], [3], [Off] or [USER] and press...
Operation Manual
Page 184
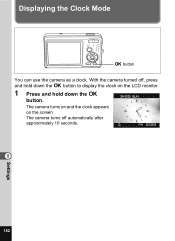
Displaying the Clock Mode 4 button You can use the camera as a clock. The camera turns off , press and hold down the 4 button to display the clock on the screen. The camera turns on and the clock appears on the LCD monitor. 1 Press and hold down the 4 button. With the camera turned off automatically after approximately 10 seconds. 8 182 Settings
Displaying the Clock Mode 4 button You can use the camera as a clock. The camera turns off , press and hold down the 4 button to display the clock on the screen. The camera turns on and the clock appears on the LCD monitor. 1 Press and hold down the 4 button. With the camera turned off automatically after approximately 10 seconds. 8 182 Settings
Operation Manual
Page 190
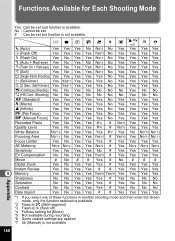
...*9 Yes Yes Yes White Balance No*13 No Yes Yes Yes #*7 Yes No No*13 No*13 Focusing Area No*11 No Yes Yes Yes*10 # Yes*10 Yes No*11 No*11 Focus Limiter Yes No Yes Yes Yes # Yes Yes Yes Yes AE Metering No*2 No*2 Yes Yes No*2 # Yes...*2 Sensitivity Yes No Yes Yes No # Yes Yes Yes Yes EV Compensation No No Yes Yes Yes*5 # Yes Yes Yes Yes Movie # No # # Yes # No # ## Digital Zoom Yes No Yes Yes Yes # Yes Yes Yes Yes Instant Review 9 Memory Yes No Yes Yes # # Yes Yes Yes Yes Yes No Yes Yes...
...*9 Yes Yes Yes White Balance No*13 No Yes Yes Yes #*7 Yes No No*13 No*13 Focusing Area No*11 No Yes Yes Yes*10 # Yes*10 Yes No*11 No*11 Focus Limiter Yes No Yes Yes Yes # Yes Yes Yes Yes AE Metering No*2 No*2 Yes Yes No*2 # Yes...*2 Sensitivity Yes No Yes Yes No # Yes Yes Yes Yes EV Compensation No No Yes Yes Yes*5 # Yes Yes Yes Yes Movie # No # # Yes # No # ## Digital Zoom Yes No Yes Yes Yes # Yes Yes Yes Yes Instant Review 9 Memory Yes No Yes Yes # # Yes Yes Yes Yes Yes No Yes Yes...
Operation Manual
Page 191
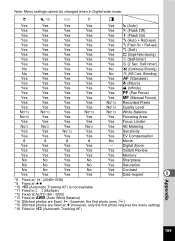
Digital Zoom Yes Yes Yes Yes Yes Instant Review Yes Yes Yes Yes Yes Memory No No Yes No Yes Sharpness No No Yes No Yes Saturation No No Yes No Yes Contrast Yes Yes Yes Yes Yes Date Imprint 9 *8 Fixed at h (2048×1536) *9 Fixed at D *10 W (Automatic ...(however, only the first photo requires the menu setting) *16 Fixed to W (Automatic Tracking AF) Appendix 189 Note: Menu settings cannot be changed when in Digital wide mode. Self-timer) No Yes Yes Yes No 1 (Continuous Shooting) No Yes Yes Yes No c (HS Cont. Shooting) Yes Yes Yes Yes Yes...
Digital Zoom Yes Yes Yes Yes Yes Instant Review Yes Yes Yes Yes Yes Memory No No Yes No Yes Sharpness No No Yes No Yes Saturation No No Yes No Yes Contrast Yes Yes Yes Yes Yes Date Imprint 9 *8 Fixed at h (2048×1536) *9 Fixed at D *10 W (Automatic ...(however, only the first photo requires the menu setting) *16 Fixed to W (Automatic Tracking AF) Appendix 189 Note: Menu settings cannot be changed when in Digital wide mode. Self-timer) No Yes Yes Yes No 1 (Continuous Shooting) No Yes Yes Yes No c (HS Cont. Shooting) Yes Yes Yes Yes Yes...
Operation Manual
Page 199
White Balance Lens Intelligent Zoom Digital Zoom LCD Monitor Auto, Daylight, Shade, Tungsten Light, Fluorescent Light, Manual Focal Length 6.3 mm - 44.1 mm (equivalent to 35.7×) 2.5-inch TFT color LCD monitor (... 41 min. 17 sec. 3 hr. 8 min. 53 sec. f/5.4 Lens Composition 12 elements in Memory 256 MB 1 min. 7 min. 38 sec. 28 sec. 2 min. 10 min. 13 sec. 10 sec. 3 min. 14 min. 16 sec. 57 sec. 2 min. 11 min. 31 sec. 33 sec. 3 min. 15 min. 28 sec. 53 sec. 5 min. 23...
White Balance Lens Intelligent Zoom Digital Zoom LCD Monitor Auto, Daylight, Shade, Tungsten Light, Fluorescent Light, Manual Focal Length 6.3 mm - 44.1 mm (equivalent to 35.7×) 2.5-inch TFT color LCD monitor (... 41 min. 17 sec. 3 hr. 8 min. 53 sec. f/5.4 Lens Composition 12 elements in Memory 256 MB 1 min. 7 min. 38 sec. 28 sec. 2 min. 10 min. 13 sec. 10 sec. 3 min. 14 min. 16 sec. 57 sec. 2 min. 11 min. 31 sec. 33 sec. 3 min. 15 min. 28 sec. 53 sec. 5 min. 23...
Operation Manual
Page 200
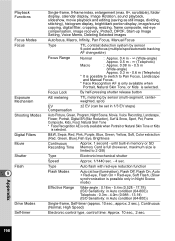
..., Soft, Color extraction (Red, Green, Blue),Fish Eye, Brightness Continuous Recording Time Approx. 1 second - Playback Functions Focus Modes Focus Exposure Mechanism Shooting Modes Digital Filters Movie Shutter Flash 9 Drive Modes Self-timer Single-frame, 9-frame index, enlargement (max. 8×, scrollable), folder display, calendar display, Image Rotation, ..., centerweighted, spot) EV Compensation ±2 EV (can be set in Auto condition (64-800)) Single-frame, Self-timer (approx. 10 sec., approx. 2 sec.), Continuous (Normal, High Speed) Electronic control type, control time: Approx...
..., Soft, Color extraction (Red, Green, Blue),Fish Eye, Brightness Continuous Recording Time Approx. 1 second - Playback Functions Focus Modes Focus Exposure Mechanism Shooting Modes Digital Filters Movie Shutter Flash 9 Drive Modes Self-timer Single-frame, 9-frame index, enlargement (max. 8×, scrollable), folder display, calendar display, Image Rotation, ..., centerweighted, spot) EV Compensation ±2 EV (can be set in Auto condition (64-800)) Single-frame, Self-timer (approx. 10 sec., approx. 2 sec.), Continuous (Normal, High Speed) Electronic control type, control time: Approx...

Operation Manual
Page 201
... PictBridge-compatible printer Print Modes Print One, Print All, DPOF AUTOPRINT Paper Size Card, L, 2L, Postcard, 100 mm×150 mm, 4"×6", 8"×10", Letter, 11"×17", A4, A3, printer setting Paper Type C, D, E, printer setting Quality C, D, E, printer setting Border Status With/without, printer...90 min. Time Function World Time Clock Mode 75 cities (28 time zones) Clock display by holding down 4/W button while camera is turned off (approx. 10 sec.) Alarm Alarm with simultaneous display of the Clock mode at the slimmest point) Weight 125 g (excluding battery and ...
... PictBridge-compatible printer Print Modes Print One, Print All, DPOF AUTOPRINT Paper Size Card, L, 2L, Postcard, 100 mm×150 mm, 4"×6", 8"×10", Letter, 11"×17", A4, A3, printer setting Paper Type C, D, E, printer setting Quality C, D, E, printer setting Border Status With/without, printer...90 min. Time Function World Time Clock Mode 75 cities (28 time zones) Clock display by holding down 4/W button while camera is turned off (approx. 10 sec.) Alarm Alarm with simultaneous display of the Clock mode at the slimmest point) Weight 125 g (excluding battery and ...