
Operation Manual
Page 15
... is the mode for viewing still pictures and playing back movies and sound files. 13 In this Operating Manual are explained below. 1 indicates the reference page number for recording movies is referred to be taken when operating the camera. A mode Q mode indicates precautions to as the "still picture capture mode" and...
... is the mode for viewing still pictures and playing back movies and sound files. 13 In this Operating Manual are explained below. 1 indicates the reference page number for recording movies is referred to be taken when operating the camera. A mode Q mode indicates precautions to as the "still picture capture mode" and...

Operation Manual
Page 46
Refer to the pages below to set the current date and time. Perform the operations in "Setting the Display Language" below for 1 the first time. The language, date, and ...
Refer to the pages below to set the current date and time. Perform the operations in "Setting the Display Language" below for 1 the first time. The language, date, and ...

Operation Manual
Page 48
... in "Changing the Date and Time" (1p.192). 46 Mode] menu appears. 3 Press the four-way controller (5). 4 Use the four-way controller (32) to the pages below for instructions. • To change [Hometown], follow the steps in "Setting the World Time" (1p.195). • To change the [Date] and [Time], follow...
... in "Changing the Date and Time" (1p.192). 46 Mode] menu appears. 3 Press the four-way controller (5). 4 Use the four-way controller (32) to the pages below for instructions. • To change [Hometown], follow the steps in "Setting the World Time" (1p.195). • To change the [Date] and [Time], follow...

Operation Manual
Page 52
Getting Started [Language/ ], [Date], [Time], [Hometown], and [DST] can be changed. Refer to the pages below for instructions. • To change the language, follow the steps in "Changing the Display Language" (1p.198). 1 • To change the date and time, follow the steps in "Changing the Date and Time" (1p.192). • To change the city or DST setting, follow the steps in "Setting the World Time" (1p.195). 50
Getting Started [Language/ ], [Date], [Time], [Hometown], and [DST] can be changed. Refer to the pages below for instructions. • To change the language, follow the steps in "Changing the Display Language" (1p.198). 1 • To change the date and time, follow the steps in "Changing the Date and Time" (1p.192). • To change the city or DST setting, follow the steps in "Setting the World Time" (1p.195). 50
Operation Manual
Page 63
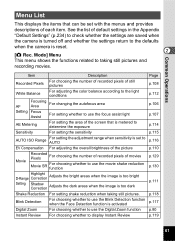
...shows the functions related to taking still pictures. Item Description Recorded Pixels For choosing the number of recorded pixels of still pictures White Balance For adjusting the color balance according to the light conditions AF Focusing Area For changing the autofocus area Setting Focus Assist For ..."Default Settings" (p.234) to check whether the settings are saved when the camera is turned off and whether the settings return to display Instant Review Page p.108 p.112 p.106 p.107 p.114 p.115 p.116 p.110 p.129 p.130 p.111 p.118 p.117 p.80 p.119 61 Common Operations Menu ...
...shows the functions related to taking still pictures. Item Description Recorded Pixels For choosing the number of recorded pixels of still pictures White Balance For adjusting the color balance according to the light conditions AF Focusing Area For changing the autofocus area Setting Focus Assist For ..."Default Settings" (p.234) to check whether the settings are saved when the camera is turned off and whether the settings return to display Instant Review Page p.108 p.112 p.106 p.107 p.114 p.115 p.116 p.110 p.129 p.130 p.111 p.118 p.117 p.80 p.119 61 Common Operations Menu ...

Operation Manual
Page 65
... Text Size Language/ Folder Name USB Connection Video Out Eye-Fi Brightness Level Power Saving Auto Power Off Reset Delete All Pixel Mapping Format Description Page For adjusting the operation volume and playback volume, and setting the start-up sound, shutter sound, p.191 key operation sound and self-timer sound For...
... Text Size Language/ Folder Name USB Connection Video Out Eye-Fi Brightness Level Power Saving Auto Power Off Reset Delete All Pixel Mapping Format Description Page For adjusting the operation volume and playback volume, and setting the start-up sound, shutter sound, p.191 key operation sound and self-timer sound For...
Operation Manual
Page 72
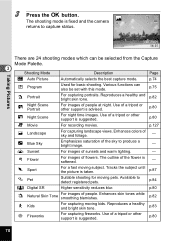
... to detect registered pets. Use of the flower is suggested . The outline of a tripod or other support is taken. p.82 R Kids For capturing moving pets. Page p.74 R Program Used for moving kids. Reproduces a healthy and bright skin tone. Use of people. For recording movies. Available to produce a bright image. - p.84 p.80...
... to detect registered pets. Use of the flower is suggested . The outline of a tripod or other support is taken. p.82 R Kids For capturing moving pets. Page p.74 R Program Used for moving kids. Reproduces a healthy and bright skin tone. Use of people. For recording movies. Available to produce a bright image. - p.84 p.80...

Operation Manual
Page 73
... two pictures together to read manner. are also available. • In shooting modes other than R, A, C, c, N, X and F, saturation, contrast, sharpness, white balance, etc. For details, refer to "Functions Available for bright scenes. Page p.90 B Party For capturing images at parties or in candlelight. p.89 Q Surf & Snow X Digital Wide For bright images such as...
... two pictures together to read manner. are also available. • In shooting modes other than R, A, C, c, N, X and F, saturation, contrast, sharpness, white balance, etc. For details, refer to "Functions Available for bright scenes. Page p.90 B Party For capturing images at parties or in candlelight. p.89 Q Surf & Snow X Digital Wide For bright images such as...
Operation Manual
Page 133
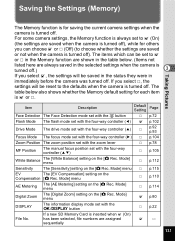
Taking Pictures Item Description Face Detection The Face Detection mode set with the I button Default Setting Page P p.72 Flash Mode The flash mode set with the four-way controller (4) O p.102 Drive Mode The drive mode set with the four-way controller (2) P p.92 p.... Zoom Position The zoom position set with the zoom lever P p.78 MF Position The manual focus position set with the four-way controller (23) White Balance The [White Balance] setting on the [A Rec. Mode] menu The [Digital Zoom] setting on the [A Rec. The table below . (Items not listed here are always saved...
Taking Pictures Item Description Face Detection The Face Detection mode set with the I button Default Setting Page P p.72 Flash Mode The flash mode set with the four-way controller (4) O p.102 Drive Mode The drive mode set with the four-way controller (2) P p.92 p.... Zoom Position The zoom position set with the zoom lever P p.78 MF Position The manual focus position set with the four-way controller (23) White Balance The [White Balance] setting on the [A Rec. Mode] menu The [Digital Zoom] setting on the [A Rec. The table below . (Items not listed here are always saved...

Operation Manual
Page 138
... of four or nine thumbnail images appears. Use the four-way controller (2345) to display on one page, pressing the four-way controller (24) while the image 1 is selected will display the previous page. If there are too many images to move the frame. Similarly, if you choose image 2 and press the... four-way controller (35), the next page appears. 1 2 Select & Delete 100-0010 Four-Image Display Frame 1 2 Select & Delete 100-0010 Nine-Image Display 136 Turn the zoom lever to nine-image display. ...
... of four or nine thumbnail images appears. Use the four-way controller (2345) to display on one page, pressing the four-way controller (24) while the image 1 is selected will display the previous page. If there are too many images to move the frame. Similarly, if you choose image 2 and press the... four-way controller (35), the next page appears. 1 2 Select & Delete 100-0010 Four-Image Display Frame 1 2 Select & Delete 100-0010 Nine-Image Display 136 Turn the zoom lever to nine-image display. ...
Operation Manual
Page 142
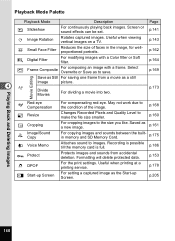
... the image. Divide Movies For dividing a movie into two. Formatting will delete protected data. Playing Back and Deleting Images Playback Mode Palette Playback Mode Description Page u Slideshow For continuously playing back images. p.162 P Digital Filter For modifying images with a frame. p.164 N Frame Composite For composing an image with a Color filter or...
... the image. Divide Movies For dividing a movie into two. Formatting will delete protected data. Playing Back and Deleting Images Playback Mode Palette Playback Mode Description Page u Slideshow For continuously playing back images. p.162 P Digital Filter For modifying images with a frame. p.164 N Frame Composite For composing an image with a Color filter or...
Operation Manual
Page 220
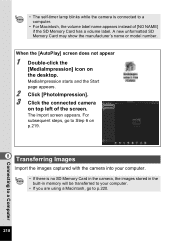
... the images captured with the camera into your computer. • If there is connected to a Computer The import screen appears. MediaImpression starts and the Start page appears. 2 Click [PhotoImpression]. 3 Click the connected camera on top left of [NO NAME] if the SD Memory Card has a volume label. For subsequent steps, go...
... the images captured with the camera into your computer. • If there is connected to a Computer The import screen appears. MediaImpression starts and the Start page appears. 2 Click [PhotoImpression]. 3 Click the connected camera on top left of [NO NAME] if the SD Memory Card has a volume label. For subsequent steps, go...

Operation Manual
Page 222
For subsequent steps, refer to a Computer The import screen appears. If the images from ]. 8 220 Connecting to Step 6 and 7 on p.219. MediaImpression 2.1 for PENTAX] icon in [Get Media from the camera are not displayed in the import screen, select [NO NAME] (or the volume label name) in the [Applications] folder. Macintosh 5 Double-click the [MediaImpression 2.1 for PENTAX starts and the Start page appears. 6 Click [Import].
For subsequent steps, refer to a Computer The import screen appears. If the images from ]. 8 220 Connecting to Step 6 and 7 on p.219. MediaImpression 2.1 for PENTAX] icon in [Get Media from the camera are not displayed in the import screen, select [NO NAME] (or the volume label name) in the [Applications] folder. Macintosh 5 Double-click the [MediaImpression 2.1 for PENTAX starts and the Start page appears. 6 Click [Import].

Operation Manual
Page 224
... Media Browser screen appears. 3 8 Select and click the folder containing the images you view, edit, manage, search for a Windows PC. MediaImpression starts and the Start page appears. 2 Click [PhotoImpression].
... Media Browser screen appears. 3 8 Select and click the folder containing the images you view, edit, manage, search for a Windows PC. MediaImpression starts and the Start page appears. 2 Click [PhotoImpression].

Operation Manual
Page 225
The explanation is displayed. 8 223 Connecting to use "MediaImpression" by using the help screen appears in [Help] on how to a Computer Details on How to Use "MediaImpression" You can find more information on the menu bar (for Windows) or [MediaImpression Help] in the web browser. 2 Click the desired topic. The help pages. 1 Select [Help] in [Menu] at the top right of the screen (for Macintosh).
The explanation is displayed. 8 223 Connecting to use "MediaImpression" by using the help screen appears in [Help] on how to a Computer Details on How to Use "MediaImpression" You can find more information on the menu bar (for Windows) or [MediaImpression Help] in the web browser. 2 Click the desired topic. The help pages. 1 Select [Help] in [Menu] at the top right of the screen (for Macintosh).

Operation Manual
Page 231
...(Infinity) z z × z z z \ (Manual Focus) z ×*9 z ×*10 ×*11 × Recorded Pixels p.108 ×*12 z ×*12 z z z White Balance p.112 z z z ×*13 z*14 z z Focusing Area z ×*24 z z z Focus Assist AF Setting p.106 p.107 ×*15 z ×*15 z z z AE.... Appendix 229 Shooting menu items not listed in this chart can be set in any shooting mode except for Green Mode. a f K Shooting Mode b\eB c S N X F Page K U c Q Function z*27 z*2 z z*27 × z*27 Zoom operation Zoom lever p.78 z z*3 z z z z z Face Detection On Smile Capture z z z...
...(Infinity) z z × z z z \ (Manual Focus) z ×*9 z ×*10 ×*11 × Recorded Pixels p.108 ×*12 z ×*12 z z z White Balance p.112 z z z ×*13 z*14 z z Focusing Area z ×*24 z z z Focus Assist AF Setting p.106 p.107 ×*15 z ×*15 z z z AE.... Appendix 229 Shooting menu items not listed in this chart can be set in any shooting mode except for Green Mode. a f K Shooting Mode b\eB c S N X F Page K U c Q Function z*27 z*2 z z*27 × z*27 Zoom operation Zoom lever p.78 z z*3 z z z z z Face Detection On Smile Capture z z z...
Operation Manual
Page 236
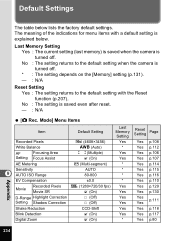
... the indications for menu items with the Reset function (p.207). Mode] Menu Items Item Default Setting Last Memory Setting Reset Setting Page Recorded Pixels m (4608×3456) Yes Yes p.108 White Balance F (Auto) * Yes p.112 AF Focusing Area Setting Focus Assist J (Multiple) O (On) Yes Yes p.106 Yes Yes p.107 AE Metering L (Multi...
... the indications for menu items with the Reset function (p.207). Mode] Menu Items Item Default Setting Last Memory Setting Reset Setting Page Recorded Pixels m (4608×3456) Yes Yes p.108 White Balance F (Auto) * Yes p.112 AF Focusing Area Setting Focus Assist J (Multiple) O (On) Yes Yes p.106 Yes Yes p.107 AE Metering L (Multi...
Operation Manual
Page 237
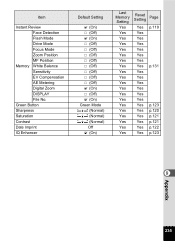
...) Last Memory Setting Yes Yes Yes Yes Yes Yes Yes Yes Yes Yes Yes Yes Yes Yes Yes Yes Yes Yes Yes Yes Reset Setting Page Yes p.119 Yes Yes Yes Yes Yes Yes Yes p.131 Yes Yes Yes Yes Yes Yes Yes p.123 Yes p.120 Yes p.121 Yes p.121 Yes... p.122 Yes p.123 9 Appendix 235 Item Instant Review Face Detection Flash Mode Drive Mode Focus Mode Zoom Position MF Position Memory White Balance Sensitivity EV Compensation AE Metering Digital Zoom DISPLAY File No.
...) Last Memory Setting Yes Yes Yes Yes Yes Yes Yes Yes Yes Yes Yes Yes Yes Yes Yes Yes Yes Yes Yes Yes Reset Setting Page Yes p.119 Yes Yes Yes Yes Yes Yes Yes p.131 Yes Yes Yes Yes Yes Yes Yes p.123 Yes p.120 Yes p.121 Yes p.121 Yes... p.122 Yes p.123 9 Appendix 235 Item Instant Review Face Detection Flash Mode Drive Mode Focus Mode Zoom Position MF Position Memory White Balance Sensitivity EV Compensation AE Metering Digital Zoom DISPLAY File No.

Operation Manual
Page 238
... - - p.190 Appendix 236 p.152 Pixel Mapping Cancel - - Yes Yes p.203 Auto Power Off 3 min. [W Setting] Menu Items Item Default Setting Last Memory Setting Reset Setting Page Operation Volume 3 Yes Yes Playback Volume 3 Yes Yes Sound Start-up Sound Shutter Sound 1 Yes Yes p.191 1 Yes Yes Operation Sound 1 Yes Yes Self-timer...
... - - p.190 Appendix 236 p.152 Pixel Mapping Cancel - - Yes Yes p.203 Auto Power Off 3 min. [W Setting] Menu Items Item Default Setting Last Memory Setting Reset Setting Page Operation Volume 3 Yes Yes Playback Volume 3 Yes Yes Sound Start-up Sound Shutter Sound 1 Yes Yes p.191 1 Yes Yes Operation Sound 1 Yes Yes Self-timer...
Operation Manual
Page 239
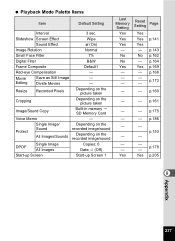
Yes Reset Setting Page Yes Yes p.141 Yes - p.168 - p.175 - p.178 - Resize Recorded Pixels Depending on the picture taken Cropping Depending on the recorded image/sound DPOF Single Image ...
Yes Reset Setting Page Yes Yes p.141 Yes - p.168 - p.175 - p.178 - Resize Recorded Pixels Depending on the picture taken Cropping Depending on the recorded image/sound DPOF Single Image ...