
Operation Manual
Page 15
... referred to as the "still picture capture mode" and the mode for recording movies is referred to as in the ones below . 1 indicates the reference page number for an explanation of the symbols used in illustrations, such as the "C mode".
... referred to as the "still picture capture mode" and the mode for recording movies is referred to as in the ones below . 1 indicates the reference page number for an explanation of the symbols used in illustrations, such as the "C mode".

Operation Manual
Page 46
... in "Setting the Date and Time" (p.48) to choose the desired display language. The language, date, and time can be changed later. Refer to the pages below to set the current date and time.
... in "Setting the Date and Time" (p.48) to choose the desired display language. The language, date, and time can be changed later. Refer to the pages below to set the current date and time.

Operation Manual
Page 48
... the selected language. The language is set the desired language. The [A Rec. The setting screen is canceled and the camera is now switched to the pages below for instructions. • To change [Hometown], follow the steps in "Setting the World Time" (1p.195). • To change the [Date] and [Time], follow...
... the selected language. The language is set the desired language. The [A Rec. The setting screen is canceled and the camera is now switched to the pages below for instructions. • To change [Hometown], follow the steps in "Setting the World Time" (1p.195). • To change the [Date] and [Time], follow...

Operation Manual
Page 52
Refer to the pages below for instructions. • To change the language, follow the steps in "Changing the Display Language" (1p.198). 1 • To change the date and time, follow the steps in "Changing the Date and Time" (1p.192). • To change the city or DST setting, follow the steps in "Setting the World Time" (1p.195). 50 Getting Started [Language/ ], [Date], [Time], [Hometown], and [DST] can be changed.
Refer to the pages below for instructions. • To change the language, follow the steps in "Changing the Display Language" (1p.198). 1 • To change the date and time, follow the steps in "Changing the Date and Time" (1p.192). • To change the city or DST setting, follow the steps in "Setting the World Time" (1p.195). 50 Getting Started [Language/ ], [Date], [Time], [Hometown], and [DST] can be changed.
Operation Manual
Page 63
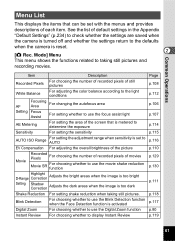
...setting shake reduction when taking still pictures and recording movies. Item Description Recorded Pixels For choosing the number of recorded pixels of still pictures White Balance For adjusting the color balance according to the light conditions AF Focusing Area For changing the autofocus area Setting Focus Assist For setting whether...turned off and whether the settings return to the defaults when the camera is activated Digital Zoom For choosing whether to display Instant Review Page p.108 p.112 p.106 p.107 p.114 p.115 p.116 p.110 p.129 p.130 p.111 p.118 p.117 p.80 p.119 61
...setting shake reduction when taking still pictures and recording movies. Item Description Recorded Pixels For choosing the number of recorded pixels of still pictures White Balance For adjusting the color balance according to the light conditions AF Focusing Area For changing the autofocus area Setting Focus Assist For setting whether...turned off and whether the settings return to the defaults when the camera is activated Digital Zoom For choosing whether to display Instant Review Page p.108 p.112 p.106 p.107 p.114 p.115 p.116 p.110 p.129 p.130 p.111 p.118 p.117 p.80 p.119 61

Operation Manual
Page 65
... Text Size Language/ Folder Name USB Connection Video Out Eye-Fi Brightness Level Power Saving Auto Power Off Reset Delete All Pixel Mapping Format Description Page For adjusting the operation volume and playback volume, and setting the start-up sound, shutter sound, p.191 key operation sound and self-timer sound For...
... Text Size Language/ Folder Name USB Connection Video Out Eye-Fi Brightness Level Power Saving Auto Power Off Reset Delete All Pixel Mapping Format Description Page For adjusting the operation volume and playback volume, and setting the start-up sound, shutter sound, p.191 key operation sound and self-timer sound For...
Operation Manual
Page 72
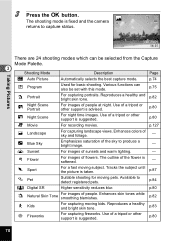
.... Use of sky and foliage. - p.80 A Night Scene C Movie For night time images. The outline of flowers. b Flower For images of the flower is taken. Page p.74 R Program Used for moving kids.
.... Use of sky and foliage. - p.80 A Night Scene C Movie For night time images. The outline of flowers. b Flower For images of the flower is taken. Page p.74 R Program Used for moving kids.

Operation Manual
Page 73
...Each Shooting Mode" (p.228). are also available. • In shooting modes other than R, A, C, c, N, X and F, saturation, contrast, sharpness, white balance, etc. Taking Pictures 71 U Candlelight For capturing scenes in an easy to the optimal settings for bright scenes. p.80 c Text Captures text in... candlelight. Page p.90 B Party For capturing images at parties or in dim light. Enhances saturation and contrast. - p.88 K Food For images ...
...Each Shooting Mode" (p.228). are also available. • In shooting modes other than R, A, C, c, N, X and F, saturation, contrast, sharpness, white balance, etc. Taking Pictures 71 U Candlelight For capturing scenes in an easy to the optimal settings for bright scenes. p.80 c Text Captures text in... candlelight. Page p.90 B Party For capturing images at parties or in dim light. Enhances saturation and contrast. - p.88 K Food For images ...
Operation Manual
Page 133
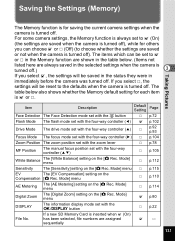
...table below . (Items not listed here are assigned O- Taking Pictures Item Description Face Detection The Face Detection mode set with the I button Default Setting Page P p.72 Flash Mode The flash mode set with the four-way controller (4) O p.102 Drive Mode The drive mode set with the four-way ...Position The zoom position set with the zoom lever P p.78 MF Position The manual focus position set with the four-way controller (23) White Balance The [White Balance] setting on the [A Rec. The items which can choose O or P (Off) (to the defaults when the camera is turned off ...
...table below . (Items not listed here are assigned O- Taking Pictures Item Description Face Detection The Face Detection mode set with the I button Default Setting Page P p.72 Flash Mode The flash mode set with the four-way controller (4) O p.102 Drive Mode The drive mode set with the four-way ...Position The zoom position set with the zoom lever P p.78 MF Position The manual focus position set with the four-way controller (23) White Balance The [White Balance] setting on the [A Rec. The items which can choose O or P (Off) (to the defaults when the camera is turned off ...

Operation Manual
Page 138
...Display/Nine-Image Display 4 You can display four or nine thumbnails of four thumbnail images. The four-image display appears showing a page consisting of captured images at a time page by page. The displayed images change four or nine images at a time. 1 In Q mode, turn the zoom lever to the left...display. If there are too many images to move the frame. Similarly, if you choose image 2 and press the four-way controller (35), the next page appears. 1 2 Select & Delete 100-0010 Four-Image Display Frame 1 2 Select & Delete 100-0010 Nine-Image Display 136 Use the four-way ...
...Display/Nine-Image Display 4 You can display four or nine thumbnails of four thumbnail images. The four-image display appears showing a page consisting of captured images at a time page by page. The displayed images change four or nine images at a time. 1 In Q mode, turn the zoom lever to the left...display. If there are too many images to move the frame. Similarly, if you choose image 2 and press the four-way controller (35), the next page appears. 1 2 Select & Delete 100-0010 Four-Image Display Frame 1 2 Select & Delete 100-0010 Nine-Image Display 136 Use the four-way ...
Operation Manual
Page 142
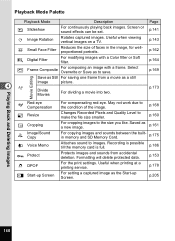
... copying images and sounds between the builtin memory and SD Memory Card. p.205 140 Playing Back and Deleting Images Playback Mode Palette Playback Mode Description Page u Slideshow For continuously playing back images. p.141 s Image Rotation Rotates captured images. Select Overwrite or Save as a new image. Useful when printing at a printing service...
... copying images and sounds between the builtin memory and SD Memory Card. p.205 140 Playing Back and Deleting Images Playback Mode Palette Playback Mode Description Page u Slideshow For continuously playing back images. p.141 s Image Rotation Rotates captured images. Select Overwrite or Save as a new image. Useful when printing at a printing service...
Operation Manual
Page 220
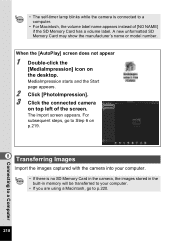
A new unformatted SD Memory Card may show the manufacturer's name or model number. MediaImpression starts and the Start page appears. 2 Click [PhotoImpression]. 3 Click the connected camera on the desktop. The import screen appears. For subsequent steps, go to Step 6 on p.219. 8 Transferring Images Import ...
A new unformatted SD Memory Card may show the manufacturer's name or model number. MediaImpression starts and the Start page appears. 2 Click [PhotoImpression]. 3 Click the connected camera on the desktop. The import screen appears. For subsequent steps, go to Step 6 on p.219. 8 Transferring Images Import ...

Operation Manual
Page 222
Macintosh 5 Double-click the [MediaImpression 2.1 for PENTAX starts and the Start page appears. 6 Click [Import]. For subsequent steps, refer to a Computer If the images from the camera are not displayed in the import screen, select [NO NAME] (or the volume label name) in the [Applications] folder. The import screen appears. MediaImpression 2.1 for PENTAX] icon in [Get Media from]. 8 220 Connecting to Step 6 and 7 on p.219.
Macintosh 5 Double-click the [MediaImpression 2.1 for PENTAX starts and the Start page appears. 6 Click [Import]. For subsequent steps, refer to a Computer If the images from the camera are not displayed in the import screen, select [NO NAME] (or the volume label name) in the [Applications] folder. The import screen appears. MediaImpression 2.1 for PENTAX] icon in [Get Media from]. 8 220 Connecting to Step 6 and 7 on p.219.

Operation Manual
Page 224
... edit the image. Items shown will differ depending on the desktop (for Windows) or in the [Applications] folder (for Macintosh). MediaImpression starts and the Start page appears. 2 Click [PhotoImpression]. You can also play back movies. Starting "MediaImpression" "MediaImpression" lets you view, edit, manage, search for, share, and print images. 1 Double-click...
... edit the image. Items shown will differ depending on the desktop (for Windows) or in the [Applications] folder (for Macintosh). MediaImpression starts and the Start page appears. 2 Click [PhotoImpression]. You can also play back movies. Starting "MediaImpression" "MediaImpression" lets you view, edit, manage, search for, share, and print images. 1 Double-click...

Operation Manual
Page 225
Details on How to Use "MediaImpression" You can find more information on how to a Computer The explanation is displayed. 8 223 Connecting to use "MediaImpression" by using the help screen appears in [Help] on the menu bar (for Macintosh). The help pages. 1 Select [Help] in [Menu] at the top right of the screen (for Windows) or [MediaImpression Help] in the web browser. 2 Click the desired topic.
Details on How to Use "MediaImpression" You can find more information on how to a Computer The explanation is displayed. 8 223 Connecting to use "MediaImpression" by using the help screen appears in [Help] on the menu bar (for Macintosh). The help pages. 1 Select [Help] in [Menu] at the top right of the screen (for Windows) or [MediaImpression Help] in the web browser. 2 Click the desired topic.

Operation Manual
Page 231
...(Infinity) z z × z z z \ (Manual Focus) z ×*9 z ×*10 ×*11 × Recorded Pixels p.108 ×*12 z ×*12 z z z White Balance p.112 z z z ×*13 z*14 z z Focusing Area z ×*24 z z z Focus Assist AF Setting p.106 p.107 ×*15 z ×*15 z z z... at On *21 Set [Movie SR] in [Movie] of the [ARec. z z z z z z g (Self-timer) Z (2 sec. a f K Shooting Mode b\eB c S N X F Page K U c Q Function z*27 z*2 z z*27 × z*27 Zoom operation Zoom lever p.78 z z*3 z z z z z Face Detection On Smile Capture z z z z z Face Detection Off I...
...(Infinity) z z × z z z \ (Manual Focus) z ×*9 z ×*10 ×*11 × Recorded Pixels p.108 ×*12 z ×*12 z z z White Balance p.112 z z z ×*13 z*14 z z Focusing Area z ×*24 z z z Focus Assist AF Setting p.106 p.107 ×*15 z ×*15 z z z... at On *21 Set [Movie SR] in [Movie] of the [ARec. z z z z z z g (Self-timer) Z (2 sec. a f K Shooting Mode b\eB c S N X F Page K U c Q Function z*27 z*2 z z*27 × z*27 Zoom operation Zoom lever p.78 z z*3 z z z z z Face Detection On Smile Capture z z z z z Face Detection Off I...
Operation Manual
Page 236
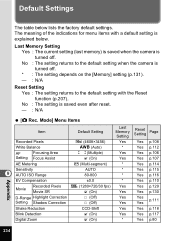
... setting when the camera is saved even after reset. - : N/A [A Rec. Mode] Menu Items Item Default Setting Last Memory Setting Reset Setting Page Recorded Pixels m (4608×3456) Yes Yes p.108 White Balance F (Auto) * Yes p.112 AF Focusing Area Setting Focus Assist J (Multiple) O (On) Yes Yes p.106 Yes Yes p.107 AE Metering L (Multi...
... setting when the camera is saved even after reset. - : N/A [A Rec. Mode] Menu Items Item Default Setting Last Memory Setting Reset Setting Page Recorded Pixels m (4608×3456) Yes Yes p.108 White Balance F (Auto) * Yes p.112 AF Focusing Area Setting Focus Assist J (Multiple) O (On) Yes Yes p.106 Yes Yes p.107 AE Metering L (Multi...
Operation Manual
Page 237
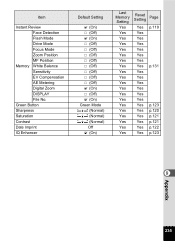
Item Instant Review Face Detection Flash Mode Drive Mode Focus Mode Zoom Position MF Position Memory White Balance Sensitivity EV Compensation AE Metering Digital Zoom DISPLAY File No. Green Button Sharpness Saturation Contrast Date Imprint IQ Enhancer Default Setting O (On) P (Off) O (On) P (...) Last Memory Setting Yes Yes Yes Yes Yes Yes Yes Yes Yes Yes Yes Yes Yes Yes Yes Yes Yes Yes Yes Yes Reset Setting Page Yes p.119 Yes Yes Yes Yes Yes Yes Yes p.131 Yes Yes Yes Yes Yes Yes Yes p.123 Yes p.120 Yes p.121 Yes p.121 Yes...
Item Instant Review Face Detection Flash Mode Drive Mode Focus Mode Zoom Position MF Position Memory White Balance Sensitivity EV Compensation AE Metering Digital Zoom DISPLAY File No. Green Button Sharpness Saturation Contrast Date Imprint IQ Enhancer Default Setting O (On) P (Off) O (On) P (...) Last Memory Setting Yes Yes Yes Yes Yes Yes Yes Yes Yes Yes Yes Yes Yes Yes Yes Yes Yes Yes Yes Yes Reset Setting Page Yes p.119 Yes Yes Yes Yes Yes Yes Yes p.131 Yes Yes Yes Yes Yes Yes Yes p.123 Yes p.120 Yes p.121 Yes p.121 Yes...

Operation Manual
Page 238
... Appendix 236 Yes Yes p.203 Auto Power Off 3 min. Yes Yes p.204 Reset Cancel - - [W Setting] Menu Items Item Default Setting Last Memory Setting Reset Setting Page Operation Volume 3 Yes Yes Playback Volume 3 Yes Yes Sound Start-up Sound Shutter Sound 1 Yes Yes p.191 1 Yes Yes Operation Sound 1 Yes Yes Self-timer...
... Appendix 236 Yes Yes p.203 Auto Power Off 3 min. Yes Yes p.204 Reset Cancel - - [W Setting] Menu Items Item Default Setting Last Memory Setting Reset Setting Page Operation Volume 3 Yes Yes Playback Volume 3 Yes Yes Sound Start-up Sound Shutter Sound 1 Yes Yes p.191 1 Yes Yes Operation Sound 1 Yes Yes Self-timer...
Operation Manual
Page 239
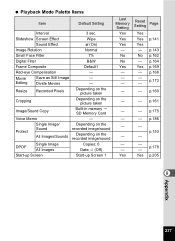
Yes Reset Setting Page Yes Yes p.141 Yes - p.178 - Movie Save as Still Image - Editing Divide Movies - Protect Single Image/ Sound All Images/Sounds Depending on the recorded image/...
Yes Reset Setting Page Yes Yes p.141 Yes - p.178 - Movie Save as Still Image - Editing Divide Movies - Protect Single Image/ Sound All Images/Sounds Depending on the recorded image/...