
User Manual
Page 2
... respective owners. Regarding trademarks PENTAX and smc PENTAX are trademarks or registered trademarks of PENTAX Corporation. All other lens or accessory, see p.58 and p.210. PRINT Image Matching enabled digital still cameras, printers and software help photographers to produce images more faithful to understand all the features and functions. Copyright 2001 Seiko Epson Corporation. Regarding PictBridge PictBridge allows the user to connect the printer and digital camera directly, using the camera in...
... respective owners. Regarding trademarks PENTAX and smc PENTAX are trademarks or registered trademarks of PENTAX Corporation. All other lens or accessory, see p.58 and p.210. PRINT Image Matching enabled digital still cameras, printers and software help photographers to produce images more faithful to understand all the features and functions. Copyright 2001 Seiko Epson Corporation. Regarding PictBridge PictBridge allows the user to connect the printer and digital camera directly, using the camera in...

User Manual
Page 10
... Images 98 Deleting Images 100 Deleting a Single Image 100 Deleting All Images 101 Deleting Selected Images (from Multi-image Display 102 Protecting Images from Deletion (Protect 104 Setting the Printing Service (DPOF 106 Printing Single Images 106 Settings for All Images 107 Printing Using PictBridge 109 Setting [Transfer Mode 110 Connecting the Camera to the Printer 111 Printing Single Images 112 Printing All Images 114 Printing Images Using the DPOF Settings 116 Disconnecting the USB Cable 116 Function Reference 117 Setting the File Format 118 Setting the JPEG Recorded...
... Images 98 Deleting Images 100 Deleting a Single Image 100 Deleting All Images 101 Deleting Selected Images (from Multi-image Display 102 Protecting Images from Deletion (Protect 104 Setting the Printing Service (DPOF 106 Printing Single Images 106 Settings for All Images 107 Printing Using PictBridge 109 Setting [Transfer Mode 110 Connecting the Camera to the Printer 111 Printing Single Images 112 Printing All Images 114 Printing Images Using the DPOF Settings 116 Disconnecting the USB Cable 116 Function Reference 117 Setting the File Format 118 Setting the JPEG Recorded...
User Manual
Page 11
... Memory Card 188 Turning the Beep On and Off 189 Changing the Date and Time and the Display Style 190 Setting the World Time 191 Setting the Display Language 194 Setting the Guide Display Time 194 Adjusting the Brightness of the LCD Monitor 195 Selecting the Video Output Format 195 Setting Auto Power Off 196 Selecting the Folder Name 196 Setting the Display Instant Review and Digital Preview 197 Selecting a Battery 198 Selecting Capture Mode Settings to Save in the Camera 199 Resetting to Default Settings...
... Memory Card 188 Turning the Beep On and Off 189 Changing the Date and Time and the Display Style 190 Setting the World Time 191 Setting the Display Language 194 Setting the Guide Display Time 194 Adjusting the Brightness of the LCD Monitor 195 Selecting the Video Output Format 195 Setting Auto Power Off 196 Selecting the Folder Name 196 Setting the Display Instant Review and Digital Preview 197 Selecting a Battery 198 Selecting Capture Mode Settings to Save in the Camera 199 Resetting to Default Settings...

User Manual
Page 16
... Priority mode K that automatically adjusts aperture and shutter speed according to the set aperture and shutter speed. The Dust Removal function also shakes the CCD for removing collected dust. • Supports the optional Battery Grip D-BG2 with 11 focusing points. This enables you take pictures with more power is achieved. • A user-friendly design has been implemented in both the camera and grip, the battery with the intended exposure. Before Using Your Camera 14 q Camera...
... Priority mode K that automatically adjusts aperture and shutter speed according to the set aperture and shutter speed. The Dust Removal function also shakes the CCD for removing collected dust. • Supports the optional Battery Grip D-BG2 with 11 focusing points. This enables you take pictures with more power is achieved. • A user-friendly design has been implemented in both the camera and grip, the battery with the intended exposure. Before Using Your Camera 14 q Camera...

User Manual
Page 23
... display multiple images at the same time (p.89). Mode] menu (p.31). 6 i button Press to delete images. (p.100) 7 M button Press to show shooting information on and off. (p.52) Set to the | position to switch to Capture mode and preview. 4 Front e-dial Use it to display the previous or next image in magnified playback (p.88) or adjust the digital filter (p.95). 5 3 button Press to display [R Set-up] menu (p.32), [A Custom Setting] menu (p.33) and [A Rec. 1 Green button Press in Enlarged view...
... display multiple images at the same time (p.89). Mode] menu (p.31). 6 i button Press to delete images. (p.100) 7 M button Press to show shooting information on and off. (p.52) Set to the | position to switch to Capture mode and preview. 4 Front e-dial Use it to display the previous or next image in magnified playback (p.88) or adjust the digital filter (p.95). 5 3 button Press to display [R Set-up] menu (p.32), [A Custom Setting] menu (p.33) and [A Rec. 1 Green button Press in Enlarged view...
User Manual
Page 30
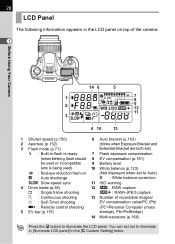
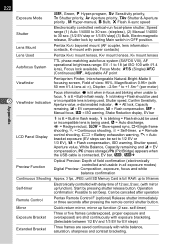
... the m button to illuminate in [Illuminate LCD panel] in flash is ready Extended Bracket are both set) 7 Flash exposure compensation (when blinking, flash should 8 EV compensation (p.161) be used or incompatible 9 Battery level lens is being used) 10 White balance (p.123) > : Red-eye reduction flash on (Not displayed when set not to illuminate the LCD panel. You can set to Auto) 3 : Auto discharge O : White balance correction Q: Slow-speed sync 11 ISO warning 4 Drive mode (p.36) 9 : Single frame shooting j : Continuous shooting 12...
... the m button to illuminate in [Illuminate LCD panel] in flash is ready Extended Bracket are both set) 7 Flash exposure compensation (when blinking, flash should 8 EV compensation (p.161) be used or incompatible 9 Battery level lens is being used) 10 White balance (p.123) > : Red-eye reduction flash on (Not displayed when set not to illuminate the LCD panel. You can set to Auto) 3 : Auto discharge O : White balance correction Q: Slow-speed sync 11 ISO warning 4 Drive mode (p.36) 9 : Single frame shooting j : Continuous shooting 12...

User Manual
Page 33
... turned off. p.122 RAW file format Sets the file format for JPEG shooting. Mode] Menu Setting Items Before Using Your Camera Perform settings related to A. p.167 JPEG Rec. p.121 Contrast Sets the image contrast. Mode] menu. p.165 Multi-exposure Sets Multi-exposure shooting. 31 [A Rec. p.121 Sharpness Makes the image outlines sharp or soft. Item Playback display Instant Review Function Sets shooting information to show during playback and whether to save when the power is set to capturing in the [Q Playback] menu. p.119 Image Tone Sets the color...
... turned off. p.122 RAW file format Sets the file format for JPEG shooting. Mode] Menu Setting Items Before Using Your Camera Perform settings related to A. p.167 JPEG Rec. p.121 Contrast Sets the image contrast. Mode] menu. p.165 Multi-exposure Sets Multi-exposure shooting. 31 [A Rec. p.121 Sharpness Makes the image outlines sharp or soft. Item Playback display Instant Review Function Sets shooting information to show during playback and whether to save when the power is set to capturing in the [Q Playback] menu. p.119 Image Tone Sets the color...

User Manual
Page 34
... Time. Item USER Format Beep Date Adjust World Time Language/ Guide display Brightness Level Video Out Transfer Mode* Auto Power Off Folder Name Select battery Dust Removal Sensor Cleaning Reset Function Registers the current camera settings to display indicators in the [R Set-up position for details on /off automatically. Sets display of the LCD monitor. Sets the output format to display Bright/Dark area warning and histogram during Digital Preview. Locks the mirror in which menus and messages appear. Sets the USB cable connection (PC or printer). Changes the language...
... Time. Item USER Format Beep Date Adjust World Time Language/ Guide display Brightness Level Video Out Transfer Mode* Auto Power Off Folder Name Select battery Dust Removal Sensor Cleaning Reset Function Registers the current camera settings to display indicators in the [R Set-up position for details on /off automatically. Sets display of the LCD monitor. Sets the output format to display Bright/Dark area warning and histogram during Digital Preview. Locks the mirror in which menus and messages appear. Sets the USB cable connection (PC or printer). Changes the language...

User Manual
Page 36
... with remote control. continuous shooting recordable images when - Sets the initial magnification of recordable images in b (Shutter Priority) mode. - The default setting is pressed. p.129 Color temp. p.169 Sets to switch number of the zoom playback. Shutter - 1 cannot be released until in remote control released from remote control when [On]. shutter release button is AF in focus. p.158 manual) mode. Shutter releases after AF activates if shutter is pressed halfway. Optical Preview lets you check the composition, exposure and focus on the LCD monitor...
... with remote control. continuous shooting recordable images when - Sets the initial magnification of recordable images in b (Shutter Priority) mode. - The default setting is pressed. p.129 Color temp. p.169 Sets to switch number of the zoom playback. Shutter - 1 cannot be released until in remote control released from remote control when [On]. shutter release button is AF in focus. p.158 manual) mode. Shutter releases after AF activates if shutter is pressed halfway. Optical Preview lets you check the composition, exposure and focus on the LCD monitor...

User Manual
Page 54
You can change the setting with [Auto Power Off] on . Move the main switch to [OFF] position to power off automatically after 1 minute of time. Getting Started • Always turn the camera off when not in use. • The power will turn off the camera. After the camera turns off automatically, turn it on again or perform any operations within a set to turn off when you do not perform any of...
You can change the setting with [Auto Power Off] on . Move the main switch to [OFF] position to power off automatically after 1 minute of time. Getting Started • Always turn the camera off when not in use. • The power will turn off the camera. After the camera turns off automatically, turn it on again or perform any operations within a set to turn off when you do not perform any of...

User Manual
Page 57
... current date and time as necessary. • To change Hometown: "Setting the World Time" (p.191) • To change date and time: "Changing the Date and Time and the Display Style" (p.190) Pressing the 3 button during initial settings cancels the settings made so far and displays the [Date Adjust] screen (p.56). Refer to the following operations and set date and time has been displayed, Initial Setting cannot be displayed. 6 Use the four-way controller (2345) to Step 2 of "Setting the Display Language...
... current date and time as necessary. • To change Hometown: "Setting the World Time" (p.191) • To change date and time: "Changing the Date and Time and the Display Style" (p.190) Pressing the 3 button during initial settings cancels the settings made so far and displays the [Date Adjust] screen (p.56). Refer to the following operations and set date and time has been displayed, Initial Setting cannot be displayed. 6 Use the four-way controller (2345) to Step 2 of "Setting the Display Language...

User Manual
Page 65
... to take pictures by the camera and the shutter speed and aperture are automatically set. (p.146) Basic Operations 2 Set the focus mode lever to B 3 (Green) mode. The Focus mode changes to B. When the image is pressed halfway. In l, the lens automatically operates when the shutter release button is focused, the shutter can be released. (p.130) 63 Letting the Camera Choose the Optimal Settings The q features various Capture modes, Focus modes, and Drive modes suited for your intentions. In B, proper exposure...
... to take pictures by the camera and the shutter speed and aperture are automatically set. (p.146) Basic Operations 2 Set the focus mode lever to B 3 (Green) mode. The Focus mode changes to B. When the image is pressed halfway. In l, the lens automatically operates when the shutter release button is focused, the shutter can be released. (p.130) 63 Letting the Camera Choose the Optimal Settings The q features various Capture modes, Focus modes, and Drive modes suited for your intentions. In B, proper exposure...

User Manual
Page 69
... take sharp pictures using the Shake Reduction function by movement of the subject. This is useful for taking close-up shots. In this case, the [Shake Reduction] setting menu appears. Taking Pictures Using the Shake 67 Reduction Function You can easily take pictures of a moving subject or night scenes. If another type of lens is used with a slower shutter speed, for blurring caused by simply turning on the [Shake Reduction] setting menu. 1 Setting...
... take sharp pictures using the Shake Reduction function by movement of the subject. This is useful for taking close-up shots. In this case, the [Shake Reduction] setting menu appears. Taking Pictures Using the Shake 67 Reduction Function You can easily take pictures of a moving subject or night scenes. If another type of lens is used with a slower shutter speed, for blurring caused by simply turning on the [Shake Reduction] setting menu. 1 Setting...
User Manual
Page 85
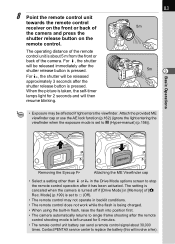
... use the AE lock function (p.162) (ignore the light entering the viewfinder when the exposure mode is left unused for 2 seconds and will be affected if light enters the viewfinder. Removing the Eyecup FP Attaching the ME Viewfinder cap • Select a setting other than h or i in [Memory] of the camera and press the shutter release button on the remote control. When the picture is taken, the self-timer...
... use the AE lock function (p.162) (ignore the light entering the viewfinder when the exposure mode is left unused for 2 seconds and will be affected if light enters the viewfinder. Removing the Eyecup FP Attaching the ME Viewfinder cap • Select a setting other than h or i in [Memory] of the camera and press the shutter release button on the remote control. When the picture is taken, the self-timer...
User Manual
Page 124
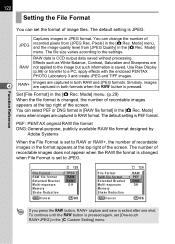
... JPEG formats. Effects such as White Balance, Contrast, Saturation and Sharpness are captured in both formats when the | button is changed , the number of recordable images appears at the top right of recorded pixels from [JPEG Quality] in the [A Rec. Mode] menu, and the image quality level from [JPEG Rec. Mode] menu. You can change the number of the screen. Set [File Format] in the [A Rec. The default setting is CCD output data saved without...
... JPEG formats. Effects such as White Balance, Contrast, Saturation and Sharpness are captured in both formats when the | button is changed , the number of recordable images appears at the top right of recorded pixels from [JPEG Quality] in the [A Rec. Mode] menu, and the image quality level from [JPEG Rec. Mode] menu. You can change the number of the screen. Set [File Format] in the [A Rec. The default setting is CCD output data saved without...
User Manual
Page 221
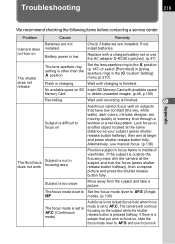
Problem Cause Remedy Camera does not turn on Batteries are not installed Battery power is low Check if batteries are moving quickly or scenery shot through a window or a net-like pattern. Replace with available space Memory Card or delete unwanted images. (p.48, p.100) Recording Subject is other than the s position Set the lens aperture ring to l and use focus lock. Alternatively, use the AC adapter D-AC50 (optional). (p.47) The shutter does not release The lens aperture ring setting is difficult...
Problem Cause Remedy Camera does not turn on Batteries are not installed Battery power is low Check if batteries are moving quickly or scenery shot through a window or a net-like pattern. Replace with available space Memory Card or delete unwanted images. (p.48, p.100) Recording Subject is other than the s position Set the lens aperture ring to l and use focus lock. Alternatively, use the AC adapter D-AC50 (optional). (p.47) The shutter does not release The lens aperture ring setting is difficult...

User Manual
Page 222
... or shooting night scenes, etc. Try different Capture modes. Appendix USB 5 connection with computer does not work The Transfer Mode is set properly Shutter speed is off Turn on the Shake Reduction switch. If a lens for Shake Reduction function to B (Green) mode. sync speed) mode Use AE lock with any repairs. * Refer to p.11 of the "PENTAX PHOTO Browser 3/PENTAX PHOTO Laboratory 3 Operating Manual" for Flash Mode when Capture mode is set the [Focal Length] on the [Shake Reduction] menu. (p.69) Turn off...
... or shooting night scenes, etc. Try different Capture modes. Appendix USB 5 connection with computer does not work The Transfer Mode is set properly Shutter speed is off Turn on the Shake Reduction switch. If a lens for Shake Reduction function to B (Green) mode. sync speed) mode Use AE lock with any repairs. * Refer to p.11 of the "PENTAX PHOTO Browser 3/PENTAX PHOTO Laboratory 3 Operating Manual" for Flash Mode when Capture mode is set the [Focal Length] on the [Shake Reduction] menu. (p.69) Turn off...
User Manual
Page 224
..., Q = Slow-speed sync, 9=Single frame shooting, j = Continuous shooting, g = Self-timer, h= Remote control shooting, ? = Battery exhaustion warning, ] = Auto bracket exposure (EV steps can be cancelled after operation Remote Control Pentax Remote Control F (optional) Release shutter immediately or three seconds after pressing the remote control shutter button. Start by setting Main switch in all exposure modes) Digital Preview: Composition, exposure, focus and white balance confirmation Continuous Shooting Approx. 3 fps, JPEG: until SD Memory Card is full RAW: up function (2 sec.
..., Q = Slow-speed sync, 9=Single frame shooting, j = Continuous shooting, g = Self-timer, h= Remote control shooting, ? = Battery exhaustion warning, ] = Auto bracket exposure (EV steps can be cancelled after operation Remote Control Pentax Remote Control F (optional) Release shutter immediately or three seconds after pressing the remote control shutter button. Start by setting Main switch in all exposure modes) Digital Preview: Composition, exposure, focus and white balance confirmation Continuous Shooting Approx. 3 fps, JPEG: until SD Memory Card is full RAW: up function (2 sec.

User Manual
Page 225
... control, GN 11 (ISO 100), Angles of coverage: 18 mm lens angle of view, Flash synchronization speed range at ISO 100, with PENTAX dedicated flash. Battery Exhaustion Battery exhaustion symbol ? is lit. (The shutter is turned on usage conditions. Some deviation from the above figures may occur in the viewfinder when ? Multi-exposure Select number of shots between 2 and 9 (Auto EV Adjust can be set according to the number of shots) Exposure...
... control, GN 11 (ISO 100), Angles of coverage: 18 mm lens angle of view, Flash synchronization speed range at ISO 100, with PENTAX dedicated flash. Battery Exhaustion Battery exhaustion symbol ? is lit. (The shutter is turned on usage conditions. Some deviation from the above figures may occur in the viewfinder when ? Multi-exposure Select number of shots between 2 and 9 (Auto EV Adjust can be set according to the number of shots) Exposure...

User Manual
Page 233
... Red-eye reduction ..........74, 183 Remaining image storage capacity 46 Remote Control 81 Reset 201, 202 Rotate 87 S Saturation 121 SD Memory Card 48 Select&Delete 102 Self-Timer 77 Sensitivity 140 Sensitivity Priority Mode K 148 Sensor Cleaning 211 Sepia (Digital Filter 97 [R Set-up] Menu 32, 205 Shade (White Balance) ........123 Shake Reduction 67 Shake Reduction switch ...19, 67 Sharpness 121 Shutter & Aperture Priority Mode L 154 Shutter Priority Mode b ......150 Shutter release button 18...
... Red-eye reduction ..........74, 183 Remaining image storage capacity 46 Remote Control 81 Reset 201, 202 Rotate 87 S Saturation 121 SD Memory Card 48 Select&Delete 102 Self-Timer 77 Sensitivity 140 Sensitivity Priority Mode K 148 Sensor Cleaning 211 Sepia (Digital Filter 97 [R Set-up] Menu 32, 205 Shade (White Balance) ........123 Shake Reduction 67 Shake Reduction switch ...19, 67 Sharpness 121 Shutter & Aperture Priority Mode L 154 Shutter Priority Mode b ......150 Shutter release button 18...


