Operation Manual
Page 1
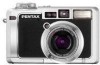
Digital Camera Operating Manual To ensure the best performance from your camera, please read the Operating Manual before using the camera.
Digital Camera Operating Manual To ensure the best performance from your camera, please read the Operating Manual before using the camera.
Operation Manual
Page 2
... anything other brands or product names are more faithful to their respective companies. Keep this manual are for buying the PENTAX Optio 750Z Digital Camera. Regarding trademarks • PENTAX is a trademark of PENTAX Corporation. • Optio is a trademark of PENTAX Corporation. • The SD logo is a trademark. • All other than personal enjoyment cannot be a valuable tool in helping...
... anything other brands or product names are more faithful to their respective companies. Keep this manual are for buying the PENTAX Optio 750Z Digital Camera. Regarding trademarks • PENTAX is a trademark of PENTAX Corporation. • Optio is a trademark of PENTAX Corporation. • The SD logo is a trademark. • All other than personal enjoyment cannot be a valuable tool in helping...

Operation Manual
Page 3
... paid to the safety of the camera may result in the event of any circumstances touch such exposed portions, as there is a danger of receiving an electric shock. • To avoid the risk of it being dropped, please do not hang the strap around your nearest PENTAX service center. Seek medical attention...
... paid to the safety of the camera may result in the event of any circumstances touch such exposed portions, as there is a danger of receiving an electric shock. • To avoid the risk of it being dropped, please do not hang the strap around your nearest PENTAX service center. Seek medical attention...

Operation Manual
Page 4
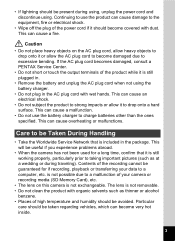
... a risk of burns. • Do not discharge the flash while it becomes hot or begins to burn yourself during removal. • Some portions of the camera heat up during use, so please take care, as there is a risk of discoloring. • If any of the battery leakage should happen to get... medical attention immediately. • If any batteries other abnormality occurs, immediately discontinue using and consult a PENTAX Service Center. Also, be careful of the battery in your eyes with clean water and get inside the product, consult...
... a risk of burns. • Do not discharge the flash while it becomes hot or begins to burn yourself during removal. • Some portions of the camera heat up during use, so please take care, as there is a risk of discoloring. • If any of the battery leakage should happen to get... medical attention immediately. • If any batteries other abnormality occurs, immediately discontinue using and consult a PENTAX Service Center. Also, be careful of the battery in your eyes with clean water and get inside the product, consult...
Operation Manual
Page 5
...become damaged due to excessive bending. Continuing to use the battery charger to a computer, etc. If the AC plug cord becomes damaged, consult a PENTAX Service Center. • Do not short or touch the output terminals of your data to charge batteries other than the ones specified. This can ... due to a malfunction of the product while it to become covered with wet hands. Caution • Do not place heavy objects on this camera is still plugged in the package. Care to be Taken During Handling • Take the Worldwide Service Network that it should be guaranteed for ...
...become damaged due to excessive bending. Continuing to use the battery charger to a computer, etc. If the AC plug cord becomes damaged, consult a PENTAX Service Center. • Do not short or touch the output terminals of your data to charge batteries other than the ones specified. This can ... due to a malfunction of the product while it to become covered with wet hands. Caution • Do not place heavy objects on this camera is still plugged in the package. Care to be Taken During Handling • Take the Worldwide Service Network that it should be guaranteed for ...
Operation Manual
Page 6
...1 LED product. 4 This could cause breakage or malfunction. • When using a tripod with rain, water or any other liquid, because the camera is 0°C to 40°C (32°F to 104°F). • The liquid crystal display will become black at low temperatures. LED ...water, toxic gases, salt, etc. as this may cause damage to prevent the camera from case and store in temperature has subsided. • Avoid contact with a dry soft cloth. • Ensure that the camera is a digital still camera that conforms to substantial vibrations, shocks or pressure. Place the...
...1 LED product. 4 This could cause breakage or malfunction. • When using a tripod with rain, water or any other liquid, because the camera is 0°C to 40°C (32°F to 104°F). • The liquid crystal display will become black at low temperatures. LED ...water, toxic gases, salt, etc. as this may cause damage to prevent the camera from case and store in temperature has subsided. • Avoid contact with a dry soft cloth. • Ensure that the camera is a digital still camera that conforms to substantial vibrations, shocks or pressure. Place the...
Operation Manual
Page 7
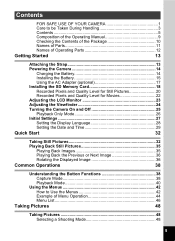
...Checking the Contents of the Package 10 Names of Parts 11 Names of Operating Parts 12 Getting Started 13 Attaching the Strap 13 Powering the Camera 14 Charging the Battery 14 Installing the Battery 15 Using the AC Adapter (optional 17 Installing the SD Memory Card 18 Recorded Pixels and...Level for Still Pictures 20 Recorded Pixels and Quality Level for Movies 22 Adjusting the LCD Monitor 23 Adjusting the Viewfinder 24 Turning the Camera On and Off 25 Playback Only Mode 26 Initial Settings 27 Setting the Display Language 28 Setting the Date and Time 29 Quick ...
...Checking the Contents of the Package 10 Names of Parts 11 Names of Operating Parts 12 Getting Started 13 Attaching the Strap 13 Powering the Camera 14 Charging the Battery 14 Installing the Battery 15 Using the AC Adapter (optional 17 Installing the SD Memory Card 18 Recorded Pixels and...Level for Still Pictures 20 Recorded Pixels and Quality Level for Movies 22 Adjusting the LCD Monitor 23 Adjusting the Viewfinder 24 Turning the Camera On and Off 25 Playback Only Mode 26 Initial Settings 27 Setting the Display Language 28 Setting the Date and Time 29 Quick ...
Operation Manual
Page 8
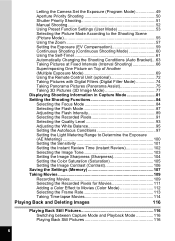
Letting the Camera Set the Exposure (Program Mode 49 Aperture Priority Shooting 50 Shutter Priority Shooting 51 Manual Shooting 52 Using Preset Function Settings (User Mode 53 Selecting ... (Interval Shooting 66 Superimposing One Picture on Top of Another (Multiple Exposure Mode 69 Using the Remote Control Unit (optional 72 Taking Pictures with Digital Filters (Digital Filter Mode 74 Taking Panorama Pictures (Panorama Assist 75 Taking 3D Pictures (3D Image Mode 77 Displaying Shooting Information in Capture Mode 81 Setting the...
Letting the Camera Set the Exposure (Program Mode 49 Aperture Priority Shooting 50 Shutter Priority Shooting 51 Manual Shooting 52 Using Preset Function Settings (User Mode 53 Selecting ... (Interval Shooting 66 Superimposing One Picture on Top of Another (Multiple Exposure Mode 69 Using the Remote Control Unit (optional 72 Taking Pictures with Digital Filters (Digital Filter Mode 74 Taking Panorama Pictures (Panorama Assist 75 Taking 3D Pictures (3D Image Mode 77 Displaying Shooting Information in Capture Mode 81 Setting the...

Operation Manual
Page 9
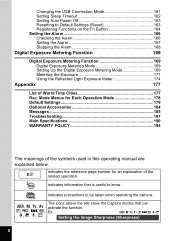
... Still Pictures 133 Editing Still Pictures 133 Changing the Image Size and Quality (Resize 133 Trimming Images 135 Editing Pictures with Digital Filters 137 Setting the Printing Service (DPOF 139 Printing Single Images 139 Printing All Images 141 Direct Printing Using PictBridge 142 Connecting the... Playing Back Sound 147 Adding a Voice Memo to Images 148 Recording a Voice Memo 148 Playing Back a Voice Memo 149 Settings 150 Camera Settings 150 Formatting an SD Memory Card 150 Changing the Date and Time 151 Changing the Sound Settings 152 Setting the World Time 154 ...
... Still Pictures 133 Editing Still Pictures 133 Changing the Image Size and Quality (Resize 133 Trimming Images 135 Editing Pictures with Digital Filters 137 Setting the Printing Service (DPOF 139 Printing Single Images 139 Printing All Images 141 Direct Printing Using PictBridge 142 Connecting the... Playing Back Sound 147 Adding a Voice Memo to Images 148 Recording a Voice Memo 148 Playing Back a Voice Memo 149 Settings 150 Camera Settings 150 Formatting an SD Memory Card 150 Changing the Date and Time 151 Changing the Sound Settings 152 Setting the World Time 154 ...
Operation Manual
Page 10
... the function. E a b c R F G D C Setting the Image Sharpness (Sharpness) 8 indicates precautions to be taken when operating the camera. The icons above the title show the Capture modes that is useful to know. Changing the USB Connection Mode 161 Setting Sleep Timeout 162 Setting ... 166 Checking the Alarm 166 Setting the Alarm 167 Stopping the Alarm 168 Digital Exposure Metering Function 169 Digital Exposure Metering Function 169 Digital Exposure Metering Mode 169 Setting Up the Digital Exposure Metering Mode 169 Metering the Exposure 171 Using the Reflected Light Exposure ...
... the function. E a b c R F G D C Setting the Image Sharpness (Sharpness) 8 indicates precautions to be taken when operating the camera. The icons above the title show the Capture modes that is useful to know. Changing the USB Connection Mode 161 Setting Sleep Timeout 162 Setting ... 166 Checking the Alarm 166 Setting the Alarm 167 Stopping the Alarm 168 Digital Exposure Metering Function 169 Digital Exposure Metering Function 169 Digital Exposure Metering Mode 169 Setting Up the Digital Exposure Metering Mode 169 Metering the Exposure 171 Using the Reflected Light Exposure ...
Operation Manual
Page 11
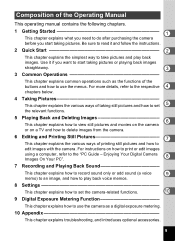
... straightaway. 3 3 Common Operations This chapter explains common operations such as the functions of the buttons and how to use the camera as a digital exposure metering. 10 Appendix This chapter explains troubleshooting, and introduces optional accessories. 9 For more details, refer to the respective 4...following chapters. 1 Getting Started 1 This chapter explains what you need to do after purchasing the camera before you want to the "PC Guide - Enjoying Your Digital Camera 8 Images On Your PC". 7 Recording and Playing Back Sound This chapter explains how to record...
... straightaway. 3 3 Common Operations This chapter explains common operations such as the functions of the buttons and how to use the camera as a digital exposure metering. 10 Appendix This chapter explains troubleshooting, and introduces optional accessories. 9 For more details, refer to the respective 4...following chapters. 1 Getting Started 1 This chapter explains what you need to do after purchasing the camera before you want to the "PC Guide - Enjoying Your Digital Camera 8 Images On Your PC". 7 Recording and Playing Back Sound This chapter explains how to record...
Operation Manual
Page 12
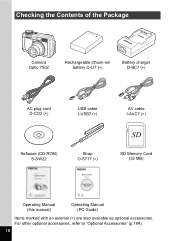
For other optional accessories, refer to "Optional Accessories" (p.184). 10 Checking the Contents of the Package Camera Optio 750Z Rechargeable lithium-ion battery D-LI7 (∗) Battery charger D-BC7 (∗) AC plug cord D-CO2 (∗) USB cable I-USB7 (∗) AV cable I-AVC7 (∗) Software (CD-ROM) S-SW22 Strap O-ST17 (∗) SD Memory Card (32 MB) Operating Manual (this manual) Operating Manual (PC Guide) Items marked with an asterisk (∗) are also available as optional accessories.
For other optional accessories, refer to "Optional Accessories" (p.184). 10 Checking the Contents of the Package Camera Optio 750Z Rechargeable lithium-ion battery D-LI7 (∗) Battery charger D-BC7 (∗) AC plug cord D-CO2 (∗) USB cable I-USB7 (∗) AV cable I-AVC7 (∗) Software (CD-ROM) S-SW22 Strap O-ST17 (∗) SD Memory Card (32 MB) Operating Manual (this manual) Operating Manual (PC Guide) Items marked with an asterisk (∗) are also available as optional accessories.

Operation Manual
Page 15
Shortening the Strap You can create a short hand strap for the camera by passing the narrow end of the strap through the metal ring on the end of the strap through the strap lug. 2 Pass the strap ... Started C 1 Pass the narrow end of the strap (C). The shortened strap can then be shortened and then attached to the camera to create a compact hand strap. The strap can also 1 be attached to carry the camera. Getting Started Attaching the Strap The provided strap (O-ST17) can be attached, as is, to the...
Shortening the Strap You can create a short hand strap for the camera by passing the narrow end of the strap through the metal ring on the end of the strap through the strap lug. 2 Pass the strap ... Started C 1 Pass the narrow end of the strap (C). The shortened strap can then be shortened and then attached to the camera to create a compact hand strap. The strap can also 1 be attached to carry the camera. Getting Started Attaching the Strap The provided strap (O-ST17) can be attached, as is, to the...
Operation Manual
Page 16
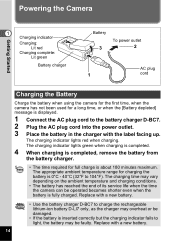
...;C - 40°C (32°F to 104°F). The appropriate ambient temperature range for full charge is about 180 minutes maximum. Powering the Camera Getting Started 1 Charging indicator Charging: Lit red Charging complete: Lit green Battery charger Battery 3 To power outlet 2 AC plug 1 cord Charging the... Battery Charge the battery when using the camera for the first time, when the camera has not been used for a long time, or when the [Battery depleted] message is displayed. 1 Connect the AC ...
...;C - 40°C (32°F to 104°F). The appropriate ambient temperature range for full charge is about 180 minutes maximum. Powering the Camera Getting Started 1 Charging indicator Charging: Lit red Charging complete: Lit green Battery charger Battery 3 To power outlet 2 AC plug 1 cord Charging the... Battery Charge the battery when using the camera for the first time, when the camera has not been used for a long time, or when the [Battery depleted] message is displayed. 1 Connect the AC ...

Operation Manual
Page 17
...cover. If you inserted the battery. Getting Started 1 2 2 1 1 Battery lock lever Installing the Battery Install the battery provided with the 2 symbol facing toward the camera lens, and push the battery in while pressing the battery lock lever on the battery side in until it when using the... battery out. Slide the battery/card cover in the direction indicated by the arrow 1 and flip the cover open 2 . 2 Insert the battery with the camera. Push the battery in the direction of the AC adapter D-AC7 (optional) is recommended. (1p.17) 15 Removing the Battery 1 Open the battery/card ...
...cover. If you inserted the battery. Getting Started 1 2 2 1 1 Battery lock lever Installing the Battery Install the battery provided with the 2 symbol facing toward the camera lens, and push the battery in while pressing the battery lock lever on the battery side in until it when using the... battery out. Slide the battery/card cover in the direction indicated by the arrow 1 and flip the cover open 2 . 2 Insert the battery with the camera. Push the battery in the direction of the AC adapter D-AC7 (optional) is recommended. (1p.17) 15 Removing the Battery 1 Open the battery/card ...

Operation Manual
Page 18
... Status Adequate power remains. Cover the terminals with fully charged battery D-LI7) Image Storage Capacity (using the camera in a cold region, or if you do not intend to use the camera for use depending on PENTAX measuring conditions. Some deviation from the above figures may occur in accordance with this message appears. Battery...
... Status Adequate power remains. Cover the terminals with fully charged battery D-LI7) Image Storage Capacity (using the camera in a cold region, or if you do not intend to use the camera for use depending on PENTAX measuring conditions. Some deviation from the above figures may occur in accordance with this message appears. Battery...

Operation Manual
Page 19
... of fire or electric shock when using the battery charger or AC adapter, be sure to read the section on "FOR SAFE USE OF YOUR CAMERA" (p.1). • Be sure to read the operation manual accompanying the AC adapter before using the adapter. • The battery cannot be charged inside the... camera even when the AC adapter is connected. 17 DC terminal 1 AC adapter To power 3 outlet 1 4 Getting Started 2 AC plug cord Using the AC Adapter (optional) ...
... of fire or electric shock when using the battery charger or AC adapter, be sure to read the section on "FOR SAFE USE OF YOUR CAMERA" (p.1). • Be sure to read the operation manual accompanying the AC adapter before using the adapter. • The battery cannot be charged inside the... camera even when the AC adapter is connected. 17 DC terminal 1 AC adapter To power 3 outlet 1 4 Getting Started 2 AC plug cord Using the AC Adapter (optional) ...
Operation Manual
Page 20
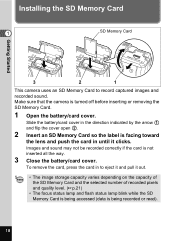
... recorded correctly if the card is turned off before inserting or removing the SD Memory Card. 1 Open the battery/card cover. Make sure that the camera is not inserted all the way. 3 Close the battery/card cover. Getting Started Installing the SD Memory Card 1 SD Memory Card 2 1 3 2 1 This...
... recorded correctly if the card is turned off before inserting or removing the SD Memory Card. 1 Open the battery/card cover. Make sure that the camera is not inserted all the way. 3 Close the battery/card cover. Getting Started Installing the SD Memory Card 1 SD Memory Card 2 1 3 2 1 This...
Operation Manual
Page 21
... the switch to violent impact. Getting Started Precautions When Using an SD Memory Card • The SD Memory Card is being played back, or the camera is not used for a long time, the data on the card may take a long time. • For information on the card is equipped with a ...to rapid changes in the following circumstances. PENTAX does not accept any liability for instructions on formatting. • Do not remove the SD Memory Card during formatting as the card may be hot. • Do not remove the SD Memory Card or turn the camera off while data is being recorded on...
... the switch to violent impact. Getting Started Precautions When Using an SD Memory Card • The SD Memory Card is being played back, or the camera is not used for a long time, the data on the card may take a long time. • For information on the card is equipped with a ...to rapid changes in the following circumstances. PENTAX does not accept any liability for instructions on formatting. • Do not remove the SD Memory Card during formatting as the card may be hot. • Do not remove the SD Memory Card or turn the camera off while data is being recorded on...

Operation Manual
Page 22
...-size print. 4:3 is sufficient for printing, but the resulting increase in data volume reduces the total number of the images captured with a digital camera. D Better Standard compression rate. therefore, you do not need select more of the image may not appear on the image quality, exposure ... of the original image. This can be specified with a 4:3 aspect ratio. Suitable for photo prints. When printing an image with the camera. Set the aspect ratio to 3:2 for viewing the image on websites or attaching to your purpose. Suitable for prints with more than the...
...-size print. 4:3 is sufficient for printing, but the resulting increase in data volume reduces the total number of the images captured with a digital camera. D Better Standard compression rate. therefore, you do not need select more of the image may not appear on the image quality, exposure ... of the original image. This can be specified with a 4:3 aspect ratio. Suitable for photo prints. When printing an image with the camera. Set the aspect ratio to 3:2 for viewing the image on websites or attaching to your purpose. Suitable for prints with more than the...


