
Operation Manual
Page 2
... in helping you to connect the printer and digital camera directly, using extremely high precision technology. Although the level of functioning pixels is a possibility that the illustrations and the display screen of all the camera's capabilities. However, this manual are trademarks or registered trademarks of obtaining copyrights also cannot be used in this has no effect on taking pictures even for purchasing the PENTAX Optio 30 Digital Camera. When used outside...
... in helping you to connect the printer and digital camera directly, using extremely high precision technology. Although the level of functioning pixels is a possibility that the illustrations and the display screen of all the camera's capabilities. However, this manual are trademarks or registered trademarks of obtaining copyrights also cannot be used in this has no effect on taking pictures even for purchasing the PENTAX Optio 30 Digital Camera. When used outside...
Operation Manual
Page 6
... Powering the Camera 12 Installing the Batteries 12 Using the AC Adapter (optional 14 Installing / Removing the SD Memory Card 15 Turning the Camera On and Off 17 Playback Only Mode 17 Initial Settings 18 Setting the Display Language 18 Setting the Date and Time 19 Setting the Recorded Pixels and the Quality Levels 20 Quick Start 22 Taking Still Pictures 22 Playing Back Still Pictures 24 Playing Back Images 24 Playing Back Previous or Next Images 24 Common Operations 26 Using the Button Functions 26 Capture Mode...
... Powering the Camera 12 Installing the Batteries 12 Using the AC Adapter (optional 14 Installing / Removing the SD Memory Card 15 Turning the Camera On and Off 17 Playback Only Mode 17 Initial Settings 18 Setting the Display Language 18 Setting the Date and Time 19 Setting the Recorded Pixels and the Quality Levels 20 Quick Start 22 Taking Still Pictures 22 Playing Back Still Pictures 24 Playing Back Images 24 Playing Back Previous or Next Images 24 Common Operations 26 Using the Button Functions 26 Capture Mode...

Operation Manual
Page 7
...Adjusting the Color Balance according to Lighting (White Balance 44 Changing the AF Area (Focusing Area 45 Setting the Light Metering Range to Determine the Exposure (AE Metering 46 Setting the Sensitivity 47 Setting the Image Sharpness 48 Setting the Color Saturation 49 Setting the Image Contrast 50 Taking Pictures 51 Setting the Functions (Program Mode 51 Selecting the Picture Mode according to the Shooting Scene (Picture Mode 52 Taking Panorama Pictures (Panorama Assist Mode 55 Using the Self-Timer 57 Continuous Shooting (Continuous Shooting / Multi Continuous Shooting 58 Using...
...Adjusting the Color Balance according to Lighting (White Balance 44 Changing the AF Area (Focusing Area 45 Setting the Light Metering Range to Determine the Exposure (AE Metering 46 Setting the Sensitivity 47 Setting the Image Sharpness 48 Setting the Color Saturation 49 Setting the Image Contrast 50 Taking Pictures 51 Setting the Functions (Program Mode 51 Selecting the Picture Mode according to the Shooting Scene (Picture Mode 52 Taking Panorama Pictures (Panorama Assist Mode 55 Using the Self-Timer 57 Continuous Shooting (Continuous Shooting / Multi Continuous Shooting 58 Using...
Operation Manual
Page 8
... Using the Printing Service Settings (DPOF 86 Disconnecting the Camera from the Printer 87 Editing / Settings 88 Editing Images 88 Changing the Image Size 88 Trimming Images 90 Editing Images with Digital Filters 92 Camera Settings 94 Formatting an SD Memory Card or the Built-in Memory 94 Changing the Date Style and Date / Time 95 Changing the Display Language 95 Changing the Start-up Screen / Background Color 96 Sleep Timeout 98 Setting Auto Power Off 98 Changing the USB Connection Mode 99 Resetting to Default Settings [Reset 99 Appendix 100 Messages 100 Troubleshooting...
... Using the Printing Service Settings (DPOF 86 Disconnecting the Camera from the Printer 87 Editing / Settings 88 Editing Images 88 Changing the Image Size 88 Trimming Images 90 Editing Images with Digital Filters 92 Camera Settings 94 Formatting an SD Memory Card or the Built-in Memory 94 Changing the Date Style and Date / Time 95 Changing the Display Language 95 Changing the Start-up Screen / Background Color 96 Sleep Timeout 98 Setting Auto Power Off 98 Changing the USB Connection Mode 99 Resetting to Default Settings [Reset 99 Appendix 100 Messages 100 Troubleshooting...
Operation Manual
Page 14
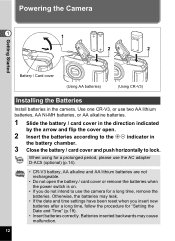
... using for a long time, remove the batteries. Batteries inserted backwards may leak. • If the date and time settings have been reset when you do not intend to lock. Powering the Camera 1 1 2 2 Getting Started Battery / Card cover (Using AA batteries) (Using CR-V3) Installing the Batteries Install batteries in the direction indicated by the arrow and flip the cover open the battery / card cover or remove the batteries when the power switch is on. • If you insert new batteries after a long time...
... using for a long time, remove the batteries. Batteries inserted backwards may leak. • If the date and time settings have been reset when you do not intend to lock. Powering the Camera 1 1 2 2 Getting Started Battery / Card cover (Using AA batteries) (Using CR-V3) Installing the Batteries Install batteries in the direction indicated by the arrow and flip the cover open the battery / card cover or remove the batteries when the power switch is on. • If you insert new batteries after a long time...

Operation Manual
Page 15
... batteries are based on the LCD monitor. * (lit green) ↓ , (lit green) ↓ ; (lit yellow) ↓ % (lit red) ↓ [Battery Depleted] : Adequate power remains. : Battery is running low. : Battery is running very low. : Battery is exhausted. : After the message is displayed, the camera will turn off the LCD monitor, and using the camera at low temperatures. When the camera is recommended when using the viewfinder to take a lot of the time) Image...
... batteries are based on the LCD monitor. * (lit green) ↓ , (lit green) ↓ ; (lit yellow) ↓ % (lit red) ↓ [Battery Depleted] : Adequate power remains. : Battery is running low. : Battery is running very low. : Battery is exhausted. : After the message is displayed, the camera will turn off the LCD monitor, and using the camera at low temperatures. When the camera is recommended when using the viewfinder to take a lot of the time) Image...
Operation Manual
Page 17
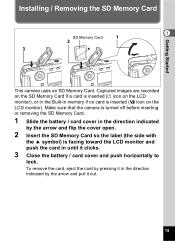
... the direction indicated by the arrow and flip the cover open. 2 Insert the SD Memory Card so the label (the side with the 2 symbol) is turned off before inserting or removing the SD Memory Card. 1 Slide the battery / card cover in memory if no card is inserted (? To remove the card, eject the card by pressing it out. 15 Getting Started Installing / Removing the SD Memory Card 1 SD Memory Card 1 2 3 2 This camera uses an SD Memory Card. icon...
... the direction indicated by the arrow and flip the cover open. 2 Insert the SD Memory Card so the label (the side with the 2 symbol) is turned off before inserting or removing the SD Memory Card. 1 Slide the battery / card cover in memory if no card is inserted (? To remove the card, eject the card by pressing it out. 15 Getting Started Installing / Removing the SD Memory Card 1 SD Memory Card 1 2 3 2 This camera uses an SD Memory Card. icon...

Operation Manual
Page 18
... sure to the [Lock] position prevents the recording and deleting of data and the formatting of disuse. Be careful. • Do not remove the card or turn off before use or store your PC. • Avoid using an SD Memory Card • Make sure the camera is turned off the camera when recording data or playing back images from the SD Memory Card, or when connected to sudden temperature changes, condensation, or direct sunlight. 16
... sure to the [Lock] position prevents the recording and deleting of data and the formatting of disuse. Be careful. • Do not remove the card or turn off before use or store your PC. • Avoid using an SD Memory Card • Make sure the camera is turned off the camera when recording data or playing back images from the SD Memory Card, or when connected to sudden temperature changes, condensation, or direct sunlight. 16
Operation Manual
Page 20
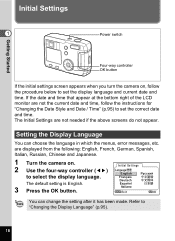
... set the correct date and time. Italiano MENU E x i t OK O K You can choose the language in which the menus, error messages, etc. Initial Settings 2 Use the four-way controller (45) English to "Changing the Display Language" (p.95). 18 Setting the Display Language You can change the setting after it has been made. Español 3 Press the OK button. Initial Settings 1 Power switch Getting Started Four-way controller OK button If the initial settings screen appears when you turn the camera...
... set the correct date and time. Italiano MENU E x i t OK O K You can choose the language in which the menus, error messages, etc. Initial Settings 2 Use the four-way controller (45) English to "Changing the Display Language" (p.95). 18 Setting the Display Language You can change the setting after it has been made. Español 3 Press the OK button. Initial Settings 1 Power switch Getting Started Four-way controller OK button If the initial settings screen appears when you turn the camera...

Operation Manual
Page 25
... the flash is in focus, the frame will light green. Viewfinder lamp The viewfinder lamp (red) lights when the flash charge is out of focus, the frame will be displayed), and selecting [Delete], and then pressing the OK button. 23 Lock the focus on the LCD monitor and the viewfinder lamp. 1. If the subject is completed. You cannot take a picture while the flash is charging or the camera is recording an image...
... the flash is in focus, the frame will light green. Viewfinder lamp The viewfinder lamp (red) lights when the flash charge is out of focus, the frame will be displayed), and selecting [Delete], and then pressing the OK button. 23 Lock the focus on the LCD monitor and the viewfinder lamp. 1. If the subject is completed. You cannot take a picture while the flash is charging or the camera is recording an image...
Operation Manual
Page 30
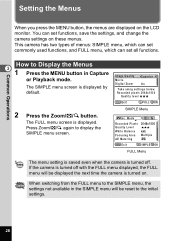
... turned on. Common Operations Setting the Menus When you press the MENU button, the menus are displayed on these menus. Mode Recorded Pixels Quality Level White Balance Focusing Area AE Metering 2048x1536 AWB Multiple MENU E x i t S I M P L E OK O K FULL Menu The menu setting is saved even when the camera is turned off with the FULL menu displayed, the FULL menu will be displayed the next time the camera is turned off . You can set functions, save the settings, and change the camera settings on the LCD...
... turned on. Common Operations Setting the Menus When you press the MENU button, the menus are displayed on these menus. Mode Recorded Pixels Quality Level White Balance Focusing Area AE Metering 2048x1536 AWB Multiple MENU E x i t S I M P L E OK O K FULL Menu The menu setting is saved even when the camera is turned off with the FULL menu displayed, the FULL menu will be displayed the next time the camera is turned off . You can set functions, save the settings, and change the camera settings on the LCD...
Operation Manual
Page 31
... Reference Image Quality For setting the recorded pixels and quality level of still pictures p.43 Movie For setting the recorded pixels of the movie picture, color mode and fps for Fast Fwd Movie p.64 - 69 Digital Zoom For setting the digital zoom p.60 Digital Filter For filtering the captured image p.92 Format For formatting the SD Memory Card or Built-in memory p.94 Date Adjust For adjusting the date and time p.95 Language/ For changing the language in both Capture mode and Playback mode. 1 Use the...
... Reference Image Quality For setting the recorded pixels and quality level of still pictures p.43 Movie For setting the recorded pixels of the movie picture, color mode and fps for Fast Fwd Movie p.64 - 69 Digital Zoom For setting the digital zoom p.60 Digital Filter For filtering the captured image p.92 Format For formatting the SD Memory Card or Built-in memory p.94 Date Adjust For adjusting the date and time p.95 Language/ For changing the language in both Capture mode and Playback mode. 1 Use the...

Operation Manual
Page 34
... Rec.Mode] menu will be displayed, and when you display the menu from Playback mode, the [Q Playback] menu will be displayed. 32 Common Operations Example of FULL Menu Operation (When the MENU Button is Pressed in Capture Mode) [A Rec.Mode] Menu 1 [Q Playback] Menu 1 [B Set-up Format Date Adjust 05/03/2004 English Screen Setting U S B C o n n e c t i o n PC MENU E x i t S I M P L E OK O K 3 Rec. Mode Recorded Pixels Quality Level White Balance Focusing Area AE Metering 2048x1536 AWB Multiple MENU E x i t S I M P L E OK O K 2 Playback Resize Trimming Copy Image Digital...
... Rec.Mode] menu will be displayed, and when you display the menu from Playback mode, the [Q Playback] menu will be displayed. 32 Common Operations Example of FULL Menu Operation (When the MENU Button is Pressed in Capture Mode) [A Rec.Mode] Menu 1 [Q Playback] Menu 1 [B Set-up Format Date Adjust 05/03/2004 English Screen Setting U S B C o n n e c t i o n PC MENU E x i t S I M P L E OK O K 3 Rec. Mode Recorded Pixels Quality Level White Balance Focusing Area AE Metering 2048x1536 AWB Multiple MENU E x i t S I M P L E OK O K 2 Playback Resize Trimming Copy Image Digital...
Operation Manual
Page 35
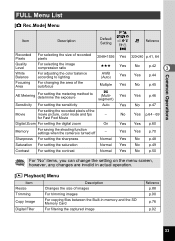
... Memory For saving the shooting function settings when the camera is turned off - Common Operations FULL Menu List [A Rec.Mode] Menu eH Item Description Default Setting ABJ LIC KE C Reference F Recorded Pixels For selecting the size of recorded pixels 2048×1536 Yes 320×240 p.41, 64 Quality Level For selecting the image compression ratio C Yes No p.42 3 White Balance For adjusting the color balance according to lighting AWB (Auto) Yes Yes p.44 Focusing...
... Memory For saving the shooting function settings when the camera is turned off - Common Operations FULL Menu List [A Rec.Mode] Menu eH Item Description Default Setting ABJ LIC KE C Reference F Recorded Pixels For selecting the size of recorded pixels 2048×1536 Yes 320×240 p.41, 64 Quality Level For selecting the image compression ratio C Yes No p.42 3 White Balance For adjusting the color balance according to lighting AWB (Auto) Yes Yes p.44 Focusing...
Operation Manual
Page 37
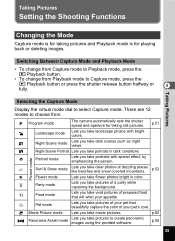
...Taking Pictures Setting the Shooting Functions Changing the Mode Capture mode is for playing back or deleting images. A Night-Scene mode Lets you take dark scenes such as night views. p.55 35 p.62 F Panorama Assist mode Lets you take pictures to select Capture mode. p.52 Picture mode I Flower mode C Party mode Lets you take flower photos bright in dark conditions. C Movie Picture mode Lets you take movie pictures. Taking Pictures Selecting the Capture Mode Display the virtual mode dial to create panoramic images using the povided software. Switching...
...Taking Pictures Setting the Shooting Functions Changing the Mode Capture mode is for playing back or deleting images. A Night-Scene mode Lets you take dark scenes such as night views. p.55 35 p.62 F Panorama Assist mode Lets you take pictures to select Capture mode. p.52 Picture mode I Flower mode C Party mode Lets you take flower photos bright in dark conditions. C Movie Picture mode Lets you take movie pictures. Taking Pictures Selecting the Capture Mode Display the virtual mode dial to create panoramic images using the povided software. Switching...
Operation Manual
Page 40
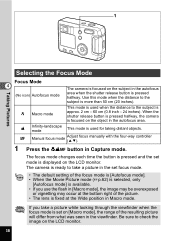
... camera is ready to check the image on the object in Capture mode. The focus mode changes each time the button is pressed and the set focus mode. • The default setting of the picture. • The lens is focused on the LCD monitor. 38 z Manual focus mode Adjust focus manually with the four-way controller (23). 1 Press the ) button in the autofocus area. Be sure to take a picture while looking through the viewfinder when the focus mode is used...
... camera is ready to check the image on the object in Capture mode. The focus mode changes each time the button is pressed and the set focus mode. • The default setting of the picture. • The lens is focused on the LCD monitor. 38 z Manual focus mode Adjust focus manually with the four-way controller (23). 1 Press the ) button in the autofocus area. Be sure to take a picture while looking through the viewfinder when the focus mode is used...
Operation Manual
Page 72
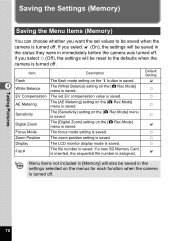
... reset to be saved when the camera is turned off . Taking Pictures 70 P Zoom Position The zoom position setting is assigned. If a new SD Memory Card is inserted, the sequential file number is saved. If you select P (Off), the settings will also be saved in the status they were in the settings selected on the [A Rec.Mode] menu is saved. O Focus Mode The focus mode setting is saved. Item Description Default Setting Flash The flash mode setting on the [A Rec.Mode] menu is saved. P Digital Zoom The [Digital Zoom] setting...
... reset to be saved when the camera is turned off . Taking Pictures 70 P Zoom Position The zoom position setting is assigned. If a new SD Memory Card is inserted, the sequential file number is saved. If you select P (Off), the settings will also be saved in the status they were in the settings selected on the [A Rec.Mode] menu is saved. O Focus Mode The focus mode setting is saved. Item Description Default Setting Flash The flash mode setting on the [A Rec.Mode] menu is saved. P Digital Zoom The [Digital Zoom] setting...
Operation Manual
Page 102
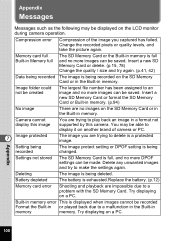
... Memory Card or delete. (p.15, 78) Change the quality / size and try to make the settings again. Try displaying on a PC. Try displaying on a PC. Memory card full Built-in Memory full The SD Memory Card or the Built-in memory is exhausted.Replace the battery. (p.12) Memory card error Shooting and playback are trying to play back an image in memory. Insert a new SD Memory Card or format the SD Memory Card or Built-in memory. Setting being recorded The image protect setting or DPOF setting...
... Memory Card or delete. (p.15, 78) Change the quality / size and try to make the settings again. Try displaying on a PC. Try displaying on a PC. Memory card full Built-in Memory full The SD Memory Card or the Built-in memory is exhausted.Replace the battery. (p.12) Memory card error Shooting and playback are trying to play back an image in memory. Insert a new SD Memory Card or format the SD Memory Card or Built-in memory. Setting being recorded The image protect setting or DPOF setting...
Operation Manual
Page 104
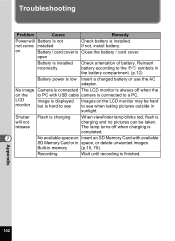
.... Shutter will Battery is not Check battery is low Insert a charged battery or use the AC adapter. Reinsert battery according to see when taking pictures outside in space, or delete unwanted images. The lamp turns off when the on Battery / card cover is charging and no pictures can be hard monitor but is hard to see to the +- Built-in the battery compartment. (p.12) Battery power is installed. Troubleshooting Problem Cause Remedy Power will...
.... Shutter will Battery is not Check battery is low Insert a charged battery or use the AC adapter. Reinsert battery according to see when taking pictures outside in space, or delete unwanted images. The lamp turns off when the on Battery / card cover is charging and no pictures can be hard monitor but is hard to see to the +- Built-in the battery compartment. (p.12) Battery power is installed. Troubleshooting Problem Cause Remedy Power will...
Operation Manual
Page 107
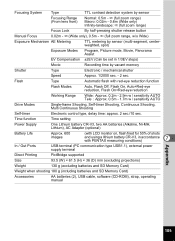
...) Exposure Modes Program, Picture mode, Movie, Panorama Assist EV Compensation ±2EV (Can be set in accordance with PENTAX measuring conditions) 7 In / Out Ports USB terminal (PC communication type USB1.1), external power supply terminal Direct Printing PictBridge supported Size 93.5 (W) × 61.5 (H) × 36 (D) mm (excluding projections) Weight 130 g (excluding batteries and SD Memory Card) Weight when shooting 180 g (including batteries and SD Memory Card) Accessories AA batteries (2), USB cable, software (CD-ROM), strap, operating manual Appendix 105 Focusing...
...) Exposure Modes Program, Picture mode, Movie, Panorama Assist EV Compensation ±2EV (Can be set in accordance with PENTAX measuring conditions) 7 In / Out Ports USB terminal (PC communication type USB1.1), external power supply terminal Direct Printing PictBridge supported Size 93.5 (W) × 61.5 (H) × 36 (D) mm (excluding projections) Weight 130 g (excluding batteries and SD Memory Card) Weight when shooting 180 g (including batteries and SD Memory Card) Accessories AA batteries (2), USB cable, software (CD-ROM), strap, operating manual Appendix 105 Focusing...


