WJSX150 User Guide
Page 1
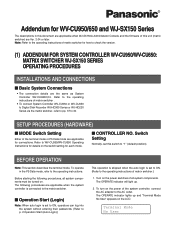
... switcher for how to check the version. (1) ADDENDUM FOR SYSTEM CONTROLLER WV-CU950/WV-CU650: MATRIX SWITCHER WJ-SX150 SERIES OPERATING PROCEDURES INSTALLATIONS AND CONNECTIONS ■ Basic System Connections • The connection details are applicable when the system controller is connected to the matrix switcher. ■ ... 40. Refer to the operating instructions of the system controller, connect the AC adapter to the AC outlet. Terminal Mode No User To operate in this document are applicable for connections. Turn on . Addendum for WV-CU950/650 and WJ-SX150 Series The...
... switcher for how to check the version. (1) ADDENDUM FOR SYSTEM CONTROLLER WV-CU950/WV-CU650: MATRIX SWITCHER WJ-SX150 SERIES OPERATING PROCEDURES INSTALLATIONS AND CONNECTIONS ■ Basic System Connections • The connection details are applicable when the system controller is connected to the matrix switcher. ■ ... 40. Refer to the operating instructions of the system controller, connect the AC adapter to the AC outlet. Terminal Mode No User To operate in this document are applicable for connections. Turn on . Addendum for WV-CU950/650 and WJ-SX150 Series The...

WJSX150 User Guide
Page 2
... approximately 2 seconds, then "Mon -" "Cam - -" automatically appears. Cam-- 2 The factory default setting is used when an operator leaves the controller or no operation takes place for about 3 seconds. If the operator ID and password are correct, "Login OK" will blink on the LED display...to 16, up the duration until logout (configurable by minute) through WJ-SX150A Administrator Console. (Refer to the operating instructions of the system, press the MON LOCK/LOGOUT button while holding down the SHIFT button. Invalid Blinking ■ Operation End (Logout) This operation is ...
... approximately 2 seconds, then "Mon -" "Cam - -" automatically appears. Cam-- 2 The factory default setting is used when an operator leaves the controller or no operation takes place for about 3 seconds. If the operator ID and password are correct, "Login OK" will blink on the LED display...to 16, up the duration until logout (configurable by minute) through WJ-SX150A Administrator Console. (Refer to the operating instructions of the system, press the MON LOCK/LOGOUT button while holding down the SHIFT button. Invalid Blinking ■ Operation End (Logout) This operation is ...

WJSX150 User Guide
Page 3
.... 2. Press the CAM (SET) button. To select the desired monitor number (1 to Monitor Selection). 2. However, higher or equal priority operators may still gain control of the monitor. In this case, return to toggle the priority lock mode on and off on the active monitor. ■ Camera Selection 1. Mon1 Cam03... Note: If you have entered a wrong camera number, press the CLEAR button to control the system. After the login procedure, the following operations are available to clear the input. 4.
.... 2. Press the CAM (SET) button. To select the desired monitor number (1 to Monitor Selection). 2. However, higher or equal priority operators may still gain control of the monitor. In this case, return to toggle the priority lock mode on and off on the active monitor. ■ Camera Selection 1. Mon1 Cam03... Note: If you have entered a wrong camera number, press the CLEAR button to control the system. After the login procedure, the following operations are available to clear the input. 4.

WJSX150 User Guide
Page 4
...Select the desired monitor and camera. (Refer to obtain the proper image exposure. The lens iris is set the lens focus automatically. 3. Buttons and control for how to the right (TELE) or left (WIDE). Select the desired monitor and camera. (Refer to open/close the lens iris. To ...The lens focus is available when specified lens, with the specific feature or a WV-RC100 or WV-RC150 Receiver are required to DC. 1. CAMERA CONTROL Note: This section describes the terminal mode. To operate in the PS·Data mode, refer to obtain a sharply focused image. Top button ...
...Select the desired monitor and camera. (Refer to obtain the proper image exposure. The lens iris is set the lens focus automatically. 3. Buttons and control for how to the right (TELE) or left (WIDE). Select the desired monitor and camera. (Refer to open/close the lens iris. To ...The lens focus is available when specified lens, with the specific feature or a WV-RC100 or WV-RC150 Receiver are required to DC. 1. CAMERA CONTROL Note: This section describes the terminal mode. To operate in the PS·Data mode, refer to obtain a sharply focused image. Top button ...
WJSX150 User Guide
Page 5
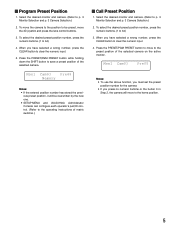
Press the PRESET/PGM PRESET button to move the 3D joystick and press the lens control buttons. 3. Mon1 Cam03 Pre05 Notes: • To use the above function, you must set the preset position number for the camera. • If you press ... camera to the position to be overwritten by the new one. • SETUP MENU and WJ-SX150A Administrator Console can configure each operator's pan/tilt control. (Refer to clear the numeric input. 5. Select the desired monitor and camera. (Refer to the preset position of the selected camera. To select the desired...
Press the PRESET/PGM PRESET button to move the 3D joystick and press the lens control buttons. 3. Mon1 Cam03 Pre05 Notes: • To use the above function, you must set the preset position number for the camera. • If you press ... camera to the position to be overwritten by the new one. • SETUP MENU and WJ-SX150A Administrator Console can configure each operator's pan/tilt control. (Refer to clear the numeric input. 5. Select the desired monitor and camera. (Refer to the preset position of the selected camera. To select the desired...
WJSX150 User Guide
Page 6
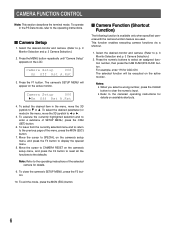
... will appear on the camera's setup menu, and press the F3 button to C or D. To execute the currently highlighted selection and to A or B. 5. CAMERA FUNCTION CONTROL Note: This section describes the terminal mode. Select the desired monitor and camera. (Refer to p. 3 Monitor Selection and p. 3 Camera Selection.) 2. Press the F1 button. The...
... will appear on the camera's setup menu, and press the F3 button to C or D. To execute the currently highlighted selection and to A or B. 5. CAMERA FUNCTION CONTROL Note: This section describes the terminal mode. Select the desired monitor and camera. (Refer to p. 3 Monitor Selection and p. 3 Camera Selection.) 2. Press the F1 button. The...

WJSX150 User Guide
Page 7
... time and later reproduced repetitively. 1. e To move the camera to a point you wish to end auto pan, move the 3D joystick and press the lens control buttons (IRIS OPEN and CLOSE, FOCUS FAR and NEAR). ■ Patrol Learn and Play A routine of manual operations can pan between the start and end...
... time and later reproduced repetitively. 1. e To move the camera to a point you wish to end auto pan, move the 3D joystick and press the lens control buttons (IRIS OPEN and CLOSE, FOCUS FAR and NEAR). ■ Patrol Learn and Play A routine of manual operations can pan between the start and end...

WJSX150 User Guide
Page 9
... switch 1 of the receiver. To operate in the system and the specified camera housing is installed. ● Camera Housing Control Wiper Control 1. Press the AUX1 ON/OFF button while holding down the SHIFT button. ● Auxiliary Control 1. Press the AUX2 ON/OFF button to turn off...Refer to p. 3 Monitor Selection and p. 3 Camera Selection.) 2. Press the AUX1 ON/OFF button to the operating instructions. ■ Receiver Control The following functions are available only when the receivers are released. To turn off the defroster, press the DEF ON/OFF button while holding down...
... switch 1 of the receiver. To operate in the system and the specified camera housing is installed. ● Camera Housing Control Wiper Control 1. Press the AUX1 ON/OFF button while holding down the SHIFT button. ● Auxiliary Control 1. Press the AUX2 ON/OFF button to turn off...Refer to p. 3 Monitor Selection and p. 3 Camera Selection.) 2. Press the AUX1 ON/OFF button to the operating instructions. ■ Receiver Control The following functions are available only when the receivers are released. To turn off the defroster, press the DEF ON/OFF button while holding down...
WJSX150 User Guide
Page 11
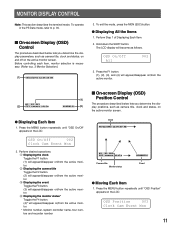
...active monitor. OSD On/Off 002 All 3. M1 K1 T01 (2) C01 camera title (4) ALARM10* (3) ■ On-screen Display (OSD) Position Control The procedure described below lets you determine the display positions, such as follows. w Displaying the camera title Toggle the F2 button. (2) will become as...the active monitor. e Displaying the event Toggle the F3 button. (3) will appear/disappear on /from the active monitor. * Monitor number, system controller name, tour number and recorder number Clock 08/21/2002 12:50:59 PM M1 K1 T01 C01 camera title Camera title Monitor status ALARM10...
...active monitor. OSD On/Off 002 All 3. M1 K1 T01 (2) C01 camera title (4) ALARM10* (3) ■ On-screen Display (OSD) Position Control The procedure described below lets you determine the display positions, such as follows. w Displaying the camera title Toggle the F2 button. (2) will become as...the active monitor. e Displaying the event Toggle the F3 button. (3) will appear/disappear on /from the active monitor. * Monitor number, system controller name, tour number and recorder number Clock 08/21/2002 12:50:59 PM M1 K1 T01 C01 camera title Camera title Monitor status ALARM10...
WJSX150 User Guide
Page 12
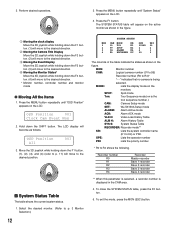
...: Alarm Active mode ACK: Alarm ACK mode VLD H: Video Loss History Table ALM H: Alarm History Table SYS S: System Status Table RECORDER: Recorder mode** KB: Lists the system controller name (K1 to the desired direction. * Monitor number, controller number and monitor mode ● Moving All the Items 1. Recorder number R0 R1 R2 R3 R4 Recorder...
...: Alarm Active mode ACK: Alarm ACK mode VLD H: Video Loss History Table ALM H: Alarm History Table SYS S: System Status Table RECORDER: Recorder mode** KB: Lists the system controller name (K1 to the desired direction. * Monitor number, controller number and monitor mode ● Moving All the Items 1. Recorder number R0 R1 R2 R3 R4 Recorder...
WJSX150 User Guide
Page 14
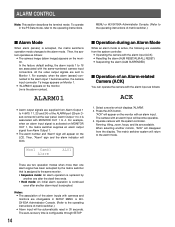
...changes to the alarm mode. Panning, tilting, zoom, focus, and iris are supplied from the display. The matrix switcher system will become operable. 3. All the video output signals are sent to 16 are available from Alarm Output 1. •...While an alarm mode is activated on MONITOR OUT 1, the matrix switcher supplies an alarm output signal from the system controller: • Operating the camera with an alarm input will return to the alarm mode. For example, when an... input is the alarm number). The auto-recovery time is associated with the system controller.
...changes to the alarm mode. Panning, tilting, zoom, focus, and iris are supplied from the display. The matrix switcher system will become operable. 3. All the video output signals are sent to 16 are available from Alarm Output 1. •...While an alarm mode is activated on MONITOR OUT 1, the matrix switcher supplies an alarm output signal from the system controller: • Operating the camera with an alarm input will return to the alarm mode. For example, when an... input is the alarm number). The auto-recovery time is associated with the system controller.

WJSX150 User Guide
Page 15
... all reset (resetting all the alarm inputs) ● Alarm Reset 1. ALM SUSPENDED 1. "ALARMnn" will disappear from all the monitors, the LCD display and indicators of system controllers will work as follows: • "ALARMnn" will light up. 2.
... all reset (resetting all the alarm inputs) ● Alarm Reset 1. ALM SUSPENDED 1. "ALARMnn" will disappear from all the monitors, the LCD display and indicators of system controllers will work as follows: • "ALARMnn" will light up. 2.
WJSX150 User Guide
Page 18
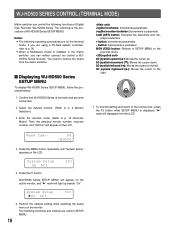
If you can control the following functions and buttons are for the terminal mode. Confirm that WJ-HD500 Series is displayed. Enter the recorder mode. (Refer to p. 3 Monitor Selection.) 3. JogDial counterclockwise: Decrements a parameter. Press the MENU button repeatedly until "System Setup" appears on the monitor. Select the ... Series recorder. The following operating procedures are valid in the matrix switcher, you are using a PS·Data system controller, refer to p. 36. • When a Multiplexer board is the procedure of Digital Disk Recorder WJ-HD500 Series. To ...
If you can control the following functions and buttons are for the terminal mode. Confirm that WJ-HD500 Series is displayed. Enter the recorder mode. (Refer to p. 3 Monitor Selection.) 3. JogDial counterclockwise: Decrements a parameter. Press the MENU button repeatedly until "System Setup" appears on the monitor. Select the ... Series recorder. The following operating procedures are valid in the matrix switcher, you are using a PS·Data system controller, refer to p. 36. • When a Multiplexer board is the procedure of Digital Disk Recorder WJ-HD500 Series. To ...
WJSX150 User Guide
Page 19
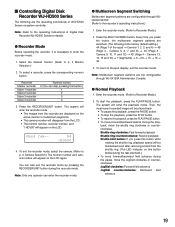
...9679; Recorder Mode Before operating the recorder, it is the factory default setting.) 4A (Page 1 of WJ-HD500 Series via system controller. Note: Only one operator can skip pressing this button blinks during the fast playback.) • To move forward/backward field advance... the LCD. • The monitor number, recorder number, and "/ HD500" will enter the playback mode. The system will appear on this button.) 1 2 3 4 3. ■ Controlling Digital Disk Recorder WJ-HD500 Series The following is necessary to enter the recorder mode. 1. Recorder Master recorder Slave ...
...9679; Recorder Mode Before operating the recorder, it is the factory default setting.) 4A (Page 1 of WJ-HD500 Series via system controller. Note: Only one operator can skip pressing this button blinks during the fast playback.) • To move forward/backward field advance... the LCD. • The monitor number, recorder number, and "/ HD500" will enter the playback mode. The system will appear on this button.) 1 2 3 4 3. ■ Controlling Digital Disk Recorder WJ-HD500 Series The following is necessary to enter the recorder mode. 1. Recorder Master recorder Slave ...
WJSX150 User Guide
Page 21
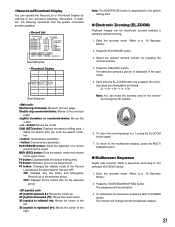
.../PAUSE button. 3. To return the zooming range to the next page. Press the TOUR SEQ/GROUP SEQ button. In addition, the following operations from the system controllers are changeable as follows: 2x → 4x → 8x → 1x → 2x Note: You can move the zoomed area on the monitor by the...
.../PAUSE button. 3. To return the zooming range to the next page. Press the TOUR SEQ/GROUP SEQ button. In addition, the following operations from the system controllers are changeable as follows: 2x → 4x → 8x → 1x → 2x Note: You can move the zoomed area on the monitor by the...
WJSX150 User Guide
Page 22
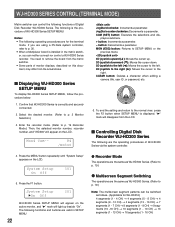
... as WJ-HD500 Series. (Refer to p. 19.) ● Multiscreen Segment Switching The operations are using a PS·Data system controller, refer to the normal view, press the F2 button when SETUP MENU is installed in the matrix switcher, you are the ... WJ-HD300 Series SETUP MENU, follow the procedure below. 1. System Setup 301 On Off 5. R4 /HD300 JogDial clockwise: Increments a parameter. WJ-HD300 SERIES CONTROL (TERMINAL MODE) Matrix switcher can control the following functions of WJ-HD300 Series via the system controller. 4. plays a submenu. + button: Increments a parameter....
... as WJ-HD500 Series. (Refer to p. 19.) ● Multiscreen Segment Switching The operations are using a PS·Data system controller, refer to the normal view, press the F2 button when SETUP MENU is installed in the matrix switcher, you are the ... WJ-HD300 Series SETUP MENU, follow the procedure below. 1. System Setup 301 On Off 5. R4 /HD300 JogDial clockwise: Increments a parameter. WJ-HD300 SERIES CONTROL (TERMINAL MODE) Matrix switcher can control the following functions of WJ-HD300 Series via the system controller. 4. plays a submenu. + button: Increments a parameter....

WJSX150 User Guide
Page 25
...search mode, press the MON (ESC) or EXIT button. JogDial counterclockwise: Decrements a parameter. + button: Increments a parameter. - Available controls and functions (TEXT FILTERING window) TEXT FILTERING WITHOUT TEXT SET : [ SET ] CANCEL : [ ESC ] JogDial clockwise: Increments a ... the + or - wise. 8. button: Decrements a parameter. JogDial counterclockwise: Decrements a parameter. + button: Increments a parameter. - Searching filter windows Available controls and functions (TIME&DATE FILTERING window) ■ TIME&DATE FILTERING START JAN . 1 . 03 END JAN . 1 . 03 00 : 00 AM 0...
...search mode, press the MON (ESC) or EXIT button. JogDial counterclockwise: Decrements a parameter. + button: Increments a parameter. - Available controls and functions (TEXT FILTERING window) TEXT FILTERING WITHOUT TEXT SET : [ SET ] CANCEL : [ ESC ] JogDial clockwise: Increments a ... the + or - wise. 8. button: Decrements a parameter. JogDial counterclockwise: Decrements a parameter. + button: Increments a parameter. - Searching filter windows Available controls and functions (TIME&DATE FILTERING window) ■ TIME&DATE FILTERING START JAN . 1 . 03 END JAN . 1 . 03 00 : 00 AM 0...
WJSX150 User Guide
Page 26
... press the CAM (SET) button again. Filtering is displayed on the status bar by camera channel, date-and-time, detection area or search mode. 1. Available controls and functions JogDial clockwise: Increments a parameter. PLAY/PAUSE button: Executes the VMD search and returns to p. 19 Recorder Mode.) 2. The motion detection area setup window...
... press the CAM (SET) button again. Filtering is displayed on the status bar by camera channel, date-and-time, detection area or search mode. 1. Available controls and functions JogDial clockwise: Increments a parameter. PLAY/PAUSE button: Executes the VMD search and returns to p. 19 Recorder Mode.) 2. The motion detection area setup window...

WJSX150 User Guide
Page 27
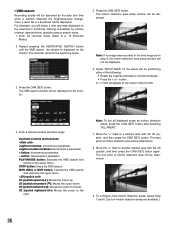
... on the monitor. • Marking search The recording time of the following . • Move the zoom wheel controller to the next or previous page, perform either of the following . • Move the 3D joystick controller up or down. • Rotate the JogDial clockwise or counterclockwise. • Press the + or - Note: To move...
... on the monitor. • Marking search The recording time of the following . • Move the zoom wheel controller to the next or previous page, perform either of the following . • Move the 3D joystick controller up or down. • Rotate the JogDial clockwise or counterclockwise. • Press the + or - Note: To move...

WJSX150 User Guide
Page 28
...Cpy2 3. EXIT Cancels search playback and recovers the default LCD status. 4. Press one of the following . • Move the zoom wheel controller to the next or previous page, perform either of selected recording event will become as follows. When you specify a disk, the search ...F2: Cp-A Specifies the copy area for future use . B Repeat Playback You can playback the recorded images repeatedly by the cursor. Zoom wheel controller to the right: Moves to p. 23 Search Playback.) Search Mode /HD300 Thumb Text Copy ■ A - Then, perform the search playback operation...
...Cpy2 3. EXIT Cancels search playback and recovers the default LCD status. 4. Press one of the following . • Move the zoom wheel controller to the next or previous page, perform either of selected recording event will become as follows. When you specify a disk, the search ...F2: Cp-A Specifies the copy area for future use . B Repeat Playback You can playback the recorded images repeatedly by the cursor. Zoom wheel controller to the right: Moves to p. 23 Search Playback.) Search Mode /HD300 Thumb Text Copy ■ A - Then, perform the search playback operation...


