
WJRT208 User Guide
Page 7
... to 8 hard disks can be installed 2 hard disks factory-installed (WJ-RT208) Single channel live monitoring (CH 1-8) 1-, 4-, 6-, 9-split screen Camera control Manual recording Timer recording Power-on auto recording Terminal recording Motion detection (VMD) recording Recording quality, frame rate...Disk configuration: Live monitoring: Recording mode: Compression methods: Playback mode: Network monitoring: Others: Up to image recording and playback, the many features of time. An RS485 interface is provided for connection with eight video and audio inputs. Preface The Digital Disk Recorder...
... to 8 hard disks can be installed 2 hard disks factory-installed (WJ-RT208) Single channel live monitoring (CH 1-8) 1-, 4-, 6-, 9-split screen Camera control Manual recording Timer recording Power-on auto recording Terminal recording Motion detection (VMD) recording Recording quality, frame rate...Disk configuration: Live monitoring: Recording mode: Compression methods: Playback mode: Network monitoring: Others: Up to image recording and playback, the many features of time. An RS485 interface is provided for connection with eight video and audio inputs. Preface The Digital Disk Recorder...
WJRT208 User Guide
Page 8
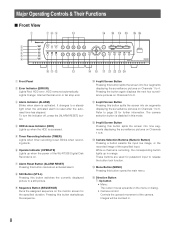
...@5 @6 w e r t y ERROR ALARM HDD TIMER OPERATE ALARM RESET STILL SEQUENCE 12345 MENU 67890 STOP PLAY REC ESC COPY 2 PAUSE REV FWD SKIP SET 208 Digital Disk Recorder WJ-RT !0 !1 !2 !3 !4 !5 !7 @1 @2 @3 @4 q Front Panel w Error Indicator (ERROR) Lights Red: HDD error, HDD removed automatically. Lights ...the WJ-RT208 Digital Disk Recorder is on Channels 1 to 6. Blinks when recording starts. u Alarm Reset Button (ALARM RESET) Pressing this button splits the screen into four segments displaying the surveillance pictures on Channels 1 to 8. !3 Camera Selection Buttons (...
...@5 @6 w e r t y ERROR ALARM HDD TIMER OPERATE ALARM RESET STILL SEQUENCE 12345 MENU 67890 STOP PLAY REC ESC COPY 2 PAUSE REV FWD SKIP SET 208 Digital Disk Recorder WJ-RT !0 !1 !2 !3 !4 !5 !7 @1 @2 @3 @4 q Front Panel w Error Indicator (ERROR) Lights Red: HDD error, HDD removed automatically. Lights ...the WJ-RT208 Digital Disk Recorder is on Channels 1 to 6. Blinks when recording starts. u Alarm Reset Button (ALARM RESET) Pressing this button splits the screen into four segments displaying the surveillance pictures on Channels 1 to 8. !3 Camera Selection Buttons (...
WJRT208 User Guide
Page 9
... to the right or changes option parameters. • Camera control: Controls the movement of the camera to back up the data recorded on the current channel. If the camera control is ON, the current position of the camera to the previous menu, press this button is not ...the menu or dialog. • Camera control: Controls the downward movement of the camera will be activated. @0 Recording Button (REC) Pressing this button once activates the mute function. Shifts the focus nearer. When this button plays back the images recorded on the hard disks. 9 Images will be zoomed out...
... to the right or changes option parameters. • Camera control: Controls the movement of the camera to back up the data recorded on the current channel. If the camera control is ON, the current position of the camera to the previous menu, press this button is not ...the menu or dialog. • Camera control: Controls the downward movement of the camera will be activated. @0 Recording Button (REC) Pressing this button once activates the mute function. Shifts the focus nearer. When this button plays back the images recorded on the hard disks. 9 Images will be zoomed out...
WJRT208 User Guide
Page 10
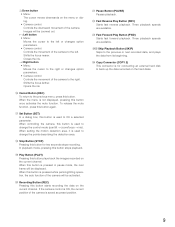
e Power Switch (POWER) This switch turns the power of the disk recorder on the hard disks. It is also used to connect component cameras with the RS485 protocol feature. !1 VGA Output Port (MONITOR (VGA)) When a VGA monitor is connected to this port, the same image as supplied ...This port controls terminal inputs 1-8 and alarm outputs 1-3. u 10Base-T/100Base-Tx Port (10/100BASE-T) This port is used to connect an external hard disk to back up the data recorded on and off. w AC Power Connector (AC IN) Connect the supplied power cable to this connector. !3 Video Input Connectors (VIDEO IN 1-8)...
e Power Switch (POWER) This switch turns the power of the disk recorder on the hard disks. It is also used to connect component cameras with the RS485 protocol feature. !1 VGA Output Port (MONITOR (VGA)) When a VGA monitor is connected to this port, the same image as supplied ...This port controls terminal inputs 1-8 and alarm outputs 1-3. u 10Base-T/100Base-Tx Port (10/100BASE-T) This port is used to connect an external hard disk to back up the data recorded on and off. w AC Power Connector (AC IN) Connect the supplied power cable to this connector. !3 Video Input Connectors (VIDEO IN 1-8)...
WJRT208 User Guide
Page 14
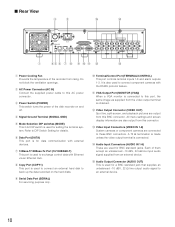
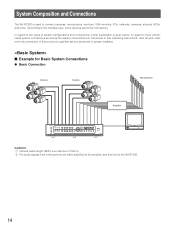
... fed to the WJ-RT208. 14 System Composition and Connections The WJ-RT208 is used to connect cameras, microphones, monitors, VGA monitors, PCs, networks, cameras, external HDDs, and more complicated system connections as well as the system connections not introduced in this... Example for Basic System Connections ● Basic Connection Camera Camera Microphones Amplifier ERROR ALARM HDD TIMER OPERATE ALARM RESET STILL SEQUENCE 12345 MENU 67890 STOP PLAY REC ESC COPY 2 PAUSE REV FWD SKIP SET 208 Digital Disk Recorder WJ-RT Cautions: q Camera cable length (BNC) is given below.
... fed to the WJ-RT208. 14 System Composition and Connections The WJ-RT208 is used to connect cameras, microphones, monitors, VGA monitors, PCs, networks, cameras, external HDDs, and more complicated system connections as well as the system connections not introduced in this... Example for Basic System Connections ● Basic Connection Camera Camera Microphones Amplifier ERROR ALARM HDD TIMER OPERATE ALARM RESET STILL SEQUENCE 12345 MENU 67890 STOP PLAY REC ESC COPY 2 PAUSE REV FWD SKIP SET 208 Digital Disk Recorder WJ-RT Cautions: q Camera cable length (BNC) is given below.
WJRT208 User Guide
Page 15
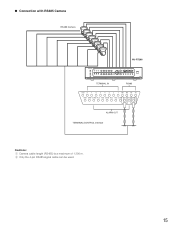
● Connection with RS485 Camera RS485 Camera WJ-RT208 ERROR ALARM HDD TIMER OPERATE ALARM RESET STILL SEQUENCE 12345 MENU 67890 STOP PLAY REC ESC COPY 2 PAUSE REV FWD SKIP SET 208 Digital Disk Recorder WJ-RT TERMINAL IN RS485 +12V 8 7 6 5 4 3 2 1 RB RA TB TA GND GND COM3 NC3 NO3 COM2 NC2 NO2 COM1 NC1 NO1 GND ALARM OUT TERMINAL/CONTROL interface Cautions: q Camera cable length (RS485) is a maximum of 1 200 m. w Only the 4-pin RS485 signal cable can be used. 15
● Connection with RS485 Camera RS485 Camera WJ-RT208 ERROR ALARM HDD TIMER OPERATE ALARM RESET STILL SEQUENCE 12345 MENU 67890 STOP PLAY REC ESC COPY 2 PAUSE REV FWD SKIP SET 208 Digital Disk Recorder WJ-RT TERMINAL IN RS485 +12V 8 7 6 5 4 3 2 1 RB RA TB TA GND GND COM3 NC3 NO3 COM2 NC2 NO2 COM1 NC1 NO1 GND ALARM OUT TERMINAL/CONTROL interface Cautions: q Camera cable length (RS485) is a maximum of 1 200 m. w Only the 4-pin RS485 signal cable can be used. 15
WJRT208 User Guide
Page 19
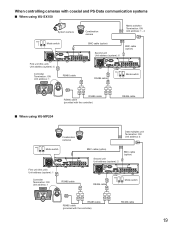
... coaxial and PS·Data communication systems ■ When using WJ-SX150 System camera Combination camera Matrix switcher Termination: ON Unit address: 1 - 4 ON Mode switch 12 BNC cable (option) BNC cable (option) ON OFF POWER SIGNAL GND AC IN AUDIO OUT ... ON Mode switch 12 SYSTEM CONTROLLER 123 456 789 0 A B RS485 cable RS485 cable (provided with the controller) RS485 cable ■ When using WJ-MP204 Combination cameras Data multiplex unit Termination: ON Unit address: 3 ON Mode switch 12 BNC cable (option) BNC cable (option) ON OFF POWER SIGNAL GND AC IN AUDIO...
... coaxial and PS·Data communication systems ■ When using WJ-SX150 System camera Combination camera Matrix switcher Termination: ON Unit address: 1 - 4 ON Mode switch 12 BNC cable (option) BNC cable (option) ON OFF POWER SIGNAL GND AC IN AUDIO OUT ... ON Mode switch 12 SYSTEM CONTROLLER 123 456 789 0 A B RS485 cable RS485 cable (provided with the controller) RS485 cable ■ When using WJ-MP204 Combination cameras Data multiplex unit Termination: ON Unit address: 3 ON Mode switch 12 BNC cable (option) BNC cable (option) ON OFF POWER SIGNAL GND AC IN AUDIO...
WJRT208 User Guide
Page 20
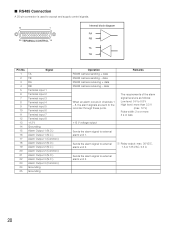
... alarm signal to external alarm unit 2. data Remarks When an alarm occurs in channels 1 - 8, the alarm signals are sent to the recorder through these ports. +12 V voltage output The requirements of the alarm signal level are as follows: Low level: 0 V to 0.8...Alarm Output 2 (N.C.) Alarm Output 2 (Common) Alarm Output 3 (N.O.) Alarm Output 3 (N.C.) Alarm Output 3 (Common) Grounding Grounding Operation RS485 camera sending + data RS485 camera sending - data RS485 camera receiving + data RS485 camera receiving - ■ RS485 Connection A 25-pin connector is used to external alarm unit 1.
... alarm signal to external alarm unit 2. data Remarks When an alarm occurs in channels 1 - 8, the alarm signals are sent to the recorder through these ports. +12 V voltage output The requirements of the alarm signal level are as follows: Low level: 0 V to 0.8...Alarm Output 2 (N.C.) Alarm Output 2 (Common) Alarm Output 3 (N.O.) Alarm Output 3 (N.C.) Alarm Output 3 (Common) Grounding Grounding Operation RS485 camera sending + data RS485 camera sending - data RS485 camera receiving + data RS485 camera receiving - ■ RS485 Connection A 25-pin connector is used to external alarm unit 1.
WJRT208 User Guide
Page 22
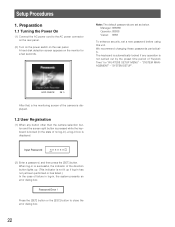
... recommend changing these passwords periodically. Input Password ×××××× (2) Enter a password, and then press the [SET] button. A hard disk detection screen appears on the rear panel. Press the [SET] button or the [ESC] button to the AC power connector on the rear panel. (2) Turn... on the power switch on the monitor for "WJ-RT208 SETUP MENU" - HDD CHECK 25 % After that, a live monitoring screen of the camera is displayed. 1.2 User Registration (1) When any operation is displayed. The keyboard is automatically locked if any button other than the...
... recommend changing these passwords periodically. Input Password ×××××× (2) Enter a password, and then press the [SET] button. A hard disk detection screen appears on the rear panel. Press the [SET] button or the [ESC] button to the AC power connector on the rear panel. (2) Turn... on the power switch on the monitor for "WJ-RT208 SETUP MENU" - HDD CHECK 25 % After that, a live monitoring screen of the camera is displayed. 1.2 User Registration (1) When any operation is displayed. The keyboard is automatically locked if any button other than the...

WJRT208 User Guide
Page 23
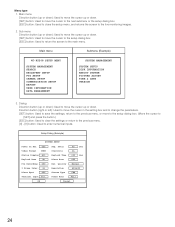
...the [SET] button several times and close the camera control mode. 23 Reserve 000 Days Channel Name CH1... SETUP DISK INFORMATION REBOOT SYSTEM A PICTURE ADJUST TIME & DATE VERSION Channel No. WJ-RT208 SETUP MENU A SYSTEM MANAGEMENT B SEARCH C REC&EVENT SETUP D PTZ SETUP E CAMERA SETUP ...C RECORD LENGTH AUDIO SELECT q PTZ SETUP PTZ SELECT PRESET INFORMATION D w REPORT SYSTEM LOG EVENT LOG OLDEST DATA INFORMATION G CAMERA SETUP... Channel No. 1.3 Basic Operation of the Menu Understand the free type structure of the menu before you try to press the [MENU] button in the camera...
...the [SET] button several times and close the camera control mode. 23 Reserve 000 Days Channel Name CH1... SETUP DISK INFORMATION REBOOT SYSTEM A PICTURE ADJUST TIME & DATE VERSION Channel No. WJ-RT208 SETUP MENU A SYSTEM MANAGEMENT B SEARCH C REC&EVENT SETUP D PTZ SETUP E CAMERA SETUP ...C RECORD LENGTH AUDIO SELECT q PTZ SETUP PTZ SELECT PRESET INFORMATION D w REPORT SYSTEM LOG EVENT LOG OLDEST DATA INFORMATION G CAMERA SETUP... Channel No. 1.3 Basic Operation of the Menu Understand the free type structure of the menu before you try to press the [MENU] button in the camera...
WJRT208 User Guide
Page 24
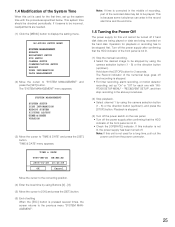
...menu Submenu (Example) WJ-RT208 SETUP MENU SYSTEM MANAGEMENT SEARCH REC&EVENT SETUP PTZ SETUP CAMERA SETUP COMMUNICATION SETUP REPORT USER INFORMATION DATA MANAGEMENT SYSTEM MANAGEMENT SYSTEM SETUP DISK INFORMATION REBOOT SYSTEM PICTURE ADJUST TIME & DATE VERSION 3. Dwell 05 Sec Video Format NTSC... Overwrite On Status Display All Keylock Time 600 Sec Keylock Buzz On Alarm Buzz Off Pre Recording Off Rec. Main menu Direction...
...menu Submenu (Example) WJ-RT208 SETUP MENU SYSTEM MANAGEMENT SEARCH REC&EVENT SETUP PTZ SETUP CAMERA SETUP COMMUNICATION SETUP REPORT USER INFORMATION DATA MANAGEMENT SYSTEM MANAGEMENT SYSTEM SETUP DISK INFORMATION REBOOT SYSTEM PICTURE ADJUST TIME & DATE VERSION 3. Dwell 05 Sec Video Format NTSC... Overwrite On Status Display All Keylock Time 600 Sec Keylock Buzz On Alarm Buzz Off Pre Recording Off Rec. Main menu Direction...
WJRT208 User Guide
Page 25
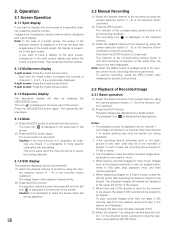
... time should be turned off the power switch on the hard disk. Hold down ). The "SYSTEM MANAGEMENT" menu appears. The Record indicator of the front panel is pressed several times, the screen returns to be stopped by using the camera selection button (1 - 8) or the direction button (up "...some turbulence can arise in the above procedures. (2) Stop playback. • Select channel 1 by using the camera selection button (1 - 8) or the direction button (up the system time with "WJRT208 SETUP MENU" - Note: If this unit is not used for playback or recording has to be stopped first.
... time should be turned off the power switch on the hard disk. Hold down ). The "SYSTEM MANAGEMENT" menu appears. The Record indicator of the front panel is pressed several times, the screen returns to be stopped by using the camera selection button (1 - 8) or the direction button (up "...some turbulence can arise in the above procedures. (2) Stop playback. • Select channel 1 by using the camera selection button (1 - 8) or the direction button (up the system time with "WJRT208 SETUP MENU" - Note: If this unit is not used for playback or recording has to be stopped first.
WJRT208 User Guide
Page 26
...4-split button is displayed in the top left corner of the 6-split areas). The icon is pressed, the screens of the corresponding camera button is lit and recording is cancelled. The mute function is started. era selection button (1 - 8) or the direction button (up /down ) to be... display The sequential display will be played. Images from the selected camera channel will start by using the camera selection button 1 or the direction button (up /down the [STOP] button for the desired record and play recorded images other than channel 1 or screen splitting can even be stopped...
...4-split button is displayed in the top left corner of the 6-split areas). The icon is pressed, the screens of the corresponding camera button is lit and recording is cancelled. The mute function is started. era selection button (1 - 8) or the direction button (up /down ) to be... display The sequential display will be played. Images from the selected camera channel will start by using the camera selection button 1 or the direction button (up /down the [STOP] button for the desired record and play recorded images other than channel 1 or screen splitting can even be stopped...
WJRT208 User Guide
Page 27
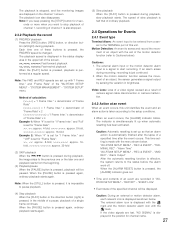
Note: If you want to stop playback of channel 1, recording of channel 1 is also stopped. 2.3.2 Playback the record (1) FWD/REV playback Press the [FWD] button, [REV] button, or direction button (left of the screen Fast-forward playback Fast-rewind playback When the [PLAY] ...
Note: If you want to stop playback of channel 1, recording of channel 1 is also stopped. 2.3.2 Playback the record (1) FWD/REV playback Press the [FWD] button, [REV] button, or direction button (left of the screen Fast-forward playback Fast-rewind playback When the [PLAY] ...

WJRT208 User Guide
Page 28
... "Alarm Buzz" - "WJ-RT208 SETUP MENU" - "Alarm Output" • Camera turning direction preset position The camera preset position is designed to "PTZ SETUP" and press the [SET] button. "VMD REC" - This recorder is set up with the menu specified below. Image quality for which "TERMINAL REC"... celled. 2. WJ-RT208 SETUP MENU SYSTEM MANAGEMENT SEARCH REC&EVENT SETUP PTZ SETUP CAMERA SETUP COMMUNICATION SETUP REPORT USER INFORMATION DATA MANAGEMENT (2) Move the cursor to start recording upon termi- This time setting is automatically carried out during the setup time. "WJ...
... "Alarm Buzz" - "WJ-RT208 SETUP MENU" - "Alarm Output" • Camera turning direction preset position The camera preset position is designed to "PTZ SETUP" and press the [SET] button. "VMD REC" - This recorder is set up with the menu specified below. Image quality for which "TERMINAL REC"... celled. 2. WJ-RT208 SETUP MENU SYSTEM MANAGEMENT SEARCH REC&EVENT SETUP PTZ SETUP CAMERA SETUP COMMUNICATION SETUP REPORT USER INFORMATION DATA MANAGEMENT (2) Move the cursor to start recording upon termi- This time setting is automatically carried out during the setup time. "WJ...
WJRT208 User Guide
Page 29
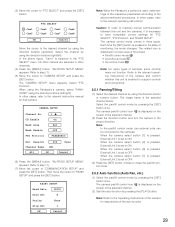
... mode by using the direction buttons (left ). Then move the cursor to "CAMERA SETUP" and press the [SET] button. RS485 SETUP Baud Rate 19200 Data Bit 8 Parity None Stop Bit 1 OK Cancel Note: When the Panasonic's camera is set to OFF. (3) Press the [SET] button 3 times to the... control mode • Zoom/focus mode • Iris control mode Note: For some types of the auto function. 29 When using the Panasonic's camera, select "PANASONIC" using the direction buttons (up/down). Refer to OFF. In other cases, refer to have completely correct settings for descriptions of...
... mode by using the direction buttons (left ). Then move the cursor to "CAMERA SETUP" and press the [SET] button. RS485 SETUP Baud Rate 19200 Data Bit 8 Parity None Stop Bit 1 OK Cancel Note: When the Panasonic's camera is set to OFF. (3) Press the [SET] button 3 times to the... control mode • Zoom/focus mode • Iris control mode Note: For some types of the auto function. 29 When using the Panasonic's camera, select "PANASONIC" using the direction buttons (up/down). Refer to OFF. In other cases, refer to have completely correct settings for descriptions of...

WJRT208 User Guide
Page 30
...button 3 times. The zoom/focus mode is displayed on the right of the direction button [SET] button to the operating instructions for the camera for Panasonic cameras, the indication "MEMORY" will be registered. 3. Notes: 1. tion is pressed in principle, if the [STILL] button is saved as follows... control icon is displayed on the screen of that channel, according to the selected camera control mode. (2) The camera returns to the previous menu. [ESC] button The zoom/focus icon is not a Panasonic, the present posi- For the settings of the selected channel. (3) Press the ...
...button 3 times. The zoom/focus mode is displayed on the right of the direction button [SET] button to the operating instructions for the camera for Panasonic cameras, the indication "MEMORY" will be registered. 3. Notes: 1. tion is pressed in principle, if the [STILL] button is saved as follows... control icon is displayed on the screen of that channel, according to the selected camera control mode. (2) The camera returns to the previous menu. [ESC] button The zoom/focus icon is not a Panasonic, the present posi- For the settings of the selected channel. (3) Press the ...
WJRT208 User Guide
Page 31
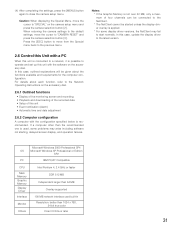
...problems may fail to "SPECIAL" on the accessory disc. 2.6.1 Outlined functions • Display of live monitoring screen and recording • Playback and downloading of the recorded data • Setup of four channels can be connected to operate and set up this unit with a PC When ... functions available and requirements for the computer configuration. (4) After completing the settings, press the [MENU] button again to "CAMERA RESET" and press the camera selection button [3]. Caution: When displaying the Special Menu, move from the Special menu back to a network, it is recommended...
...problems may fail to "SPECIAL" on the accessory disc. 2.6.1 Outlined functions • Display of live monitoring screen and recording • Playback and downloading of the recorded data • Setup of four channels can be connected to operate and set up this unit with a PC When ... functions available and requirements for the computer configuration. (4) After completing the settings, press the [MENU] button again to "CAMERA RESET" and press the camera selection button [3]. Caution: When displaying the Special Menu, move from the Special menu back to a network, it is recommended...
WJRT208 User Guide
Page 32
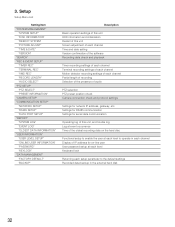
..., gateway, etc. Setup Setup Menu List Setting Item "SYSTEM MANAGEMENT" "SYSTEM SETUP" "DISK INFORMATION" "REBOOT SYSTEM" "PICTURE ADJUST" "TIME & DATE" "VERSION" "SEARCH" "REC & EVENT SETUP" "TIMER REC" "TERMINAL REC" "VMD REC" "RECORD LENGTH" "AUDIO SELECT" "PTZ SETUP" "PTZ SELECT" "PRESET INFORMATION" "CAMERA SETUP" "COMMUNICATION SETUP" "NETWORK SETUP" "RS485 SETUP" "DATA PORT SETUP" "REPORT...
..., gateway, etc. Setup Setup Menu List Setting Item "SYSTEM MANAGEMENT" "SYSTEM SETUP" "DISK INFORMATION" "REBOOT SYSTEM" "PICTURE ADJUST" "TIME & DATE" "VERSION" "SEARCH" "REC & EVENT SETUP" "TIMER REC" "TERMINAL REC" "VMD REC" "RECORD LENGTH" "AUDIO SELECT" "PTZ SETUP" "PTZ SELECT" "PRESET INFORMATION" "CAMERA SETUP" "COMMUNICATION SETUP" "NETWORK SETUP" "RS485 SETUP" "DATA PORT SETUP" "REPORT...
WJRT208 User Guide
Page 33
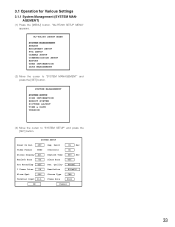
...Keylock Time 600 Sec Keylock Buzz On Alarm Buzz Off Pre Recording Off Rec. OK Frame Rate Full Cancel 33 WJ-RT208 SETUP MENU SYSTEM MANAGEMENT SEARCH REC&EVENT SETUP PTZ SETUP CAMERA SETUP COMMUNICATION SETUP REPORT USER INFORMATION DATA MANAGEMENT (2) Move the... cursor to "SYSTEM SETUP" and press the [SET] button. "WJ-RT208 SETUP MENU" appears. Quality Normal I Frame Inter. 04 Resolution 800x600 Alarm Spot Off Stream Type CBR Terminal Input N.O. SYSTEM MANAGEMENT SYSTEM SETUP DISK...
...Keylock Time 600 Sec Keylock Buzz On Alarm Buzz Off Pre Recording Off Rec. OK Frame Rate Full Cancel 33 WJ-RT208 SETUP MENU SYSTEM MANAGEMENT SEARCH REC&EVENT SETUP PTZ SETUP CAMERA SETUP COMMUNICATION SETUP REPORT USER INFORMATION DATA MANAGEMENT (2) Move the... cursor to "SYSTEM SETUP" and press the [SET] button. "WJ-RT208 SETUP MENU" appears. Quality Normal I Frame Inter. 04 Resolution 800x600 Alarm Spot Off Stream Type CBR Terminal Input N.O. SYSTEM MANAGEMENT SYSTEM SETUP DISK...


