
WJRT208 User Guide
Page 2
... limits for a Class A digital device, pursuant to Part 15 of important operating and maintenance (servicing) instructions in the literature accompanying the appliance. This equipment generates, uses, and can radiate radio frequency energy and, if not installed and used in which case the user will be required to correct the interference at his own expense. The serial number of this product...
... limits for a Class A digital device, pursuant to Part 15 of important operating and maintenance (servicing) instructions in the literature accompanying the appliance. This equipment generates, uses, and can radiate radio frequency energy and, if not installed and used in which case the user will be required to correct the interference at his own expense. The serial number of this product...
WJRT208 User Guide
Page 5
... the Network Operating Instructions (PDF) for descriptions of how to operate this appliance to qualified service personnel or system installers. • Prevent condensation from forming on the surface of the hard disk. Precautions • Refer all work related to the installation of this unit using a PC. The recorder is required to read the Network Operating Instructions (PDF). This could permanently damage the appliance. Power or battery failure may erase settings you...
... the Network Operating Instructions (PDF) for descriptions of how to operate this appliance to qualified service personnel or system installers. • Prevent condensation from forming on the surface of the hard disk. Precautions • Refer all work related to the installation of this unit using a PC. The recorder is required to read the Network Operating Instructions (PDF). This could permanently damage the appliance. Power or battery failure may erase settings you...
WJRT208 User Guide
Page 7
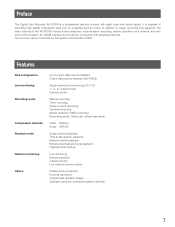
... disks factory-installed (WJ-RT208) Single channel live monitoring (CH 1-8) 1-, 4-, 6-, 9-split screen Camera control Manual recording Timer recording Power-on auto recording Terminal recording Motion detection (VMD) recording Recording quality, frame rate, stream type setup Video: MPEG-4 Audio: ADPCM Single channel playback Time & date search playback Network remote playback Remote download and local playback Playback after backup Live monitoring Remote playback Camera control Live network communication Password key protection Running log record Original heat radiation design Operable using...
... disks factory-installed (WJ-RT208) Single channel live monitoring (CH 1-8) 1-, 4-, 6-, 9-split screen Camera control Manual recording Timer recording Power-on auto recording Terminal recording Motion detection (VMD) recording Recording quality, frame rate, stream type setup Video: MPEG-4 Audio: ADPCM Single channel playback Time & date search playback Network remote playback Remote download and local playback Playback after backup Live monitoring Remote playback Camera control Live network communication Password key protection Running log record Original heat radiation design Operable using...
WJRT208 User Guide
Page 8
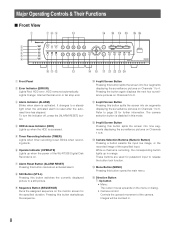
... ■ Front View q uio !3 !6 !8 !9 @0 @5 @6 w e r t y ERROR ALARM HDD TIMER OPERATE ALARM RESET STILL SEQUENCE 12345 MENU 67890 STOP PLAY REC ESC COPY 2 PAUSE REV FWD SKIP SET 208 Digital Disk Recorder WJ-RT !0 !1 !2 !3 !4 !5 !7 @1 @2 @3 @4 q Front Panel w Error Indicator (ERROR) Lights Red: HDD error, HDD removed automatically. t Timer Recording Indicator (TIMER) Lights when timer recording is activated. y Operate Indicator (OPERATE) Lights up when the power of the WJ-RT208 Digital Disk Recorder is accessed. Pressing the button again displays the next four...
... ■ Front View q uio !3 !6 !8 !9 @0 @5 @6 w e r t y ERROR ALARM HDD TIMER OPERATE ALARM RESET STILL SEQUENCE 12345 MENU 67890 STOP PLAY REC ESC COPY 2 PAUSE REV FWD SKIP SET 208 Digital Disk Recorder WJ-RT !0 !1 !2 !3 !4 !5 !7 @1 @2 @3 @4 q Front Panel w Error Indicator (ERROR) Lights Red: HDD error, HDD removed automatically. t Timer Recording Indicator (TIMER) Lights when timer recording is activated. y Operate Indicator (OPERATE) Lights up when the power of the WJ-RT208 Digital Disk Recorder is accessed. Pressing the button again displays the next four...
WJRT208 User Guide
Page 10
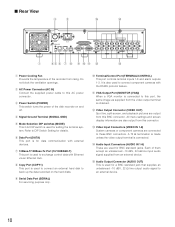
... hard disk to DIP Switch Setting for data communication with the RS485 protocol feature. !1 VGA Output Port (MONITOR (VGA)) When a VGA monitor is connected. !4 Audio Input Connectors (AUDIO IN 1-8) These are used to connect component cameras with external devices. o Serial Data Port (SERIAL) For servicing purpose only. !0 Terminal/Control Port (TERMINAL/CONTROL) This port controls terminal inputs 1-8 and alarm outputs 1-3. A 75 Ω termination is made unless the video...
... hard disk to DIP Switch Setting for data communication with the RS485 protocol feature. !1 VGA Output Port (MONITOR (VGA)) When a VGA monitor is connected. !4 Audio Input Connectors (AUDIO IN 1-8) These are used to connect component cameras with external devices. o Serial Data Port (SERIAL) For servicing purpose only. !0 Terminal/Control Port (TERMINAL/CONTROL) This port controls terminal inputs 1-8 and alarm outputs 1-3. A 75 Ω termination is made unless the video...
WJRT208 User Guide
Page 14
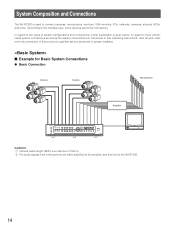
... then fed to two types of system configurations and connections, a brief explanation is a maximum of this product to qualified service personnel or system installers. ■ Example for Basic System Connections ● Basic Connection Camera Camera Microphones Amplifier ERROR ALARM HDD TIMER OPERATE ALARM RESET STILL SEQUENCE 12345 MENU 67890 STOP PLAY REC ESC COPY 2 PAUSE REV FWD SKIP SET 208 Digital Disk Recorder WJ-RT Cautions: q Camera cable length (BNC) is given below...
... then fed to two types of system configurations and connections, a brief explanation is a maximum of this product to qualified service personnel or system installers. ■ Example for Basic System Connections ● Basic Connection Camera Camera Microphones Amplifier ERROR ALARM HDD TIMER OPERATE ALARM RESET STILL SEQUENCE 12345 MENU 67890 STOP PLAY REC ESC COPY 2 PAUSE REV FWD SKIP SET 208 Digital Disk Recorder WJ-RT Cautions: q Camera cable length (BNC) is given below...
WJRT208 User Guide
Page 16
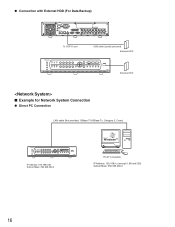
... 1 2 3 4 5 6 7 8 TERMINAL/CONTROL 1 2 3 4 5 6 7 8 MODE DATA 10/100BASE-T COPY1 SERIAL MONITOR(VGA) VIDEO OUT VIDEO IN To COPY1 port USB cable (Locally procured) External HDD ERROR ALARM HDD TIMER OPERATE ALARM RESET STILL SEQUENCE 12345 MENU 67890 STOP PLAY REC ESC COPY 2 PAUSE REV FWD SKIP SET 208 Digital Disk Recorder WJ-RT External HDD ■ Example for Network System Connection ● Direct PC Connection LAN cable (Not provided: 10Base-T/100Base-Tx, Category 5, Cross) ERROR ALARM HDD TIMER OPERATE ALARM RESET STILL...
... 1 2 3 4 5 6 7 8 TERMINAL/CONTROL 1 2 3 4 5 6 7 8 MODE DATA 10/100BASE-T COPY1 SERIAL MONITOR(VGA) VIDEO OUT VIDEO IN To COPY1 port USB cable (Locally procured) External HDD ERROR ALARM HDD TIMER OPERATE ALARM RESET STILL SEQUENCE 12345 MENU 67890 STOP PLAY REC ESC COPY 2 PAUSE REV FWD SKIP SET 208 Digital Disk Recorder WJ-RT External HDD ■ Example for Network System Connection ● Direct PC Connection LAN cable (Not provided: 10Base-T/100Base-Tx, Category 5, Cross) ERROR ALARM HDD TIMER OPERATE ALARM RESET STILL...
WJRT208 User Guide
Page 18
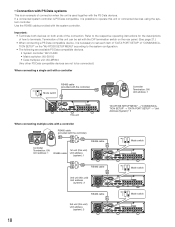
... set with the DIP termination switch on the rear panel. (See page 21.) • When connecting a PS·Data compatible device, it is necessary to operate this unit) Unit address (system): 3 ON OFF POWER SIGNAL GND AC IN AUDIO OUT AUDIO IN 1 2 3 4 5 6 7 8 TERMINAL/CONTROL 1 2 3 4 5 6 7 8 MODE DATA 10/100BASE-T COPY1 SERIAL MONITOR(VGA) VIDEO OUT VIDEO IN 18 Use the RS485 cable provided with the controller) A B Controller Termination: ON Unit address...
... set with the DIP termination switch on the rear panel. (See page 21.) • When connecting a PS·Data compatible device, it is necessary to operate this unit) Unit address (system): 3 ON OFF POWER SIGNAL GND AC IN AUDIO OUT AUDIO IN 1 2 3 4 5 6 7 8 TERMINAL/CONTROL 1 2 3 4 5 6 7 8 MODE DATA 10/100BASE-T COPY1 SERIAL MONITOR(VGA) VIDEO OUT VIDEO IN 18 Use the RS485 cable provided with the controller) A B Controller Termination: ON Unit address...
WJRT208 User Guide
Page 22
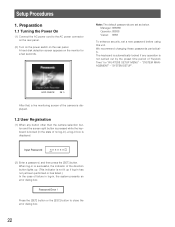
... A hard disk detection screen appears on the rear panel. Password Error ! Note: The default passwords are set a new password before using this unit. HDD CHECK 25 % After that, a live monitoring screen of the camera is displayed. 1.2 User Registration (1) When any operation is displayed. "SYSTEM SETUP". Press the [SET] button or the [ESC] button to the AC power connector on the rear panel. (2) Turn on the power switch on the monitor for "WJ-RT208 SETUP MENU" - Setup Procedures 1. Manager: 888888 Operator: 88888 Viewer: 8888 To enhance security, set...
... A hard disk detection screen appears on the rear panel. Password Error ! Note: The default passwords are set a new password before using this unit. HDD CHECK 25 % After that, a live monitoring screen of the camera is displayed. 1.2 User Registration (1) When any operation is displayed. "SYSTEM SETUP". Press the [SET] button or the [ESC] button to the AC power connector on the rear panel. (2) Turn on the power switch on the monitor for "WJ-RT208 SETUP MENU" - Setup Procedures 1. Manager: 888888 Operator: 88888 Viewer: 8888 To enhance security, set...
WJRT208 User Guide
Page 25
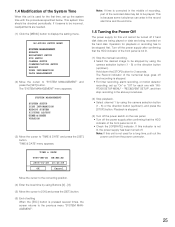
... SETUP", and then stop recording in the middle of recording, part of the recorded data may fail to be stopped by using Buttons [0] - [9]. (5) Move the cursor to display the setting menu. Playback is stopped. (3) Turn off if hard disk data are being recorded on the rear panel. • Turn off the power supply after confirming that the HDD indicator of the front panel is not lit. (1) Stop the manual recording. • Select the desired image to the previous menu "SYSTEM...
... SETUP", and then stop recording in the middle of recording, part of the recorded data may fail to be stopped by using Buttons [0] - [9]. (5) Move the cursor to display the setting menu. Playback is stopped. (3) Turn off if hard disk data are being recorded on the rear panel. • Turn off the power supply after confirming that the HDD indicator of the front panel is not lit. (1) Stop the manual recording. • Select the desired image to the previous menu "SYSTEM...
WJRT208 User Guide
Page 26
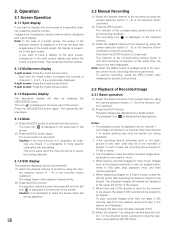
... recording file is displayed only for the channel to be recorded by two users or more for channel 1. Images from the selected camera channel will be carried out during playback. 26 2.2 Manual Recording (1) Select the desired channel to be played, the latest 5 000 records will stop the recording. It is in operation, all channels are displayed on a 6-split screen, press the [PLAY] button after releasing the camera control mode...
... recording file is displayed only for the channel to be recorded by two users or more for channel 1. Images from the selected camera channel will be carried out during playback. 26 2.2 Manual Recording (1) Select the desired channel to be played, the latest 5 000 records will stop the recording. It is in operation, all channels are displayed on a 6-split screen, press the [PLAY] button after releasing the camera control mode...

WJRT208 User Guide
Page 28
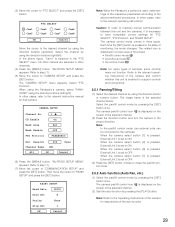
... SETUP MENU" appears. WJ-RT208 SETUP MENU SYSTEM MANAGEMENT SEARCH REC&EVENT SETUP PTZ SETUP CAMERA SETUP COMMUNICATION SETUP REPORT USER INFORMATION DATA MANAGEMENT (2) Move the cursor to cancel the alarm. 2.5 Camera Control (1) Press the [MENU] button. PTZ SETUP PTZ SELECT PRESET INFORMATION 28 • When an event occurs, the monitoring images of its channel are displayed in the process of recording images from the TERMINAL/CONTROL port of the rear panel to the PC through the network. This time setting...
... SETUP MENU" appears. WJ-RT208 SETUP MENU SYSTEM MANAGEMENT SEARCH REC&EVENT SETUP PTZ SETUP CAMERA SETUP COMMUNICATION SETUP REPORT USER INFORMATION DATA MANAGEMENT (2) Move the cursor to cancel the alarm. 2.5 Camera Control (1) Press the [MENU] button. PTZ SETUP PTZ SELECT PRESET INFORMATION 28 • When an event occurs, the monitoring images of its channel are displayed in the process of recording images from the TERMINAL/CONTROL port of the rear panel to the PC through the network. This time setting...
WJRT208 User Guide
Page 29
... by pressing the [SET] button once. The camera pan/tilt control icon is used, make settings of the selected channel. (2) Start the auto function by pressing the [SET] button once. RS485 SETUP Baud Rate 19200 Data Bit 8 Parity None Stop Bit 1 OK Cancel Note: When the Panasonic's camera is displayed on the screen of monitoring, the mode changes. Note: Refer to ON. The "CAMERA SETUP" menu appears. Cam1 Cam5 PTZ SELECT Cam2 Cam6...
... by pressing the [SET] button once. The camera pan/tilt control icon is used, make settings of the selected channel. (2) Start the auto function by pressing the [SET] button once. RS485 SETUP Baud Rate 19200 Data Bit 8 Parity None Stop Bit 1 OK Cancel Note: When the Panasonic's camera is displayed on the screen of monitoring, the mode changes. Note: Refer to ON. The "CAMERA SETUP" menu appears. Cam1 Cam5 PTZ SELECT Cam2 Cam6...
WJRT208 User Guide
Page 31
..., update the display driver to the latest version. 2.6 Control this Unit with a PC When this unit is connected to a network, it is possible to operate and set up this case, outlined explanations will be given about each function, refer to the Network Operating Instructions on the accessory disc. 2.6.1 Outlined functions • Display of live monitoring screen and recording • Playback and downloading of the recorded data • Setup of...
..., update the display driver to the latest version. 2.6 Control this Unit with a PC When this unit is connected to a network, it is possible to operate and set up this case, outlined explanations will be given about each function, refer to the Network Operating Instructions on the accessory disc. 2.6.1 Outlined functions • Display of live monitoring screen and recording • Playback and downloading of the recorded data • Setup of...
WJRT208 User Guide
Page 36
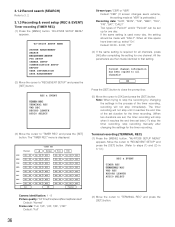
... SETUP" and press the [SET] button. WJ-RT208 SETUP MENU SYSTEM MANAGEMENT SEARCH REC&EVENT SETUP PTZ SETUP CAMERA SETUP COMMUNICATION SETUP REPORT USER INFORMATION DATA MANAGEMENT (2) Move the cursor to 3. 2. 3.1.3 Recording & event setup (REC & EVENT) Timer recording (TIMER REC) (1) Press the [MENU] button. When all time spans have been set later.) To stop the timer recording, stop immediately. "WJ-RT208 SETUP MENU" appears. Default: 00:00 - 24:00, "Off" (4) If the same setting is used every day, the setting...
... SETUP" and press the [SET] button. WJ-RT208 SETUP MENU SYSTEM MANAGEMENT SEARCH REC&EVENT SETUP PTZ SETUP CAMERA SETUP COMMUNICATION SETUP REPORT USER INFORMATION DATA MANAGEMENT (2) Move the cursor to 3. 2. 3.1.3 Recording & event setup (REC & EVENT) Timer recording (TIMER REC) (1) Press the [MENU] button. When all time spans have been set later.) To stop the timer recording, stop immediately. "WJ-RT208 SETUP MENU" appears. Default: 00:00 - 24:00, "Off" (4) If the same setting is used every day, the setting...
WJRT208 User Guide
Page 37
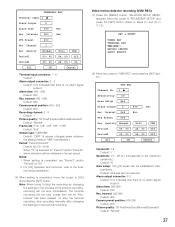
... PTZ Preset 000 Rec. Channel 1 Rec. For [All] operation and functions, refer to the timer recording explanation. (4) When setting is no alarm signal output.) Alarm time: 000 - 999 Default: 030 Rec. The terminal recording will not stop immediately. Move the cursor to "REC&EVENT SETUP" and press the [SET] button. (Refer to steps (1) and (2) in the process of the terminal recording, recording will not stop recording manually after changing...
... PTZ Preset 000 Rec. Channel 1 Rec. For [All] operation and functions, refer to the timer recording explanation. (4) When setting is no alarm signal output.) Alarm time: 000 - 999 Default: 030 Rec. The terminal recording will not stop immediately. Move the cursor to "REC&EVENT SETUP" and press the [SET] button. (Refer to steps (1) and (2) in the process of the terminal recording, recording will not stop recording manually after changing...
WJRT208 User Guide
Page 38
...] and press the [SET] button. Cursor The green areas are displayed on the screen. RECORD LENGTH Time Per File OK 015 Min Cancel Setup enabled range: 005 - 240 Default: 15 Note: If the "RECORD LENGTH" setup conditions are changed in the process of the motion detector area. "WJ-RT208 SETUP MENU" appears. A motion detector area setup screen is being performed using the provided software, VMD response may be...
...] and press the [SET] button. Cursor The green areas are displayed on the screen. RECORD LENGTH Time Per File OK 015 Min Cancel Setup enabled range: 005 - 240 Default: 15 Note: If the "RECORD LENGTH" setup conditions are changed in the process of the motion detector area. "WJ-RT208 SETUP MENU" appears. A motion detector area setup screen is being performed using the provided software, VMD response may be...
WJRT208 User Guide
Page 41
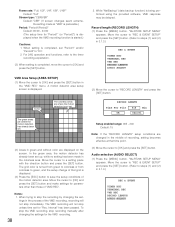
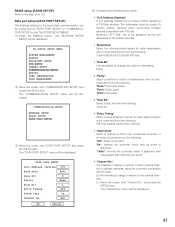
.../200 ms/400 ms/1 000 ms • "Alarm Data" Select a method to change the value for when data reception is a unique number assigning to operate cameras using the controller compatible with PS·Data. The "DATA PORT SETUP" menu will be assigned as the unit addresses to the system devices. • "Baud Rate" Select the communication speed for data transmission with a connected device from the following. 2 400/4 800...
.../200 ms/400 ms/1 000 ms • "Alarm Data" Select a method to change the value for when data reception is a unique number assigning to operate cameras using the controller compatible with PS·Data. The "DATA PORT SETUP" menu will be assigned as the unit addresses to the system devices. • "Baud Rate" Select the communication speed for data transmission with a connected device from the following. 2 400/4 800...
WJRT208 User Guide
Page 42
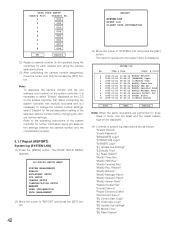
...change the camera number settings, select "Disable" for the set association setting of the system controller for each camera port using the camera selection buttons. (3) After completing the camera number assignment, move the cursor onto [OK] and press the [SET] button. SYSTEM LOG No. Reserve" "Modify Network" "Modify Manager Pswd" "Modify Operator Pswd" "Modify Viewer Pswd" "Restore Default Set" "Format Disk=m" "Repair Directory Diskm" "Disconnect User=n" "[R] Control User Login" "[R] Video User Login" "[R] Update Sys Settings" "[R] Modify Time" "[R] Reset System" DATA PORT SETUP Camera...
...change the camera number settings, select "Disable" for the set association setting of the system controller for each camera port using the camera selection buttons. (3) After completing the camera number assignment, move the cursor onto [OK] and press the [SET] button. SYSTEM LOG No. Reserve" "Modify Network" "Modify Manager Pswd" "Modify Operator Pswd" "Modify Viewer Pswd" "Restore Default Set" "Format Disk=m" "Repair Directory Diskm" "Disconnect User=n" "[R] Control User Login" "[R] Video User Login" "[R] Update Sys Settings" "[R] Modify Time" "[R] Reset System" DATA PORT SETUP Camera...
WJRT208 User Guide
Page 54
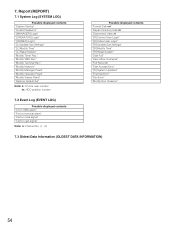
... "Modify Network" "Modify Manager Pswd" "Modify Operator Pswd" "Modify Viewer Pswd" "Restore Default Set" Note: n: On-line user number m: HDD position number Possible displayed contents "Format Disk=m" "Repair Directory Disk m" "Disconnect User=n" "[R] Control User Login" "[R] Video User Login" "[R] Update Sys Settings" "[R] Modify Time" "[R] Reset System" "Disk Full" "User Allow Overwrite" "Full Records" "Disk Access Error" "[R] System Updated" "Thermal Error" "Fan Error" "Modify Rec. "Modify Terminal Rec." Reserve" 7.2 Event Log (EVENT LOG) Possible displayed contents "Ch=n VMD alarm...
... "Modify Network" "Modify Manager Pswd" "Modify Operator Pswd" "Modify Viewer Pswd" "Restore Default Set" Note: n: On-line user number m: HDD position number Possible displayed contents "Format Disk=m" "Repair Directory Disk m" "Disconnect User=n" "[R] Control User Login" "[R] Video User Login" "[R] Update Sys Settings" "[R] Modify Time" "[R] Reset System" "Disk Full" "User Allow Overwrite" "Full Records" "Disk Access Error" "[R] System Updated" "Thermal Error" "Fan Error" "Modify Rec. "Modify Terminal Rec." Reserve" 7.2 Event Log (EVENT LOG) Possible displayed contents "Ch=n VMD alarm...


