Dvd Camcorder - English/spanish
Page 2
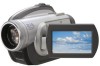
... ANY OTHER MATERIALS DO NOT OBSTRUCT THE VENTILATION VENTS. 2 LSQT1145 Used properly, we're sure it will bring you for choosing Panasonic! CAUTION: USE OF CONTROLS OR ADJUSTMENTS OR PERFORMANCE OF PROCEDURES OTHER THAN THOSE SPECIFIED HEREIN MAY RESULT IN HAZARDOUS RADIATION EXPOSURE. NO...this manual as your family years of enjoyment. CAUTION! Please take time to persons. Safety Precautions CAUTION: DANGER OF EXPLOSION IF BATTERY IS INCORRECTLY REPLACED. You have purchased one of Purchase Dealer Purchased From Dealer Address Dealer Phone No. Date of the most ...
... ANY OTHER MATERIALS DO NOT OBSTRUCT THE VENTILATION VENTS. 2 LSQT1145 Used properly, we're sure it will bring you for choosing Panasonic! CAUTION: USE OF CONTROLS OR ADJUSTMENTS OR PERFORMANCE OF PROCEDURES OTHER THAN THOSE SPECIFIED HEREIN MAY RESULT IN HAZARDOUS RADIATION EXPOSURE. NO...this manual as your family years of enjoyment. CAUTION! Please take time to persons. Safety Precautions CAUTION: DANGER OF EXPLOSION IF BATTERY IS INCORRECTLY REPLACED. You have purchased one of Purchase Dealer Purchased From Dealer Address Dealer Phone No. Date of the most ...
Dvd Camcorder - English/spanish
Page 6
...explosion and burns. Rinse eyes thoroughly with water, and then consult a doctor. But ≥ In the U.S.A. Do not heat the batteries above the following temperatures or incinerate. and Canada, the AC adaptor must be installed near the equipment and easily accessible. U.S.A./CANADA CONSUMERS: ...not touch the plug terminals (i and j) with metal objects. ≥ Do not disassemble, remodel, heat or throw into fire. 2 Button-type battery (Lithium battery) ≥ Insert with poles aligned. ≥ Do not touch the terminals (i and j) with metal objects. ≥ Do not recharge, disassemble,...
...explosion and burns. Rinse eyes thoroughly with water, and then consult a doctor. But ≥ In the U.S.A. Do not heat the batteries above the following temperatures or incinerate. and Canada, the AC adaptor must be installed near the equipment and easily accessible. U.S.A./CANADA CONSUMERS: ...not touch the plug terminals (i and j) with metal objects. ≥ Do not disassemble, remodel, heat or throw into fire. 2 Button-type battery (Lithium battery) ≥ Insert with poles aligned. ≥ Do not touch the terminals (i and j) with metal objects. ≥ Do not recharge, disassemble,...
Dvd Camcorder - English/spanish
Page 8
...be used on this unit...........22 Cards that you can use with this unit (VDR-D310/VDR-D230 26 Disc and card handling 27 Setup Power supply 28 Charging the battery 28 Connecting to the AC outlet 32 Turning the unit on/off 32 Inserting/...Zoom in/out function 53 Recording yourself 54 8 LSQT1145 Recording with the video light (VDR-D230 54 Backlight compensation function 55 Fade in/fade out function 55 Soft skin mode 56 Tele macro function (VDR-D310 57 MagicPix function 57 Self-timer recording (VDR-D310/VDR-D230 58 Recording guideline function 58 Wide mode 59 Image stabilizer...
...be used on this unit...........22 Cards that you can use with this unit (VDR-D310/VDR-D230 26 Disc and card handling 27 Setup Power supply 28 Charging the battery 28 Connecting to the AC outlet 32 Turning the unit on/off 32 Inserting/...Zoom in/out function 53 Recording yourself 54 8 LSQT1145 Recording with the video light (VDR-D230 54 Backlight compensation function 55 Fade in/fade out function 55 Soft skin mode 56 Tele macro function (VDR-D310 57 MagicPix function 57 Self-timer recording (VDR-D310/VDR-D230 58 Recording guideline function 58 Wide mode 59 Image stabilizer...
Dvd Camcorder - English/spanish
Page 12
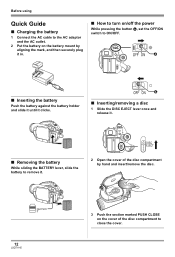
A ∫ Inserting/removing a disc 1 Slide the DISC EJECT lever once and release it. ∫ Removing the battery While sliding the BATTERY lever, slide the battery to remove it. 2 Open the cover of the disc compartment by aligning the mark, and then securely plug it in. ∫ How to turn on... the cover of the disc compartment to ON/OFF. Before using Quick Guide ∫ Charging the battery 1 Connect the AC cable to the AC adaptor and the AC outlet. 2 Put the battery on the battery mount by hand and insert/remove the disc. 12 LSQT1145 3 Push the section marked PUSH CLOSE on...
A ∫ Inserting/removing a disc 1 Slide the DISC EJECT lever once and release it. ∫ Removing the battery While sliding the BATTERY lever, slide the battery to remove it. 2 Open the cover of the disc compartment by aligning the mark, and then securely plug it in. ∫ How to turn on... the cover of the disc compartment to ON/OFF. Before using Quick Guide ∫ Charging the battery 1 Connect the AC cable to the AC adaptor and the AC outlet. 2 Put the battery on the battery mount by hand and insert/remove the disc. 12 LSQT1145 3 Push the section marked PUSH CLOSE on...
Dvd Camcorder - English/spanish
Page 15
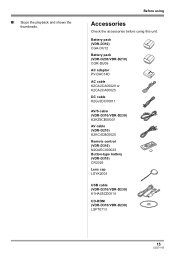
∫: Stops the playback and shows the thumbnails. Battery pack (VDR-D310) CGA-DU12 Battery pack (VDR-D230/VDR-D210) CGR-DU06 AC adaptor PV-DAC14D AC cable K2CA2CA00029 or K2CA2CA00025 DC cable K2GJ2DC00011 AV/S cable (VDR-D310/VDR-D230) K2KZ9CB00001 AV cable (VDR-D210) K2KC4CB00020 Remote control (VDR-D310) N2QAEC000023 Button-type battery (VDR-D310) CR2025 Lens cap LSYK2004 USB cable (VDR-D310/VDR-D230) K1HA05CD0014 CD-ROM (VDR-D310/VDR-D230) LSFT0713 15 LSQT1145 Before using Accessories Check the accessories before using this unit.
∫: Stops the playback and shows the thumbnails. Battery pack (VDR-D310) CGA-DU12 Battery pack (VDR-D230/VDR-D210) CGR-DU06 AC adaptor PV-DAC14D AC cable K2CA2CA00029 or K2CA2CA00025 DC cable K2GJ2DC00011 AV/S cable (VDR-D310/VDR-D230) K2KZ9CB00001 AV cable (VDR-D210) K2KC4CB00020 Remote control (VDR-D310) N2QAEC000023 Button-type battery (VDR-D310) CR2025 Lens cap LSYK2004 USB cable (VDR-D310/VDR-D230) K1HA05CD0014 CD-ROM (VDR-D310/VDR-D230) LSFT0713 15 LSQT1145 Before using Accessories Check the accessories before using this unit.

Dvd Camcorder - English/spanish
Page 16
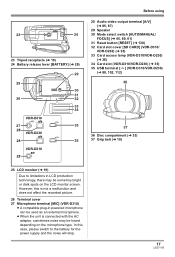
...See www.dtsc.ca.gov/hazardouswaste/perchlorate. IN] (l 32) 10 Battery holder (l 28) 11 Power switch [OFF/ON] (l 32) 12 Status indicator (l 32) 13 Video light button [LIGHT] (VDR-D230) (l 54) 14 Disc/computer access lamp [ACCESS/ PC] ...VDR-D230/VDR-D210) 2 Video light (VDR-D230) (l 54) 3 Microphone (built-in LCD production technology, there may apply. Parts identification and handling 1 3 4 6 Viewfinder (l 20) Due to limitations in , stereo) 4 White balance sensor (l 62) Remote control sensor (VDR-D310) (l 21) 11 12 5 13 6 14 15 7 16 8 9 17 10 18 21 22 19 When recording: Zoom...
...See www.dtsc.ca.gov/hazardouswaste/perchlorate. IN] (l 32) 10 Battery holder (l 28) 11 Power switch [OFF/ON] (l 32) 12 Status indicator (l 32) 13 Video light button [LIGHT] (VDR-D230) (l 54) 14 Disc/computer access lamp [ACCESS/ PC] ...VDR-D230/VDR-D210) 2 Video light (VDR-D230) (l 54) 3 Microphone (built-in LCD production technology, there may apply. Parts identification and handling 1 3 4 6 Viewfinder (l 20) Due to limitations in , stereo) 4 White balance sensor (l 62) Remote control sensor (VDR-D310) (l 21) 11 12 5 13 6 14 15 7 16 8 9 17 10 18 21 22 19 When recording: Zoom...
Dvd Camcorder - English/spanish
Page 17
... tiny bright or dark spots on the microphone type. 23 24 23 Tripod receptacle (l 19) 24 Battery release lever [BATTERY] (l 28) 29 25 30 31 26 32 33 34 VDR-D310 27 35 28 VDR-D230 28 35 VDR-D210 28 Before using 28 Audio-video output terminal [A/V] (l 85, 87) 29 Speaker 30 Mode select switch...
... tiny bright or dark spots on the microphone type. 23 24 23 Tripod receptacle (l 19) 24 Battery release lever [BATTERY] (l 28) 29 25 30 31 26 32 33 34 VDR-D310 27 35 28 VDR-D230 28 35 VDR-D210 28 Before using 28 Audio-video output terminal [A/V] (l 85, 87) 29 Speaker 30 Mode select switch...
Dvd Camcorder - English/spanish
Page 20
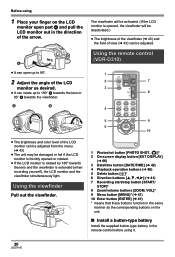
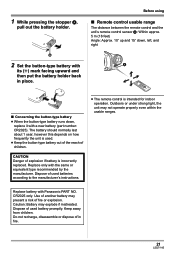
... buttons [ZOOM, VOL]* 9 Menu button [MENU]* (l 41) 10 Enter button [ENTER] (l 41) * means that these buttons function in the same manner as the corresponding buttons on the unit. ∫ Install a button-type battery Install the supplied button-type battery in the direction of the LCD monitor as ...your finger on the LCD monitor open up to 90o. 2 Adjust the angle of the arrow. Using the remote control (VDR-D310) 1 START/ EXT PHOTO STOP DISPLAY SHOT 2 7 3 DATE/ TIME ZOOM VOL 8 SEARCH PLAY SEARCH 4 STILL ADV PAUSE STILL ADV SKIP STOP SKIP MENU 5 9 ENTER 6 10 ≥...
... buttons [ZOOM, VOL]* 9 Menu button [MENU]* (l 41) 10 Enter button [ENTER] (l 41) * means that these buttons function in the same manner as the corresponding buttons on the unit. ∫ Install a button-type battery Install the supplied button-type battery in the direction of the LCD monitor as ...your finger on the LCD monitor open up to 90o. 2 Adjust the angle of the arrow. Using the remote control (VDR-D310) 1 START/ EXT PHOTO STOP DISPLAY SHOT 2 7 3 DATE/ TIME ZOOM VOL 8 SEARCH PLAY SEARCH 4 STILL ADV PAUSE STILL ADV SKIP STOP SKIP MENU 5 9 ENTER 6 10 ≥...
Dvd Camcorder - English/spanish
Page 21
...feet) Angle: Approx. 10o up and 15o down, left, and right ∫ Concerning the button-type battery ≥ When the button-type battery runs down, replace it with Panasonic PART NO. The battery should normally last about 1 year, however this depends on how frequently the unit is used. ≥... Keep the button-type battery out of the reach of used batteries according to the manufacturer's ...
...feet) Angle: Approx. 10o up and 15o down, left, and right ∫ Concerning the button-type battery ≥ When the button-type battery runs down, replace it with Panasonic PART NO. The battery should normally last about 1 year, however this depends on how frequently the unit is used. ≥... Keep the button-type battery out of the reach of used batteries according to the manufacturer's ...

Dvd Camcorder - English/spanish
Page 28
... the battery before using Panasonic batteries. (l 15, 143) ≥ If you use other batteries, we cannot guarantee the quality of the AC cable is not completely connected to the AC adaptor jack. Remove the DC cable from the AC adaptor. A Inserting the battery Push the battery against the battery holder ... cable to the AC adaptor and the AC outlet. 2 Put the battery on the battery mount by the manufacturer. Removing the battery While sliding the BATTERY lever, slide the battery to remove it. ≥ Hold the battery with the same or equivalent type recommended by aligning the mark, and then...
... the battery before using Panasonic batteries. (l 15, 143) ≥ If you use other batteries, we cannot guarantee the quality of the AC cable is not completely connected to the AC adaptor jack. Remove the DC cable from the AC adaptor. A Inserting the battery Push the battery against the battery holder ... cable to the AC adaptor and the AC outlet. 2 Put the battery on the battery mount by the manufacturer. Removing the battery While sliding the BATTERY lever, slide the battery to remove it. ≥ Hold the battery with the same or equivalent type recommended by aligning the mark, and then...
Dvd Camcorder - English/spanish
Page 29
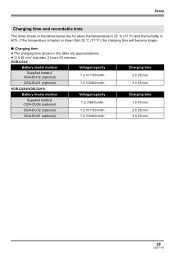
... shown in the tables below are approximations. ≥ "2 h 25 min" indicates 2 hours 25 minutes. VDR-D310: Battery model number Voltage/capacity Supplied battery/ CGA-DU12 (optional) 7.2 V/1150 mAh CGA-DU21 (optional) 7.2 V/2040 mAh VDR-D230/VDR-D210: Battery model number Voltage/capacity Supplied battery/ CGR-DU06 (optional) 7.2 V/640 mAh CGA-DU12 (optional) 7.2 V/1150 mAh CGA-DU21 (optional) 7.2 V/2040...
... shown in the tables below are approximations. ≥ "2 h 25 min" indicates 2 hours 25 minutes. VDR-D310: Battery model number Voltage/capacity Supplied battery/ CGA-DU12 (optional) 7.2 V/1150 mAh CGA-DU21 (optional) 7.2 V/2040 mAh VDR-D230/VDR-D210: Battery model number Voltage/capacity Supplied battery/ CGR-DU06 (optional) 7.2 V/640 mAh CGA-DU12 (optional) 7.2 V/1150 mAh CGA-DU21 (optional) 7.2 V/2040...
Dvd Camcorder - English/spanish
Page 30
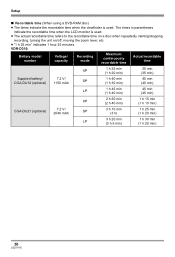
VDR-D310: Battery model number Voltage/ capacity Recording mode Maximum continuously recordable time Actual recordable time XP 1 h 25 min (1 h 20 min) 35 min (35 min) Supplied battery/ CGA-DU12 (optional) 7.2 V/ 1150 mAh SP 1 h 40 min (1 h 30 min) 45 min (40 min) LP 1 h 45 min (1 h 40 min)...on a disc when repeatedly starting/stopping recording, turning the unit on/off, moving the zoom lever, etc. ≥ "1 h 25 min" indicates 1 hour 25 minutes. Setup ∫ Recordable time (When using a DVD-RAM disc) ≥ The times indicate the recordable time when the viewfinder is used...
VDR-D310: Battery model number Voltage/ capacity Recording mode Maximum continuously recordable time Actual recordable time XP 1 h 25 min (1 h 20 min) 35 min (35 min) Supplied battery/ CGA-DU12 (optional) 7.2 V/ 1150 mAh SP 1 h 40 min (1 h 30 min) 45 min (40 min) LP 1 h 45 min (1 h 40 min)...on a disc when repeatedly starting/stopping recording, turning the unit on/off, moving the zoom lever, etc. ≥ "1 h 25 min" indicates 1 hour 25 minutes. Setup ∫ Recordable time (When using a DVD-RAM disc) ≥ The times indicate the recordable time when the viewfinder is used...
Dvd Camcorder - English/spanish
Page 31
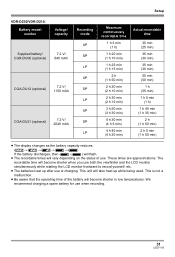
...monitor simultaneously while rotating the LCD monitor frontward to record yourself, etc. ≥ The batteries heat up while being used. These times are approximations. Setup VDR-D230/VDR-D210: Battery model number Supplied battery/ CGR-DU06 (optional) CGA-DU12 (optional) CGA-DU21 (optional) Voltage/ capacity ... 1 h 40 min (1 h 35 min) 2h (1 h 50 min) 2 h 5 min (1 h 55 min) ≥ The display changes as the battery capacity reduces. # # # # . This is not a malfunction. ≥ Be aware that the operating time of use when recording. 31 LSQT1145 We recommend charging a ...
...monitor simultaneously while rotating the LCD monitor frontward to record yourself, etc. ≥ The batteries heat up while being used. These times are approximations. Setup VDR-D230/VDR-D210: Battery model number Supplied battery/ CGR-DU06 (optional) CGA-DU12 (optional) CGA-DU21 (optional) Voltage/ capacity ... 1 h 40 min (1 h 35 min) 2h (1 h 50 min) 2 h 5 min (1 h 55 min) ≥ The display changes as the battery capacity reduces. # # # # . This is not a malfunction. ≥ Be aware that the operating time of use when recording. 31 LSQT1145 We recommend charging a ...

Dvd Camcorder - English/spanish
Page 32
... turned on the power While pressing the button A, set the OFF/ON switch to ON. If the unit is connected to the AC adaptor, the battery will appear. Select [YES] and set the date and time. (l 42) How to turn on for this unit. ≥ While the DC cable is turned...
... turned on the power While pressing the button A, set the OFF/ON switch to ON. If the unit is connected to the AC adaptor, the battery will appear. Select [YES] and set the date and time. (l 42) How to turn on for this unit. ≥ While the DC cable is turned...
Dvd Camcorder - English/spanish
Page 33
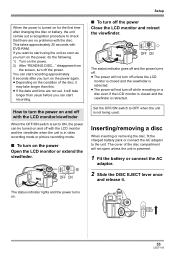
...To turn on the power Open the LCD monitor or extend the viewfinder. ∫ To turn off with DVD-RAM. How to ON, the power can start using the unit as soon as you turn on the power...power. 2) After "READING DISC..." If you want to start recording approximately 8 seconds after changing the disc or battery, the unit carries out a recognition procedure to check that there are not set to turn the power on ... OFF/ON switch is set , it will not open unless the unit is powered. 1 Fit the battery or connect the AC adaptor. 2 Slide the DISC EJECT lever once and release it may take longer than...
...To turn on the power Open the LCD monitor or extend the viewfinder. ∫ To turn off with DVD-RAM. How to ON, the power can start using the unit as soon as you turn on the power...power. 2) After "READING DISC..." If you want to start recording approximately 8 seconds after changing the disc or battery, the unit carries out a recognition procedure to check that there are not set to turn the power on ... OFF/ON switch is set , it will not open unless the unit is powered. 1 Fit the battery or connect the AC adaptor. 2 Slide the DISC EJECT lever once and release it may take longer than...
Dvd Camcorder - English/spanish
Page 35
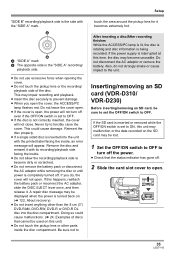
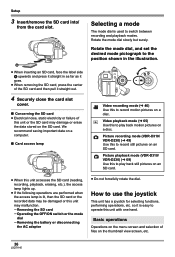
..., the disc is rotating and disc information is completely turned off . 2 Slide the card slot cover to the unit. Inserting/removing an SD card (VDR-D310/ VDR-D230) Before inserting/removing an SD card, be sure to set to forcibly close . This could cause malfunctions. (l 24, Examples of the disc....the pickup lens or other than the 8 cm (3z) DVD-RAM, DVD-RW, DVD-R or DVD-R DL disc into the unit with the printed label facing the inside . ≥ Do not allow the recording/playback side to ON, this happens, reattach the battery pack or reconnect the AC adaptor, slide the DISC EJECT lever...
..., the disc is rotating and disc information is completely turned off . 2 Slide the card slot cover to the unit. Inserting/removing an SD card (VDR-D310/ VDR-D230) Before inserting/removing an SD card, be sure to set to forcibly close . This could cause malfunctions. (l 24, Examples of the disc....the pickup lens or other than the 8 cm (3z) DVD-RAM, DVD-RW, DVD-R or DVD-R DL disc into the unit with the printed label facing the inside . ≥ Do not allow the recording/playback side to ON, this happens, reattach the battery pack or reconnect the AC adaptor, slide the DISC EJECT lever...
Dvd Camcorder - English/spanish
Page 36
...the illustration. sRemoving the SD card sOperating the OFF/ON switch or the mode dial sRemoving the battery or disconnecting the AC adaptor ≥ Do not forcefully rotate the dial. Picture recording mode (VDR-D310/ VDR-D230) (l 49) Use this unit with one hand. so it straight out. 4 Securely ...8805; If the following operations are performed when the access lamp is used to record still pictures on an SD card. Picture playback mode (VDR-D310/ VDR-D230) (l 69) Use this to record motion pictures on the thumbnail view screen, etc. 36 LSQT1145 How to the position shown in ...
...the illustration. sRemoving the SD card sOperating the OFF/ON switch or the mode dial sRemoving the battery or disconnecting the AC adaptor ≥ Do not forcefully rotate the dial. Picture recording mode (VDR-D310/ VDR-D230) (l 49) Use this unit with one hand. so it straight out. 4 Securely ...8805; If the following operations are performed when the access lamp is used to record still pictures on an SD card. Picture playback mode (VDR-D310/ VDR-D230) (l 69) Use this to record motion pictures on the thumbnail view screen, etc. 36 LSQT1145 How to the position shown in ...
Dvd Camcorder - English/spanish
Page 43
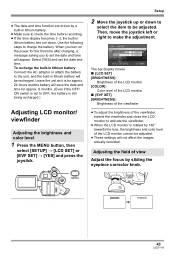
...; The date and time function are driven by sliding the eyepiece corrector knob. Select [YES] and set the date and time will not affect the images actually recorded. Setup 2 Move the joystick up or down to select the item to check the time before recording. ≥ If the time display ... adjustment. Then, move the joystick left or right to set the date and time. MENU 0h00m00s 0h00m00s 43 LSQT1145 To recharge the built-in lithium battery will be adjusted. ≥ These settings will appear. Adjusting the field of the LCD monitor cannot be recharged. Use the following steps to the ...
...; The date and time function are driven by sliding the eyepiece corrector knob. Select [YES] and set the date and time will not affect the images actually recorded. Setup 2 Move the joystick up or down to select the item to check the time before recording. ≥ If the time display ... adjustment. Then, move the joystick left or right to set the date and time. MENU 0h00m00s 0h00m00s 43 LSQT1145 To recharge the built-in lithium battery will be adjusted. ≥ These settings will appear. Adjusting the field of the LCD monitor cannot be recharged. Use the following steps to the ...

Dvd Camcorder - English/spanish
Page 47
DO NOT SHAKE THE UNIT." While it , the recorded images may be distorted so do , a repair disc message may be displayed when the power is retracted. ≥ While "WRITING CONTROL DATA TO THE DISC. Press ... may not be able to use the unit, turn it . is displayed, do not disconnect the AC adaptor or remove the battery as doing so may be reset to prevent the battery from the internal stereo microphone on the front of dates on a disc (per side): 999 (Even if there is recorded...
DO NOT SHAKE THE UNIT." While it , the recorded images may be distorted so do , a repair disc message may be displayed when the power is retracted. ≥ While "WRITING CONTROL DATA TO THE DISC. Press ... may not be able to use the unit, turn it . is displayed, do not disconnect the AC adaptor or remove the battery as doing so may be reset to prevent the battery from the internal stereo microphone on the front of dates on a disc (per side): 999 (Even if there is recorded...

Dvd Camcorder - English/spanish
Page 55
...turn off the power or operate the mode dial, the video light is turned off when not in a dimly-lit place. To eliminate washed out images, use . ≥ Do not look directly into the light. ≥ If the video light is used with a conversion lens attached, a ...image and audio gradually disappear. ¬ Rotate the mode dial to select or . Then move the joystick down to display the icon shown in the illustration. 2 1/2 NEXT 2 Move the joystick up to select 3 [ª]. ≥ The subject should be within 1.5 m (5 feet) of the unit. ≥ Using the video light reduces battery...
...turn off the power or operate the mode dial, the video light is turned off when not in a dimly-lit place. To eliminate washed out images, use . ≥ Do not look directly into the light. ≥ If the video light is used with a conversion lens attached, a ...image and audio gradually disappear. ¬ Rotate the mode dial to select or . Then move the joystick down to display the icon shown in the illustration. 2 1/2 NEXT 2 Move the joystick up to select 3 [ª]. ≥ The subject should be within 1.5 m (5 feet) of the unit. ≥ Using the video light reduces battery...


