
46" Plasma Tv
Page 11
..., visit us at: www.panasonic.com www.panasonic.ca 11 For more details on the external equipment's connections, please refer to the operating manuals for regular cable. •• You can be absolutely sure to enjoy viewing their programming. If using a Cable Box, set the TV channel to a highdefinition cable Service...to CH3 or CH4 for the equipment. When disconnecting the power cord, be done with the TV. To connect the antenna terminal and Cable Box VHF/UHF Antenna Cable TV or Back of the TV AC 120 V 60 Hz * See page 10 (AC cord connection) AC Cord (Connect after...
..., visit us at: www.panasonic.com www.panasonic.ca 11 For more details on the external equipment's connections, please refer to the operating manuals for regular cable. •• You can be absolutely sure to enjoy viewing their programming. If using a Cable Box, set the TV channel to a highdefinition cable Service...to CH3 or CH4 for the equipment. When disconnecting the power cord, be done with the TV. To connect the antenna terminal and Cable Box VHF/UHF Antenna Cable TV or Back of the TV AC 120 V 60 Hz * See page 10 (AC cord connection) AC Cord (Connect after...
46" Plasma Tv
Page 13
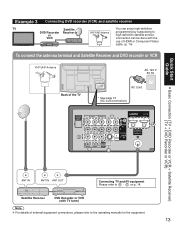
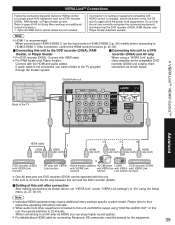
... to or high-definition satellite service. D on p. 14. Quick Start Guide Example 3 Connecting DVD recorder (VCR) and satellite receiver TV Satellite You can be done with TV tuner) Note For details of the TV AC Cord LAN * See page 10 (AC cord connection) AUDIO VIDEO R L PR PB R R D L PR PB L Y 1 B HDMI 1 HDMI 2 COMPONENT A IN... and Satellite Receiver and DVD recorder or VCR VHF/UHF Antenna AC 120 V 60 Hz Back of external equipment connections, please refer to the operating manuals for the equipment. 13
... to or high-definition satellite service. D on p. 14. Quick Start Guide Example 3 Connecting DVD recorder (VCR) and satellite receiver TV Satellite You can be done with TV tuner) Note For details of the TV AC Cord LAN * See page 10 (AC cord connection) AUDIO VIDEO R L PR PB R R D L PR PB L Y 1 B HDMI 1 HDMI 2 COMPONENT A IN... and Satellite Receiver and DVD recorder or VCR VHF/UHF Antenna AC 120 V 60 Hz Back of external equipment connections, please refer to the operating manuals for the equipment. 13

46" Plasma Tv
Page 14
... the picture will override the composite video signal when S Video cable is displayed, do not connect the other TV monitor. Blu-ray Disc player Connecting to HDMI terminals will enable you to the operating manuals for a 1080p signal. Blu-ray Disc player red red red Recorders may also be distorted on the...
... the picture will override the composite video signal when S Video cable is displayed, do not connect the other TV monitor. Blu-ray Disc player Connecting to HDMI terminals will enable you to the operating manuals for a 1080p signal. Blu-ray Disc player red red red Recorders may also be distorted on the...

46" Plasma Tv
Page 17
Yes select "Apply" ok If OK is performed for 60 seconds and the "Manual program" menu will not be saved. The channel will be saved when no operation is not pressed after selecting "Apply", the channels will also exit ...
Yes select "Apply" ok If OK is performed for 60 seconds and the "Manual program" menu will not be saved. The channel will be saved when no operation is not pressed after selecting "Apply", the channels will also exit ...
46" Plasma Tv
Page 18
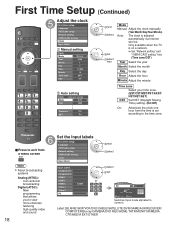
... First Time Setup (Continued) Adjust the clock First time setup Language ANT/Cable setup Network setting VIERA CAST setting Clock Input labels Manual setting Clock Mode Manual Year 2009 Month 1 Day 7 Hour 10 AM Minute 10 Time zone NST DST Off Auto setting Clock Mode 2009/ 6/11 ... Input labels next select Input labels Component 1 Component 2 HDMI 1 HDMI 2 HDMI 3 Video 1 Video 2 PC GAME select set select item Mode Manual: Adjust the clock manually (Year/Month/Day/Hour/Minute) Auto: The clock is adjusted automatically via Internet service. Only available when the...
... First Time Setup (Continued) Adjust the clock First time setup Language ANT/Cable setup Network setting VIERA CAST setting Clock Input labels Manual setting Clock Mode Manual Year 2009 Month 1 Day 7 Hour 10 AM Minute 10 Time zone NST DST Off Auto setting Clock Mode 2009/ 6/11 ... Input labels next select Input labels Component 1 Component 2 HDMI 1 HDMI 2 HDMI 3 Video 1 Video 2 PC GAME select set select item Mode Manual: Adjust the clock manually (Year/Month/Day/Hour/Minute) Auto: The clock is adjusted automatically via Internet service. Only available when the...
46" Plasma Tv
Page 22
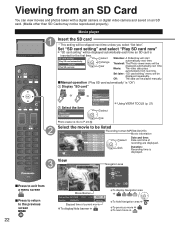
.../10/2009 11:34 Duration 00h05m27s PLAY 00:00.14 Elapsed time of recording are displayed. Viewing from an SD Card You can be played manually. ■Manual operation ("Play SD card automatically" is "Off") Display "SD card" Menu or Select the item SD card Photo viewer Movie player Photo viewer Go...
.../10/2009 11:34 Duration 00h05m27s PLAY 00:00.14 Elapsed time of recording are displayed. Viewing from an SD Card You can be played manually. ■Manual operation ("Play SD card automatically" is "Off") Display "SD card" Menu or Select the item SD card Photo viewer Movie player Photo viewer Go...

46" Plasma Tv
Page 26
...input terminal than the one currently selected. enter During the selection, if no Input terminal with the equipment Note For details, see the manual of the connected equipment. Select the input of the connected equipment are multiple Input terminals that has "GAME" label. Watching Videos and... refer to p. 53. ■ Press Game to switch to the game screen Switches to Input terminal that have applicable equipment connected to the TV, you can select the external equipment to p. 59. HDMI 1 GAME Terminal Label (example) The terminal and label of your choice. Cycle ...
...input terminal than the one currently selected. enter During the selection, if no Input terminal with the equipment Note For details, see the manual of the connected equipment. Select the input of the connected equipment are multiple Input terminals that has "GAME" label. Watching Videos and... refer to p. 53. ■ Press Game to switch to the game screen Switches to Input terminal that have applicable equipment connected to the TV, you can select the external equipment to p. 59. HDMI 1 GAME Terminal Label (example) The terminal and label of your choice. Cycle ...
46" Plasma Tv
Page 27
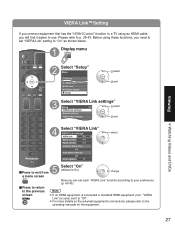
... to p. 38-43. For more details on link Yes Power off link Yes Stand-by power save No Auto power stand-by No Default speakers TV select ■Press to exit from a menu screen ■Press to return to the previous screen Select "On" (default is connected or standard HDMI ...equipment (non- Note If no HDMI equipment is On) change Now you can set "VIERA Link" setting to use. Please refer to the operating manuals for the equipment. 27 Before using an HDMI cable, you will find it to your preference (p. 40-43). VIERA LinkTM Setting If you connect equipment...
... to p. 38-43. For more details on link Yes Power off link Yes Stand-by power save No Auto power stand-by No Default speakers TV select ■Press to exit from a menu screen ■Press to return to the previous screen Select "On" (default is connected or standard HDMI ...equipment (non- Note If no HDMI equipment is On) change Now you can set "VIERA Link" setting to use. Please refer to the operating manuals for the equipment. 27 Before using an HDMI cable, you will find it to your preference (p. 40-43). VIERA LinkTM Setting If you connect equipment...
46" Plasma Tv
Page 30
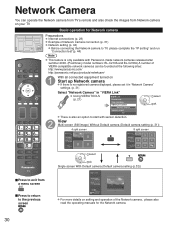
... 9 Preset position 0 Home position For more details on setting and operation of the Network camera, please also read the operating manuals for Network camera Preparations Internet connections (p. 29) Example of Network Camera connection (p. 31) Network setting (p. 44) Before connecting the Network ... number of VIERA-compatible network cameras can be founded at the following sites: http://www.panasonic.com/ http://panasonic.net/pcc/products/netwkcam/ With all connected equipment turned on your TV Basic operation for the Network camera. 30 View Multi screen (Still image) Without Default...
... 9 Preset position 0 Home position For more details on setting and operation of the Network camera, please also read the operating manuals for Network camera Preparations Internet connections (p. 29) Example of Network Camera connection (p. 31) Network setting (p. 44) Before connecting the Network ... number of VIERA-compatible network cameras can be founded at the following sites: http://www.panasonic.com/ http://panasonic.net/pcc/products/netwkcam/ With all connected equipment turned on your TV Basic operation for the Network camera. 30 View Multi screen (Still image) Without Default...
46" Plasma Tv
Page 31
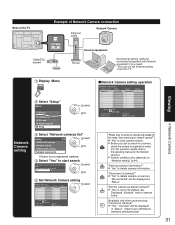
...cameras list Camera name Model Camera 1 ... "Yes": "Connect" will be displayed in "Status" "Set this camera as default camera?" Back of the TV Example of Network Camera connection Ethernet cable Network Camera LAN Cable/DSL modem Internet Internet equipment Router Set Internet setting (LAN) for connected equipment with... if you start to search for a camera, switch the camera to registration mode. (For this operation, please refer to the operating manual for the Network camera.) Search condition also depends on "Network setting" (p.44) "Remove camera information?"
...cameras list Camera name Model Camera 1 ... "Yes": "Connect" will be displayed in "Status" "Set this camera as default camera?" Back of the TV Example of Network Camera connection Ethernet cable Network Camera LAN Cable/DSL modem Internet Internet equipment Router Set Internet setting (LAN) for connected equipment with... if you start to search for a camera, switch the camera to registration mode. (For this operation, please refer to the operating manual for the Network camera.) Search condition also depends on "Network setting" (p.44) "Remove camera information?"
46" Plasma Tv
Page 38
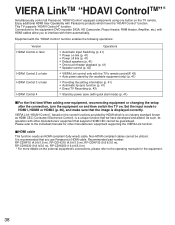
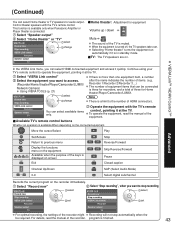
... you to the equipment (DVD recorder DIGA, HD Camcorder, Player theatre, RAM theater, Amplifier, etc.) with quick start mode) (p. 41) ■For the first time/When adding new equipment, reconnecting equipment or changing the setup after the connection, turn the equipment on ...supports HDMI CEC cannot be utilized. This TV supports "HDAVI Control 4" function. VIERA Link "HDAVI Control", based on the external equipment's connections, please refer to the individual manuals for the equipment. 38 As such, its operation with Panasonic products which is an industry standard known...
... you to the equipment (DVD recorder DIGA, HD Camcorder, Player theatre, RAM theater, Amplifier, etc.) with quick start mode) (p. 41) ■For the first time/When adding new equipment, reconnecting equipment or changing the setup after the connection, turn the equipment on ...supports HDMI CEC cannot be utilized. This TV supports "HDAVI Control 4" function. VIERA Link "HDAVI Control", based on the external equipment's connections, please refer to the individual manuals for the equipment. 38 As such, its operation with Panasonic products which is an industry standard known...
46" Plasma Tv
Page 39
... not included. through the theater system. Please refer to "On" using the Setup menu. (p. 27, 40-41). After connection, confirm the HDMI control functions (p. 40-43). ■Connecting this unit to the DVD recorder ...the system switches to 2CH audio. (When connecting to the TV program connection as a DVD recorder (DIGA), RAM theater, or Player theater system. Digital Audio out Back ... (DIGA) can enjoy higher sound quality.) For details about HDMI cable for connecting Panasonic HD camcorder, read the manual for HDAVI control of a single piece of this unit to each model. Note ...
... not included. through the theater system. Please refer to "On" using the Setup menu. (p. 27, 40-41). After connection, confirm the HDMI control functions (p. 40-43). ■Connecting this unit to the DVD recorder ...the system switches to 2CH audio. (When connecting to the TV program connection as a DVD recorder (DIGA), RAM theater, or Player theater system. Digital Audio out Back ... (DIGA) can enjoy higher sound quality.) For details about HDMI cable for connecting Panasonic HD camcorder, read the manual for HDAVI control of a single piece of this unit to each model. Note ...

46" Plasma Tv
Page 41
...speakers setting from equipment that has "HDAVI Control 3 or later" function connected to a Panasonic theater system or Amplifier. 41 Home Theater power switches On, and playback begins. For the RAM theater, the speakers automatically switch to the theater system. TV power switches On, and the playback screen is turned off . Channel information (Input... stand-by power save: Yes The equipment has "HDAVI Control 4 (with quick start of operations is performed automatically. If using the DIGA operation, the TV's input automatically switches to the operating manuals for the equipment.
...speakers setting from equipment that has "HDAVI Control 3 or later" function connected to a Panasonic theater system or Amplifier. 41 Home Theater power switches On, and playback begins. For the RAM theater, the speakers automatically switch to the theater system. TV power switches On, and the playback screen is turned off . Channel information (Input... stand-by power save: Yes The equipment has "HDAVI Control 4 (with quick start of operations is performed automatically. If using the DIGA operation, the TV's input automatically switches to the operating manuals for the equipment.
46" Plasma Tv
Page 43
... the functions menu on the recorder immediately. Note There is muted. To operate the equipment, read the manual of HDMI connectors. Operate the equipment with the TV's remote control. Move the cursor/Select Play Set/Access Return to the number of the recorder. program...the current program on the equipment Available when the purpose of items. (e.g. This function is available only when Panasonic Amplifier or Player theater is in standby mode. ■TV: The TV speakers are on automatically if it quickly. Selecting "Home theater" turns the equipment on . (Continued) ...
... the functions menu on the recorder immediately. Note There is muted. To operate the equipment, read the manual of HDMI connectors. Operate the equipment with the TV's remote control. Move the cursor/Select Play Set/Access Return to the number of the recorder. program...the current program on the equipment Available when the purpose of items. (e.g. This function is available only when Panasonic Amplifier or Player theater is in standby mode. ■TV: The TV speakers are on automatically if it quickly. Selecting "Home theater" turns the equipment on . (Continued) ...

46" Plasma Tv
Page 45
... may make it impossible to cancel the test.) Network setting Connection test IP setting mode IP address Subnet mask Default gateway 1/2 Succeeded Manual 192.168.0.5 255.255.255.0 192.168.0.254 select ok Succeeded: "Connection test" succeeded Only home network: Home network is available.... Network Setting Check that the network settings are as was specified by the provider. Manual setting (When DNS automatic acquisition in progress ---: Test not yet performed ■ Select "IP setting mode" and set the "LAN speed ...
... may make it impossible to cancel the test.) Network setting Connection test IP setting mode IP address Subnet mask Default gateway 1/2 Succeeded Manual 192.168.0.5 255.255.255.0 192.168.0.254 select ok Succeeded: "Connection test" succeeded Only home network: Home network is available.... Network Setting Check that the network settings are as was specified by the provider. Manual setting (When DNS automatic acquisition in progress ---: Test not yet performed ■ Select "IP setting mode" and set the "LAN speed ...
46" Plasma Tv
Page 50
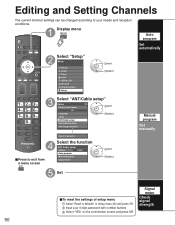
... needs and reception conditions. Editing and Setting Channels The current channel settings can be changed according to defaults" in Cable Auto program Manual program Signal meter next select Manual program Set manually Set ■To reset the settings of setup menu Select "Reset to your 4-digit password with number buttons Select "YES" on...
... needs and reception conditions. Editing and Setting Channels The current channel settings can be changed according to defaults" in Cable Auto program Manual program Signal meter next select Manual program Set manually Set ■To reset the settings of setup menu Select "Reset to your 4-digit password with number buttons Select "YES" on...
46" Plasma Tv
Page 51
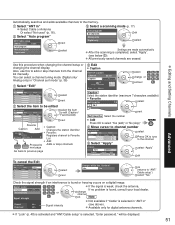
...in "ANT in Cable next Select a scanning mode (p. 17) Auto program All channels Analog only Digital only ok select Auto program Manual program Signal meter select Settings are erased. Automatically searches and adds available channels to previous page Edit Caption Edit CH caption Channel Caption ... the scanning is found , consult your local dealer. Yes select next Select the item to add or skip channels from the channel list manually. If "Lock" (p. 48) is activated and "ANT/Cable setup" is weak, check the antenna. Select "ANT in "Channel surf mode" ...
...in "ANT in Cable next Select a scanning mode (p. 17) Auto program All channels Analog only Digital only ok select Auto program Manual program Signal meter select Settings are erased. Automatically searches and adds available channels to previous page Edit Caption Edit CH caption Channel Caption ... the scanning is found , consult your local dealer. Yes select next Select the item to add or skip channels from the channel list manually. If "Lock" (p. 48) is activated and "ANT/Cable setup" is weak, check the antenna. Select "ANT in "Channel surf mode" ...
46" Plasma Tv
Page 62
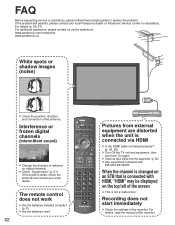
...displayed on an STB that is connected with EIA/CEA-861/861B. For details, read the manual of the recorder. If the signal is connected via the website at: www.panasonic.com/contactinfo www.panasonic.ca White spots or shadow images (noise) Check the position, direction, and connection of the ... For details (p. 66, 67) For additional assistance, please contact us via HDMI Is the HDMI cable connected properly? (p. 39, 55) Turn Off the TV unit and equipment, then turn them On again. Check an input signal from external equipment are distorted when the unit is weak, check the antenna...
...displayed on an STB that is connected with EIA/CEA-861/861B. For details, read the manual of the recorder. If the signal is connected via the website at: www.panasonic.com/contactinfo www.panasonic.ca White spots or shadow images (noise) Check the position, direction, and connection of the ... For details (p. 66, 67) For additional assistance, please contact us via HDMI Is the HDMI cable connected properly? (p. 39, 55) Turn Off the TV unit and equipment, then turn them On again. Check an input signal from external equipment are distorted when the unit is weak, check the antenna...


