Sd Multi Media Termi
Page 1
SV-AV30U Before use, please read these instructions completely. For USA assistance. please call :1-800-211-PANA(7262) or send e-mail to:consumerproducts@panasonic.com For Canadian assistance. R SD Multi AV Device Operating Instructions Model No. please call :1-800-561-5505 or visit us at www.panasonic.ca VQT0C31-2
SV-AV30U Before use, please read these instructions completely. For USA assistance. please call :1-800-211-PANA(7262) or send e-mail to:consumerproducts@panasonic.com For Canadian assistance. R SD Multi AV Device Operating Instructions Model No. please call :1-800-561-5505 or visit us at www.panasonic.ca VQT0C31-2

Sd Multi Media Termi
Page 3
...on the LCD Monitor 19 Basic Functions Recording Still Pictures 20 Playing back Still Pictures 21 Recording Moving Pictures (MPEG4 22 Playing Back Moving Pictures (MPEG4 23 Recording Voice (Voice Recording Function 24 Hearing the Voice Recorded (Voice Playback 25 Listening to Music (Music .........37 Recording pictures supplied from an external device 38 Using Auto Recording Function ....39 On a Personal Computer About the supplied software..........40 USB Driver 41 SD-MovieStage 42 SD-Jukebox 43 Installing USB Driver 44 Installing SD-MovieStage Ver.2.0 44 Installing SD-Jukebox ...
...on the LCD Monitor 19 Basic Functions Recording Still Pictures 20 Playing back Still Pictures 21 Recording Moving Pictures (MPEG4 22 Playing Back Moving Pictures (MPEG4 23 Recording Voice (Voice Recording Function 24 Hearing the Voice Recorded (Voice Playback 25 Listening to Music (Music .........37 Recording pictures supplied from an external device 38 Using Auto Recording Function ....39 On a Personal Computer About the supplied software..........40 USB Driver 41 SD-MovieStage 42 SD-Jukebox 43 Installing USB Driver 44 Installing SD-MovieStage Ver.2.0 44 Installing SD-Jukebox ...
Sd Multi Media Termi
Page 4
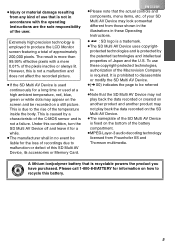
...read these materials may be regulated in your community due to thank you for purchasing this opportunity to environmental considerations. Whatever you have recorded and created can be used without obtaining permission from the holders of mercury. REFER SERVICING TO QUALIFIED SERVICE PERSONNEL. For disposal or recycling... imágenes dinámicas/la voz grabada/ la música 73 Dear Customer, We would like to take this Panasonic SD Multi AV Device. Only 68 Customer Services Directory (For U.S.A. Notice: This product has parts that contain a small amount of the copyrights. 4
...read these materials may be regulated in your community due to thank you for purchasing this opportunity to environmental considerations. Whatever you have recorded and created can be used without obtaining permission from the holders of mercury. REFER SERVICING TO QUALIFIED SERVICE PERSONNEL. For disposal or recycling... imágenes dinámicas/la voz grabada/ la música 73 Dear Customer, We would like to take this Panasonic SD Multi AV Device. Only 68 Customer Services Directory (For U.S.A. Notice: This product has parts that contain a small amount of the copyrights. 4
Sd Multi Media Termi
Page 5
... to the rise of the temperature inside the body. The result is not in no event be recorded on the SD Multi AV Device. ≥The nameplate of Japan and the U.S. This is required. Under this SD Multi AV Device, its accessories or Memory Card. ≥Please note that is used continuously for... created on another product and another product may appear on the screen and be liable for the loss of recordings due to malfunction or defect of this condition, turn the SD Multi AV Device off and leave it for a long time or used at a high ambient temperature, red, blue, green or white...
... to the rise of the temperature inside the body. The result is not in no event be recorded on the SD Multi AV Device. ≥The nameplate of Japan and the U.S. This is required. Under this SD Multi AV Device, its accessories or Memory Card. ≥Please note that is used continuously for... created on another product and another product may appear on the screen and be liable for the loss of recordings due to malfunction or defect of this condition, turn the SD Multi AV Device off and leave it for a long time or used at a high ambient temperature, red, blue, green or white...
Sd Multi Media Termi
Page 7
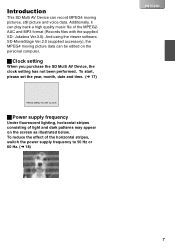
And using the viewer software, SD-MovieStage Ver.2.0 (supplied accessory), the MPEG4 moving pictures, still picture and voice data. Additionally, it can be edited on the screen as illustrated below.... light and dark patterns may appear on the personal computer. ª Clock setting When you purchase the SD Multi AV Device, the clock setting has not been performed. Jukebox Ver.3.0). To reduce the effect of... frequency to 50 Hz or 60 Hz. (l 18) 7 Introduction This SD Multi AV Device can record MPEG4 moving picture data can play back a high quality music file of the MPEG2AAC and MP3 ...
And using the viewer software, SD-MovieStage Ver.2.0 (supplied accessory), the MPEG4 moving pictures, still picture and voice data. Additionally, it can be edited on the screen as illustrated below.... light and dark patterns may appear on the personal computer. ª Clock setting When you purchase the SD Multi AV Device, the clock setting has not been performed. Jukebox Ver.3.0). To reduce the effect of... frequency to 50 Hz or 60 Hz. (l 18) 7 Introduction This SD Multi AV Device can record MPEG4 moving picture data can play back a high quality music file of the MPEG2AAC and MP3 ...
Sd Multi Media Termi
Page 8
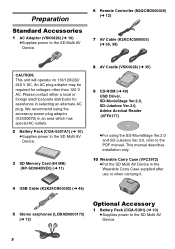
...8 AV Cradle (VSK0628) (l 35) 9 CD-ROM (l 40) USB Driver, SD-MovieStage Ver.2.0, SD-Jukebox Ver.3.0, Adobe Acrobat Reader (VFF0177) ≥For using the SD-MovieStage Ver.2.0 and SD-Jukebox Ver.3.0, refer to the SD Multi AV Device. 8 We recommend using the accessory power plug adaptor (VJSS0070) in ...CGA-S301) (l 10) ≥Supplies power to the PDF manual. Preparation Standard Accessories 1 AC Adaptor (VSK0626) (l 10) ≥Supplies power to the SD Multi AV Device. 6 Remote Controller (N2QCBD000029) (l 12) HOLD EQ 7 AV Cable (K2KC4CB00005) (l 36, 38) CAUTION: This unit will operate on...
...8 AV Cradle (VSK0628) (l 35) 9 CD-ROM (l 40) USB Driver, SD-MovieStage Ver.2.0, SD-Jukebox Ver.3.0, Adobe Acrobat Reader (VFF0177) ≥For using the SD-MovieStage Ver.2.0 and SD-Jukebox Ver.3.0, refer to the SD Multi AV Device. 8 We recommend using the accessory power plug adaptor (VJSS0070) in ...CGA-S301) (l 10) ≥Supplies power to the PDF manual. Preparation Standard Accessories 1 AC Adaptor (VSK0626) (l 10) ≥Supplies power to the SD Multi AV Device. 6 Remote Controller (N2QCBD000029) (l 12) HOLD EQ 7 AV Cable (K2KC4CB00005) (l 36, 38) CAUTION: This unit will operate on...

Sd Multi Media Termi
Page 9
Controls and Components 1 LCD Monitor (l 12) 2 Mode Button [MODE] (l 13) 3 Recording Start/Stop Button (l 20, 22, 24) 4 Menu Button [MENU] (l 14) 5 Multi-function Button Operating/... 10) 14 USB Terminal (l 46) 15 USB Terminal Cover (l 46) 16 Power/Mode Switch [OFF/PLAY/REC] (l 13) 17 Recording Start/Stop Button (l 20, 22, 24, 57) 18 Microphone (built-in, monaural) (l 24) 19 Flash (l 20) 20 Lens ...(l 10) 23 AV Cradle Connector (l 35) 24 AV Output Control Switch [AV OUT/SD PLAY/ LCD MONITOR] (l 36) 25 AV Input Control Switch [AV IN SD/AV IN AV OUT] (l 36, 37, 38) 26 Device Connector (l 35) 27...
Controls and Components 1 LCD Monitor (l 12) 2 Mode Button [MODE] (l 13) 3 Recording Start/Stop Button (l 20, 22, 24) 4 Menu Button [MENU] (l 14) 5 Multi-function Button Operating/... 10) 14 USB Terminal (l 46) 15 USB Terminal Cover (l 46) 16 Power/Mode Switch [OFF/PLAY/REC] (l 13) 17 Recording Start/Stop Button (l 20, 22, 24, 57) 18 Microphone (built-in, monaural) (l 24) 19 Flash (l 20) 20 Lens ...(l 10) 23 AV Cradle Connector (l 35) 24 AV Output Control Switch [AV OUT/SD PLAY/ LCD MONITOR] (l 36) 25 AV Input Control Switch [AV IN SD/AV IN AV OUT] (l 36, 37, 38) 26 Device Connector (l 35) 27...

Sd Multi Media Termi
Page 10
... Using AC Adaptor 1 Connect the AC Adaptor to AC Main socket. 1 2 Connect the DC Input Lead to the [DC IN 4.8V] socket on the SD Multi AV Device. THE SOCKET OUTLET SHALL BE INSTALLED NEAR THE EQUIPMENT AND SHALL BE EASILY ACCESSIBLE. ª Charging the Battery 1 While holding the [ ] ...part, slide it to remove the Battery Compartment 1 Cover. 2 Press the terminals of the battery onto the terminals of the SD Multi AV Device off. 5 Wait until Power Lamp 1 goes off. ≥When recharging is completed, Power Lamp goes off. ≥If the Power Lamp ...
... Using AC Adaptor 1 Connect the AC Adaptor to AC Main socket. 1 2 Connect the DC Input Lead to the [DC IN 4.8V] socket on the SD Multi AV Device. THE SOCKET OUTLET SHALL BE INSTALLED NEAR THE EQUIPMENT AND SHALL BE EASILY ACCESSIBLE. ª Charging the Battery 1 While holding the [ ] ...part, slide it to remove the Battery Compartment 1 Cover. 2 Press the terminals of the battery onto the terminals of the SD Multi AV Device off. 5 Wait until Power Lamp 1 goes off. ≥When recharging is completed, Power Lamp goes off. ≥If the Power Lamp ...

Sd Multi Media Termi
Page 11
...out. ! Replace only with the label 2 facing up, and then insert it fully into the Memory Card Slot horizontally. ≥Turn off the SD Multi AV Device before inserting a Card. ª Removing the Memory Card Slide the Card Eject Lever 3 to the manufacturer's instructions. CARD EJECT 11 ...CAUTION Danger of used for this SD Multi AV Device. 1 Hold the Memory Card placing the cut off 1 corner 1 at the front with the same or equivalent type recommended by the ...
...out. ! Replace only with the label 2 facing up, and then insert it fully into the Memory Card Slot horizontally. ≥Turn off the SD Multi AV Device before inserting a Card. ª Removing the Memory Card Slide the Card Eject Lever 3 to the manufacturer's instructions. CARD EJECT 11 ...CAUTION Danger of used for this SD Multi AV Device. 1 Hold the Memory Card placing the cut off 1 corner 1 at the front with the same or equivalent type recommended by the ...

Sd Multi Media Termi
Page 12
...8805;The Earphones can be connected directly with the SD Multi AV Device. ª Operating the Remote Controller 1 [:]: Selects the previous file or fast- rewinds the files. 2 [9]: Selects the next file or fast-forwards the files. 3 [_/1µ]: Records/Stops recording images or sounds in the Remote Controller. 1 ... illustrated. 1 : Up to 120° maximum 2 : Up to 180° maximum 3 : Up to open ! Using the LCD Monitor 1,2 Record and play the video image while viewing the LCD Monitor. 1 1 Put your finger on the groove 1 to 90° maximum Using the Remote Controller...
...8805;The Earphones can be connected directly with the SD Multi AV Device. ª Operating the Remote Controller 1 [:]: Selects the previous file or fast- rewinds the files. 2 [9]: Selects the next file or fast-forwards the files. 3 [_/1µ]: Records/Stops recording images or sounds in the Remote Controller. 1 ... illustrated. 1 : Up to 120° maximum 2 : Up to 180° maximum 3 : Up to open ! Using the LCD Monitor 1,2 Record and play the video image while viewing the LCD Monitor. 1 1 Put your finger on the groove 1 to 90° maximum Using the Remote Controller...
Sd Multi Media Termi
Page 13
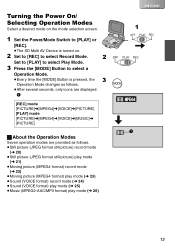
...desired mode on the mode selection screen. 1 Set the Power/Mode Switch to [PLAY] or [REC]. ≥The SD Multi AV Device is turned on. 2 Set to [REC] to select Record Mode. 2 Set to [PLAY] to select Play Mode. 3 Press the [MODE] Button to select a Operation Mode...Still picture (JPEG format still picture) record mode (l 20) ≥Still picture (JPEG format still picture) play mode (l 21) ≥Moving picture (MPEG4 format) record mode (l 22) ≥Moving picture (MPEG4 format) play mode (l 23) ≥Sound (VOICE format) record mode (l 24) ≥Sound (VOICE format) play mode (l 25) &#...
...desired mode on the mode selection screen. 1 Set the Power/Mode Switch to [PLAY] or [REC]. ≥The SD Multi AV Device is turned on. 2 Set to [REC] to select Record Mode. 2 Set to [PLAY] to select Play Mode. 3 Press the [MODE] Button to select a Operation Mode...Still picture (JPEG format still picture) record mode (l 20) ≥Still picture (JPEG format still picture) play mode (l 21) ≥Moving picture (MPEG4 format) record mode (l 22) ≥Moving picture (MPEG4 format) play mode (l 23) ≥Sound (VOICE format) record mode (l 24) ≥Sound (VOICE format) play mode (l 25) &#...
Sd Multi Media Termi
Page 17
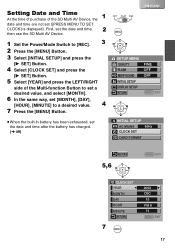
... SET YEAR MONTH DAY HOUR MINUTE RETURN 7 MENU 2003 DEC 15 PM 8 14 MENU EXIT 17 First, set the date and time, 2 then use the SD Multi AV Device. 1 Set the Power/Mode Switch to a desired value. 4 7 Press the [MENU] Button. Setting Date and Time At the time of purchase of... [INITIAL SETUP] and press the [1 SET] Button. 4 Select [CLOCK SET] and press the [1 SET] Button. 5 Select [YEAR] and press the LEFT/RIGHT side of the SD Multi AV Device, the 1 date and time are not set ([PRESS MENU TO SET CLOCK] is displayed).
... SET YEAR MONTH DAY HOUR MINUTE RETURN 7 MENU 2003 DEC 15 PM 8 14 MENU EXIT 17 First, set the date and time, 2 then use the SD Multi AV Device. 1 Set the Power/Mode Switch to a desired value. 4 7 Press the [MENU] Button. Setting Date and Time At the time of purchase of... [INITIAL SETUP] and press the [1 SET] Button. 4 Select [CLOCK SET] and press the [1 SET] Button. 5 Select [YEAR] and press the LEFT/RIGHT side of the SD Multi AV Device, the 1 date and time are not set ([PRESS MENU TO SET CLOCK] is displayed).
Sd Multi Media Termi
Page 18
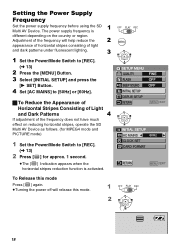
Setting the Power Supply Frequency 1 Set the power supply frequency before using the SD Multi AV Device. OFF PLAY REC MENU SETUP MENU QUALITY FLASH BEEP SOUND INITIAL SETUP DISPLAY SETUP RETURN FINE OFF OFF MENU EXIT INITIAL SETUP .... 1 OFF PLAY REC 2 18 The power supply frequency is activated. Adjustment of the frequency does not have much effect on reducing horizontal stripes, operate the SD Multi AV Device as follows. (for MPEG4 mode and PICTURE mode) 1 Set the Power/Mode Switch to [REC]. (l 13) 2 Press [ ] for approx. 1 second. ≥The...
Setting the Power Supply Frequency 1 Set the power supply frequency before using the SD Multi AV Device. OFF PLAY REC MENU SETUP MENU QUALITY FLASH BEEP SOUND INITIAL SETUP DISPLAY SETUP RETURN FINE OFF OFF MENU EXIT INITIAL SETUP .... 1 OFF PLAY REC 2 18 The power supply frequency is activated. Adjustment of the frequency does not have much effect on reducing horizontal stripes, operate the SD Multi AV Device as follows. (for MPEG4 mode and PICTURE mode) 1 Set the Power/Mode Switch to [REC]. (l 13) 2 Press [ ] for approx. 1 second. ≥The...
Sd Multi Media Termi
Page 21
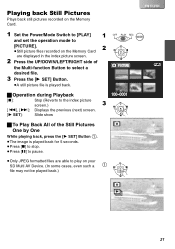
... ª To Play Back All of the Multi-function Button to play on your SD Multi AV Device. (In some cases, even such a 1 file may not be played back.) 21 Playing back Still Pictures Plays back still pictures recorded on the Memory Card. 1 Set the Power/Mode Switch to [PLAY] 1 and set... the operation mode to [PICTURE]. ≥Still picture files recorded on the Memory Card 2 are displayed in the index picture screen. 2 Press the UP/DOWN/LEFT/RIGHT side of the Still Pictures One by One ...
... ª To Play Back All of the Multi-function Button to play on your SD Multi AV Device. (In some cases, even such a 1 file may not be played back.) 21 Playing back Still Pictures Plays back still pictures recorded on the Memory Card. 1 Set the Power/Mode Switch to [PLAY] 1 and set... the operation mode to [PICTURE]. ≥Still picture files recorded on the Memory Card 2 are displayed in the index picture screen. 2 Press the UP/DOWN/LEFT/RIGHT side of the Still Pictures One by One ...
Sd Multi Media Termi
Page 24
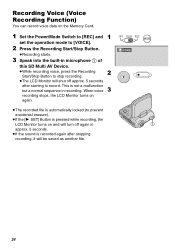
...VOICE 1 24 When voice 3 recording stops, the LCD Monitor turns on and will turn off approx. 5 seconds after stopping recording, it will shut off again in approx. 5 seconds. ≥If the sound is not a malfunction but a normal sequence in microphone 1 of this SD Multi AV Device. ≥While recording voice, press the Recording Start/Stop Button to stop recording.... 2 ≥The LCD Monitor will be saved as another file. This is recorded again after starting to...
...VOICE 1 24 When voice 3 recording stops, the LCD Monitor turns on and will turn off approx. 5 seconds after stopping recording, it will shut off again in approx. 5 seconds. ≥If the sound is not a malfunction but a normal sequence in microphone 1 of this SD Multi AV Device. ≥While recording voice, press the Recording Start/Stop Button to stop recording.... 2 ≥The LCD Monitor will be saved as another file. This is recorded again after starting to...
Sd Multi Media Termi
Page 25
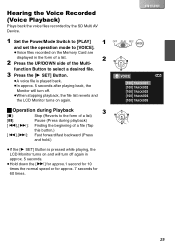
Hearing the Voice Recorded (Voice Playback) Plays back the voice files recorded by the SD Multi AV Device. 1 Set the Power/Mode Switch to [PLAY] 1 and set the operation mode to select a desired file. 3 Press the [1 SET] Button. ≥A voice file is pressed while playing, the LCD Monitor turns ...≥Hold down the [9] for approx.1 second for 10 times the normal speed or for approx. 7 seconds for 60 times. 25 OFF PLAY REC MODE VOICE [100] TRACK001 [100] TRACK002 [100] TRACK003 [100] TRACK004 [100] TRACK005 ª Operation during Playback [∫]: Stop (Reverts to the form of ...
Hearing the Voice Recorded (Voice Playback) Plays back the voice files recorded by the SD Multi AV Device. 1 Set the Power/Mode Switch to [PLAY] 1 and set the operation mode to select a desired file. 3 Press the [1 SET] Button. ≥A voice file is pressed while playing, the LCD Monitor turns ...≥Hold down the [9] for approx.1 second for 10 times the normal speed or for approx. 7 seconds for 60 times. 25 OFF PLAY REC MODE VOICE [100] TRACK001 [100] TRACK002 [100] TRACK003 [100] TRACK004 [100] TRACK005 ª Operation during Playback [∫]: Stop (Reverts to the form of ...

Sd Multi Media Termi
Page 26
... with the 1 software. 1 Set the Power/Mode Switch to [PLAY] and set the operation mode to [MUSIC]. ≥Music files recorded on the SD Memory Card using the SD-Jukebox Ver.3.0 (supplied accessory) special software program in the playlist) are displayed as shown 1. 3 Press the [1 SET] Button. ≥... a still picture associated are repeated. 26 SETUP MENU SELECT PLAYLIST REPEAT POWER SAVE BEEP SOUND DISPLAY SETUP RETURN ALL ON ON MENU EXIT For the SD-Jukebox Ver.3.0, refer to [1MUSIC] or [ALL]. 2 [1MUSIC]: [ALL]: The track being played is repeated. 2 All the tracks (when a ...
... with the 1 software. 1 Set the Power/Mode Switch to [PLAY] and set the operation mode to [MUSIC]. ≥Music files recorded on the SD Memory Card using the SD-Jukebox Ver.3.0 (supplied accessory) special software program in the playlist) are displayed as shown 1. 3 Press the [1 SET] Button. ≥... a still picture associated are repeated. 26 SETUP MENU SELECT PLAYLIST REPEAT POWER SAVE BEEP SOUND DISPLAY SETUP RETURN ALL ON ON MENU EXIT For the SD-Jukebox Ver.3.0, refer to [1MUSIC] or [ALL]. 2 [1MUSIC]: [ALL]: The track being played is repeated. 2 All the tracks (when a ...
Sd Multi Media Termi
Page 27
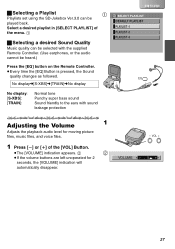
...2 seconds, the [VOLUME] indication will automatically disappear. VOLUME - VOL + 27 ª Selecting a Playlist 1 Playlists set using the SD-Jukebox Ver.3.0 can be selected with sound leakage protection SELECT PLAYLIST DEFAULT PLAYLIST PLAYLIST -1 PLAYLIST -2 PLAYLIST -3 EQ HOLD EQ Adjusting the ...Volume 1 Adjusts the playback audio level for moving picture files, music files, and voice files. 1 Press [s] or [r] of the menu. 1 ª Selecting a desired Sound Quality Music quality can be heard.) Press the [...
...2 seconds, the [VOLUME] indication will automatically disappear. VOLUME - VOL + 27 ª Selecting a Playlist 1 Playlists set using the SD-Jukebox Ver.3.0 can be selected with sound leakage protection SELECT PLAYLIST DEFAULT PLAYLIST PLAYLIST -1 PLAYLIST -2 PLAYLIST -3 EQ HOLD EQ Adjusting the ...Volume 1 Adjusts the playback audio level for moving picture files, music files, and voice files. 1 Press [s] or [r] of the menu. 1 ª Selecting a desired Sound Quality Music quality can be heard.) Press the [...

Sd Multi Media Termi
Page 28
... is displayed. 3 ≥Press the [1] until the [1] Indication is displayed. ≥Press [ª] for approx. 1 second again to resume Normal Recording mode. In such cases, the white balance can be able to bring out natural colors. white paper). 3 Keep pressing [1] until the [1] Indication disappears... shines from behind a recording subject.) 2 1 Set the Power/Mode Switch to [REC] and set the operation mode to [PICTURE] or [MPEG4]. 2 Point the SD Multi AV Device at a full- screen white subject (e.g. OFF PLAY REC MODE Adjusting White Balance The SD Multi AV Device adjusts...
... is displayed. 3 ≥Press the [1] until the [1] Indication is displayed. ≥Press [ª] for approx. 1 second again to resume Normal Recording mode. In such cases, the white balance can be able to bring out natural colors. white paper). 3 Keep pressing [1] until the [1] Indication disappears... shines from behind a recording subject.) 2 1 Set the Power/Mode Switch to [REC] and set the operation mode to [PICTURE] or [MPEG4]. 2 Point the SD Multi AV Device at a full- screen white subject (e.g. OFF PLAY REC MODE Adjusting White Balance The SD Multi AV Device adjusts...

Sd Multi Media Termi
Page 29
... pause. (l 21, 23, 25) 2 Press the [MENU] Button. ≥The editing menu screen appears. 3 Press the UP/DOWN side of the Multi- Erasing the Files Recorded on a Memory Card Using SD Multi AV Device, you can erase files...
... pause. (l 21, 23, 25) 2 Press the [MENU] Button. ≥The editing menu screen appears. 3 Press the UP/DOWN side of the Multi- Erasing the Files Recorded on a Memory Card Using SD Multi AV Device, you can erase files...


