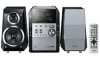
SAPM29 User Guide
Page 1
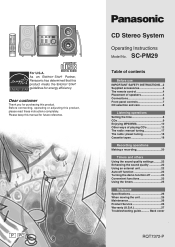
... INSTRUCTIONS ...2 Supplied accessories 3 The remote control 4 Placement of speakers 4 Connections 5 Front panel controls 7 CD selection and care 8 Listening operations Setting the time 8 CDs 9 Enjoying MP3/WMA 10 Other ways of playing CD's 12 The radio: manual tuning 17 The radio: preset tuning 18 Cassette tapes 18 Recording operations Making a recording 20 Timers and others Using the sound quality settings ..........22 Enhancing the sound quality 22 Using an external unit 22 Auto-off function 23 Turning the demo function off 23 Convenient functions 23 Using the timers...
... INSTRUCTIONS ...2 Supplied accessories 3 The remote control 4 Placement of speakers 4 Connections 5 Front panel controls 7 CD selection and care 8 Listening operations Setting the time 8 CDs 9 Enjoying MP3/WMA 10 Other ways of playing CD's 12 The radio: manual tuning 17 The radio: preset tuning 18 Cassette tapes 18 Recording operations Making a recording 20 Timers and others Using the sound quality settings ..........22 Enhancing the sound quality 22 Using an external unit 22 Auto-off function 23 Turning the demo function off 23 Convenient functions 23 Using the timers...
SAPM29 User Guide
Page 2
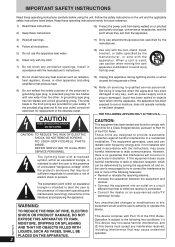
... can radiate radio frequency energy and, if not installed and used , use this equipment would void the user's authority to the following measures: l Reorient or relocate the receiving antenna. Follow the safety instructions on or pinched particularly at plugs, convenience receptacles, and the point where they exit from the apparatus. 3) Heed all warnings. 4) Follow all servicing to persons. A polarized plug has two...
... can radiate radio frequency energy and, if not installed and used , use this equipment would void the user's authority to the following measures: l Reorient or relocate the receiving antenna. Follow the safety instructions on or pinched particularly at plugs, convenience receptacles, and the point where they exit from the apparatus. 3) Heed all warnings. 4) Follow all servicing to persons. A polarized plug has two...
SAPM29 User Guide
Page 3
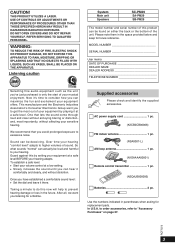
... for replacement parts. After all, we want you to consider how you have established a comfortable sound level: l Set the dial and leave it 's time to get the most importantly, without affecting your sensitive hearing. AC power supply cord 1 pc. (K2CB2CB00006) FM indoor antenna 1 pc. (RSA0007-L) AM loop antenna 1 pc. (N1DAAAA00001) Remote control transmitter 1 pc. (N2QAJB000095) Batteries 2 pc. DO NOT OPEN COVERS AND DO NOT REPAIR...
... for replacement parts. After all, we want you to consider how you have established a comfortable sound level: l Set the dial and leave it 's time to get the most importantly, without affecting your sensitive hearing. AC power supply cord 1 pc. (K2CB2CB00006) FM indoor antenna 1 pc. (RSA0007-L) AM loop antenna 1 pc. (N1DAAAA00001) Remote control transmitter 1 pc. (N2QAJB000095) Batteries 2 pc. DO NOT OPEN COVERS AND DO NOT REPAIR...
SAPM29 User Guide
Page 4
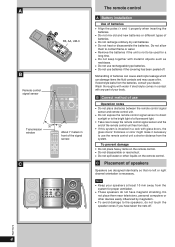
... to use Operation notes l Do not place obstacles between the remote control signal sensor and remote control unit. C Placement of use the remote control unit a shorter distance from the batteries, consult your body. l Do not heat or disassemble the batteries. l Remove the batteries if the unit is necessary. CD CHANGE ; A 1 3 R6, AA, UM-3 2 2 B Remote control signal sensor 8 POWER AC IN / h REC S.SOUND EQ PLAY LIST RE-MASTER AUX CD CHECK TUNER/BAND CD q/ h VOLUME STOP g TAPE 7 - DEMO CD 1 CD 2 CD 3 CD 4 CD...
... to use Operation notes l Do not place obstacles between the remote control signal sensor and remote control unit. C Placement of use the remote control unit a shorter distance from the batteries, consult your body. l Do not heat or disassemble the batteries. l Remove the batteries if the unit is necessary. CD CHANGE ; A 1 3 R6, AA, UM-3 2 2 B Remote control signal sensor 8 POWER AC IN / h REC S.SOUND EQ PLAY LIST RE-MASTER AUX CD CHECK TUNER/BAND CD q/ h VOLUME STOP g TAPE 7 - DEMO CD 1 CD 2 CD 3 CD 4 CD...

SAPM29 User Guide
Page 5
... the tags on its base. Using other wires and cords. 3 Connect the speaker cables. Consult a qualified service person if damage has occurred or if you experience a sudden change in the risk of fire. l Do not attach these speakers to grey terminals. Connections l Plug the AC power supply cord into a household AC 21 outlet only after all other equipment. Stand the antenna up on the ends of...
... the tags on its base. Using other wires and cords. 3 Connect the speaker cables. Consult a qualified service person if damage has occurred or if you experience a sudden change in the risk of fire. l Do not attach these speakers to grey terminals. Connections l Plug the AC power supply cord into a household AC 21 outlet only after all other equipment. Stand the antenna up on the ends of...
SAPM29 User Guide
Page 7
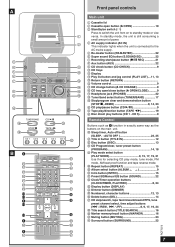
... jack (PHONES 22 18 Tuner/band select button (TUNER/BAND 17 19 Stop/program clear and demonstration button (STOP g, -DEMO 9, 14, 23 20 CD play/pause button (CD q/ h 9 21 Tape play/direction button (TAPE 7 19 22 Disc direct play mode, tune mode, FM mode, AM beat proof function and tape reverse mode. 28 Repeat button (REPEAT 15 29 Album select button (ALBUM 9 30 Intro button (INTRO 15 31 Preset EQ/Manual EQ button (SOUND 22 32 Clock/Timer operation buttons (CLOCK/TIMER, PLAY/REC 8, 24 33 Display button (DISPLAY) 34 Dimmer button (DIMMER) 35 Numbered, character buttons...
... jack (PHONES 22 18 Tuner/band select button (TUNER/BAND 17 19 Stop/program clear and demonstration button (STOP g, -DEMO 9, 14, 23 20 CD play/pause button (CD q/ h 9 21 Tape play/direction button (TAPE 7 19 22 Disc direct play mode, tune mode, FM mode, AM beat proof function and tape reverse mode. 28 Repeat button (REPEAT 15 29 Album select button (ALBUM 9 30 Intro button (INTRO 15 31 Preset EQ/Manual EQ button (SOUND 22 32 Clock/Timer operation buttons (CLOCK/TIMER, PLAY/REC 8, 24 33 Display button (DISPLAY) 34 Dimmer button (DIMMER) 35 Numbered, character buttons...
SAPM29 User Guide
Page 8
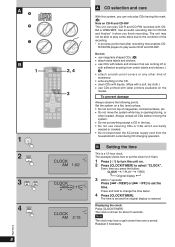
... display is shown for about 5 seconds. Note The clock may not be able to play audio CD-R and CD-RW. Always unload all CDs before moving the system. l Do not disconnect the AC power supply cord from under labels and stickers. ( C) l attach scratch-proof covers or any other kind of magazines, inclined surfaces, etc. Press and hold to change the time faster. 4 Press [CLOCK/TIMER]. l clean CDs...
... display is shown for about 5 seconds. Note The clock may not be able to play audio CD-R and CD-RW. Always unload all CDs before moving the system. l Do not disconnect the AC power supply cord from under labels and stickers. ( C) l attach scratch-proof covers or any other kind of magazines, inclined surfaces, etc. Press and hold to change the time faster. 4 Press [CLOCK/TIMER]. l clean CDs...
SAPM29 User Guide
Page 9
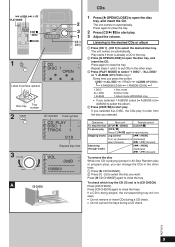
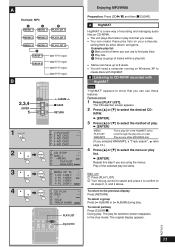
AUTO OFF TIMER REC ^ TITLE IN PLAY MODE DISC 1 PROGRAM GHI 4 PLAY MODE PQRS 7 REPEAT DEL ALBUM DISPLAY DIMMER ABC DEF 23 JKL MNO 56 TUV WXYZ 89 SPACE l"# 0 >=10 /REW /FF u i TUNER/ BAND AUX TAPE w q CD q/ h CLEAR g /FF STOP DEMO 8 POWER AC IN / h REC AUX CD CHECK VOL ENTER VOL PLAY LIST RETURN CLEAR q TITLE RE-MASTER INTRO MARKER SEARCH S.SOUND EQ SOUND SORROUND MUTING S.SOUND EQ PLAY LIST RE-MASTER TUNER/BAND CD q/ h VOLUME STOP g TAPE 7 - OPEN/ CLOSE UP 3 1 (CD 1) (CD 5) PHONES 1 ; Press...
AUTO OFF TIMER REC ^ TITLE IN PLAY MODE DISC 1 PROGRAM GHI 4 PLAY MODE PQRS 7 REPEAT DEL ALBUM DISPLAY DIMMER ABC DEF 23 JKL MNO 56 TUV WXYZ 89 SPACE l"# 0 >=10 /REW /FF u i TUNER/ BAND AUX TAPE w q CD q/ h CLEAR g /FF STOP DEMO 8 POWER AC IN / h REC AUX CD CHECK VOL ENTER VOL PLAY LIST RETURN CLEAR q TITLE RE-MASTER INTRO MARKER SEARCH S.SOUND EQ SOUND SORROUND MUTING S.SOUND EQ PLAY LIST RE-MASTER TUNER/BAND CD q/ h VOLUME STOP g TAPE 7 - OPEN/ CLOSE UP 3 1 (CD 1) (CD 5) PHONES 1 ; Press...
SAPM29 User Guide
Page 11
... CLOCK/ - AUTO OFF TIMER ^ PLAY/ REC TITLE IN DISPLAY DIMMER DISC 1 PROGRAM GHI 4 PLAY MODE PQRS 7 REPEAT DEL ALBUM ABC DEF 23 JKL MNO 56 TUV WXYZ 89 SPACE l"# 0 >=10 /REW /FF u i TUNER/ BAND AUX q TAPE w q CD q/ h CLEAR g VOL ENTER PLAY LIST VOL RETURN q TITLE RE-MASTER INTRO MARKER SEARCH S.SOUND EQ SOUND SORROUND MUTING ALBUM CLEAR RETURN 1 PLAY LIST 2 3 4 q q q q q q ENTER ENTER ENTER 1 1>PLAYLIST 2 2 NO DISC ALL DISC 3 3 NO DISC 4 4 NO DISC 5 5 NO DISC 1 CD STOP 2 DISC...
... CLOCK/ - AUTO OFF TIMER ^ PLAY/ REC TITLE IN DISPLAY DIMMER DISC 1 PROGRAM GHI 4 PLAY MODE PQRS 7 REPEAT DEL ALBUM ABC DEF 23 JKL MNO 56 TUV WXYZ 89 SPACE l"# 0 >=10 /REW /FF u i TUNER/ BAND AUX q TAPE w q CD q/ h CLEAR g VOL ENTER PLAY LIST VOL RETURN q TITLE RE-MASTER INTRO MARKER SEARCH S.SOUND EQ SOUND SORROUND MUTING ALBUM CLEAR RETURN 1 PLAY LIST 2 3 4 q q q q q q ENTER ENTER ENTER 1 1>PLAYLIST 2 2 NO DISC ALL DISC 3 3 NO DISC 4 4 NO DISC 5 5 NO DISC 1 CD STOP 2 DISC...

SAPM29 User Guide
Page 13
... . DEMO CD 1 CD 2 CD 3 CD 4 CD 5 DOWN PUSH ENTER RETRUN ; To return to select the desired track number. For example, 20: [ ≧ 10] [2] [0] Note You cannot use direct access play from a specific track to the last track of information during play time display shows "--:-- AUTO OFF TIMER ^ PLAY/ REC TITLE IN DISPLAY DIMMER DISC 1 PROGRAM GHI 4 PLAY MODE PQRS 7 REPEAT DEL ALBUM ABC DEF 23 JKL MNO 56 TUV WXYZ 89 SPACE l"# 0 >=10 /REW /FF u i TUNER/ BAND AUX TAPE w q CD q/ h CLEAR...
... . DEMO CD 1 CD 2 CD 3 CD 4 CD 5 DOWN PUSH ENTER RETRUN ; To return to select the desired track number. For example, 20: [ ≧ 10] [2] [0] Note You cannot use direct access play from a specific track to the last track of information during play time display shows "--:-- AUTO OFF TIMER ^ PLAY/ REC TITLE IN DISPLAY DIMMER DISC 1 PROGRAM GHI 4 PLAY MODE PQRS 7 REPEAT DEL ALBUM ABC DEF 23 JKL MNO 56 TUV WXYZ 89 SPACE l"# 0 >=10 /REW /FF u i TUNER/ BAND AUX TAPE w q CD q/ h CLEAR...
SAPM29 User Guide
Page 17
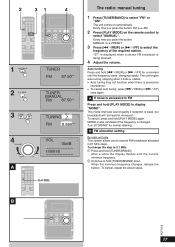
... MARKER SEARCH S.SOUND EQ SOUND SORROUND MUTING PLAY MODE 8 POWER AC IN / h REC S.SOUND EQ PLAY LIST RE-MASTER AUX CD CHECK TUNER/BAND CD q/ h VOLUME STOP g TAPE 7 - OPEN/ CLOSE UP PHONES The radio: manual tuning 1 Press [TUNER/BAND] to select "MANUAL". MONO is also cancelled if the frequency is being received. 4 Adjust the volume. To cancel, repeat the above steps. 17 q q RQT7372 2 31 4 SLEEP CLOCK/ - AUTO OFF TIMER ^ PLAY/ REC TITLE IN DISPLAY DIMMER DISC 1 PROGRAM GHI 4 PLAY MODE PQRS 7 REPEAT DEL ALBUM ABC DEF...
... MARKER SEARCH S.SOUND EQ SOUND SORROUND MUTING PLAY MODE 8 POWER AC IN / h REC S.SOUND EQ PLAY LIST RE-MASTER AUX CD CHECK TUNER/BAND CD q/ h VOLUME STOP g TAPE 7 - OPEN/ CLOSE UP PHONES The radio: manual tuning 1 Press [TUNER/BAND] to select "MANUAL". MONO is also cancelled if the frequency is being received. 4 Adjust the volume. To cancel, repeat the above steps. 17 q q RQT7372 2 31 4 SLEEP CLOCK/ - AUTO OFF TIMER ^ PLAY/ REC TITLE IN DISPLAY DIMMER DISC 1 PROGRAM GHI 4 PLAY MODE PQRS 7 REPEAT DEL ALBUM ABC DEF...
SAPM29 User Guide
Page 19
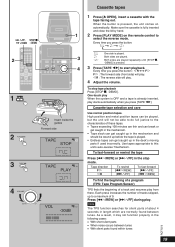
..., STOP , /REW DEMO OPEN 1 SLEEP CLOCK/ - Tape direction F o p R To rewind [u 2/REW] [i 1/FF] To fast-forward [i 1/FF] [u 2/REW] To find the beginning of a program (TPS: Tape Program Sensor) TPS finds the beginning of 9. p R : The reverse side will play . CD CHANGE ; AUTO OFF TIMER ^ PLAY/ REC TITLE IN DISPLAY DIMMER DISC 1 PROGRAM GHI 4 PLAY MODE PQRS 7 REPEAT DEL ALBUM ABC DEF 23 JKL MNO 56 TUV WXYZ 89 SPACE l"# 0 >=10 /REW /FF u i TUNER/ BAND AUX TAPE w q CD q/ h CLEAR...
..., STOP , /REW DEMO OPEN 1 SLEEP CLOCK/ - Tape direction F o p R To rewind [u 2/REW] [i 1/FF] To fast-forward [i 1/FF] [u 2/REW] To find the beginning of a program (TPS: Tape Program Sensor) TPS finds the beginning of 9. p R : The reverse side will play . CD CHANGE ; AUTO OFF TIMER ^ PLAY/ REC TITLE IN DISPLAY DIMMER DISC 1 PROGRAM GHI 4 PLAY MODE PQRS 7 REPEAT DEL ALBUM ABC DEF 23 JKL MNO 56 TUV WXYZ 89 SPACE l"# 0 >=10 /REW /FF u i TUNER/ BAND AUX TAPE w q CD q/ h CLEAR...

SAPM29 User Guide
Page 20
AUTO OFF TIMER ^ PLAY/ REC TITLE IN DISPLAY DIMMER PLAY MODE DISC 1 PROGRAM GHI 4 PLAY MODE PQRS 7 REPEAT DEL ALBUM ABC DEF 23 JKL MNO 56 TUV WXYZ 89 SPACE l"# 0 >=10 /REW /FF u i TUNER/ BAND AUX TAPE w q CD q/ h CLEAR g VOL ENTER VOL PLAY LIST RETURN TITLE RE-MASTER INTRO MARKER SEARCH S.SOUND EQ SOUND SORROUND MUTING / h REC 8 POWER AC IN / h REC STOP g AUX CD - OPEN/ CLOSE UP PHONES Making a recording Before recording Types of volume and sound quality on recording These have...
AUTO OFF TIMER ^ PLAY/ REC TITLE IN DISPLAY DIMMER PLAY MODE DISC 1 PROGRAM GHI 4 PLAY MODE PQRS 7 REPEAT DEL ALBUM ABC DEF 23 JKL MNO 56 TUV WXYZ 89 SPACE l"# 0 >=10 /REW /FF u i TUNER/ BAND AUX TAPE w q CD q/ h CLEAR g VOL ENTER VOL PLAY LIST RETURN TITLE RE-MASTER INTRO MARKER SEARCH S.SOUND EQ SOUND SORROUND MUTING / h REC 8 POWER AC IN / h REC STOP g AUX CD - OPEN/ CLOSE UP PHONES Making a recording Before recording Types of volume and sound quality on recording These have...

SAPM29 User Guide
Page 21
..., it . Common recording operations To stop it is re-recorded in its entirety on the reverse side. C Recording from the beginning, on the reverse side C 2 8 POWER AC IN STOP DEMO / h REC S.SOUND EQ PLAY LIST RE-MASTER AUX CD CHECK TUNER/BAND CD q/ h VOLUME STOP g TAPE 7 - Recording will go into the stop mode. 2 Press [*/ h REC] to resume recording again. The CD starts. AUTO OFF TIMER ^ PLAY/ REC TITLE IN DISPLAY DIMMER PLAY MODE DISC 1 PROGRAM GHI 4 PLAY MODE PQRS 7 REPEAT DEL ALBUM ABC DEF...
..., it . Common recording operations To stop it is re-recorded in its entirety on the reverse side. C Recording from the beginning, on the reverse side C 2 8 POWER AC IN STOP DEMO / h REC S.SOUND EQ PLAY LIST RE-MASTER AUX CD CHECK TUNER/BAND CD q/ h VOLUME STOP g TAPE 7 - Recording will go into the stop mode. 2 Press [*/ h REC] to resume recording again. The CD starts. AUTO OFF TIMER ^ PLAY/ REC TITLE IN DISPLAY DIMMER PLAY MODE DISC 1 PROGRAM GHI 4 PLAY MODE PQRS 7 REPEAT DEL ALBUM ABC DEF...
SAPM29 User Guide
Page 22
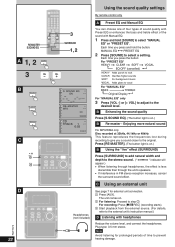
... the volume level, and connect the headphones. The unit comes on .) B Re-master - For recording: Press [*/ h REC] (recording starts). 3 Start playback from the external source. (For details, refer to step 3 . RQT7372 q RE-MASTER S.SOUND EQ SLEEP CLOCK/ - AUTO OFF TIMER ^ PLAY/ REC TITLE IN DISPLAY DIMMER DISC 1 PROGRAM GHI 4 PLAY MODE PQRS 7 REPEAT DEL ALBUM ABC DEF 23 JKL MNO 56 TUV WXYZ 89 SPACE l"# 0 >=10 /REW /FF u i TUNER/ BAND AUX TAPE w q CD...
... the volume level, and connect the headphones. The unit comes on .) B Re-master - For recording: Press [*/ h REC] (recording starts). 3 Start playback from the external source. (For details, refer to step 3 . RQT7372 q RE-MASTER S.SOUND EQ SLEEP CLOCK/ - AUTO OFF TIMER ^ PLAY/ REC TITLE IN DISPLAY DIMMER DISC 1 PROGRAM GHI 4 PLAY MODE PQRS 7 REPEAT DEL ALBUM ABC DEF 23 JKL MNO 56 TUV WXYZ 89 SPACE l"# 0 >=10 /REW /FF u i TUNER/ BAND AUX TAPE w q CD...

SAPM29 User Guide
Page 23
... 8 POWER AC IN / h REC S.SOUND EQ PLAY LIST RE-MASTER AUX CD CHECK TUNER/BAND CD q/ h VOLUME STOP g TAPE 7 - REMASTER HighMAT The display changes each time the button is on ) To show a demonstration of purchase. The display dims and all the way to cancel. ("MUTING" goes out.) Muting can also be dimmer. Press [MUTING]. "AUTO OFF" disappears from the display. Press [DIMMER]. AUTO OFF TIMER ^ PLAY/ REC TITLE IN DISPLAY DIMMER DISC PROGRAM PLAY MODE REPEAT...
... 8 POWER AC IN / h REC S.SOUND EQ PLAY LIST RE-MASTER AUX CD CHECK TUNER/BAND CD q/ h VOLUME STOP g TAPE 7 - REMASTER HighMAT The display changes each time the button is on ) To show a demonstration of purchase. The display dims and all the way to cancel. ("MUTING" goes out.) Muting can also be dimmer. Press [MUTING]. "AUTO OFF" disappears from the display. Press [DIMMER]. AUTO OFF TIMER ^ PLAY/ REC TITLE IN DISPLAY DIMMER DISC PROGRAM PLAY MODE REPEAT...
SAPM29 User Guide
Page 24
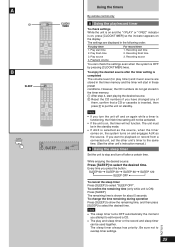
... the timer indicators from the display. 2 Make changes to the source or volume. 3 Do steps 4 to 5. (Continued on ) 1 Press [zPLAY/REC] to wake you press the button: CLOCK zPLAY zREC Original display zPLAY to on . AUTO OFF ^ PLAY/ REC TITLE IN DISPLAY DIMMER DISC ABC 12 PROGRAM GHI JKL 45 PLAY MODE PQRS TUV 78 REPEAT DEL 0 ALBUM /REW u DEF 3 MNO 6 WXYZ 9 SPACE l"# >=10 /FF i TUNER/ BAND AUX TAPE w q CD q/ h CLEAR...
... the timer indicators from the display. 2 Make changes to the source or volume. 3 Do steps 4 to 5. (Continued on ) 1 Press [zPLAY/REC] to wake you press the button: CLOCK zPLAY zREC Original display zPLAY to on . AUTO OFF ^ PLAY/ REC TITLE IN DISPLAY DIMMER DISC ABC 12 PROGRAM GHI JKL 45 PLAY MODE PQRS TUV 78 REPEAT DEL 0 ALBUM /REW u DEF 3 MNO 6 WXYZ 9 SPACE l"# >=10 /FF i TUNER/ BAND AUX TAPE w q CD q/ h CLEAR...
SAPM29 User Guide
Page 25
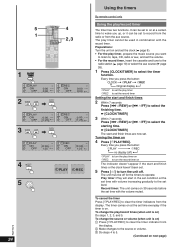
... AUTO OFF SLEEP Using the timers By remote control only A Using the play and sleep timer or the record and sleep timer can check the settings even when the system is functioning, the finish time setting will start in the timer memory. 1 After step 4, start playing the desired source. 2 Reset the CD numbers if you turn off and on , the timer will not function. Recording start time 2. AUTO OFF TIMER ^ PLAY/ REC TITLE IN DISPLAY DIMMER DISC 1 PROGRAM GHI 4 PLAY MODE PQRS 7 REPEAT DEL...
... AUTO OFF SLEEP Using the timers By remote control only A Using the play and sleep timer or the record and sleep timer can check the settings even when the system is functioning, the finish time setting will start in the timer memory. 1 After step 4, start playing the desired source. 2 Reset the CD numbers if you turn off and on , the timer will not function. Recording start time 2. AUTO OFF TIMER ^ PLAY/ REC TITLE IN DISPLAY DIMMER DISC 1 PROGRAM GHI 4 PLAY MODE PQRS 7 REPEAT DEL...
SAPM29 User Guide
Page 26
... Power supply AC 120 V, 60 Hz) Power consumption 130 W Dimensions (W x H x D) 179 x 247 x 378 mm Mass 5.4 kg Power consumption in standby mode: Approx. 0.6 W Note 1. Specifications g AMPLIFIER SECTION RMS Power output 10% Total harmonic distortion 1 kHz, both channels driven (Low channel) 35 W per channel (6 Ω) 8 kHz, both channels driven (High channel) 35 W per channel (6 Ω) Total Bi-Amp power 70 W per channel Input sensitivity AUX 250 mV Input Impedance AUX 11.8 kΩ g FM TUNER SECTION Frequency...
... Power supply AC 120 V, 60 Hz) Power consumption 130 W Dimensions (W x H x D) 179 x 247 x 378 mm Mass 5.4 kg Power consumption in standby mode: Approx. 0.6 W Note 1. Specifications g AMPLIFIER SECTION RMS Power output 10% Total harmonic distortion 1 kHz, both channels driven (Low channel) 35 W per channel (6 Ω) 8 kHz, both channels driven (High channel) 35 W per channel (6 Ω) Total Bi-Amp power 70 W per channel Input sensitivity AUX 250 mV Input Impedance AUX 11.8 kΩ g FM TUNER SECTION Frequency...
SAPM29 User Guide
Page 28
... the speaker connections. (è page 5) An AC power supply cord or fluorescent light is no disc in temperature. CD-RW cannot be defective. The disc may be upside down. The unit cannot display the remaining play time. En 5770 Ambler Drive Mississauga, Ontario L4W 2T3 www.panasonic.ca RQT7372-P H0104SG0 Troubleshooting guide Before requesting service, make the disc changing noises for a few moments and then it . Common Problems No sound. "ERROR" is displayed...
... the speaker connections. (è page 5) An AC power supply cord or fluorescent light is no disc in temperature. CD-RW cannot be defective. The disc may be upside down. The unit cannot display the remaining play time. En 5770 Ambler Drive Mississauga, Ontario L4W 2T3 www.panasonic.ca RQT7372-P H0104SG0 Troubleshooting guide Before requesting service, make the disc changing noises for a few moments and then it . Common Problems No sound. "ERROR" is displayed...


