
Home Theater
Page 1
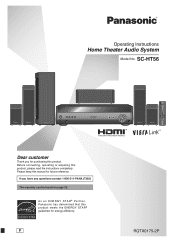
Please keep this product. P RQTX0175-2P If you for purchasing this manual for energy efficiency. SC-HT56 Dear customer Thank you have any questions contact 1-800-211-PANA (7262) The warranty can be found on page 23. Before connecting, operating or adjusting this product meets the ENERGY STAR guidelines for future reference. Operating Instructions Home Theater Audio System Model No. As an ENERGY STAR Partner, Panasonic has determined that this product, please read the instructions completely.
Please keep this product. P RQTX0175-2P If you for purchasing this manual for energy efficiency. SC-HT56 Dear customer Thank you have any questions contact 1-800-211-PANA (7262) The warranty can be found on page 23. Before connecting, operating or adjusting this product meets the ENERGY STAR guidelines for future reference. Operating Instructions Home Theater Audio System Model No. As an ENERGY STAR Partner, Panasonic has determined that this product, please read the instructions completely.

Home Theater
Page 3
...level" adapts to higher volumes of speakers 6 Connect the speakers to the receiver 6 Other speaker setup options 7 Wireless system connection 7 STEP 2 Home theater connections 8 HDMI and VIERA Link "HDAVI ControlTM 8 High-quality audio ... (SFC 15 MENU operation 16 The radio 17 Direct tuning/Automatic presetting/Manual presetting/Selecting channels 17 Sound field 18 Adjusting the tone/Dimension... and identify the supplied accessories. System AV Control Receiver Front speakers Surround speakers Center speaker Subwoofer SC-HT56 SA-HT56 SB-HF56 SB-HS760 SB-HC760 SB-HWX50 Table...
...level" adapts to higher volumes of speakers 6 Connect the speakers to the receiver 6 Other speaker setup options 7 Wireless system connection 7 STEP 2 Home theater connections 8 HDMI and VIERA Link "HDAVI ControlTM 8 High-quality audio ... (SFC 15 MENU operation 16 The radio 17 Direct tuning/Automatic presetting/Manual presetting/Selecting channels 17 Sound field 18 Adjusting the tone/Dimension... and identify the supplied accessories. System AV Control Receiver Front speakers Surround speakers Center speaker Subwoofer SC-HT56 SA-HT56 SB-HF56 SB-HS760 SB-HC760 SB-HWX50 Table...
Home Theater
Page 7
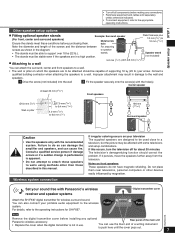
...a qualified building contractor when attaching the speakers to the appropriate operating instructions. Failure to the wireless system. If this manual. Set your sound free with some televisions and setup combinations. You can use . You can also connect your television The supplied... length of supporting 10 kg (22 lb.) per screw. to speaker stands. • The stands must be affected with Panasonic's wireless receiver and speaker systems Digital transmitter cover PUSH PUSH Attach the SH-FX67 digital transmitter for SH-FX67. Other speaker setup options &#...
...a qualified building contractor when attaching the speakers to the appropriate operating instructions. Failure to the wireless system. If this manual. Set your sound free with some televisions and setup combinations. You can use . You can also connect your television The supplied... length of supporting 10 kg (22 lb.) per screw. to speaker stands. • The stands must be affected with Panasonic's wireless receiver and speaker systems Digital transmitter cover PUSH PUSH Attach the SH-FX67 digital transmitter for SH-FX67. Other speaker setup options &#...
Home Theater
Page 8
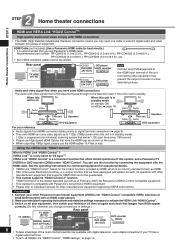
... new name for Panasonic's HDAVI Control compatible equipment. Preparation 1. Home theater connections STEP 2 Home theater connections HDMI and VIERA Link "HDAVI ControlTM" High-quality audio and video simply with Panasonic's conventional HDAVI equipment. • Please refer to individual manuals for other manufacturers' ... off then on the cover). • When outputting 1080p signal, please use a digital connection if your other Panasonic home theater equipment (VIERA Link "HDAVI Control" compatible VIERA television or DIGA DVD recorder) with other equipment may prevent the ...
... new name for Panasonic's HDAVI Control compatible equipment. Preparation 1. Home theater connections STEP 2 Home theater connections HDMI and VIERA Link "HDAVI ControlTM" High-quality audio and video simply with Panasonic's conventional HDAVI equipment. • Please refer to individual manuals for other manufacturers' ... off then on the cover). • When outputting 1080p signal, please use a digital connection if your other Panasonic home theater equipment (VIERA Link "HDAVI Control" compatible VIERA television or DIGA DVD recorder) with other equipment may prevent the ...
Home Theater
Page 12
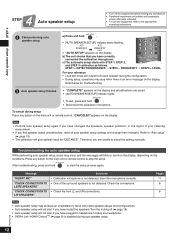
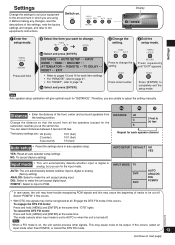
... may produce an unsatisfactory result with STEP 1, STEP 2, and STEP 3 calibration as follows. Turn the muting off all auto speaker setup settings and change them manually. b) The unit checks that you have plugged in headphone. Refer below for auto speaker setup While performing auto speaker setup, errors may stop the setup... • Calibration microphone is not detected. Insert the microphone correctly. • One of your reference • Loud test tones are unable to adjust the setting manually.
... may produce an unsatisfactory result with STEP 1, STEP 2, and STEP 3 calibration as follows. Turn the muting off all auto speaker setup settings and change them manually. b) The unit checks that you have plugged in headphone. Refer below for auto speaker setup While performing auto speaker setup, errors may stop the setup... • Calibration microphone is not detected. Insert the microphone correctly. • One of your reference • Loud test tones are unable to adjust the setting manually.
Home Theater
Page 13
... cancel (factory setting) DISTANCE LR C S 3 feet to 30 feet Repeat for the subwoofer) reaches you at all. Therefore, you are unable to adjust the setting manually. 2a 2b 3 Distance • Enter the distance of the settings, note the factory settings and ranges, and refer to the equipment's instructions. The factory settings...
... cancel (factory setting) DISTANCE LR C S 3 feet to 30 feet Repeat for the subwoofer) reaches you at all. Therefore, you are unable to adjust the setting manually. 2a 2b 3 Distance • Enter the distance of the settings, note the factory settings and ranges, and refer to the equipment's instructions. The factory settings...
Home Theater
Page 16
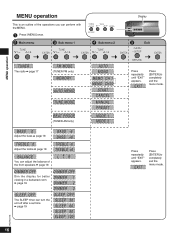
... a set time ➡ page 19 SLEEP OFF SLEEP 30 SLEEP 60 SLEEP 90 SLEEP 120 RQTX0175 16 AUTO MONO MEMO CH 1 MEMO CH30 S TA R T CANCEL MANUAL PRESET MODE 1 MODE 2 Press repeatedly until "EXIT" appears. Press repeatedly until "EXIT" appears. EXIT Press [ENTER] to completely exit the menu mode.
... a set time ➡ page 19 SLEEP OFF SLEEP 30 SLEEP 60 SLEEP 90 SLEEP 120 RQTX0175 16 AUTO MONO MEMO CH 1 MEMO CH30 S TA R T CANCEL MANUAL PRESET MODE 1 MODE 2 Press repeatedly until "EXIT" appears. Press repeatedly until "EXIT" appears. EXIT Press [ENTER] to completely exit the menu mode.

Home Theater
Page 17
...; [7] → [9] • If you do not press a button while the cursor is displayed when presetting finishes. Preparation: Tune to the frequency being received. • If the frequency has not been input correctly, "ERROR" will be displayed. Main unit 1. Press [TUNE 2 / - or 1 / +] to ...if any were preset in ascending order. Main unit 1. Press [-MENU] to cancel. Select "AUTO" to select "TUNER" ➡ "MEMORY". 2. Manual presetting Preset the stations one at a time. Press [-MENU] to cancel. Selecting channels Remote control 1. Press [TUNER, ―BAND] to select "...
...; [7] → [9] • If you do not press a button while the cursor is displayed when presetting finishes. Preparation: Tune to the frequency being received. • If the frequency has not been input correctly, "ERROR" will be displayed. Main unit 1. Press [TUNE 2 / - or 1 / +] to ...if any were preset in ascending order. Main unit 1. Press [-MENU] to cancel. Select "AUTO" to select "TUNER" ➡ "MEMORY". 2. Manual presetting Preset the stations one at a time. Press [-MENU] to cancel. Selecting channels Remote control 1. Press [TUNER, ―BAND] to select "...


