

Cd Stereo System
Page 2
... INSTRUCTIONS 4 Placement of speakers 5 Concerning the remote control 5 Battery installation 5 Correct method of use 5 Connections 6 Basic connections (for supplied accessories 6 Optional antenna connections 7 External unit connection 7 Front panel controls 8 Setting the time 9 Turning the demo function off 9 Auto-off function 9 Compact disc operations Concerning compact discs 10 Listening to compact discs 11 Direct access play 12 Repeat play 12 Random play 12 Program play 13 To listen to special CDs and tracks (CD Manager function 14 Radio operations Listening to radio...
... INSTRUCTIONS 4 Placement of speakers 5 Concerning the remote control 5 Battery installation 5 Correct method of use 5 Connections 6 Basic connections (for supplied accessories 6 Optional antenna connections 7 External unit connection 7 Front panel controls 8 Setting the time 9 Turning the demo function off 9 Auto-off function 9 Compact disc operations Concerning compact discs 10 Listening to compact discs 11 Direct access play 12 Repeat play 12 Random play 12 Program play 13 To listen to special CDs and tracks (CD Manager function 14 Radio operations Listening to radio...
Cd Stereo System
Page 3
... QUALIFIED SERVICE PERSONNEL. NO USER-SERVICEABLE PARTS INSIDE. Before using Recording operations Before recording 18 Recording the radio 19 Recording discs 20 Recording with CD Manager 20 Other functions Using the built-in sound quality/ sound field settings 21 Enhancing the sound quality 21 To mute the volume 21 Timer operations Using the timer 22 Using the play/record timer 22 Using the sleep timer 24 Reference Using an external unit 24 Troubleshooting guide 25 Servicenter List (U.S.A 26 Warranty (U.S.A 27 Specifications Back Cover Maintenance Back Cover Product Service...
... QUALIFIED SERVICE PERSONNEL. NO USER-SERVICEABLE PARTS INSIDE. Before using Recording operations Before recording 18 Recording the radio 19 Recording discs 20 Recording with CD Manager 20 Other functions Using the built-in sound quality/ sound field settings 21 Enhancing the sound quality 21 To mute the volume 21 Timer operations Using the timer 22 Using the play/record timer 22 Using the sleep timer 24 Reference Using an external unit 24 Troubleshooting guide 25 Servicenter List (U.S.A 26 Warranty (U.S.A 27 Specifications Back Cover Maintenance Back Cover Product Service...

Cd Stereo System
Page 4
... fall below . When installing an outdoor antenna, take hold of the plug or cord wih wet hands. Maintenance (See back cover for future reference. Replacement parts -When parts need replacing ensure the servicer uses parts specified by qualified service personnel if: (a) The AC power supply cord or the plug has been damaged; Always grasp the plug body firmly when connecting and disconnecting it . Overloading-When connecting the AC power supply cord, be careful not...
... fall below . When installing an outdoor antenna, take hold of the plug or cord wih wet hands. Maintenance (See back cover for future reference. Replacement parts -When parts need replacing ensure the servicer uses parts specified by qualified service personnel if: (a) The AC power supply cord or the plug has been damaged; Always grasp the plug body firmly when connecting and disconnecting it . Overloading-When connecting the AC power supply cord, be careful not...
Cd Stereo System
Page 6
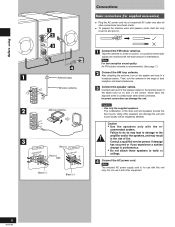
... outdoor antenna is for supplied accessories) • Plug the AC power cord into a household AC outlet only after all other speakers can damage the unit. Connect each other equipment. 6 RQT5706 Consult a qualified service person if damage has occurred or if you experience a sudden change in a position where radio signals are correct. Do not use with other when connected. Then, turn on the system and tune...
... outdoor antenna is for supplied accessories) • Plug the AC power cord into a household AC outlet only after all other speakers can damage the unit. Connect each other equipment. 6 RQT5706 Consult a qualified service person if damage has occurred or if you experience a sudden change in a position where radio signals are correct. Do not use with other when connected. Then, turn on the system and tune...

Cd Stereo System
Page 8
... of power. 3 Clock/timer and demonstration button (CLOCK/TIMER, -DEMO 9, 22, 23 4 Display 5 Play timer/record timer button (rPLAY/rREC) ...... 22 6 Cassette holder 17 7 CD manager button (CD MANAGER 14, 20 8 CD tray open button (c DECK OPEN 17 & Reverse mode select button (REV MODE 17 ( Recording start/pause button (a REC/ J 19 ) Headphone jack (PHONES 24 B Center console ~ Tuner/band select button (TUNER/BAND 15 + Tape play/direction button (TAPE 17 , CD play button (CD 1 ~ CD 5 11 $ Volume control (VOLUME Down, Up 11 % Deck open /close button (c CD OPEN/CLOSE) .. 11 9 Disc tray...
... of power. 3 Clock/timer and demonstration button (CLOCK/TIMER, -DEMO 9, 22, 23 4 Display 5 Play timer/record timer button (rPLAY/rREC) ...... 22 6 Cassette holder 17 7 CD manager button (CD MANAGER 14, 20 8 CD tray open button (c DECK OPEN 17 & Reverse mode select button (REV MODE 17 ( Recording start/pause button (a REC/ J 19 ) Headphone jack (PHONES 24 B Center console ~ Tuner/band select button (TUNER/BAND 15 + Tape play/direction button (TAPE 17 , CD play button (CD 1 ~ CD 5 11 $ Volume control (VOLUME Down, Up 11 % Deck open /close button (c CD OPEN/CLOSE) .. 11 9 Disc tray...

Cd Stereo System
Page 9
... standby. Note This function does not work if the source is switched to whatever was previously displayed. NO DEMO (off . "AUTO OFF" remains displayed if CD or tape is turned off ) ↔ DEMO (on the power. This example in the figure shows how to show the present time. Press [CLOCK/TIMER] to clear "AUTO OFF" from the display if either tuner or AUX is shown on again, "AUTO OFF" is...
... standby. Note This function does not work if the source is switched to whatever was previously displayed. NO DEMO (off . "AUTO OFF" remains displayed if CD or tape is turned off ) ↔ DEMO (on the power. This example in the figure shows how to show the present time. Press [CLOCK/TIMER] to clear "AUTO OFF" from the display if either tuner or AUX is shown on again, "AUTO OFF" is...

Cd Stereo System
Page 10
...the power cord from a cold to clean CDs Wipe from dust, scratches, and warping. A However, do not use cleaning CDs or CDs which are taking the disc from the household AC outlet during disc changing operation. Compact disc operations ...tray. • F Load CDs as shown in their cases to hold CDs Do not touch the recorded surface. Storage precautions Be sure to a heat vent or heating appliance • In the glove compartment or on the rear deck of magazines, inclined surfaces, etc. • Do not move the system while tray is not needed with 8 cm CDs (singles). • Set...
...the power cord from a cold to clean CDs Wipe from dust, scratches, and warping. A However, do not use cleaning CDs or CDs which are taking the disc from the household AC outlet during disc changing operation. Compact disc operations ...tray. • F Load CDs as shown in their cases to hold CDs Do not touch the recorded surface. Storage precautions Be sure to a heat vent or heating appliance • In the glove compartment or on the rear deck of magazines, inclined surfaces, etc. • Do not move the system while tray is not needed with 8 cm CDs (singles). • Set...

Cd Stereo System
Page 11
... the "final disc". Adjust the volume. To pause Press [CD -/ J] during playback. 1 2 3 / REW / STOP 1 CD OPEN CLOSE 4 CD / FF/ 2 Label must face upward. 3 CD1 CD2 CD3 CD4 CD5 4 VOLUME DOWN UP 1 2 3 4 5 Track number 1 2 3 4 5 Elapsed playing time (Of current track number) dB A STOP Total playing Number of tracks time 1 2 3 4 5 Disc number Compact disc operations Listening to compact discs This unit can play CD-DA format audio CD-R and CD-RW that enables CD-R/ CD-RW players to play audio CD-R and CD-RW. To continue loading CDs in the programmed order, whether...
... the "final disc". Adjust the volume. To pause Press [CD -/ J] during playback. 1 2 3 / REW / STOP 1 CD OPEN CLOSE 4 CD / FF/ 2 Label must face upward. 3 CD1 CD2 CD3 CD4 CD5 4 VOLUME DOWN UP 1 2 3 4 5 Track number 1 2 3 4 5 Elapsed playing time (Of current track number) dB A STOP Total playing Number of tracks time 1 2 3 4 5 Disc number Compact disc operations Listening to compact discs This unit can play CD-DA format audio CD-R and CD-RW that enables CD-R/ CD-RW players to play audio CD-R and CD-RW. To continue loading CDs in the programmed order, whether...

Cd Stereo System
Page 12
... play just one track Set the 1-TRACK mode (z page 14), press [REPEAT] before or during playback, and make sure " " is displayed. Random play by remote control only A Press [REPEAT] before or during play. Note You can use random play Press [RANDOM] to clear "RANDOM" display. The CD will be played in random order. Every time you want (perform steps 1 ~ 6 on the loaded CDs are repeated. Compact disc operations 2 TUNE REW/3 CLEAR FF/4 MODE MUTING FM MODE/BP REV MODE SOUND...
... play just one track Set the 1-TRACK mode (z page 14), press [REPEAT] before or during playback, and make sure " " is displayed. Random play by remote control only A Press [REPEAT] before or during play. Note You can use random play Press [RANDOM] to clear "RANDOM" display. The CD will be played in random order. Every time you want (perform steps 1 ~ 6 on the loaded CDs are repeated. Compact disc operations 2 TUNE REW/3 CLEAR FF/4 MODE MUTING FM MODE/BP REV MODE SOUND...

Cd Stereo System
Page 13
... to select the disc you turned OFF your CDs The track is retained in the programmed sequence. Press [CD -/J]. Press [g] or [f]. Press [L CLEAR]. Press [DISC]. (within 3 seconds. To cancel program play mode Press [PROGRAM] in memory. No further tracks can play it will also erase the entire program. Compact disc operations 4 2 1 2 3 4 5 7 A B 3 5 71 CLEAR PRGM 1 2 3 4 5 1 2 3 4 5 Specified disc number Specified track number Program order 1 2 3 4 5 Indicates program mode Listening to compact discs Program play by remote control only You...
... to select the disc you turned OFF your CDs The track is retained in the programmed sequence. Press [CD -/J]. Press [g] or [f]. Press [L CLEAR]. Press [DISC]. (within 3 seconds. To cancel program play mode Press [PROGRAM] in memory. No further tracks can play it will also erase the entire program. Compact disc operations 4 2 1 2 3 4 5 7 A B 3 5 71 CLEAR PRGM 1 2 3 4 5 1 2 3 4 5 Specified disc number Specified track number Program order 1 2 3 4 5 Indicates program mode Listening to compact discs Program play by remote control only You...

Cd Stereo System
Page 15
... REV MODE SOUND EQ FM MODE/BP Radio operations Listening to radio broadcasts Press [TUNER/BAND] to cancel the mode. "MONO" goes out. MONO is also canceled if the frequency is being received. 2 Adjust the volume. dB Note • After changing the "allocation" setting, the frequencies you press the button: FMGAM Press [TUNE MODE] to hold [TUNER/BAND]. Every time you previously preset in 0.1 MHz steps. Stereo and monaural broadcasts are automatically played...
... REV MODE SOUND EQ FM MODE/BP Radio operations Listening to radio broadcasts Press [TUNER/BAND] to cancel the mode. "MONO" goes out. MONO is also canceled if the frequency is being received. 2 Adjust the volume. dB Note • After changing the "allocation" setting, the frequencies you press the button: FMGAM Press [TUNE MODE] to hold [TUNER/BAND]. Every time you previously preset in 0.1 MHz steps. Stereo and monaural broadcasts are automatically played...

Cd Stereo System
Page 16
... [TUNER/BAND] to select "FM" or "AM". 2 Press [TUNE MODE] to select "PRESET". 3 Press [g/REW/3] or [4/FF/f] to change. Release the button when frequency begins to select the preset channel. 3 16 RQT5706 Every time you press the button: FMGAM Press the numbered buttons to preset and the order they are two methods of presetting stations. Adjust the volume. Manual presetting : You can be set in ascending order. Preparation: Tune to the frequency where presetting...
... [TUNER/BAND] to select "FM" or "AM". 2 Press [TUNE MODE] to select "PRESET". 3 Press [g/REW/3] or [4/FF/f] to change. Release the button when frequency begins to select the preset channel. 3 16 RQT5706 Every time you press the button: FMGAM Press the numbered buttons to preset and the order they are two methods of presetting stations. Adjust the volume. Manual presetting : You can be set in ascending order. Preparation: Tune to the frequency where presetting...
Cd Stereo System
Page 18
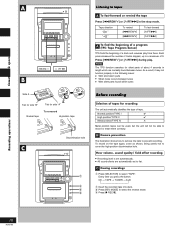
... identifies the type of tape. Every time you press the button: CD → TAPE → TUNER → AUX 2 Insert the recorded tape into deck. 3 Press [REV MODE] to prevent recording. C Erasing recordings 1 Press [SELECTOR] to a maximum of tracks skipped, up to select "TAPE". Each press increases the number of 9. As a result, it may not function properly in the stop mode. Recording operations 18 RQT5706 To record on the tape again, cover as...
... identifies the type of tape. Every time you press the button: CD → TAPE → TUNER → AUX 2 Insert the recorded tape into deck. 3 Press [REV MODE] to prevent recording. C Erasing recordings 1 Press [SELECTOR] to a maximum of tracks skipped, up to select "TAPE". Each press increases the number of 9. As a result, it may not function properly in the stop mode. Recording operations 18 RQT5706 To record on the tape again, cover as...
Cd Stereo System
Page 20
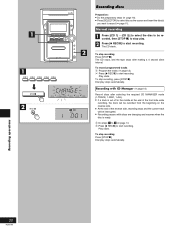
... of the reverse side, recording stops and the current track will be recorded, then [STOP L] to start recording. Play starts. To record programmed tracks 1 Program the tracks (z page 13). 2 Press [a REC/J] to stop recording, press [STOP L]. Disc play stops automatically. Recording with CD Manager (z page 14) Record discs after making a 4 second silent interval. Disc play stops automatically. Normal recording Press [(CD 1) ~ (CD 5)] to select the disc to be interrupted. • Recording pauses while discs are changing and resumes when the disc is ready. 1 Do...
... of the reverse side, recording stops and the current track will be recorded, then [STOP L] to start recording. Play starts. To record programmed tracks 1 Program the tracks (z page 13). 2 Press [a REC/J] to stop recording, press [STOP L]. Disc play stops automatically. Recording with CD Manager (z page 14) Record discs after making a 4 second silent interval. Disc play stops automatically. Normal recording Press [(CD 1) ~ (CD 5)] to select the disc to be interrupted. • Recording pauses while discs are changing and resumes when the disc is ready. 1 Do...
Cd Stereo System
Page 22
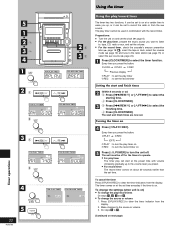
tape, CD, radio or aux, and set the clock (A page 9). • For the play timer, prepare the music source you press the button: CLOCK PLAY REC Previous display rPLAY : to set the play timer on rREC : to turn the unit off for the timers to operate. • For play timer The timer play timer cannot be set to on at the set the record timer Setting the start and finish times are now set to select the finishing time. 2 Press [CLOCK/TIMER]. Make changes to select the...
tape, CD, radio or aux, and set the clock (A page 9). • For the play timer, prepare the music source you press the button: CLOCK PLAY REC Previous display rPLAY : to set the play timer on rREC : to turn the unit off for the timers to operate. • For play timer The timer play timer cannot be set to on at the set the record timer Setting the start and finish times are now set to select the finishing time. 2 Press [CLOCK/TIMER]. Make changes to select the...

Cd Stereo System
Page 23
... these preset conditions. Reset the Disc numbers and reverse mode if you want to playback or record from a connected component, set the component's timer to the same time. (See the instruction manual that a Disc or cassette is inserted, then press [f/7, POWER] to put the unit on ). Using the timer Using the play/record timer To change the timer Press [rPLAY/rREC] to select the desired timer (when the unit is on standby. Every time the button is...
... these preset conditions. Reset the Disc numbers and reverse mode if you want to playback or record from a connected component, set the component's timer to the same time. (See the instruction manual that a Disc or cassette is inserted, then press [f/7, POWER] to put the unit on ). Using the timer Using the play/record timer To change the timer Press [rPLAY/rREC] to select the desired timer (when the unit is on standby. Every time the button is...

Cd Stereo System
Page 24
... SLEEP Using the timer SELECTOR REC Headphones (not included) A Using the sleep timer This timer turns your system OFF at the set time has elapsed. Start playback from the external source. (For details, refer to the owner's manual of the equipment.) Recording from the external source. (For details, refer to the owner's manual of time to select the desired time. It lets you press the button: CD → TAPE → TUNER → AUX 3.
... SLEEP Using the timer SELECTOR REC Headphones (not included) A Using the sleep timer This timer turns your system OFF at the set time has elapsed. Start playback from the external source. (For details, refer to the owner's manual of the equipment.) Recording from the external source. (For details, refer to the owner's manual of time to select the desired time. It lets you press the button: CD → TAPE → TUNER → AUX 3.

Cd Stereo System
Page 25
Common Problems No sound. An AC power supply cord or fluorescent light is displayed. Incorrect operation performed. "F61" is near the cables. Set the time. 9 Check and correct the speaker cords connection. Where there is distorted. Separate the antenna wire of Authorized Service Centers (enclosed with this unit's cables. Playing discs The display is wrong or play . Wait about some of the check points, or if the remedies indicated in the chart...
Common Problems No sound. An AC power supply cord or fluorescent light is displayed. Incorrect operation performed. "F61" is near the cables. Set the time. 9 Check and correct the speaker cords connection. Where there is distorted. Separate the antenna wire of Authorized Service Centers (enclosed with this unit's cables. Playing discs The display is wrong or play . Wait about some of the check points, or if the remedies indicated in the chart...

Cd Stereo System
Page 27
...Serial No. ALL EXPRESS AND IMPLIED WARRANTIES, INCLUDING THE WARRANTIES OF MERCHANTABILITY, AND FITNESS FOR A PARTICULAR PURPOSE, ARE LIMITED TO THE APPLICABLE WARRANTY PERIOD SET FORTH ABOVE. If a problem with this product with and without CD Players), CASSETTE RECORDERS, MICROCASSETTE RECORDERS/ TRANSCRIBERS, IC RECORDERS, RECEIVERS, TUNERS, AMPLIFIERS, SUBWOOFER AMPLIFIERS, TURNTABLES, CASSETTE DECKS, AUDIO PROCESSORS, EQUALIZERS, AUDIO MIXERS, REMOTE CONTROLS, HOME THEATER SYSTEMS (receiver/amplifiers, speakers), RACK SYSTEMS (receivers, tuners, amplifiers, cassette decks, CD players...
...Serial No. ALL EXPRESS AND IMPLIED WARRANTIES, INCLUDING THE WARRANTIES OF MERCHANTABILITY, AND FITNESS FOR A PARTICULAR PURPOSE, ARE LIMITED TO THE APPLICABLE WARRANTY PERIOD SET FORTH ABOVE. If a problem with this product with and without CD Players), CASSETTE RECORDERS, MICROCASSETTE RECORDERS/ TRANSCRIBERS, IC RECORDERS, RECEIVERS, TUNERS, AMPLIFIERS, SUBWOOFER AMPLIFIERS, TURNTABLES, CASSETTE DECKS, AUDIO PROCESSORS, EQUALIZERS, AUDIO MIXERS, REMOTE CONTROLS, HOME THEATER SYSTEMS (receiver/amplifiers, speakers), RACK SYSTEMS (receivers, tuners, amplifiers, cassette decks, CD players...

Cd Stereo System
Page 28
... dipped in Malaysia Panasonic Sales Company, Division of Matsushita Electric of channels Frequency response Wow and flutter Digital filter D/A converter 44.1 kHz 16 bit linear Semiconductor laser/780 nm Stereo 20 Hz-20 kHz (+1, -2 dB) Below measurable limit 8 fs MASH (1 bit DAC) SPEAKER SECTION Type Speaker(s) Woofer Tweeter Impedance Input power Output sound pressure level Cross over frequency Frequency range Dimensions (WxHxD) Mass 2 way speaker system 12 cm...
... dipped in Malaysia Panasonic Sales Company, Division of Matsushita Electric of channels Frequency response Wow and flutter Digital filter D/A converter 44.1 kHz 16 bit linear Semiconductor laser/780 nm Stereo 20 Hz-20 kHz (+1, -2 dB) Below measurable limit 8 fs MASH (1 bit DAC) SPEAKER SECTION Type Speaker(s) Woofer Tweeter Impedance Input power Output sound pressure level Cross over frequency Frequency range Dimensions (WxHxD) Mass 2 way speaker system 12 cm...


