
PVL453 User Guide
Page 1
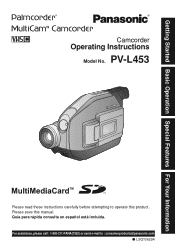
Guía para rápida consulta en español está incluida. Getting Started Basic Operation Special Features For Your Information Camcorder Operating Instructions Model No. For assistance, please call : 1-800-211-PANA(7262) or send e-mail to operate this manual. PV-L453 Please read these instructions carefully before attempting to : consumerproducts@panasonic.com LSQT0629A Please save this product.
Guía para rápida consulta en español está incluida. Getting Started Basic Operation Special Features For Your Information Camcorder Operating Instructions Model No. For assistance, please call : 1-800-211-PANA(7262) or send e-mail to operate this manual. PV-L453 Please read these instructions carefully before attempting to : consumerproducts@panasonic.com LSQT0629A Please save this product.
PVL453 User Guide
Page 2
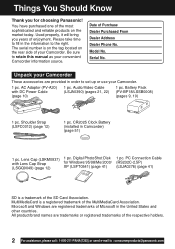
...most sophisticated and reliable products on the rear side of the SD Card Association. Digital PhotoShot Disk for choosing Panasonic! The serial number is a trademark of your Camcorder. Battery Pack (PV-BP18/LSSB0008) (pages 9, 10) 1 pc. Be sure to set up or use ...your convenient Camcorder information source. Unpack your Camcorder These accessories are trademarks or registered trademarks of Microsoft in order to retain this manual as your Camcorder. 1 pc. Please take time to the right. PC Connection Cable (RS232C-2.5P) ...
...most sophisticated and reliable products on the rear side of the SD Card Association. Digital PhotoShot Disk for choosing Panasonic! The serial number is a trademark of your Camcorder. Battery Pack (PV-BP18/LSSB0008) (pages 9, 10) 1 pc. Be sure to set up or use ...your convenient Camcorder information source. Unpack your Camcorder These accessories are trademarks or registered trademarks of Microsoft in order to retain this manual as your Camcorder. 1 pc. Please take time to the right. PC Connection Cable (RS232C-2.5P) ...
PVL453 User Guide
Page 6
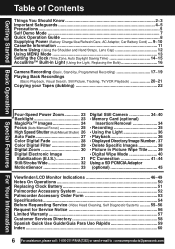
.../VCR Playback 20~21 Copying your Tapes (dubbing 22 Four-Speed Power Zoom 23 Backlight 23 MagicPix™ Images 24 Focus (Auto/Manual Focus 25 High Speed Shutter (Auto/Manual Shutter) 26 Auto Fade 27 Color Digital Fade 28 Color Digital Filter 29 Digital Zoom 30 Digital Electronic Image Stabilization (E.I.S 31 Still... Quick Use Guide/Guía Para Uso Rápido 59 Index ...60 6 For assistance, please call : 1-800-211-PANA(7262) or send e-mail to : consumerproducts@panasonic.com
.../VCR Playback 20~21 Copying your Tapes (dubbing 22 Four-Speed Power Zoom 23 Backlight 23 MagicPix™ Images 24 Focus (Auto/Manual Focus 25 High Speed Shutter (Auto/Manual Shutter) 26 Auto Fade 27 Color Digital Fade 28 Color Digital Filter 29 Digital Zoom 30 Digital Electronic Image Stabilization (E.I.S 31 Still... Quick Use Guide/Guía Para Uso Rápido 59 Index ...60 6 For assistance, please call : 1-800-211-PANA(7262) or send e-mail to : consumerproducts@panasonic.com
PVL453 User Guide
Page 15
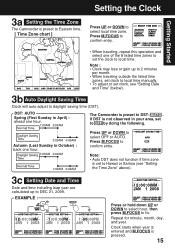
Setting the Clock Getting Started 3a Setting the Time Zone The Camcorder is preset to Eastern time. [ Time Zone chart ] Press UP or DOWN to DEC 31, 2099....EXAMPLE : Press or hold down UP or DOWN to select hour, then press M.FOCUS to DST: AUTO . The Camcorder is set to Hawaii or Samoa (see "Setting the Time Zone" above). 3c Setting Date and Time Date and time... calculated up to 2 minutes per month. • When traveling outside the listed time zones, set clock to local time manually. • To adjust or set clock, see "Setting Date and Time" (below). 3b Auto Daylight Saving Time Clock...
Setting the Clock Getting Started 3a Setting the Time Zone The Camcorder is preset to Eastern time. [ Time Zone chart ] Press UP or DOWN to DEC 31, 2099....EXAMPLE : Press or hold down UP or DOWN to select hour, then press M.FOCUS to DST: AUTO . The Camcorder is set to Hawaii or Samoa (see "Setting the Time Zone" above). 3c Setting Date and Time Date and time... calculated up to 2 minutes per month. • When traveling outside the listed time zones, set clock to local time manually. • To adjust or set clock, see "Setting Date and Time" (below). 3b Auto Daylight Saving Time Clock...
PVL453 User Guide
Page 18
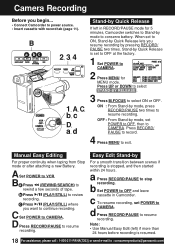
...factory. 1 Set POWER to CAMERA. 2 Press MENU for 5 minutes, Camcorder switches to Stand-by Quick Release is resumed. 18 For assistance, please call : 1-800-211-PANA(7262) or send e-mail to : consumerproducts@panasonic.com When set POWER to OFF, then to CAMERA. Press UP or ... continuity when taping from Stop mode or after attaching a new Battery. b Press (PLAY/STILL) to resume recording. Note: • Use Manual Easy Edit (left in Camcorder. Stand-by mode to conserve battery. d Press RECORD/PAUSE to review recording. ON : From Stand-by pressing RECORD/ PAUSE two times. ...
...factory. 1 Set POWER to CAMERA. 2 Press MENU for 5 minutes, Camcorder switches to Stand-by Quick Release is resumed. 18 For assistance, please call : 1-800-211-PANA(7262) or send e-mail to : consumerproducts@panasonic.com When set POWER to OFF, then to CAMERA. Press UP or ... continuity when taping from Stop mode or after attaching a new Battery. b Press (PLAY/STILL) to resume recording. Note: • Use Manual Easy Edit (left in Camcorder. Stand-by mode to conserve battery. d Press RECORD/PAUSE to review recording. ON : From Stand-by pressing RECORD/ PAUSE two times. ...
PVL453 User Guide
Page 20
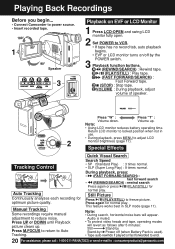
...• SLP (Super Long Play) : 9 times normal. Press M.FOCUS to return to : consumerproducts@panasonic.com E VOLUME : During playback, adjust volume of speaker. Manual Tracking Some recordings require manual adjustment to freeze picture. During playback, press: • (FAST FORWARD/SEARCH) : fast forward search...or press normal play . Press "W" : Press "T" : Volume down. Volume up . Playing Back Recordings Before you begin... • Connect Camcorder to power source. • Insert recorded tape. 1 Speaker 3 D A B C E Playback on /off by Power off (when Battery ...
...• SLP (Super Long Play) : 9 times normal. Press M.FOCUS to return to : consumerproducts@panasonic.com E VOLUME : During playback, adjust volume of speaker. Manual Tracking Some recordings require manual adjustment to freeze picture. During playback, press: • (FAST FORWARD/SEARCH) : fast forward search...or press normal play . Press "W" : Press "T" : Volume down. Volume up . Playing Back Recordings Before you begin... • Connect Camcorder to power source. • Insert recorded tape. 1 Speaker 3 D A B C E Playback on /off by Power off (when Battery ...
PVL453 User Guide
Page 21
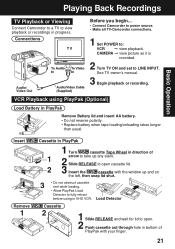
... 3 • Do not obstruct cassette reel while loading. • Allow PlayPak Load Detector to : VCR © view playback. See TV owner's manual. 3 Begin playback or recording. VCR Playback using in direction of PlayPak with the window up any slack. 2 Slide RELEASE to open cassette lid. 2...(Optional) Load Battery in progress. Insert Remove 1 Cassette in PlayPak 1 Turn cassette Tape Wheel in VHS VCR. Playing Back Recordings Basic Operation TV Playback or Viewing Connect Camcorder to a TV to view playback or recordings in PlayPak Remove Battery lid and insert AA battery. •...
... 3 • Do not obstruct cassette reel while loading. • Allow PlayPak Load Detector to : VCR © view playback. See TV owner's manual. 3 Begin playback or recording. VCR Playback using in direction of PlayPak with the window up any slack. 2 Slide RELEASE to open cassette lid. 2...(Optional) Load Battery in progress. Insert Remove 1 Cassette in PlayPak 1 Turn cassette Tape Wheel in VHS VCR. Playing Back Recordings Basic Operation TV Playback or Viewing Connect Camcorder to a TV to view playback or recordings in PlayPak Remove Battery lid and insert AA battery. •...

PVL453 User Guide
Page 22
... call : 1-800-211-PANA(7262) or send e-mail to : consumerproducts@panasonic.com Copying your Tapes (dubbing) Connections 5 2, 4 Source (Playing) Camcorder Audio/ Video Out Monitor with record tab into VCR. 2 Press (PLAY/STILL) on Camcorder, then press again at starting point. 3 Press REC, then STILL/PAUSE ... left). • Turn both units to LINE. Before you begin... • Make Camcorder-VCR connections (see VCR owner's manual. • Set Camcorder POWER to VCR. 1 Insert a pre-recorded tape into Camcorder and a blank tape with your TV • Turn TV on and tune to VCR...
... call : 1-800-211-PANA(7262) or send e-mail to : consumerproducts@panasonic.com Copying your Tapes (dubbing) Connections 5 2, 4 Source (Playing) Camcorder Audio/ Video Out Monitor with record tab into VCR. 2 Press (PLAY/STILL) on Camcorder, then press again at starting point. 3 Press REC, then STILL/PAUSE ... left). • Turn both units to LINE. Before you begin... • Make Camcorder-VCR connections (see VCR owner's manual. • Set Camcorder POWER to VCR. 1 Insert a pre-recorded tape into Camcorder and a blank tape with your TV • Turn TV on and tune to VCR...
PVL453 User Guide
Page 24
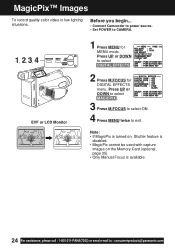
Press UP or DOWN to select MAGICPIX . 3 Press M.FOCUS to select ON. 4 Press MENU twice to : consumerproducts@panasonic.com MagicPix™ Images To record quality color video in low lighting situations. Note: • If MagicPix is turned on, Shutter feature is disabled. &#... be used with capture images on the Memory Card (optional, page 35). • Only Manual Focus is available. 24 For assistance, please call : 1-800-211-PANA(7262) or send e-mail to exit. Before you begin... • Connect Camcorder to power source. • Set POWER to select DIGITAL EFFECTS . 2 Press M.FOCUS for...
Press UP or DOWN to select MAGICPIX . 3 Press M.FOCUS to select ON. 4 Press MENU twice to : consumerproducts@panasonic.com MagicPix™ Images To record quality color video in low lighting situations. Note: • If MagicPix is turned on, Shutter feature is disabled. &#... be used with capture images on the Memory Card (optional, page 35). • Only Manual Focus is available. 24 For assistance, please call : 1-800-211-PANA(7262) or send e-mail to exit. Before you begin... • Connect Camcorder to power source. • Set POWER to select DIGITAL EFFECTS . 2 Press M.FOCUS for...
PVL453 User Guide
Page 25
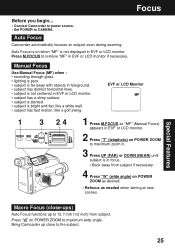
...in EVF or LCD monitor. • subject has a shiny surface. • subject is slanted. • subject is not centered in EVF or LCD monitor. Manual Focus Use Manual Focus (MF) when : • recording through glass. • lighting is poor. • subject is far away with objects in foreground. • subject... has fast motion, like a golf swing. Auto Focus is on POWER ZOOM as desired. • Refocus as needed when aiming at new scenes. Bring Camcorder up close -ups) Auto Focus functions up to maximum zoom in. 3 Press UP (FAR) or DOWN (NEAR) until subject is in EVF or LCD...
...in EVF or LCD monitor. • subject has a shiny surface. • subject is slanted. • subject is not centered in EVF or LCD monitor. Manual Focus Use Manual Focus (MF) when : • recording through glass. • lighting is poor. • subject is far away with objects in foreground. • subject... has fast motion, like a golf swing. Auto Focus is on POWER ZOOM as desired. • Refocus as needed when aiming at new scenes. Bring Camcorder up close -ups) Auto Focus functions up to maximum zoom in. 3 Press UP (FAR) or DOWN (NEAR) until subject is in EVF or LCD...
PVL453 User Guide
Page 26
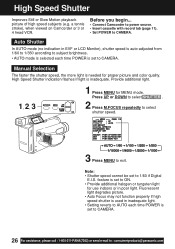
... is set to ON. • Provide additional halogen or tungsten light for MENU mode. Before you begin... • Connect Camcorder to power source. • Insert cassette with record tab (page 11). • Set POWER to 1/60 if Digital E.I.S....• Setting reverts to exit. High Speed Shutter Improves Still or Slow Motion playback picture of high speed subjects (e.g. Manual Selection The faster the shutter speed, the more light is set to CAMERA. Note: • Shutter speed cannot be...shutter speed is auto-adjusted from 1/60 to 1/350 according to : consumerproducts@panasonic.com
... is set to ON. • Provide additional halogen or tungsten light for MENU mode. Before you begin... • Connect Camcorder to power source. • Insert cassette with record tab (page 11). • Set POWER to 1/60 if Digital E.I.S....• Setting reverts to exit. High Speed Shutter Improves Still or Slow Motion playback picture of high speed subjects (e.g. Manual Selection The faster the shutter speed, the more light is set to CAMERA. Note: • Shutter speed cannot be...shutter speed is auto-adjusted from 1/60 to 1/350 according to : consumerproducts@panasonic.com
PVL453 User Guide
Page 36
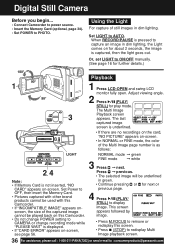
...169; green FINE mode © white 3 Press © next. Digital Still Camera Before you begin... • Connect Camcorder to power source. • Insert the Memory Card (optional, page 34). • Set POWER to AUTO. Set ...dim lighting, the Light comes on for next or previous page. 4 Press (PLAY/ STILL) to ON/OFF manually. (See page 16 for play mode. Press © previous. • The selected image will be played ... image. • Press M.FOCUS to remove or redisplay this Camcorder. • Do not change POWER setting to : consumerproducts@panasonic.com Set LIGHT to PHOTO.
...169; green FINE mode © white 3 Press © next. Digital Still Camera Before you begin... • Connect Camcorder to power source. • Insert the Memory Card (optional, page 34). • Set POWER to AUTO. Set ...dim lighting, the Light comes on for next or previous page. 4 Press (PLAY/ STILL) to ON/OFF manually. (See page 16 for play mode. Press © previous. • The selected image will be played ... image. • Press M.FOCUS to remove or redisplay this Camcorder. • Do not change POWER setting to : consumerproducts@panasonic.com Set LIGHT to PHOTO.
PVL453 User Guide
Page 39
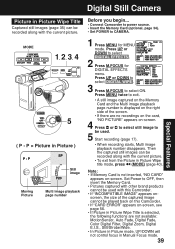
... Filter, Digital Zoom, Digital E.I.S., Still/Strobe/Wide. • In Picture in Picture mode, UP/DOWN will not control focus in Manual Focus mode. 39 Digital Still Camera Special Features Picture in Picture Wipe Title Captured still images (page 35) can be recorded along with... the current picture. • To exit from the Picture in Picture ) Still image Moving Picture Multi image playback page number Before you begin... • Connect Camcorder to power source. • Insert the Memory Card (optional, page 34). • Set POWER to select ON. MODE 1, 2, 3, 4 5 ( P - Note...
... Filter, Digital Zoom, Digital E.I.S., Still/Strobe/Wide. • In Picture in Picture mode, UP/DOWN will not control focus in Manual Focus mode. 39 Digital Still Camera Special Features Picture in Picture Wipe Title Captured still images (page 35) can be recorded along with... the current picture. • To exit from the Picture in Picture ) Still image Moving Picture Multi image playback page number Before you begin... • Connect Camcorder to power source. • Insert the Memory Card (optional, page 34). • Set POWER to select ON. MODE 1, 2, 3, 4 5 ( P - Note...
PVL453 User Guide
Page 41
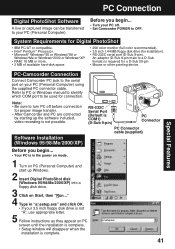
...-disk space. • 256 color monitor (full color recommended). • 3.5 inch 1.44 MB floppy disk drive (for proper image transfer. • After Camcorder and PC are connected by starting up Windows. 2 Insert Digital PhotoShot disk (Windows 95/98/Me/2000/XP) into a floppy disk drive. 3 Click on...on PC screen until the installation is complete. • Setup window will disappear when the installation is complete. 41 Refer to PC or Windows manual to identify which COM port to the serial port on your PC (Personal Computer) using the supplied PC connector cable. Note: • Be ...
...-disk space. • 256 color monitor (full color recommended). • 3.5 inch 1.44 MB floppy disk drive (for proper image transfer. • After Camcorder and PC are connected by starting up Windows. 2 Insert Digital PhotoShot disk (Windows 95/98/Me/2000/XP) into a floppy disk drive. 3 Click on...on PC screen until the installation is complete. • Setup window will disappear when the installation is complete. 41 Refer to PC or Windows manual to identify which COM port to the serial port on your PC (Personal Computer) using the supplied PC connector cable. Note: • Be ...
PVL453 User Guide
Page 48
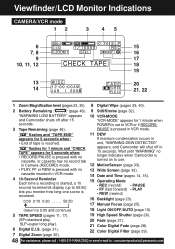
... Mode • REC (record) • FF (fast forward) • REW (rewind) • PAUSE • PLAY 0:00 0:10 0:20 . . . . . 59:50 16 Backlight (page 23). 17 Manual Focus (page 25). (return to 0:00 and continue) 18 Light ON/OFF/AUTO (page 16). 5 TAPE SPEED (pages 11, 17). (SP=standard play, SLP=super... of tape is pressed in 15 seconds. " " flashes and "TAPE END" 11 DEW appears for 5 seconds when: • RECORD/PAUSE is turned on to : consumerproducts@panasonic.com "WARNING LOW BATTERY" appears and Camcorder shuts off in VCR mode.
... Mode • REC (record) • FF (fast forward) • REW (rewind) • PAUSE • PLAY 0:00 0:10 0:20 . . . . . 59:50 16 Backlight (page 23). 17 Manual Focus (page 25). (return to 0:00 and continue) 18 Light ON/OFF/AUTO (page 16). 5 TAPE SPEED (pages 11, 17). (SP=standard play, SLP=super... of tape is pressed in 15 seconds. " " flashes and "TAPE END" 11 DEW appears for 5 seconds when: • RECORD/PAUSE is turned on to : consumerproducts@panasonic.com "WARNING LOW BATTERY" appears and Camcorder shuts off in VCR mode.

