
Digital Video Camera - English/ Spanish
Page 7
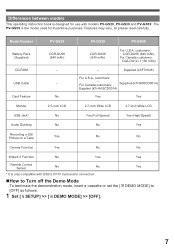
... (High-Speed) Audio Dubbing No No Yes Recording a Still Picture on a Tape Yes No No Cinema Function Yes No No Wide/4:3 Function No Yes Yes Remote Control Sensor No No * It is only compatible with models PV-GS29, PV-GS39 and PV-GS59. Differences between models This operating instruction book is designed...
... (High-Speed) Audio Dubbing No No Yes Recording a Still Picture on a Tape Yes No No Cinema Function Yes No No Wide/4:3 Function No Yes Yes Remote Control Sensor No No * It is only compatible with models PV-GS29, PV-GS39 and PV-GS59. Differences between models This operating instruction book is designed...
Digital Video Camera - English/ Spanish
Page 9
...) ...8 Quick Guide 10 Standard Accessories 12 Parts Identification and Handling 12 The Remote Control (PV-GS59 Only : Optional) ..14 Power Supply 15 Charging Time and Available Recording Time .....16 How to ...Recording with the Built-in LED Video Light .........33 Quick Start 34 Self-timer Recording (For PV-GS39/PV-GS59)....35 Zoom In/Out Functions 35 Digital Zoom Function 36 Image Stabilizer Function... Form (For U.S.A. customers 83 Limited Warranty (For U.S.A. customers 17 To Use as a Web Camera 60 Using the Motion Picture Editing Software (PV-GS59 Only 64 If you no longer need software...
...) ...8 Quick Guide 10 Standard Accessories 12 Parts Identification and Handling 12 The Remote Control (PV-GS59 Only : Optional) ..14 Power Supply 15 Charging Time and Available Recording Time .....16 How to ...Recording with the Built-in LED Video Light .........33 Quick Start 34 Self-timer Recording (For PV-GS39/PV-GS59)....35 Zoom In/Out Functions 35 Digital Zoom Function 36 Image Stabilizer Function... Form (For U.S.A. customers 83 Limited Warranty (For U.S.A. customers 17 To Use as a Web Camera 60 Using the Motion Picture Editing Software (PV-GS59 Only 64 If you no longer need software...

Digital Video Camera - English/ Spanish
Page 12
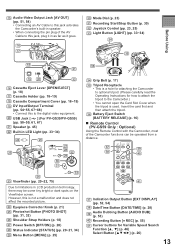
... (pp. 19~20) 9 Card Slot (pp. 19~20) 13 10 11 12 14 A/V 15 10 Lens Hood (p. 75) 11 Lens 12 White Balance Sensor (p. 42) Remote Control Sensor (PV-GS59 Only) (p. 15) 13 Zoom Lever [W/T] (pp. 35, 36) Volume Lever [- / VOL +] (pp. 45, 47) 14 Microphone (built-in LCD production technology, there...
... (pp. 19~20) 9 Card Slot (pp. 19~20) 13 10 11 12 14 A/V 15 10 Lens Hood (p. 75) 11 Lens 12 White Balance Sensor (p. 42) Remote Control Sensor (PV-GS59 Only) (p. 15) 13 Zoom Lever [W/T] (pp. 35, 36) Volume Lever [- / VOL +] (pp. 45, 47) 14 Microphone (built-in LCD production technology, there...
Digital Video Camera - English/ Spanish
Page 13
... spots on the Viewfinder screen. Insert the card first and then attach the tripod. 36 Battery Eject Switch [BATTERY RELEASE] (p. 16) „ Remote Control (PV-GS59 Only : Optional) Using the Remote Control with the Camcorder, most of the AV Cable to this jack, plug it in as far as it goes. 16 17 30... [STATUS] (pp. 20~21, 34) 29 Menu Button [MENU] (p. 25) 34 Grip Belt (p. 17) 35 Tripod Receptacle • This is used. However, this to the digital video equipment. 20 USB Jack [ ] (For PV-GS39/PV-GS59) (pp. 58~59, 61, 67) 21 Speaker (p. 45) 22 Built-in LED Light (pp. 33~34...
... spots on the Viewfinder screen. Insert the card first and then attach the tripod. 36 Battery Eject Switch [BATTERY RELEASE] (p. 16) „ Remote Control (PV-GS59 Only : Optional) Using the Remote Control with the Camcorder, most of the AV Cable to this jack, plug it in as far as it goes. 16 17 30... [STATUS] (pp. 20~21, 34) 29 Menu Button [MENU] (p. 25) 34 Grip Belt (p. 17) 35 Tripod Receptacle • This is used. However, this to the digital video equipment. 20 USB Jack [ ] (For PV-GS39/PV-GS59) (pp. 58~59, 61, 67) 21 Speaker (p. 45) 22 Built-in LED Light (pp. 33~34...

Digital Video Camera - English/ Spanish
Page 14
... promptly. ●Do not recharge, disassemble or dispose of fire or explosion. ●Battery may explode if mistreated. ●As with Panasonic type CR2025 only. Use of another battery may present a risk of in the same manner as the corresponding buttons on operation frequency.) &#...45 Menu Button [MENU]* (p. 26) 46 50 1 2 Insert a button-type battery (CR2025) with the (+) marking facing upward. 3 Insert the Battery Holder into the Remote Control. 51 52 47 48 49 53 46 Photoshot Button [PHOTO SHOT]* (p. 32) 47 Rewind/Review Button [◄◄] (p. 46) 48 Pause Button [ ] (pp. ...
... promptly. ●Do not recharge, disassemble or dispose of fire or explosion. ●Battery may explode if mistreated. ●As with Panasonic type CR2025 only. Use of another battery may present a risk of in the same manner as the corresponding buttons on operation frequency.) &#...45 Menu Button [MENU]* (p. 26) 46 50 1 2 Insert a button-type battery (CR2025) with the (+) marking facing upward. 3 Insert the Battery Holder into the Remote Control. 51 52 47 48 49 53 46 Photoshot Button [PHOTO SHOT]* (p. 32) 47 Rewind/Review Button [◄◄] (p. 46) 48 Pause Button [ ] (pp. ...

Digital Video Camera - English/ Spanish
Page 15
...Button and [ ■ ] Button simultaneously. 2 • When the battery in the Remote Control is replaced, the mode is operated for indoor use , fully charge the Battery. • We recommend using a Panasonic Battery. • We cannot guarantee the quality of this Camcorder when batteries from the ...central axis • The above ranges. „ Selecting Remote Control Modes When 2 Camcorders are used simultaneously, they can be...
...Button and [ ■ ] Button simultaneously. 2 • When the battery in the Remote Control is replaced, the mode is operated for indoor use , fully charge the Battery. • We recommend using a Panasonic Battery. • We cannot guarantee the quality of this Camcorder when batteries from the ...central axis • The above ranges. „ Selecting Remote Control Modes When 2 Camcorders are used simultaneously, they can be...
Digital Video Camera - English/ Spanish
Page 26
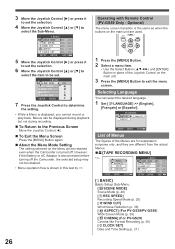
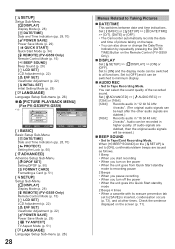
...Control [►] or press it to set . BASIC SCENE MODE REC SPEED WIND CUT ASPECT CLOCK SET SETUP ENTER OFF EXIT 7 Press the Joystick Control... will be set the selection. 4 Move the Joystick Control [▲] or [▼] to select the Sub-Menu...241;ol]. 3 Move the Joystick Control [►] or press it to set the selection. 6 Move the Joystick Control [▲] or [▼] to select...; To Return to the Previous Screen Move the Joystick Control [◄]. „ To Exit the Menu Screen Press...ENTER EXIT List of Menus The figures of the Joystick Control on the main unit. 3 Press the [MENU] ...
...Control [►] or press it to set . BASIC SCENE MODE REC SPEED WIND CUT ASPECT CLOCK SET SETUP ENTER OFF EXIT 7 Press the Joystick Control... will be set the selection. 4 Move the Joystick Control [▲] or [▼] to select the Sub-Menu...241;ol]. 3 Move the Joystick Control [►] or press it to set the selection. 6 Move the Joystick Control [▲] or [▼] to select...; To Return to the Previous Screen Move the Joystick Control [◄]. „ To Exit the Menu Screen Press...ENTER EXIT List of Menus The figures of the Joystick Control on the main unit. 3 Press the [MENU] ...

Digital Video Camera - English/ Spanish
Page 27
...COLOR] Fade color (p. 37) [ AUDIO REC] Audio Recording Mode (p. 28) [ USB FUNCTION] (PV-GS59 Only) USB Functions Mode (pp. 61, 67) [ D.ZOOM] Digital Zoom (p. 36) [ ZOOM MIC] Zoom Microphone (p. 35) [ SHTR EFFECT] (PV-GS29 Only) Shutter effect (p. 31) [ SETUP] Setup Sub-Menu [ DISPLAY] Display Mode...DATE/TIME] Date and Time Indication (pp. 28, 70) [ POWER SAVE] Power Save Mode (p. 29) [ QUICK START] Quick Start Mode (p. 34) [ REMOTE] (PV-GS59 Only) Remote Control Mode (p. 15) [ BEEP SOUND] Beep Sound (p. 28) [ LCD SET] LCD Adjustment (p. 22) [ EVF SET] Viewfinder Adjustment (p. 22) [ INITIAL SET]...
...COLOR] Fade color (p. 37) [ AUDIO REC] Audio Recording Mode (p. 28) [ USB FUNCTION] (PV-GS59 Only) USB Functions Mode (pp. 61, 67) [ D.ZOOM] Digital Zoom (p. 36) [ ZOOM MIC] Zoom Microphone (p. 35) [ SHTR EFFECT] (PV-GS29 Only) Shutter effect (p. 31) [ SETUP] Setup Sub-Menu [ DISPLAY] Display Mode...DATE/TIME] Date and Time Indication (pp. 28, 70) [ POWER SAVE] Power Save Mode (p. 29) [ QUICK START] Quick Start Mode (p. 34) [ REMOTE] (PV-GS59 Only) Remote Control Mode (p. 15) [ BEEP SOUND] Beep Sound (p. 28) [ LCD SET] LCD Adjustment (p. 22) [ EVF SET] Viewfinder Adjustment (p. 22) [ INITIAL SET]...
Digital Video Camera - English/ Spanish
Page 28
...] Date and Time Indication (pp. 28, 70) [ POWER SAVE] Power Save Mode (p. 29) [ QUICK START] Quick Start Mode (p. 34) [ REMOTE] (PV-GS59 Only) Remote Control Mode (p. 15) [ BEEP SOUND] Beep Sound (p. 28) [ LCD SET] LCD Adjustment (p. 22) [ EVF SET] Viewfinder Adjustment (p. 22) [ INITIAL... DPOF SET] Setting DPOF (p. 50) [ FORMAT CARD] Formatting a Card (p. 51) [ SETUP] Setup Sub-Menu [ DISPLAY] Display Mode (p. 28) [ REMOTE] (PV-GS59 Only) Remote Control Mode (p. 15) [ LCD SET] LCD Adjustment (p. 22) [ EVF SET] Viewfinder Adjustment (p. 22) [ POWER SAVE] Power Save Mode (p. 29) [ ...
...] Date and Time Indication (pp. 28, 70) [ POWER SAVE] Power Save Mode (p. 29) [ QUICK START] Quick Start Mode (p. 34) [ REMOTE] (PV-GS59 Only) Remote Control Mode (p. 15) [ BEEP SOUND] Beep Sound (p. 28) [ LCD SET] LCD Adjustment (p. 22) [ EVF SET] Viewfinder Adjustment (p. 22) [ INITIAL... DPOF SET] Setting DPOF (p. 50) [ FORMAT CARD] Formatting a Card (p. 51) [ SETUP] Setup Sub-Menu [ DISPLAY] Display Mode (p. 28) [ REMOTE] (PV-GS59 Only) Remote Control Mode (p. 15) [ LCD SET] LCD Adjustment (p. 22) [ EVF SET] Viewfinder Adjustment (p. 22) [ POWER SAVE] Power Save Mode (p. 29) [ ...
Digital Video Camera - English/ Spanish
Page 32
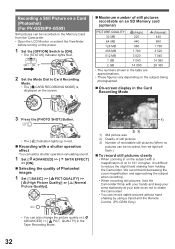
... stationary at your side so as not to shake the Camcorder. • You can record stable pictures without hand shaking by using a tripod and the Remote Control. (PV-GS59 Only) • You can be recorded, the red light will flash.) „ To record still pictures clearly • When zooming in on the...
... stationary at your side so as not to shake the Camcorder. • You can record stable pictures without hand shaking by using a tripod and the Remote Control. (PV-GS59 Only) • You can be recorded, the red light will flash.) „ To record still pictures clearly • When zooming in on the...

Digital Video Camera - English/ Spanish
Page 36
...>> [OFF]. About the Variable Speed Zoom Function • When pushing the [W/T] Lever as far as it 36 When the Camcorder is used, the Digital Zoom Function cannot be used with the Remote Control. (PV-GS59 Only) „ To Cancel the Image Stabilizer Function Set [ ADVANCED] >> [ EIS] >> [OFF]. With the...8226; Set to Tape Recording Mode. 1 Set [ ADVANCED] >> [ EIS] >> [ON]. Image Stabilizer Function If the Camcorder is shaken while recording, the camera shake in the image can be corrected. • If the Camcorder shakes too much, the images may appear. • When a tripod is used , ...
...>> [OFF]. About the Variable Speed Zoom Function • When pushing the [W/T] Lever as far as it 36 When the Camcorder is used, the Digital Zoom Function cannot be used with the Remote Control. (PV-GS59 Only) „ To Cancel the Image Stabilizer Function Set [ ADVANCED] >> [ EIS] >> [OFF]. With the...8226; Set to Tape Recording Mode. 1 Set [ ADVANCED] >> [ EIS] >> [ON]. Image Stabilizer Function If the Camcorder is shaken while recording, the camera shake in the image can be corrected. • If the Camcorder shakes too much, the images may appear. • When a tripod is used , ...
Digital Video Camera - English/ Spanish
Page 45
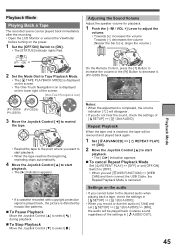
...; Rewind the tape to the point where you want to start playback. • When the tape reaches the beginning, rewinding stops automatically. 4 Move the Joystick Control [▲] to start playback. • The [ ►] Indication appears. „ To cancel Repeat Playback Mode Set [ REPEAT PLAY] >> [OFF] or set [OFF/ON] ... to decrease it. (PV-GS59 Only) SP 3h59m59s29f R 2:00 12:34:56AM JAN 2 2006 28 Notes: • When the adjustment is canceled. On the Remote Control, press the [T] Button to increase the volume or the [W] Button to [ON]. • The [STATUS] Indicator lights Red.
...; Rewind the tape to the point where you want to start playback. • When the tape reaches the beginning, rewinding stops automatically. 4 Move the Joystick Control [▲] to start playback. • The [ ►] Indication appears. „ To cancel Repeat Playback Mode Set [ REPEAT PLAY] >> [OFF] or set [OFF/ON] ... to decrease it. (PV-GS59 Only) SP 3h59m59s29f R 2:00 12:34:56AM JAN 2 2006 28 Notes: • When the adjustment is canceled. On the Remote Control, press the [T] Button to increase the volume or the [W] Button to [ON]. • The [STATUS] Indicator lights Red.

Digital Video Camera - English/ Spanish
Page 46
...Navigation icon is displayed. • The Variable Speed Search function is not available when the Repeat Playback is active. Cue/Review Playback 1 Move the Joystick Control [◄] or [►] during Playback. • It turns to Cue Playback A or Review Playback B . [One-Touch Navigation icon] A B ... 1/5th of the screen. 1 Press the [►] Button. 2 Press the [◄Ι] Button or [Ι►] Button on the Remote Control. • The [Ι►] or [◄Ι] Indication appears. Variable Speed Search Function (PV-GS59 Only) The speed of Cue Playback...
...Navigation icon is displayed. • The Variable Speed Search function is not available when the Repeat Playback is active. Cue/Review Playback 1 Move the Joystick Control [◄] or [►] during Playback. • It turns to Cue Playback A or Review Playback B . [One-Touch Navigation icon] A B ... 1/5th of the screen. 1 Press the [►] Button. 2 Press the [◄Ι] Button or [Ι►] Button on the Remote Control. • The [Ι►] or [◄Ι] Indication appears. Variable Speed Search Function (PV-GS59 Only) The speed of Cue Playback...
Digital Video Camera - English/ Spanish
Page 47
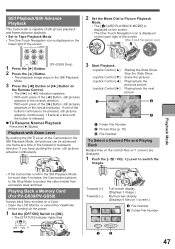
... the [►] Button. Towards [+] : Towards [-] : Full-screen display (Displays 1 image.) Multi-screen display (Displays 6 files on the Remote Control. • The [ΙΙ►] or [◄ΙΙ] Indication appears. • With each press of the buttons continues to switch ...Control [►] : Playing back the next picture 1 703-0809 2 12:34:56AM JAN 2 2006 NO. 11 3 1 Folder File Number 2 Picture Size (p. 70) 3 File Number To Select a Desired File and Playing Back Multiple files on the card (6 files on the power. 1 Set the [OFF/ON] Switch to protect the video...
... the [►] Button. Towards [+] : Towards [-] : Full-screen display (Displays 1 image.) Multi-screen display (Displays 6 files on the Remote Control. • The [ΙΙ►] or [◄ΙΙ] Indication appears. • With each press of the buttons continues to switch ...Control [►] : Playing back the next picture 1 703-0809 2 12:34:56AM JAN 2 2006 NO. 11 3 1 Folder File Number 2 Picture Size (p. 70) 3 File Number To Select a Desired File and Playing Back Multiple files on the card (6 files on the power. 1 Set the [OFF/ON] Switch to protect the video...
Digital Video Camera - English/ Spanish
Page 52
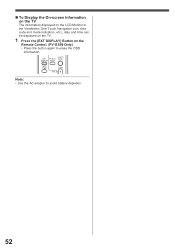
Note: • Use the AC adaptor to erase the OSD information. „ To Display the On-screen Information on the TV The information displayed on the LCD Monitor or the Viewfinder (One-Touch Navigation icon, time code and mode indication, etc.), date and time can be displayed on the TV. 1 Press the [EXT DISPLAY] Button on the Remote Control. (PV-GS59 Only) • Press the button again to avoid battery depletion. 52
Note: • Use the AC adaptor to erase the OSD information. „ To Display the On-screen Information on the TV The information displayed on the LCD Monitor or the Viewfinder (One-Touch Navigation icon, time code and mode indication, etc.), date and time can be displayed on the TV. 1 Press the [EXT DISPLAY] Button on the Remote Control. (PV-GS59 Only) • Press the button again to avoid battery depletion. 52
Digital Video Camera - English/ Spanish
Page 53
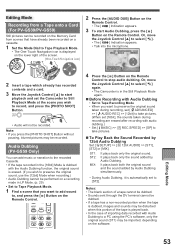
...8226; During Audio Dubbing, it is displayed on the lower right of the screen. [One-Touch Navigation icon] 2 Press the [AUDIO DUB] Button on the Remote Control. • The [ ] Indication appears. 3 To start playback and set the Camcorder to Still Playback Mode at the scene you wish to select [ ].... Editing Mode Recording from scenes that you want to add sound to, and press the [ ] Button on the Remote Control. 12:34:56AM JAN 2 2006 4 Press the [ ] Button on the Remote Control to stop audio dubbing. SP 3h59m59s29f R 2:00 2 Insert a tape which already has recorded contents and a card...
...8226; During Audio Dubbing, it is displayed on the lower right of the screen. [One-Touch Navigation icon] 2 Press the [AUDIO DUB] Button on the Remote Control. • The [ ] Indication appears. 3 To start playback and set the Camcorder to Still Playback Mode at the scene you wish to select [ ].... Editing Mode Recording from scenes that you want to add sound to, and press the [ ] Button on the Remote Control. 12:34:56AM JAN 2 2006 4 Press the [ ] Button on the Remote Control to stop audio dubbing. SP 3h59m59s29f R 2:00 2 Insert a tape which already has recorded contents and a card...
Digital Video Camera - English/ Spanish
Page 54
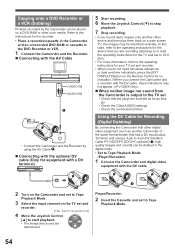
...TV set and recorder. • When you do not need functional indications or date and time indications, press the [EXT DISPLAY] Button on the Remote Control for no indication. (When you connect the Camcorder and a recorder with the DV cable, these indications may not appear.) (PV-GS59 Only) &#... and digital video equipment with the DV cable. 1 2 Turn on the Camcorder and set to Tape Playback Mode. 3 Select the input channel on the TV set to Tape Playback Mode. 54 Player/Recorder: 2 Insert the Cassette and set and recorder. [One-Touch Navigation icon] 4 Move the Joystick Control [▲...
...TV set and recorder. • When you do not need functional indications or date and time indications, press the [EXT DISPLAY] Button on the Remote Control for no indication. (When you connect the Camcorder and a recorder with the DV cable, these indications may not appear.) (PV-GS59 Only) &#... and digital video equipment with the DV cable. 1 2 Turn on the Camcorder and set to Tape Playback Mode. 3 Select the input channel on the TV set to Tape Playback Mode. 54 Player/Recorder: 2 Insert the Cassette and set and recorder. [One-Touch Navigation icon] 4 Move the Joystick Control [▲...
Digital Video Camera - English/ Spanish
Page 55
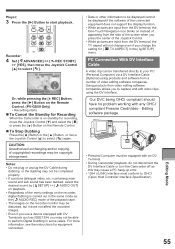
...change even if you to perform Digital Dubbing in the [ SETUP] menu. PC Connection With DV Interface Cable A video clip can be copyright infringement. Using products from a number of copyrighted recordings may be transferred directly to OHCI (Open Host Controller Interface Specification). Editing software package... R 2:00 12:34:56AM JAN 2 2006 100 Or, while pressing the [● REC] Button, press the [►] Button on the Remote Control. (PV-GS59 Only) • Recording starts. „ To Cancel the Standby for [ TV ASPECT] in some cases. CAUTION: Unauthorized exchanging and/...
...change even if you to perform Digital Dubbing in the [ SETUP] menu. PC Connection With DV Interface Cable A video clip can be copyright infringement. Using products from a number of copyrighted recordings may be transferred directly to OHCI (Open Host Controller Interface Specification). Editing software package... R 2:00 12:34:56AM JAN 2 2006 100 Or, while pressing the [● REC] Button, press the [►] Button on the Remote Control. (PV-GS59 Only) • Recording starts. „ To Cancel the Standby for [ TV ASPECT] in some cases. CAUTION: Unauthorized exchanging and/...
Digital Video Camera - English/ Spanish
Page 71
...]. It takes some time until the cassette holder opens, but this is inserted. NO DATA: There are attempting Audio Dubbing or Digital Dubbing on the SD Memory Card is not compatible with the accidental erasure prevention slider placed in Card Recording Mode. CARD LOCKED: ...and delete unnecessary files. Warning/Alarm Indications If any one of the Remote Control after powering-on a tape with the accidental erasure prevention slider placed in PC Mode with a different TV system. NEED HEAD CLEANING: The video heads are connecting the USB Cable with this Camcorder. Press the [...
...]. It takes some time until the cassette holder opens, but this is inserted. NO DATA: There are attempting Audio Dubbing or Digital Dubbing on the SD Memory Card is not compatible with the accidental erasure prevention slider placed in Card Recording Mode. CARD LOCKED: ...and delete unnecessary files. Warning/Alarm Indications If any one of the Remote Control after powering-on a tape with the accidental erasure prevention slider placed in PC Mode with a different TV system. NEED HEAD CLEANING: The video heads are connecting the USB Cable with this Camcorder. Press the [...
Digital Video Camera - English/ Spanish
Page 76
... indications other than the actual remaining tape time. If it is automatically adjusted. • There are not restored yet, turn on the Remote Control correct? Wait until the condensation indication disappears. If you set to [SAVE]), recording cannot be correctly displayed. • In some recording ...focus mode to 3 minutes shorter than cassette removal can be performed. • Has condensation occurred? If the setting on the Remote Control is not in the Playback Mode, recording cannot be operated though powered up. Insert a new cassette. • Is the...
... indications other than the actual remaining tape time. If it is automatically adjusted. • There are not restored yet, turn on the Remote Control correct? Wait until the condensation indication disappears. If you set to [SAVE]), recording cannot be correctly displayed. • In some recording ...focus mode to 3 minutes shorter than cassette removal can be performed. • Has condensation occurred? If the setting on the Remote Control is not in the Playback Mode, recording cannot be operated though powered up. Insert a new cassette. • Is the...


