

PT52LCX16 User Guide
Page 1
... keep this manual show the PT-56LCX16. Help us at www.panasonicpr.com Three Important Reasons to any and all of the DTV certification mark indicates that this product will successfully receive digital television transmissions that meet your needs. Illustrations in the ATSC Digital Television Standard. Multimedia Projection HDTV Operating Instructions Models No. Register online at : http://www.panasonic.com/contactinfo...
... keep this manual show the PT-56LCX16. Help us at www.panasonicpr.com Three Important Reasons to any and all of the DTV certification mark indicates that this product will successfully receive digital television transmissions that meet your needs. Illustrations in the ATSC Digital Television Standard. Multimedia Projection HDTV Operating Instructions Models No. Register online at : http://www.panasonic.com/contactinfo...

PT52LCX16 User Guide
Page 2
... persons. If the provided plug does not fit into the apparatus, the apparatus has been exposed to qualified service personnel. Replace the lamp unit only after its use this apparatus near water. Openings in the cabinet are provided for your outlet, consult an electrician for long periods of this Operating Instructions manual. 4) Follow all servicing to rain or moisture...
... persons. If the provided plug does not fit into the apparatus, the apparatus has been exposed to qualified service personnel. Replace the lamp unit only after its use this apparatus near water. Openings in the cabinet are provided for your outlet, consult an electrician for long periods of this Operating Instructions manual. 4) Follow all servicing to rain or moisture...

PT52LCX16 User Guide
Page 4
... the dealer or an experienced radio / TV technician for a Class B digital device, pursuant to which can radiate radio frequency energy and, if not installed and used in a particular installation. Retain your purchase receipt also, and record the serial number of customers. FCC Caution: To assure continued compliance, follow the attached installation instructions and use only shielded interface cables when connecting to provide reasonable protection against...
... the dealer or an experienced radio / TV technician for a Class B digital device, pursuant to which can radiate radio frequency energy and, if not installed and used in a particular installation. Retain your purchase receipt also, and record the serial number of customers. FCC Caution: To assure continued compliance, follow the attached installation instructions and use only shielded interface cables when connecting to provide reasonable protection against...

PT52LCX16 User Guide
Page 5
... More ! Picture Adjustments 37 Audio Adjustments 40 Sleep Timer Feature 42 Lock Feature 43 Photo Viewer 47 Setup Features 52 Operating Peripheral Equipment 58 Other Remote Control Operation/Code List 59 Warning Indicators 63 Information ! Replacing the lamp unit 64 Troubleshooting 66 Specifications 68 Cleaning 69 Customer Services Directory 70 Limited Warranty 71 Other Information 72 Index ...79 5 Information IMPORTANT SAFETY INSTRUCTIONS 2 Before Using 6 Location of Contents To Start ! Table of Controls 9 Installation 12 Getting Started Basic Operation...
... More ! Picture Adjustments 37 Audio Adjustments 40 Sleep Timer Feature 42 Lock Feature 43 Photo Viewer 47 Setup Features 52 Operating Peripheral Equipment 58 Other Remote Control Operation/Code List 59 Warning Indicators 63 Information ! Replacing the lamp unit 64 Troubleshooting 66 Specifications 68 Cleaning 69 Customer Services Directory 70 Limited Warranty 71 Other Information 72 Index ...79 5 Information IMPORTANT SAFETY INSTRUCTIONS 2 Before Using 6 Location of Contents To Start ! Table of Controls 9 Installation 12 Getting Started Basic Operation...

PT52LCX16 User Guide
Page 7
... burn used batteries. 5. Do not combine a new battery with a pair of new ones. 2. Battery replacement is done. • POWER indicator flashes red. After flashing stops, unplug the unit then plug it snaps shut. Slide the battery cover in direction of the codes on the Remote Control for more than 3 seconds. Two AA size 3. Unit shuts itself off when reset is necessary when the Remote Control acts sporadically or stops operating the Projection Display set "Ctrl with "Alkaline"). 4. Install batteries...
... burn used batteries. 5. Do not combine a new battery with a pair of new ones. 2. Battery replacement is done. • POWER indicator flashes red. After flashing stops, unplug the unit then plug it snaps shut. Slide the battery cover in direction of the codes on the Remote Control for more than 3 seconds. Two AA size 3. Unit shuts itself off when reset is necessary when the Remote Control acts sporadically or stops operating the Projection Display set "Ctrl with "Alkaline"). 4. Install batteries...
PT52LCX16 User Guide
Page 9
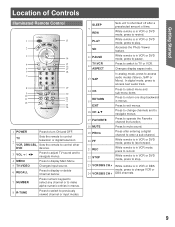
.... 8 R-TUNE Press to switch to change VCR or DBS channels. 9 Press to previously viewed channel or input modes. TV Sets the remote to control television or digital television. 2 VCR, DBS/CBL, Sets the remote to control other DVD devices. 3 VOL -+ / ◄► Press to adjust TV sound and to navigate menus. 4 MENU Press to display Main Menu. 5 TV/VIDEO Changes Input source. 6 RECALL Press to display or delete Channel banner. 7 NUMBER Press numeric keypad to...
.... 8 R-TUNE Press to switch to change VCR or DBS channels. 9 Press to previously viewed channel or input modes. TV Sets the remote to control television or digital television. 2 VCR, DBS/CBL, Sets the remote to control other DVD devices. 3 VOL -+ / ◄► Press to adjust TV sound and to navigate menus. 4 MENU Press to display Main Menu. 5 TV/VIDEO Changes Input source. 6 RECALL Press to display or delete Channel banner. 7 NUMBER Press numeric keypad to...

PT52LCX16 User Guide
Page 18
... PCM. • Depending on the unit. But, if NTSC channel is selected, the output from the Digital Audio Out jack on the unit to the connector. Procedure Connect the Digital Audio cable from the Digital Audio Out jack will be connected to a Dolby Digital decoder. Installation (continued) Digital Audio Out Use the diagram below to connect the Digital Audio Output of your Projection Display to the Digital Audio Out jack on your DVD player and DVD-Audio software the copyright protection function may...
... PCM. • Depending on the unit. But, if NTSC channel is selected, the output from the Digital Audio Out jack on the unit to the connector. Procedure Connect the Digital Audio cable from the Digital Audio Out jack will be connected to a Dolby Digital decoder. Installation (continued) Digital Audio Out Use the diagram below to connect the Digital Audio Output of your Projection Display to the Digital Audio Out jack on your DVD player and DVD-Audio software the copyright protection function may...

PT52LCX16 User Guide
Page 20
... their respective operating instruction manuals. • When audio from other equipment connected to this unit via HDMI is output using the Setup Menu. (p. 56) Notes: • Individual HDMI devices may require additional menu settings specific to an AV amp via the web at: http://www.panasonic.com/contactinfo HDMI Optic fiber HDMI OUT OPTICAL HDMI IN HDMI OUT (Panasonic AV amp) DIGA (Panasonic DVD Recorder) Setting this unit, the system switches to 2CH audio. (When connected to each...
... their respective operating instruction manuals. • When audio from other equipment connected to this unit via HDMI is output using the Setup Menu. (p. 56) Notes: • Individual HDMI devices may require additional menu settings specific to an AV amp via the web at: http://www.panasonic.com/contactinfo HDMI Optic fiber HDMI OUT OPTICAL HDMI IN HDMI OUT (Panasonic AV amp) DIGA (Panasonic DVD Recorder) Setting this unit, the system switches to 2CH audio. (When connected to each...
PT52LCX16 User Guide
Page 22
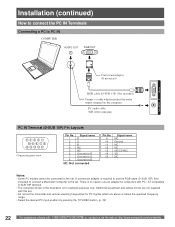
... Connection port view Pin No. There is no need to the set . Additional equipment and cables shown are not supplied with PC / AT compatible D-SUB 15P terminal. • The computer shown in the illustration is required to use the RGB cable (D-SUB 15P) (Not included) to connect a Macintosh computer to use an adapter for computers with this set. • Do not set the horizontal and vertical scanning frequencies...
... Connection port view Pin No. There is no need to the set . Additional equipment and cables shown are not supplied with PC / AT compatible D-SUB 15P terminal. • The computer shown in the illustration is required to use the RGB cable (D-SUB 15P) (Not included) to connect a Macintosh computer to use an adapter for computers with this set. • Do not set the horizontal and vertical scanning frequencies...
PT52LCX16 User Guide
Page 25
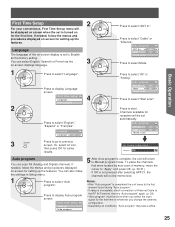
..., First Time Set up menu will be displayed on screen when the set is complete, the unit will return to previous screen. If needed , follow the menus and procedures displayed on-screen for the first time or whenever you change the antenna configuration. • Depending on conditions, "Auto program" may take a while. 25 Basic Operation You can scan All (Analog and Digital) channels. Auto program ANT In ◄ Cable ► Mode All Start scan Press to...
..., First Time Set up menu will be displayed on screen when the set is complete, the unit will return to previous screen. If needed , follow the menus and procedures displayed on-screen for the first time or whenever you change the antenna configuration. • Depending on conditions, "Auto program" may take a while. 25 Basic Operation You can scan All (Analog and Digital) channels. Auto program ANT In ◄ Cable ► Mode All Start scan Press to...
PT52LCX16 User Guide
Page 29
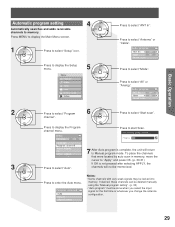
... "Manual program setting". (p. 30) • "Auto program" must be memorized. Press to display the Setup menu. 5 Menu Picture Audio Timer Lock Memory card Setup Press to memory. Press to start Scan. To place the channels that were located by auto scan in memory, move the cursor to select "Auto". Setup CH scan All Press to display the Program channel menu. Now scanning analog channel... Press to select "Mode". Auto program ANT In ◄ Cable ► Mode All Start scan Press to enter the Auto menu. Press to select "Antenna...
... "Manual program setting". (p. 30) • "Auto program" must be memorized. Press to display the Setup menu. 5 Menu Picture Audio Timer Lock Memory card Setup Press to memory. Press to start Scan. To place the channels that were located by auto scan in memory, move the cursor to select "Auto". Setup CH scan All Press to display the Program channel menu. Now scanning analog channel... Press to select "Mode". Auto program ANT In ◄ Cable ► Mode All Start scan Press to enter the Auto menu. Press to select "Antenna...

PT52LCX16 User Guide
Page 32
... input is displayed. input of source connected to display Photo Viewer mode. Projection Display operation Selecting Input Mode 1 Press to display the Input select menu. • Pressing TV/VIDEO while viewing PC input will not be changed. (p. 53) Card input mode (Photo Viewer) is selected. 2 Press corresponding NUMBER keys on the Remote Control to select the Press to COMPONENT VIDEO INPUT 1 is displayed. Photo (Photo Signal of source connected to INPUT 2 is displayed. Switches between the current and last channel or input modes. Press to switch...
... input is displayed. input of source connected to display Photo Viewer mode. Projection Display operation Selecting Input Mode 1 Press to display the Input select menu. • Pressing TV/VIDEO while viewing PC input will not be changed. (p. 53) Card input mode (Photo Viewer) is selected. 2 Press corresponding NUMBER keys on the Remote Control to select the Press to COMPONENT VIDEO INPUT 1 is displayed. Photo (Photo Signal of source connected to INPUT 2 is displayed. Switches between the current and last channel or input modes. Press to switch...

PT52LCX16 User Guide
Page 33
... Picture mode Time remaining setting in Sleep Timer SAP indication Signal resolution Aspect 33 Basic Operation Unit Status display Press the Channel ▲▼ or RECALL button, except when the MENU screen is automatically selected. Press OK. Adjust to display current unit status information. These channels behave as sub-channels within a single 6 MHz channel. It will indicate the channel and program in digital television differs from conventional television. Channel Number 15-2 ABC - Using the CH/VOL Button...
... Picture mode Time remaining setting in Sleep Timer SAP indication Signal resolution Aspect 33 Basic Operation Unit Status display Press the Channel ▲▼ or RECALL button, except when the MENU screen is automatically selected. Press OK. Adjust to display current unit status information. These channels behave as sub-channels within a single 6 MHz channel. It will indicate the channel and program in digital television differs from conventional television. Channel Number 15-2 ABC - Using the CH/VOL Button...
PT52LCX16 User Guide
Page 34
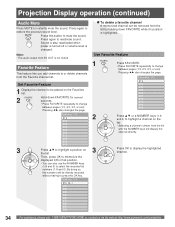
...://www.panasonic.com/contactinfo Sound is also reactivated when power is turned off or volume level is not muted. Favorite Feature This feature lets you add channels to instantly mute the sound. Setting 1/3 [1] [2] [3] [4] [5] [6] [7] [8] [9] [0] 3 Press ▲▼ to reactivate sound. Setting 1/3 [1] 26-1 [2] [3] [4] [5] [6] [7] [8] [9] [0] To delete a favorite channel A memorized channel can also use the NUMBER keys (1-9 and 0) to change between pages (1/3, 2/3, 3/3, or exit). Then, press OK to memorize the displayed...
...://www.panasonic.com/contactinfo Sound is also reactivated when power is turned off or volume level is not muted. Favorite Feature This feature lets you add channels to instantly mute the sound. Setting 1/3 [1] [2] [3] [4] [5] [6] [7] [8] [9] [0] 3 Press ▲▼ to reactivate sound. Setting 1/3 [1] 26-1 [2] [3] [4] [5] [6] [7] [8] [9] [0] To delete a favorite channel A memorized channel can also use the NUMBER keys (1-9 and 0) to change between pages (1/3, 2/3, 3/3, or exit). Then, press OK to memorize the displayed...

PT52LCX16 User Guide
Page 35
...) when receiving a digital channel. Stereo SAP Mono Sleep Timer Feature Switches the unit OFF in a preset amount of SAP button. MTS Stereo and SAP broadcast Multi-channel Television Sound Stereo (main language) and Secondary Audio Program (sub language) broadcasts are possible broadcast types with sleep timer set from 0 to 90 minutes in 30 minute intervals. Select Stereo audio mode. • If stereo broadcast is weak and the display flickers, select Mono audio mode for...
...) when receiving a digital channel. Stereo SAP Mono Sleep Timer Feature Switches the unit OFF in a preset amount of SAP button. MTS Stereo and SAP broadcast Multi-channel Television Sound Stereo (main language) and Secondary Audio Program (sub language) broadcasts are possible broadcast types with sleep timer set from 0 to 90 minutes in 30 minute intervals. Select Stereo audio mode. • If stereo broadcast is weak and the display flickers, select Mono audio mode for...

PT52LCX16 User Guide
Page 41
... image with all channels. (AI sound is a proprietary audio enhancement technology that could occur when switching input signals. • "Audio leveler" is not available when "Speakers" is set to display the Other adjust menu. The clarity of digital audio input signal transmitted via separate RCA terminals. BBE works like an automatic focus in Audio leveler On On Auto Auto +7 Item Explanations AI sound Equalize overall volume levels across all TV programs including news...
... image with all channels. (AI sound is a proprietary audio enhancement technology that could occur when switching input signals. • "Audio leveler" is not available when "Speakers" is set to display the Other adjust menu. The clarity of digital audio input signal transmitted via separate RCA terminals. BBE works like an automatic focus in Audio leveler On On Auto Auto +7 Item Explanations AI sound Equalize overall volume levels across all TV programs including news...
PT52LCX16 User Guide
Page 52
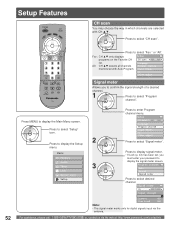
... ► list. Press MENU to display the Setup menu. or "All". Press to select "Setup" icon. 2 Press to display the Main Menu screen. Setup CH scan All Language Program channel Input labels CC Other adjust Press to enter Program channel menu. All: CH ▲▼ selects all channels Language Program channel memorized with CH ▲▼. Input labels CC Other adjust Signal meter Allows you must enter your password to select "Program channel". Menu Picture Audio Timer 3 Lock Memory card Setup Press to select "Signal meter". For...
... ► list. Press MENU to display the Setup menu. or "All". Press to select "Setup" icon. 2 Press to display the Main Menu screen. Setup CH scan All Language Program channel Input labels CC Other adjust Press to enter Program channel menu. All: CH ▲▼ selects all channels Language Program channel memorized with CH ▲▼. Input labels CC Other adjust Signal meter Allows you must enter your password to select "Program channel". Menu Picture Audio Timer 3 Lock Memory card Setup Press to select "Signal meter". For...

PT52LCX16 User Guide
Page 56
... instruction manuals for compatibility information. • Non-HDMI-compliant cables cannot be utilized. • We recommend using Panasonic HDMI cables RP-CDHG15 (1.5 m), RP-CDHG30 (3.0 m), RP-CDHG50 (5.0 m), etc. (Product numbers correct as home theater system volume control and automatic switching to models with Panasonic's "Control with HDMI". Setup CH scan All Language Program channel Input labels CC Other adjust 2 Press to select the setting. Other adjust Prog-out stop Ctrl with HDMI Power off . Power off link When "Set" is turned off link Power on link...
... instruction manuals for compatibility information. • Non-HDMI-compliant cables cannot be utilized. • We recommend using Panasonic HDMI cables RP-CDHG15 (1.5 m), RP-CDHG30 (3.0 m), RP-CDHG50 (5.0 m), etc. (Product numbers correct as home theater system volume control and automatic switching to models with Panasonic's "Control with HDMI". Setup CH scan All Language Program channel Input labels CC Other adjust 2 Press to select the setting. Other adjust Prog-out stop Ctrl with HDMI Power off . Power off link When "Set" is turned off link Power on link...

PT52LCX16 User Guide
Page 57
... speakers. TV power switches On and the playback screen is connected via the HDMI input (1). Prog-out stop ". Setup CH scan All Language Program channel Input labels CC Other adjust 2 Press to select "Prog-out stop When connecting external equipment to "Off" or other inputs. 57 Advanced Operation Menu TV speakers Picture Audio Timer Lock Memory card Setup Home theater: Adjustment for desired volume level. Pressing the OK button toggles between TV and home theater volume control. • "Ctrl with HDMI...
... speakers. TV power switches On and the playback screen is connected via the HDMI input (1). Prog-out stop ". Setup CH scan All Language Program channel Input labels CC Other adjust 2 Press to select "Prog-out stop When connecting external equipment to "Off" or other inputs. 57 Advanced Operation Menu TV speakers Picture Audio Timer Lock Memory card Setup Home theater: Adjustment for desired volume level. Pressing the OK button toggles between TV and home theater volume control. • "Ctrl with HDMI...

PT52LCX16 User Guide
Page 66
... red.) • Replace lamp with a new one. dealer, if problem persists. This is not a malfunction. 36, 38 The Projection Display set the Remote Control code? Some parts of the screen are clogged. The fan will also disappear. Image freezes. If the steps above do not light up. • This is a characteristic of the LCD panel and not a malfunction. - Power turns off at : http://www.panasonic...
... red.) • Replace lamp with a new one. dealer, if problem persists. This is not a malfunction. 36, 38 The Projection Display set the Remote Control code? Some parts of the screen are clogged. The fan will also disappear. Image freezes. If the steps above do not light up. • This is a characteristic of the LCD panel and not a malfunction. - Power turns off at : http://www.panasonic...


