

Operating Instructions
Page 6
... projector 21 Connecting example: Computers 21 Connecting example: AV equipment 22 Basic Operation Switching the projector on/off the projector 25 Projecting an image 26 Selecting the input signal 26 Positioning the image 26 Remote control operation 27 Operating range 27 Setting up the image position automatically 27 Switching the input signal 28 Enlarging the centred area 28 Capturing an image 29 Stopping the projection 29 Resetting to the factory default settings 29 Projecting an image in INDEX-WINDOW mode 29 Using...
... projector 21 Connecting example: Computers 21 Connecting example: AV equipment 22 Basic Operation Switching the projector on/off the projector 25 Projecting an image 26 Selecting the input signal 26 Positioning the image 26 Remote control operation 27 Operating range 27 Setting up the image position automatically 27 Switching the input signal 28 Enlarging the centred area 28 Capturing an image 29 Stopping the projection 29 Resetting to the factory default settings 29 Projecting an image in INDEX-WINDOW mode 29 Using...

Operating Instructions
Page 7
... INITIAL START UP 43 INSTALLATION 44 HIGH ALTITUDE MODE 44 EMULATE 44 FUNCTION BUTTON 44 AUDIO SETTING 44 TEST PATTERN 45 INITIALIZE ALL 45 FILTER COUNTER RESET 45 SECURITY menu 46 PASSWORD 46 PASSWORD CHANGE 46 TEXT DISPLAY 46 TEXT CHANGE 46 MENU LOCK 47 MENU LOCK PASSWORD 47 CONTROL DEVICE SETUP 47 NETWORK menu 48 Items in NETWORK menu 48 TEMP, LAMP and FILTER Indicators 49 Managing the indicated problems 49 Care and Replacement 50 Cleaning the projector 50 Replacing the Lamp unit 50 Replacing the Auto Cleaning Filter (ACF 51 Troubleshooting...
... INITIAL START UP 43 INSTALLATION 44 HIGH ALTITUDE MODE 44 EMULATE 44 FUNCTION BUTTON 44 AUDIO SETTING 44 TEST PATTERN 45 INITIALIZE ALL 45 FILTER COUNTER RESET 45 SECURITY menu 46 PASSWORD 46 PASSWORD CHANGE 46 TEXT DISPLAY 46 TEXT CHANGE 46 MENU LOCK 47 MENU LOCK PASSWORD 47 CONTROL DEVICE SETUP 47 NETWORK menu 48 Items in NETWORK menu 48 TEMP, LAMP and FILTER Indicators 49 Managing the indicated problems 49 Care and Replacement 50 Cleaning the projector 50 Replacing the Lamp unit 50 Replacing the Auto Cleaning Filter (ACF 51 Troubleshooting...

Operating Instructions
Page 10
... adjuster legs or the top cover to move the projector, as near an air conditioner or lighting equipment. See "TEMP indicator" on the projector. If you have absorbed the gas or that you leave used , they may explode or leak, and fire, injury or contamination of time, disconnect the mains plug from the mains socket and remove the batteries from the remote control...
... adjuster legs or the top cover to move the projector, as near an air conditioner or lighting equipment. See "TEMP indicator" on the projector. If you have absorbed the gas or that you leave used , they may explode or leak, and fire, injury or contamination of time, disconnect the mains plug from the mains socket and remove the batteries from the remote control...

Operating Instructions
Page 11
... tobacco smoke environment. Display the white screen test pattern for long periods of blue, green or red. Occasionally, a few stuck pixels may remain as fixed points of time, as this may greatly affect on the liquid crystal panel. The lamp life is should cover the following envisioned incidents. Security Take the safety measures for the password. ENGLISH - 11 If using this projector at high elevations 1 400...
... tobacco smoke environment. Display the white screen test pattern for long periods of blue, green or red. Occasionally, a few stuck pixels may remain as fixed points of time, as this may greatly affect on the liquid crystal panel. The lamp life is should cover the following envisioned incidents. Security Take the safety measures for the password. ENGLISH - 11 If using this projector at high elevations 1 400...

Operating Instructions
Page 15
... a cable is connected to adjust the projection angle. (page 18) About Your Projector Lamp unit compartment (page 50) Air exhaust port Heated air comes out of them as this opening. AUDIO IN Connect audio cables for input and output by Kensington, to the connected equipment. ENGLISH - 15 VARIABLE AUDIO OUT Connect an audio cable for outputting audio signals to protect your projector. Preparation J Back and bottom view Security lock Attach the commercial shackle lock, manufactured by menu operation...
... a cable is connected to adjust the projection angle. (page 18) About Your Projector Lamp unit compartment (page 50) Air exhaust port Heated air comes out of them as this opening. AUDIO IN Connect audio cables for input and output by Kensington, to the connected equipment. ENGLISH - 15 VARIABLE AUDIO OUT Connect an audio cable for outputting audio signals to protect your projector. Preparation J Back and bottom view Security lock Attach the commercial shackle lock, manufactured by menu operation...
Operating Instructions
Page 16
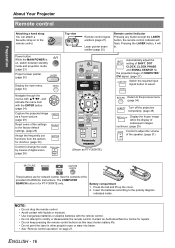
...) Capture the projected image as a frozen picture. (page 29) Reset some of the settings to the factory default settings. (page 29) Assign the frequently use functions from the options for network control. Pressing the LASER button, it will flash. Return to the previous menu. (page 34) Turn off the projection temporarily. (page 29) Display the frozen image while the display of subsequent images continues. (page 29) Control to change the scale by...
...) Capture the projected image as a frozen picture. (page 29) Reset some of the settings to the factory default settings. (page 29) Assign the frequently use functions from the options for network control. Pressing the LASER button, it will flash. Return to the previous menu. (page 34) Turn off the projection temporarily. (page 29) Display the frozen image while the display of subsequent images continues. (page 29) Control to change the scale by...

Operating Instructions
Page 21
J LAN terminal ACT lamp (Green) Flashes when transmit data. LINK lamp (Yellow) Illuminates when a LAN cable (10 Base-T/100 Base-TX) is effective. Connections Before connection to the projector Read and follow the operating and connecting instructions of each peripheral device to be turned off. Connecting example: Computers Computers Monitor Getting Started Audio system Computer for controlling NOTE: • Use COMPUTER terminals to input YPBPR signals. • When connecting to OUTPUT, do not connect any input signals. •...
J LAN terminal ACT lamp (Green) Flashes when transmit data. LINK lamp (Yellow) Illuminates when a LAN cable (10 Base-T/100 Base-TX) is effective. Connections Before connection to the projector Read and follow the operating and connecting instructions of each peripheral device to be turned off. Connecting example: Computers Computers Monitor Getting Started Audio system Computer for controlling NOTE: • Use COMPUTER terminals to input YPBPR signals. • When connecting to OUTPUT, do not connect any input signals. •...

Operating Instructions
Page 23
... guide 3. The internal lamp cooling fan keeps operating by unplugging the mains plug from the mains socket. 2. See "INITIAL START UP" on page 43. Depress the latch and slide the cover off Mains lead J Connecting 1. Hold the plug and unplug the mains lead from the AC IN terminal on the back of the projector and slide it clicks. 4. Power indicator lights in...
... guide 3. The internal lamp cooling fan keeps operating by unplugging the mains plug from the mains socket. 2. See "INITIAL START UP" on page 43. Depress the latch and slide the cover off Mains lead J Connecting 1. Hold the plug and unplug the mains lead from the AC IN terminal on the back of the projector and slide it clicks. 4. Power indicator lights in...
Operating Instructions
Page 24
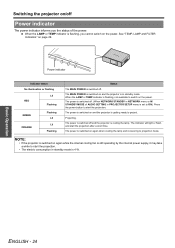
... NETWORK STANDBY in NETWORK menu or IN STANDBY MODE of the power. The MAIN POWER is switched on and the projector is switched off. Switching the projector on/off Power indicator The power indicator informs you cannot switch on the power. See "TEMP, LAMP and FILTER Indicators" on again while the internal cooling fan is still operating by the internal power supply, it may take a while to start the projection. • The electric consumption in standby mode. Power indicator Indicator status No illumination or flashing RED Lit Flashing GREEN ORANGE Flashing...
... NETWORK STANDBY in NETWORK menu or IN STANDBY MODE of the power. The MAIN POWER is switched on and the projector is switched off. Switching the projector on/off Power indicator The power indicator informs you cannot switch on the power. See "TEMP, LAMP and FILTER Indicators" on again while the internal cooling fan is still operating by the internal power supply, it may take a while to start the projection. • The electric consumption in standby mode. Power indicator Indicator status No illumination or flashing RED Lit Flashing GREEN ORANGE Flashing...

Operating Instructions
Page 26
...; Do not touch the air exhaust port as default and the signal from the connected devices is detected automatically. Switch on the screen. The image will be projected on the connected devices. Open the front panel cover. 2. Press the INPUT SELECT buttons to adjust the image. Focus lever Zoom lever 3. Basic Operation ENGLISH - 26 See "Switching the input signal" on page 45. Adjust the projected image with the TEST PATTERN in OPTION menu. Adjust the angle of the...
...; Do not touch the air exhaust port as default and the signal from the connected devices is detected automatically. Switch on the screen. The image will be projected on the connected devices. Open the front panel cover. 2. Press the INPUT SELECT buttons to adjust the image. Focus lever Zoom lever 3. Basic Operation ENGLISH - 26 See "Switching the input signal" on page 45. Adjust the projected image with the TEST PATTERN in OPTION menu. Adjust the angle of the...

Operating Instructions
Page 33
... FUNCTION BUTTON page 44 DISABLE PICTURE MODE ASPECT DAYLIGHT VIEW AUDIO SETTING VOLUME (Default: 20) BALANCE (Default: 0) IN STANDBY MODE OFF ON AUDIO IN SELECT DVI COM.AUDIO IN 2 AUDIO IN COMPUTER1 COM.AUDIO IN 1 AUDIO IN COMPUTER2 COM.AUDIO IN 2 AUDIO IN TEST PATTERN INITIALIZE ALL FILTER COUNTER RESET page 44 page 45 page 45 page 45 SECURITY PASSWORD OFF ON PASSWORD CHANGE TEXT DISPLAY OFF ON TEXT CHANGE MENU LOCK OFF ON MENU LOCK PASSWORD CONTROL DEVICE SETUP CONTROL PANEL ENABLE DISABLE REMOTE CONTROLLER...
... FUNCTION BUTTON page 44 DISABLE PICTURE MODE ASPECT DAYLIGHT VIEW AUDIO SETTING VOLUME (Default: 20) BALANCE (Default: 0) IN STANDBY MODE OFF ON AUDIO IN SELECT DVI COM.AUDIO IN 2 AUDIO IN COMPUTER1 COM.AUDIO IN 1 AUDIO IN COMPUTER2 COM.AUDIO IN 2 AUDIO IN TEST PATTERN INITIALIZE ALL FILTER COUNTER RESET page 44 page 45 page 45 page 45 SECURITY PASSWORD OFF ON PASSWORD CHANGE TEXT DISPLAY OFF ON TEXT CHANGE MENU LOCK OFF ON MENU LOCK PASSWORD CONTROL DEVICE SETUP CONTROL PANEL ENABLE DISABLE REMOTE CONTROLLER...
Operating Instructions
Page 34
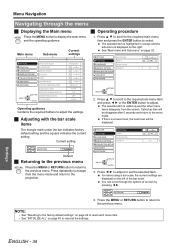
... button to return to select. PICTURE KEYSTONE POSITION SHIFT LANGUAGE OVER SCAN DISPLAY OPTION ASPECT 4:3 PROJECTOR SETUP SECURITY NETWORK RETURN SELECT ENTER 2. NOTE: • See "Resetting to the factory default settings" on page 29 to adjust or set the selected item. Main menu Sub-menu Current settings PICTURE POSITION LANGUAGE DISPLAY OPTION PROJECTOR SETUP SECURITY NETWORK SELECT RETURN ENTER PICTURE MODE CONTRAST BRIGHTNESS COLOR TINT SHARPNESS COLOR TEMPERATURE DAYLIGHT VIEW DIGITAL CINEMA REALITY NOISE REDUCTION TV-SYSTEM STANDARD DEFAULT AUTO...
... button to return to select. PICTURE KEYSTONE POSITION SHIFT LANGUAGE OVER SCAN DISPLAY OPTION ASPECT 4:3 PROJECTOR SETUP SECURITY NETWORK RETURN SELECT ENTER 2. NOTE: • See "Resetting to the factory default settings" on page 29 to adjust or set the selected item. Main menu Sub-menu Current settings PICTURE POSITION LANGUAGE DISPLAY OPTION PROJECTOR SETUP SECURITY NETWORK SELECT RETURN ENTER PICTURE MODE CONTRAST BRIGHTNESS COLOR TINT SHARPNESS COLOR TEMPERATURE DAYLIGHT VIEW DIGITAL CINEMA REALITY NOISE REDUCTION TV-SYSTEM STANDARD DEFAULT AUTO...

Operating Instructions
Page 36
... the projected image. PICTURE menu COLOR TEMPERATURE TV-SYSTEM You can improve the vertical resolution of a 2-2 or 2-3 pulldown movie. DIGITAL CINEMA REALITY You can adjust the white balance of the projector. You can switch the automatic noise reduction system on page 14. • AUTO is not available when INSTALLATION setting in well-lit rooms where the ambient light sources cannot be controlled, such as when a door opens or when window coverings...
... the projected image. PICTURE menu COLOR TEMPERATURE TV-SYSTEM You can improve the vertical resolution of a 2-2 or 2-3 pulldown movie. DIGITAL CINEMA REALITY You can adjust the white balance of the projector. You can switch the automatic noise reduction system on page 14. • AUTO is not available when INSTALLATION setting in well-lit rooms where the ambient light sources cannot be controlled, such as when a door opens or when window coverings...

Operating Instructions
Page 41
... select USER, you need to select a character. 4. TEXT CHANGE ALL DELETE AUTO SETUP You can turn off the auto signal detecting system. See "Remote control" on /off that is AUTO. SIGNAL SEARCH OK CANCEL 1. AUTO When the projector detects a COMPUTER or DVI signal, adjust the projected image position automatically for when the COMPUTER signal is ON. Use F G I H to display the image in the text line. Press the DEFAULT button to specify the location of...
... select USER, you need to select a character. 4. TEXT CHANGE ALL DELETE AUTO SETUP You can turn off the auto signal detecting system. See "Remote control" on /off that is AUTO. SIGNAL SEARCH OK CANCEL 1. AUTO When the projector detects a COMPUTER or DVI signal, adjust the projected image position automatically for when the COMPUTER signal is ON. Use F G I H to display the image in the text line. Press the DEFAULT button to specify the location of...
Operating Instructions
Page 44
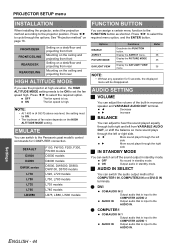
... projecting from front Mounting on the ceiling and projecting from front Setting on a desk/floor and projecting from rear Mounting on the HIGH ALTITUDE MODE setting. Options DISABLE ASPECT PICTURE MODE DAYLIGHT VIEW Functions Deactivate the FUNCTION button. I H to select the required menu option, and the ENTER button. J AUDIO IN SELECT You can adjust to the AUDIO IN. Settings ENGLISH - 44 OFF The fan speed is input to set the fan speed high. Display the DAYLIGHT VIEW menu. AUDIO SETTING...
... projecting from front Mounting on the ceiling and projecting from front Setting on a desk/floor and projecting from rear Mounting on the HIGH ALTITUDE MODE setting. Options DISABLE ASPECT PICTURE MODE DAYLIGHT VIEW Functions Deactivate the FUNCTION button. I H to select the required menu option, and the ENTER button. J AUDIO IN SELECT You can adjust to the AUDIO IN. Settings ENGLISH - 44 OFF The fan speed is input to set the fan speed high. Display the DAYLIGHT VIEW menu. AUDIO SETTING...

Operating Instructions
Page 45
PROJECTOR SETUP menu FILTER COUNTER RESET After you replaced the Auto Cleaning Filter (ACF), REMAINING FILTER of STATUS in PROJECTOR SETUP need to be out of focus. • When the image is distorted in keystone, adjust the KEYSTONE in PROJECTOR SETUP menu. 1. The upper and lower edge might be reset to the factory default password operation. INITIALIZE ALL You can use the 7 different test patterns to select the required test pattern. 3. Press the power button. 7. See "Minimum required setting screen" on page 19...
PROJECTOR SETUP menu FILTER COUNTER RESET After you replaced the Auto Cleaning Filter (ACF), REMAINING FILTER of STATUS in PROJECTOR SETUP need to be out of focus. • When the image is distorted in keystone, adjust the KEYSTONE in PROJECTOR SETUP menu. 1. The upper and lower edge might be reset to the factory default password operation. INITIALIZE ALL You can use the 7 different test patterns to select the required test pattern. 3. Press the power button. 7. See "Minimum required setting screen" on page 19...

Operating Instructions
Page 49
... the projector is located at high elevation. Instead contact an Authorised Service Centre. See "Replacing the Lamp unit" on the projector*1 and set the HIGH ALTITUDE MODE to new ACF. The room temperature is cooled enough. The projector will perform only 2 minutes with the projector, the TEMP, LAMP and/or FILTER indicators will inform you. Indicator Illuminating red Flashing red Flashing orange Illuminating orange Problem Cause Remedy REMAINING FILTER has Detect no problem is damaged. REMAINING FILTER has turned yellow. abnormal...
... the projector is located at high elevation. Instead contact an Authorised Service Centre. See "Replacing the Lamp unit" on the projector*1 and set the HIGH ALTITUDE MODE to new ACF. The room temperature is cooled enough. The projector will perform only 2 minutes with the projector, the TEMP, LAMP and/or FILTER indicators will inform you. Indicator Illuminating red Flashing red Flashing orange Illuminating orange Problem Cause Remedy REMAINING FILTER has Detect no problem is damaged. REMAINING FILTER has turned yellow. abnormal...

Operating Instructions
Page 51
... 49. • The ACF operational sound may be switched off. RUNTIME of STATUS in red for 10 minutes and the projector will be heard. • While the ACF is operating, the FILTER indicator will inform you keep using the projector after the FILTER indicator illuminating in red, the indicator will start to flash in the PROJECTOR SETUP menu will be reset to loosen the 2 lamp unit cover fixing screws on ventilation. Lamp unit cover fixing screws 2. Prepare a Phillips-head screwdriver...
... 49. • The ACF operational sound may be switched off. RUNTIME of STATUS in red for 10 minutes and the projector will be heard. • While the ACF is operating, the FILTER indicator will inform you keep using the projector after the FILTER indicator illuminating in red, the indicator will start to flash in the PROJECTOR SETUP menu will be reset to loosen the 2 lamp unit cover fixing screws on ventilation. Lamp unit cover fixing screws 2. Prepare a Phillips-head screwdriver...

Operating Instructions
Page 53
... control buttons of CONTROL DEVICE SETUP in use. The projector may be obstructed. The projector may be a problem with your dealer. The external video output from a computer DVI-D graphic board does not appear. COLOR or TINT adjustment may not have been inserted correctly. A cable may not have tripped. The MAIN POWER switch is lit or flashes. TEMP indicator is turned off. The lens focus may be connected properly. The BRIGHTNESS adjustment setting may...
... control buttons of CONTROL DEVICE SETUP in use. The projector may be obstructed. The projector may be a problem with your dealer. The external video output from a computer DVI-D graphic board does not appear. COLOR or TINT adjustment may not have been inserted correctly. A cable may not have tripped. The MAIN POWER switch is lit or flashes. TEMP indicator is turned off. The lens focus may be connected properly. The BRIGHTNESS adjustment setting may...

Operating Instructions
Page 64
... Indicator status 24 Remote control button 16 Power cord secure lock Accessories 12 Attaching 23 Projection lens 14 PROJECTOR SETUP menu 43 R REMAINING FILTER 43 REMOTE 15 LAMP switching 57 Pin assignments 57 Switching input signals 57 Remote control Accessories 12 Indicator 16 Signal emitter 16 Signal receptor 14 RETURN Control panel button 14 Remote control button 16 RGB/YPBPR 36 RUNTIME 43 S Safety cable Accessories 12 Safeguards 58 Screen size 16:10 17 16:9 59 Security lock 15 SECURITY menu 46 SERIAL 15 Basic format 55 Cable specifications...
... Indicator status 24 Remote control button 16 Power cord secure lock Accessories 12 Attaching 23 Projection lens 14 PROJECTOR SETUP menu 43 R REMAINING FILTER 43 REMOTE 15 LAMP switching 57 Pin assignments 57 Switching input signals 57 Remote control Accessories 12 Indicator 16 Signal emitter 16 Signal receptor 14 RETURN Control panel button 14 Remote control button 16 RGB/YPBPR 36 RUNTIME 43 S Safety cable Accessories 12 Safeguards 58 Screen size 16:10 17 16:9 59 Security lock 15 SECURITY menu 46 SERIAL 15 Basic format 55 Cable specifications...


