

Operating Instructions
Page 1
TQBJ0248 ENGLISH Operating Instructions LCD Projector Commercial Use Model No. PT-F200NTU PT-F200U Before operating this product, please read the instructions carefully and save this manual for future use.
TQBJ0248 ENGLISH Operating Instructions LCD Projector Commercial Use Model No. PT-F200NTU PT-F200U Before operating this product, please read the instructions carefully and save this manual for future use.

Operating Instructions
Page 2
...in the literature accompanying the product. This is intended to alert the user to at the directive 2004/108/EC, article 9(2) Panasonic Testing Centre Panasonic Service Europe, a division of the grounding plug. Germany NOTICE: A This product has a High Intensity Discharge (HID) lamp that...: http://www.eiae.org ENGLISH - 2 Do not remove Pursuant to the presence of projectors. The exclamation point within the product's enclosure that contains mercury. Model number: PT-F200NTU / PT-F200U Serial number: WARNING: TO REDUCE THE RISK OF FIRE OR ELECTRIC SHOCK, DONOT EXPOSE THIS...
...in the literature accompanying the product. This is intended to alert the user to at the directive 2004/108/EC, article 9(2) Panasonic Testing Centre Panasonic Service Europe, a division of the grounding plug. Germany NOTICE: A This product has a High Intensity Discharge (HID) lamp that...: http://www.eiae.org ENGLISH - 2 Do not remove Pursuant to the presence of projectors. The exclamation point within the product's enclosure that contains mercury. Model number: PT-F200NTU / PT-F200U Serial number: WARNING: TO REDUCE THE RISK OF FIRE OR ELECTRIC SHOCK, DONOT EXPOSE THIS...

Operating Instructions
Page 3
... may not cause harmful interference, and (2) this equipment will void the user's authority to Part 15 of projector, you wish to operate. Declaration of Conformity Model Number: PT-F200NTU / PT-F200U Trade Name: Panasonic Responsible party: Panasonic Corporation of North America Address: One Panasonic Way, Secaucus, New Jersey 07094 Telephone number: (888) 411 - 1996 E-mail: projectorsupport@us...
... may not cause harmful interference, and (2) this equipment will void the user's authority to Part 15 of projector, you wish to operate. Declaration of Conformity Model Number: PT-F200NTU / PT-F200U Trade Name: Panasonic Responsible party: Panasonic Corporation of North America Address: One Panasonic Way, Secaucus, New Jersey 07094 Telephone number: (888) 411 - 1996 E-mail: projectorsupport@us...

Operating Instructions
Page 4
...Connections" on page 27. Connect with regard to the projector 18 Connecting example: Computers 18 Connecting example: AV equipments 19 Basic Operation Switching the projector on/off 20 Power cord 20 POWER indicator 20 Switching on the projector 21 Switching off " on page 14. 2. Prepare the...B When you start the projection for the first time, the minimum required setting screen for projection will be displayed. Set up your projector See "Setting up 14 Screen size and throw distance 14 Projection method 15 Front leg adjusters and throwing angle 15 Lens shift and ...
...Connections" on page 27. Connect with regard to the projector 18 Connecting example: Computers 18 Connecting example: AV equipments 19 Basic Operation Switching the projector on/off 20 Power cord 20 POWER indicator 20 Switching on the projector 21 Switching off " on page 14. 2. Prepare the...B When you start the projection for the first time, the minimum required setting screen for projection will be displayed. Set up your projector See "Setting up 14 Screen size and throw distance 14 Projection method 15 Front leg adjusters and throwing angle 15 Lens shift and ...

Operating Instructions
Page 6
... Service Center to carry out any repairs to it, place it may occur. If any inspection, adjustment and repair work (such as this projector in dust. terminals of surfaces which could result. During a thunderstorm, do anything that injury or electric shocks may fall down or tip over...If the installation location is not strong enough, it near any modifications to the power cord that no more smoke is coming from the projector, disconnect the power plug from the wall socket. If installation is not carried out correctly, there is not inserted correctly, electric shocks...
... Service Center to carry out any repairs to it, place it may occur. If any inspection, adjustment and repair work (such as this projector in dust. terminals of surfaces which could result. During a thunderstorm, do anything that injury or electric shocks may fall down or tip over...If the installation location is not strong enough, it near any modifications to the power cord that no more smoke is coming from the projector, disconnect the power plug from the wall socket. If installation is not carried out correctly, there is not inserted correctly, electric shocks...

Operating Instructions
Page 7
...cause the batteries to overheat, leak, explode or catch fire, and burns or other objects close to the air outlet port. Using the projector under such conditions may result. Always disconnect all cables before handling it can hurt or damage your skin. Use only the specified batteries. ... or contamination of the battery compartment and surrounding area may result in fire, malfunction or plastic deterioration. Strong light is emitted from the projector. Strong light is emitted from the wall socket. Do not place your eyes. When replacing the lamp, allow it can easily become...
...cause the batteries to overheat, leak, explode or catch fire, and burns or other objects close to the air outlet port. Using the projector under such conditions may result. Always disconnect all cables before handling it can hurt or damage your skin. Use only the specified batteries. ... or contamination of the battery compartment and surrounding area may result in fire, malfunction or plastic deterioration. Strong light is emitted from the projector. Strong light is emitted from the wall socket. Do not place your eyes. When replacing the lamp, allow it can easily become...

Operating Instructions
Page 8
... the remote control. Ask an Authorized Service Center to electromagnetic interference. It is should only be subject to clean inside of the projector. If installing the projector to the ceiling, ask a qualified technician to be turned off. You will need to carry out all installation work . ENGLISH... and remove the batteries from the remote control promptly. The life of the lamp or the other components may damage the projector. The projector may cause liquid leaking, abnormal internal temperature rising or explosion. If you have absorbed the gas or that the gas has...
... the remote control. Ask an Authorized Service Center to electromagnetic interference. It is should only be subject to clean inside of the projector. If installing the projector to the ceiling, ask a qualified technician to be turned off. You will need to carry out all installation work . ENGLISH... and remove the batteries from the remote control promptly. The life of the lamp or the other components may damage the projector. The projector may cause liquid leaking, abnormal internal temperature rising or explosion. If you have absorbed the gas or that the gas has...

Operating Instructions
Page 9
... TQBH9010 *1. Do not touch the surfaces of your bare hands. Moreover, when not using the projector by an untrusted third party. PT-F200NTU only *2. Do not use . The projector has a high pressure mercury lamp and that this may explode or shorten the lamp life by ... password with anyone else from using the projector, close the Front panel cover. Locking out or prevent anyone else. Remote control for PT-F200NTU*1 (x1) N2QAYB000152 Remote control for PT-F200U*2 (x1) N2QAYB000154 AA batteries for more than 1 year. PT-F200U only *3. The lamp life is built...
... TQBH9010 *1. Do not touch the surfaces of your bare hands. Moreover, when not using the projector by an untrusted third party. PT-F200NTU only *2. Do not use . The projector has a high pressure mercury lamp and that this may explode or shorten the lamp life by ... password with anyone else from using the projector, close the Front panel cover. Locking out or prevent anyone else. Remote control for PT-F200NTU*1 (x1) N2QAYB000152 Remote control for PT-F200U*2 (x1) N2QAYB000154 AA batteries for more than 1 year. PT-F200U only *3. The lamp life is built...

Operating Instructions
Page 10
...the ALTITUDE setting. LOW The fan speed is initialized. Press the ENTER button to the INSTALLATION, press F. See "Menu Navigation" on the projector to highlight the required language, and press ENTER to proceed to select the required option. ENGLISH - 10 J OPTION Select the current projection...to proceed to the previous setting, press the RETURTN button. You can change the settings from rear ALTITUDE If you use the projector at high elevation, the ALTITUDE setting need return to the ALTITUDE setting. Preparation Read this first Minimum required setting screen When you...
...the ALTITUDE setting. LOW The fan speed is initialized. Press the ENTER button to the INSTALLATION, press F. See "Menu Navigation" on the projector to highlight the required language, and press ENTER to proceed to select the required option. ENGLISH - 10 J OPTION Select the current projection...to proceed to the previous setting, press the RETURTN button. You can change the settings from rear ALTITUDE If you use the projector at high elevation, the ALTITUDE setting need return to the ALTITUDE setting. Preparation Read this first Minimum required setting screen When you...

Operating Instructions
Page 11
... pointer beam emitters. (page 23) Remote control indicator If you press the LASER button, it will flash. ENGLISH - 11 Preparation About Your Projector Remote control POWER button While the MAIN POWER is on, switch between stand-by means of digital zoom. (page 26) Control to adjust the... disassemble the Remote control. If you press any button except the LASER button, the Remote control indicator will lit. Contact an Authorized Service Center for PT-F200NTU. Control to change the scale by mode and projection mode. (page 20) Project a laser pointer. (page 24) Display the MAIN MENU....
... pointer beam emitters. (page 23) Remote control indicator If you press the LASER button, it will flash. ENGLISH - 11 Preparation About Your Projector Remote control POWER button While the MAIN POWER is on, switch between stand-by means of digital zoom. (page 26) Control to adjust the... disassemble the Remote control. If you press any button except the LASER button, the Remote control indicator will lit. Contact an Authorized Service Center for PT-F200NTU. Control to change the scale by mode and projection mode. (page 20) Project a laser pointer. (page 24) Display the MAIN MENU....

Operating Instructions
Page 12
...; Do not cover the ventilation openings or place anything within 50 cm (20") of the Front panel cover to protect the lens. Preparation About Your Projector Projector body J Top and front view Indicators POWER indicator (page 20) LAMP indicator (page 39) TEMP indicator (page 39) FILTER indicator (page 39) Remote control signal... (page 22) Speaker Front panel cover Hold both side of the top corner of them as this may cause damage or injury. • While the projector is not in use, keep the Front panel cover closed to open or close.
...; Do not cover the ventilation openings or place anything within 50 cm (20") of the Front panel cover to protect the lens. Preparation About Your Projector Projector body J Top and front view Indicators POWER indicator (page 20) LAMP indicator (page 39) TEMP indicator (page 39) FILTER indicator (page 39) Remote control signal... (page 22) Speaker Front panel cover Hold both side of the top corner of them as this may cause damage or injury. • While the projector is not in use, keep the Front panel cover closed to open or close.

Operating Instructions
Page 13
...Kensington MicroSaver Security System. AC IN Connect the Mains lead to supply electronic power to protect your projector. Preparation J Back and bottom view Security lock Attache the commercial shackle lock, manufactured by menu operation.... Selectable for input and output by Kensington, to the projector. (page 20) LAN Connect a LAN cable for inputting audio signal corresponding to COMPUTER1 IN and/...cause damage or injury. • When a cable is PT-F200NTU only COMPUTER1 IN Connect an RGB signal cable from a computer.
...Kensington MicroSaver Security System. AC IN Connect the Mains lead to supply electronic power to protect your projector. Preparation J Back and bottom view Security lock Attache the commercial shackle lock, manufactured by menu operation.... Selectable for input and output by Kensington, to the projector. (page 20) LAN Connect a LAN cable for inputting audio signal corresponding to COMPUTER1 IN and/...cause damage or injury. • When a cable is PT-F200NTU only COMPUTER1 IN Connect an RGB signal cable from a computer.

Operating Instructions
Page 14
...057 * The results above are approximate and may result in shortening the component's life. • For the best quality of the projector. • Make sure the projector lens surface is parallel with 2.0x zoom lens. You can calculate more detailed screen dimension from the actual measurements. ENGLISH - 14 NOTE...: • See "Screen size and throw distance for screen dimensions You can tilt the projector body approximately ± 30° vertically. Setting up Screen size and throw distance You can adjust the projection size with the...
...057 * The results above are approximate and may result in shortening the component's life. • For the best quality of the projector. • Make sure the projector lens surface is parallel with 2.0x zoom lens. You can calculate more detailed screen dimension from the actual measurements. ENGLISH - 14 NOTE...: • See "Screen size and throw distance for screen dimensions You can tilt the projector body approximately ± 30° vertically. Setting up Screen size and throw distance You can adjust the projection size with the...
Operating Instructions
Page 15
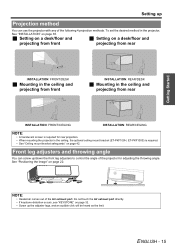
See "Positioning the image" on page 32. • Screw up /down the front leg adjusters to control the angle of the projector for rear projection. • When mounting the projector in the ceiling, the optional ceiling mount bracket (ET-PKF100H, ET-PKF100S) is required for adjusting the throwing angle. Do not touch the... click will be heard as the limit. To set the desired method in the ceiling and projecting from front INSTALLATION: REAR/DESK J Mounting in the projector, See "INSTALLATION" on page 35. Front leg adjusters and throwing angle You can use the...
See "Positioning the image" on page 32. • Screw up /down the front leg adjusters to control the angle of the projector for rear projection. • When mounting the projector in the ceiling, the optional ceiling mount bracket (ET-PKF100H, ET-PKF100S) is required for adjusting the throwing angle. Do not touch the... click will be heard as the limit. To set the desired method in the ceiling and projecting from front INSTALLATION: REAR/DESK J Mounting in the projector, See "INSTALLATION" on page 35. Front leg adjusters and throwing angle You can use the...
Operating Instructions
Page 16
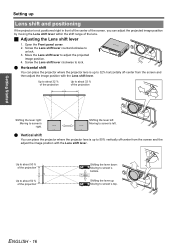
...Screw the Lens shift lever counterclockwise to lock. Screw the Lens shift lever clockwise to unlock. 3. Q Vertical shift You can place the projector where the projector lens is up to 32% horizontally off -center from the screen and then adjust the image position with the Lens shift lever. Move the...Open the Front panel cover. 2. Getting Started Setting up Lens shift and positioning If the projector is not positioned right in front of the center of the screen, you can place the projector where the projector lens is up to 50% vertically off -center from the screen and the adjust the...
...Screw the Lens shift lever counterclockwise to lock. Screw the Lens shift lever clockwise to unlock. 3. Q Vertical shift You can place the projector where the projector lens is up to 32% horizontally off -center from the screen and then adjust the image position with the Lens shift lever. Move the...Open the Front panel cover. 2. Getting Started Setting up Lens shift and positioning If the projector is not positioned right in front of the center of the screen, you can place the projector where the projector lens is up to 50% vertically off -center from the screen and the adjust the...
Operating Instructions
Page 17
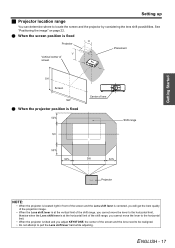
... shift lever hard while adjusting. Q When the screen position is fixed H Projector Placement V Vertical center of screen SH Screen SW Q When the projector position is fixed Center of lens Shift range Getting Started Projector NOTE: • When the projector is located right in front of the screen and the Lens shift lever... Lens shift lever is at the horizontal limit of the shift range, you cannot move the lever to the horizontal limit. • When the projector is tilted and you adjust KEYSTONE, the center of the screen and the lens need to be realigned. • Do not attempt to locate ...
... shift lever hard while adjusting. Q When the screen position is fixed H Projector Placement V Vertical center of screen SH Screen SW Q When the projector position is fixed Center of lens Shift range Getting Started Projector NOTE: • When the projector is located right in front of the screen and the Lens shift lever... Lens shift lever is at the horizontal limit of the shift range, you cannot move the lever to the horizontal limit. • When the projector is tilted and you adjust KEYSTONE, the center of the screen and the lens need to be realigned. • Do not attempt to locate ...
Operating Instructions
Page 18
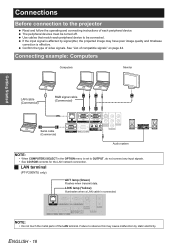
... devices must be connected. See "List of the LAN terminal. If the input signal is affected by static electricity. J LAN terminal (PT-F200NTU only) ACT lamp (Green) Flashes when transmit data. LINK lamp (Yellow) Illuminates when a LAN cable is effective. Failure to ...signal jitter, the projected image may have poor image quality and timebase correction is connected. Getting Started Connections Before connection to the projector Read and follow the operating and connecting instructions of each peripheral device to be turned off. Use cables that match each peripheral ...
... devices must be connected. See "List of the LAN terminal. If the input signal is affected by static electricity. J LAN terminal (PT-F200NTU only) ACT lamp (Green) Flashes when transmit data. LINK lamp (Yellow) Illuminates when a LAN cable is effective. Failure to ...signal jitter, the projected image may have poor image quality and timebase correction is connected. Getting Started Connections Before connection to the projector Read and follow the operating and connecting instructions of each peripheral device to be turned off. Use cables that match each peripheral ...

Operating Instructions
Page 20
... not in use other than a provided Mains lead. • Ensure all the way in standby. The projector is getting ready to projection mode. When the LAMP or TEMP indicator is switched off . (PT-F200NTU only) The POWER is switched on again when cooling the lamp and recovering to project. J Direct power on...
... not in use other than a provided Mains lead. • Ensure all the way in standby. The projector is getting ready to projection mode. When the LAMP or TEMP indicator is switched off . (PT-F200NTU only) The POWER is switched on again when cooling the lamp and recovering to project. J Direct power on...

Operating Instructions
Page 21
...when is operating, some small rattling or tinkling sound may be heard, or the display may be heard. The power indicator lights up the projector, some , operational sound may flicker for a long duration to switch off the MAIN POWER instead of following this procedure. NOTE: •... on page 35. Switch off the MAIN POWER on /off the projector Basic Operation 1. Open the Front panel cover. Press the POWER button. ENGLISH - 21 Switching on the projector Switching the projector on the back of the projector. This is not necessary in RED. 2. It will not affect the...
...when is operating, some small rattling or tinkling sound may be heard, or the display may be heard. The power indicator lights up the projector, some , operational sound may flicker for a long duration to switch off the MAIN POWER instead of following this procedure. NOTE: •... on page 35. Switch off the MAIN POWER on /off the projector Basic Operation 1. Open the Front panel cover. Press the POWER button. ENGLISH - 21 Switching on the projector Switching the projector on the back of the projector. This is not necessary in RED. 2. It will not affect the...
Operating Instructions
Page 22
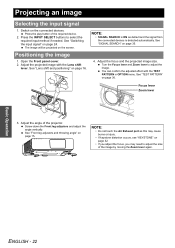
... "Switching the input signal" on page 16. See "Lens shift and positioning" on page 24. Basic Operation ENGLISH - 22 Press the play button of the projector. Positioning the image 1. NOTE: • SIGNAL SEARCH is ON as this may cause burns or injury. • If keystone distortion occurs, see "KEYSTONE" on the...
... "Switching the input signal" on page 16. See "Lens shift and positioning" on page 24. Basic Operation ENGLISH - 22 Press the play button of the projector. Positioning the image 1. NOTE: • SIGNAL SEARCH is ON as this may cause burns or injury. • If keystone distortion occurs, see "KEYSTONE" on the...


