

Operating Instructions
Page 3
.... If you use serial port to discard this equipment will not occur in the Standard for help. This equipment complied with Part 15 of North America Address: One Panasonic Way, Secaucus, New Jersey 07094 Telephone number: (888) 411 - 1996 E-mail: projectorsupport@us.panasonic.com This device complies with FCC radiation exposure limits set forth for external control of operation. - WARNING: A Not for use in a computer...
.... If you use serial port to discard this equipment will not occur in the Standard for help. This equipment complied with Part 15 of North America Address: One Panasonic Way, Secaucus, New Jersey 07094 Telephone number: (888) 411 - 1996 E-mail: projectorsupport@us.panasonic.com This device complies with FCC radiation exposure limits set forth for external control of operation. - WARNING: A Not for use in a computer...

Operating Instructions
Page 8
... adjuster legs or the top cover to purchase the separate installation kit (Model No. You will need to sudden temperature changes, such as a safety precaution before the season for an extended period of the lamp unit and check the inside the projector without being cleaned out, it may cause the user to build up the projector near high-voltage power lines or near an air...
... adjuster legs or the top cover to purchase the separate installation kit (Model No. You will need to sudden temperature changes, such as a safety precaution before the season for an extended period of the lamp unit and check the inside the projector without being cleaned out, it may cause the user to build up the projector near high-voltage power lines or near an air...

Operating Instructions
Page 9
... not using the projector after the instructed lamp replacement timing. Locking out or prevent anyone else. Do not share your password with very high precision technology to be magnified and projected onto the screen. ENGLISH - 9 The leakage of use of blue, green or red. Security instructions Change your projector. PT-F200U only *3. Important Information Precautions with your bare hands. The lamp may greatly affect on individual lamp characteristics, usage condition and the installation...
... not using the projector after the instructed lamp replacement timing. Locking out or prevent anyone else. Do not share your password with very high precision technology to be magnified and projected onto the screen. ENGLISH - 9 The leakage of use of blue, green or red. Security instructions Change your projector. PT-F200U only *3. Important Information Precautions with your bare hands. The lamp may greatly affect on individual lamp characteristics, usage condition and the installation...

Operating Instructions
Page 11
... up the cover. 2. Display the frozen image while the display of subsequent images continues. (page 25) COMPUTER SEARCH button is only for PT-F200NTU. Insert the batteries according to the previous menu. (page 27) Turn off the projection temporarily. Contact an Authorized Service Center for repairs. • Do not keep pressing the Remote control buttons as a frozen picture. (page 25) Reset some of the settings to the factory default settings. (page 25...
... up the cover. 2. Display the frozen image while the display of subsequent images continues. (page 25) COMPUTER SEARCH button is only for PT-F200NTU. Insert the batteries according to the previous menu. (page 27) Turn off the projection temporarily. Contact an Authorized Service Center for repairs. • Do not keep pressing the Remote control buttons as a frozen picture. (page 25) Reset some of the settings to the factory default settings. (page 25...

Operating Instructions
Page 13
... audio cables for network connection. Preparation J Back and bottom view Security lock Attache the commercial shackle lock, manufactured by menu operation. MAIN POWER Switch the projector on page 45. Selectable for inputting audio signals corresponding to the connected equipment. COMPUTER AUDIO IN Connect audio cables for input and output by Kensington, to adjust the projection angle. (page 15) About Your Projector Lamp unit compartment (page 41) Air exhaust port Heated air comes out of them as this opening. REMOTE See "REMOTE...
... audio cables for network connection. Preparation J Back and bottom view Security lock Attache the commercial shackle lock, manufactured by menu operation. MAIN POWER Switch the projector on page 45. Selectable for inputting audio signals corresponding to the connected equipment. COMPUTER AUDIO IN Connect audio cables for input and output by Kensington, to adjust the projection angle. (page 15) About Your Projector Lamp unit compartment (page 41) Air exhaust port Heated air comes out of them as this opening. REMOTE See "REMOTE...
Operating Instructions
Page 18
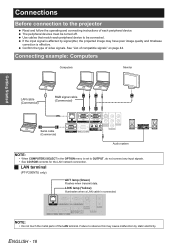
.... ENGLISH - 18 Failure to OUTPUT, do not connect any input signals. • See CD-ROM contents for the LAN network connection. The peripheral devices must be connected. Getting Started Connections Before connection to the projector Read and follow the operating and connecting instructions of each peripheral device to be turned off. Confirm the type of video signals. J LAN terminal (PT-F200NTU only) ACT lamp (Green) Flashes when transmit data. LINK lamp (Yellow) Illuminates when a LAN cable is effective.
.... ENGLISH - 18 Failure to OUTPUT, do not connect any input signals. • See CD-ROM contents for the LAN network connection. The peripheral devices must be connected. Getting Started Connections Before connection to the projector Read and follow the operating and connecting instructions of each peripheral device to be turned off. Confirm the type of video signals. J LAN terminal (PT-F200NTU only) ACT lamp (Green) Flashes when transmit data. LINK lamp (Yellow) Illuminates when a LAN cable is effective.

Operating Instructions
Page 20
... lamp. See "DIRECT POWER ON" on /off . POWER indicator POWER indicator Basic Operation Indicator status No illumination or flashing RED GREEN ORANGE Lit Flashing Flashing Lit Lit Flashing Status The MAIN POWER is flashing, the POWER indicator will keep operating by the internal power supply, it may take a while to the projector when not in standby mode is still operating by the internal power supply. When the LAMP or TEMP indicator is switched off Power cord J Connecting 1. Network connection is ready while the POWER is turned off the power to start the projection...
... lamp. See "DIRECT POWER ON" on /off . POWER indicator POWER indicator Basic Operation Indicator status No illumination or flashing RED GREEN ORANGE Lit Flashing Flashing Lit Lit Flashing Status The MAIN POWER is flashing, the POWER indicator will keep operating by the internal power supply, it may take a while to the projector when not in standby mode is still operating by the internal power supply. When the LAMP or TEMP indicator is switched off Power cord J Connecting 1. Network connection is ready while the POWER is turned off the power to start the projection...
Operating Instructions
Page 22
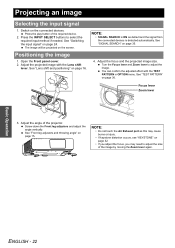
... Air Exhaust port as default and the signal from the connected devices is detected automatically. Basic Operation ENGLISH - 22 Open the Front panel cover. 2. Screw down the Front leg adjusters and adjust the angle vertically. Projecting an image Selecting the input signal 1. See "Switching the input signal" on page 16. Positioning the image 1. Adjust the projected image with the TEST PATTERN in OPTION menu. See "Lens shift and positioning" on page 24. Turn the Focus lever and Zoom...
... Air Exhaust port as default and the signal from the connected devices is detected automatically. Basic Operation ENGLISH - 22 Open the Front panel cover. 2. Screw down the Front leg adjusters and adjust the angle vertically. Projecting an image Selecting the input signal 1. See "Switching the input signal" on page 16. Positioning the image 1. Adjust the projected image with the TEST PATTERN in OPTION menu. See "Lens shift and positioning" on page 24. Turn the Focus lever and Zoom...

Operating Instructions
Page 25
... button. Adjust each menu items manually. • To reset all the settings to capture a new image and the frozen image window will be updated in INDEX-WINDOW mode, press ENTER to the factory defaults, see "INITIALIZE ALL" on page 36. Q Capturing a new image While in a while. Display the required sub menu or the menu items and press the DEFAULT button again. Basic Operation Remote control operation Capturing an image When projecting an image, press FREEZE to capture the projected image and display...
... button. Adjust each menu items manually. • To reset all the settings to capture a new image and the frozen image window will be updated in INDEX-WINDOW mode, press ENTER to the factory defaults, see "INITIALIZE ALL" on page 36. Q Capturing a new image While in a while. Display the required sub menu or the menu items and press the DEFAULT button again. Basic Operation Remote control operation Capturing an image When projecting an image, press FREEZE to capture the projected image and display...

Operating Instructions
Page 27
... dedicated buttons on page 28. Main menu Sub-menu Current settings PICTURE POSITION LANGUAGE OPTION SECURITY NETWORK SELECT RETURN ENTER PICTURE MODE CONTRAST BRIGHTNESS COLOUR TINT SHARPNESS COLOUR TEMPERATURE DAYLIGHT VIEW DETAILED SETUP STANDARD STANDARD AUTO Operating guidance Contains the required buttons to select. KEYSTONE 4. Navigating through the menu with the bar scale items The triangle mark under the bar indicates factory default setting and the square indicates the current setting. J Operating procedure...
... dedicated buttons on page 28. Main menu Sub-menu Current settings PICTURE POSITION LANGUAGE OPTION SECURITY NETWORK SELECT RETURN ENTER PICTURE MODE CONTRAST BRIGHTNESS COLOUR TINT SHARPNESS COLOUR TEMPERATURE DAYLIGHT VIEW DETAILED SETUP STANDARD STANDARD AUTO Operating guidance Contains the required buttons to select. KEYSTONE 4. Navigating through the menu with the bar scale items The triangle mark under the bar indicates factory default setting and the square indicates the current setting. J Operating procedure...

Operating Instructions
Page 28
...*2 SHARPNESS COLOR TEMPERATURE DAYLIGHT VIEW DETAILED SETUP*2 POSITION KEYSTONE POSITION*2 DOT CLOCK*2 CLOCK PHASE*2 ASPECT*2 LANGUAGE RESIZING*2 FRAME LOCK*2 Options (underlined is default setting) NATURAL STANDARD • Default: 0 • Default: 0 DYNAMIC*1 BLACKBOARD • Default: 0 • Default: 0 • Default: 0 LOW HIGH AUTO OFF WHITE BALANCE*2 • Default: 0 TV-SYSTEM (S-VIDEO/VIDEO signals only) STILL MODE (S-VIDEO/VIDEO) NOISE REDUCTION (S-VIDEO/VIDEO) • Default: 0 STANDARD ON WHITE BALANCE RED WHITE BALANCE GREEN WHITE BALANCE BLUE AUTO NTSC...
...*2 SHARPNESS COLOR TEMPERATURE DAYLIGHT VIEW DETAILED SETUP*2 POSITION KEYSTONE POSITION*2 DOT CLOCK*2 CLOCK PHASE*2 ASPECT*2 LANGUAGE RESIZING*2 FRAME LOCK*2 Options (underlined is default setting) NATURAL STANDARD • Default: 0 • Default: 0 DYNAMIC*1 BLACKBOARD • Default: 0 • Default: 0 • Default: 0 LOW HIGH AUTO OFF WHITE BALANCE*2 • Default: 0 TV-SYSTEM (S-VIDEO/VIDEO signals only) STILL MODE (S-VIDEO/VIDEO) NOISE REDUCTION (S-VIDEO/VIDEO) • Default: 0 STANDARD ON WHITE BALANCE RED WHITE BALANCE GREEN WHITE BALANCE BLUE AUTO NTSC...
Operating Instructions
Page 29
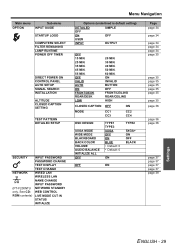
...) INPUT PASSWORD PASSWORD CHANGE TEXT DISPLAY TEXT CHANGE WIRED LAN WIRELESS LAN NAME CHANGE INPUT PASSWORD NETWORK STANDBY WEB CONTROL LIVE MODE CUT IN STATUS INITIALIZE Menu Navigation Options (underlined is default setting) DETAILED SIMPLE OFF ON OFF USER INPUT OUTPUT OFF 15 MIN. 25 MIN. 35 MIN. 45 MIN. 55 MIN. OFF VALID AUTO ON FRONT/DESK REAR/DESK LOW 20 MIN. 30 MIN. 40 MIN. 50 MIN. 60 MIN. ON INVALID BUTTON...
...) INPUT PASSWORD PASSWORD CHANGE TEXT DISPLAY TEXT CHANGE WIRED LAN WIRELESS LAN NAME CHANGE INPUT PASSWORD NETWORK STANDBY WEB CONTROL LIVE MODE CUT IN STATUS INITIALIZE Menu Navigation Options (underlined is default setting) DETAILED SIMPLE OFF ON OFF USER INPUT OUTPUT OFF 15 MIN. 25 MIN. 35 MIN. 45 MIN. 55 MIN. OFF VALID AUTO ON FRONT/DESK REAR/DESK LOW 20 MIN. 30 MIN. 40 MIN. 50 MIN. 60 MIN. ON INVALID BUTTON...

Operating Instructions
Page 30
..., you can adjust the white balance of the projected image. See "Main menu and Sub-menu" on page 36. Lighter Darker PICTURE MODE Depending on page 12. • AUTO is not available when INSTALLATION setting in well-lit rooms where the ambient light sources cannot be controlled, such as when a door opens or when window coverings fail to optimize image projection. Less sharp More sharp COLOR TEMPERATURE You can use these preset...
..., you can adjust the white balance of the projected image. See "Main menu and Sub-menu" on page 36. Lighter Darker PICTURE MODE Depending on page 12. • AUTO is not available when INSTALLATION setting in well-lit rooms where the ambient light sources cannot be controlled, such as when a door opens or when window coverings fail to optimize image projection. Less sharp More sharp COLOR TEMPERATURE You can use these preset...

Operating Instructions
Page 35
.... SIGNAL SEARCH You can turn off the AUTO SETUP function for DOT CLOCK and CLOCK PHASE. OPTION menu POWER OFF TIMER You can set the fan speed high. Press I H to cycle through the options. AUTO SETUP You can switch the projector start from the terminals and project the image. DIRECT POWER ON You can turn off the function of 5 minutes. ON The projector will start up status for when the Mains lead is connected...
.... SIGNAL SEARCH You can turn off the AUTO SETUP function for DOT CLOCK and CLOCK PHASE. OPTION menu POWER OFF TIMER You can set the fan speed high. Press I H to cycle through the options. AUTO SETUP You can switch the projector start from the terminals and project the image. DIRECT POWER ON You can turn off the function of 5 minutes. ON The projector will start up status for when the Mains lead is connected...

Operating Instructions
Page 36
... change the background color of PICTURE MODE in menu items. J BACK COLOR You can turn ON/OFF the WIDE MODE setting. J VOLUME You can use the 7 different test patterns to select the required option. TEST PATTERN You can adjust the volume of the image. Switch off the projector by pressing the POWER button. 3. OPTION menu CLOSED CAPTION SETTING If the input signal contains closed captions, you can choose a BLUE or BLACK screen...
... change the background color of PICTURE MODE in menu items. J BACK COLOR You can turn ON/OFF the WIDE MODE setting. J VOLUME You can use the 7 different test patterns to select the required option. TEST PATTERN You can adjust the volume of the image. Switch off the projector by pressing the POWER button. 3. OPTION menu CLOSED CAPTION SETTING If the input signal contains closed captions, you can choose a BLUE or BLACK screen...

Operating Instructions
Page 39
... cannot operate properly. Confirm the status of the LAMP, TEMP and/or FILTER indicators. 3. Lamp unit will be replaced. The room temperature is about 240 hours. Remedy See "Replacing the ARF (Auto Rolling Filter)" on page 41. MAIN POWER after 90 seconds. ARF is running out and the remaining time is too high. Turn on the projector. Cause Remedy The ventilation openings are covered. Manage the indicated problems as follow. 1. Indicator Illuminating RED Flashing RED Illuminating ORANGE Flashing ORANGE Problem FILTER...
... cannot operate properly. Confirm the status of the LAMP, TEMP and/or FILTER indicators. 3. Lamp unit will be replaced. The room temperature is about 240 hours. Remedy See "Replacing the ARF (Auto Rolling Filter)" on page 41. MAIN POWER after 90 seconds. ARF is running out and the remaining time is too high. Turn on the projector. Cause Remedy The ventilation openings are covered. Manage the indicated problems as follow. 1. Indicator Illuminating RED Flashing RED Illuminating ORANGE Flashing ORANGE Problem FILTER...

Operating Instructions
Page 40
... enlarged and projected onto a screen. Failure to remove the dirt, soak a cloth with water, wring the cloth well and then wipe the projector. It will inform you of the replacement timing. FILTER indicator will be turned on. • Do not switch the power on while the ARF cover removed. • When you replace the ARF unit, clean the compartment and/or the Air Exhaust port if you use a chemical...
... enlarged and projected onto a screen. Failure to remove the dirt, soak a cloth with water, wring the cloth well and then wipe the projector. It will inform you of the replacement timing. FILTER indicator will be turned on. • Do not switch the power on while the ARF cover removed. • When you replace the ARF unit, clean the compartment and/or the Air Exhaust port if you use a chemical...
Operating Instructions
Page 42
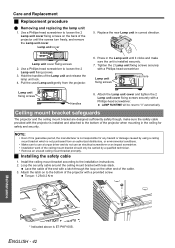
.... Lamp unit fixing screws Press here Lamp unit fixing screws Handles 8. Loop the security cable around the ceiling mount bracket with a provided screw. Pull the used Lamp unit gently from an authorized distributors, or environmental conditions. • Make sure to the bottom of the ceiling mount bracket should only be reset to the installation instructions. 2. Replace the new Lamp unit in the Lamp unit until the screws turn freely, and remove the Lamp unit cover. Press...
.... Lamp unit fixing screws Press here Lamp unit fixing screws Handles 8. Loop the security cable around the ceiling mount bracket with a provided screw. Pull the used Lamp unit gently from an authorized distributors, or environmental conditions. • Make sure to the bottom of the ceiling mount bracket should only be reset to the installation instructions. 2. Replace the new Lamp unit in the Lamp unit until the screws turn freely, and remove the Lamp unit cover. Press...
Operating Instructions
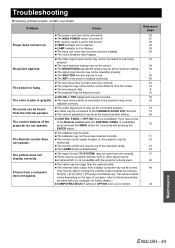
Page 43
... control buttons of the Remote control while the CONTROL PANEL is invalidated, press and hold the MENU button for further details.) COMPUTER2 SELECT setting in use. LAMP indicator is deactivated. The lens focus may not be weak. The projector may not have a loss of the projector do not operate. The batteries may be at the correct distance from a laptop computer may not be correct. (You may not be connected properly...
... control buttons of the Remote control while the CONTROL PANEL is invalidated, press and hold the MENU button for further details.) COMPUTER2 SELECT setting in use. LAMP indicator is deactivated. The lens focus may not be weak. The projector may not have a loss of the projector do not operate. The batteries may be at the correct distance from a laptop computer may not be correct. (You may not be connected properly...

Operating Instructions
Page 52
... panel button 12 Remote control button 11 F FILTER REMAINING 34 Focus lever 12, 22 FRAME LOCK 33 FREEZE Remote control 25 Remote control button 11 Front leg adjusters 13, 15, 22 Front panel cover 12 H Hand strap 11 HIGHLAND 35 I INDEX-WINDOW Remote control 25 Remote control button 11 INITIALIZE ALL 36 INPUT GUIDE 34 INPUT PASSWORD 37 INPUT SELECT Control panel button 12 Remote control button 11 Selecting 22, 24 INSTALLATION Menu 35 Projection method 15 K KEYSTONE 32 L LAMP Indicator 12 Indicator status 39 LAMP RUNTIME 34 Lamp unit compartment 13 Replacing 41 LAN...
... panel button 12 Remote control button 11 F FILTER REMAINING 34 Focus lever 12, 22 FRAME LOCK 33 FREEZE Remote control 25 Remote control button 11 Front leg adjusters 13, 15, 22 Front panel cover 12 H Hand strap 11 HIGHLAND 35 I INDEX-WINDOW Remote control 25 Remote control button 11 INITIALIZE ALL 36 INPUT GUIDE 34 INPUT PASSWORD 37 INPUT SELECT Control panel button 12 Remote control button 11 Selecting 22, 24 INSTALLATION Menu 35 Projection method 15 K KEYSTONE 32 L LAMP Indicator 12 Indicator status 39 LAMP RUNTIME 34 Lamp unit compartment 13 Replacing 41 LAN...


